
1. Single-Edge Marble Vein (One Side Only)
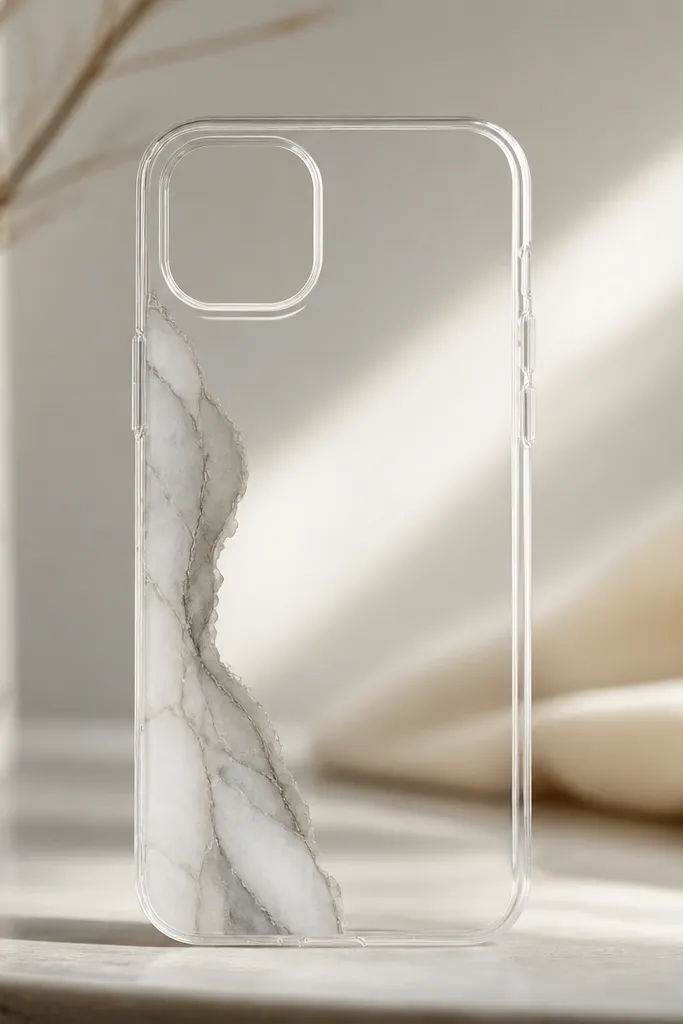
This one looks expensive because the pattern has a clear job: it guides the eye without filling the whole case. I use translucent white and light grey alcohol ink on a thin layer of clear resin, then drag a toothpick just once to create a controlled vein. The effect is smooth and airy, and it flatters cooler skin tones and silver jewelry because the grey reads crisp. It also looks great on phones with a darker back since the resin stays bright at the edge. The minimalist styling principle here is a single focal line with lots of breathing room.
Start by taping off the camera and button areas with painter’s tape so resin can’t creep into cutouts. Brush a 1 mm clear resin layer onto the left side only, then drop a few micro dots of white ink and grey ink along the edge. Use a toothpick to pull one thin vein upward — stop after you get the line you like. Cover with a thin clear topcoat, keeping the resin level smooth, then cure fully (UV) or let it set according to your resin instructions (casting). After curing, sand any edge texture lightly with 800 grit and buff with polishing compound for a glassy shine.
If the vein looks too strong, add one more thin clear layer instead of dragging more ink.
Don’t flood the whole case with marble — it turns into a busy pattern fast.
2. Black Dot Gradient Confetti
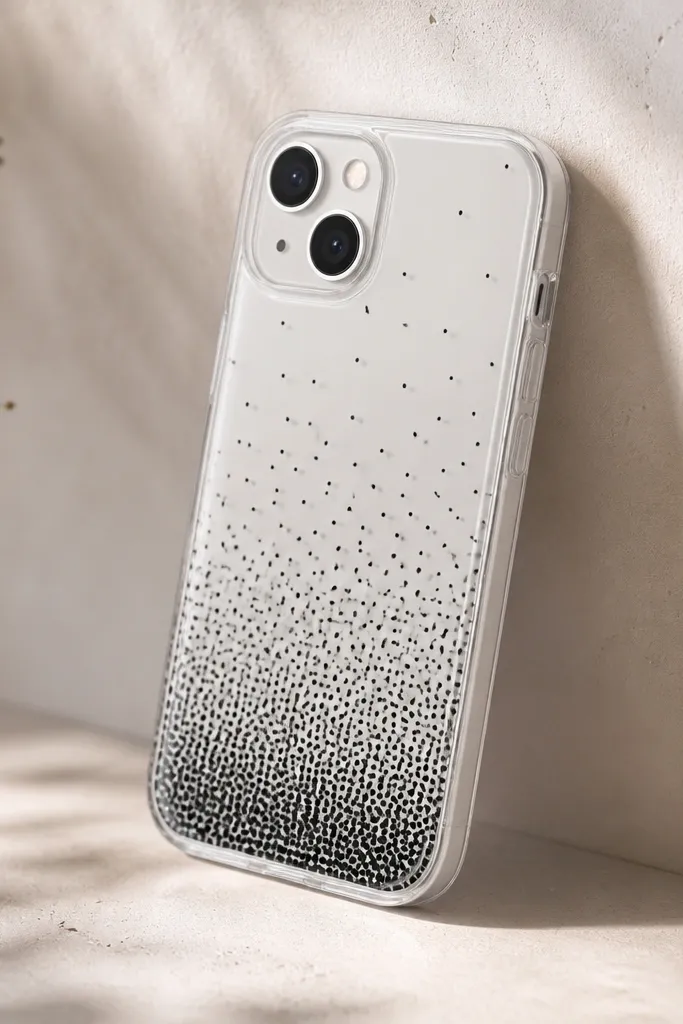
This design reads minimalist because the dots are tiny and the gradient creates motion without clutter. I use fine black pigment powder or micro-glitter that’s mostly matte, then seal it under resin so it doesn’t look dusty. It looks sharp with warm undertones too because black against clear creates contrast that flatters most skin colors. On a phone, the gradient feels modern, like a poster print, not a craft sticker. The principle is controlled density — you plan the “amount” of texture.
Mix a small batch of clear resin and pour a thin base layer across the whole case. Use a toothpick to place dots starting at the bottom corner, then space them farther apart as you move diagonally upward. If you’re using pigment powder, tap it lightly from a clean makeup brush for even specks; if using micro-glitter, sprinkle with restraint and pick up strays with tape. Add a clear topcoat, making sure the dots stay suspended and don’t float to the surface too much. Cure in layers if needed, then sand only the edges with 1000 grit so the center stays perfectly glossy.
Make a quick paper template with dot spacing before you touch resin so the gradient looks intentional.
Avoid big chunky glitter — it ruins the scale and makes the case look cheap.
3. Micro Dried Flower in a Center Oval
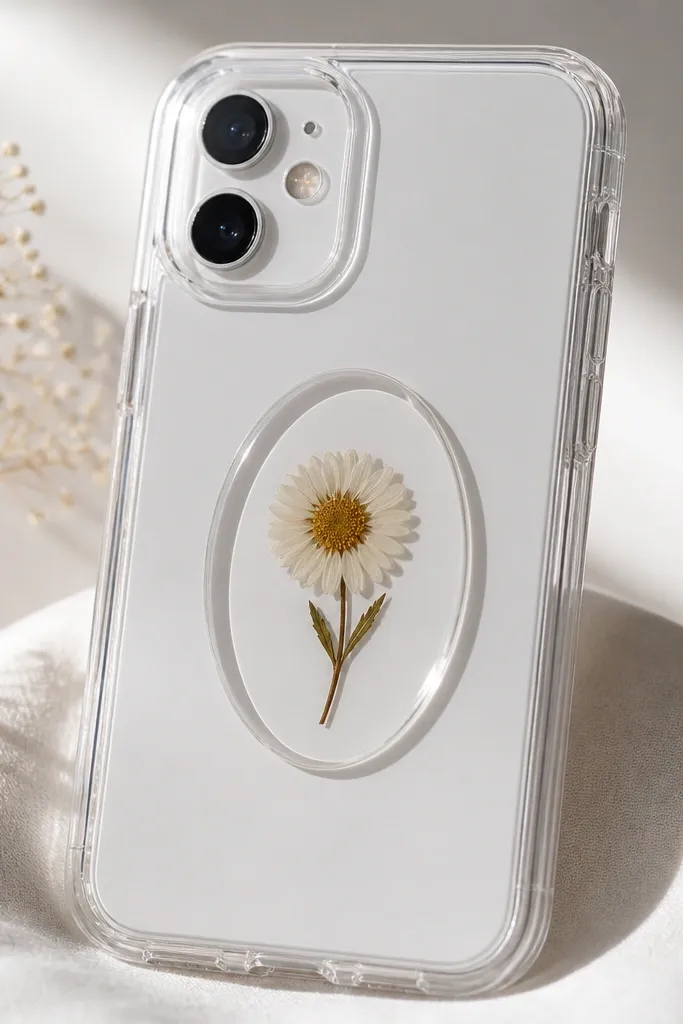
This is the minimalist floral version, not the “confetti bouquet” look. I pick one small flower and flatten it between book pages for 24-48 hours so it doesn’t warp the resin. The oval window is the key: it frames the flower and keeps the rest of the case clean. Dried whites and pale blush tones look best under a clear dome, and the center placement flatters hands that like a focal point at the middle of the phone. The styling principle is single subject + a simple shape boundary.
Start by trimming the flower so it sits within a 14-18 mm oval area, leaving at least 3 mm of empty resin around it. Pour a thin clear base layer and place the flower with tweezers, then add a little clear resin to lock it in place without covering the petals too thickly. For the oval, I use a silicone oval mold or a strip of acetate cut into an oval to guide the resin shape, then pour a small amount and cure. Remove the guide once cured, add a final clear topcoat to level the surface, and cure fully. Sand the perimeter only with 800 grit and buff for shine.
Dust the flower edges with a tiny amount of clear glitter-free mica so it catches light without looking sparkly.
Don’t use thick flowers or layered petals — they create bumps and look lumpy under resin.
4. Rose Gold Foil Strip with Soft Shadow
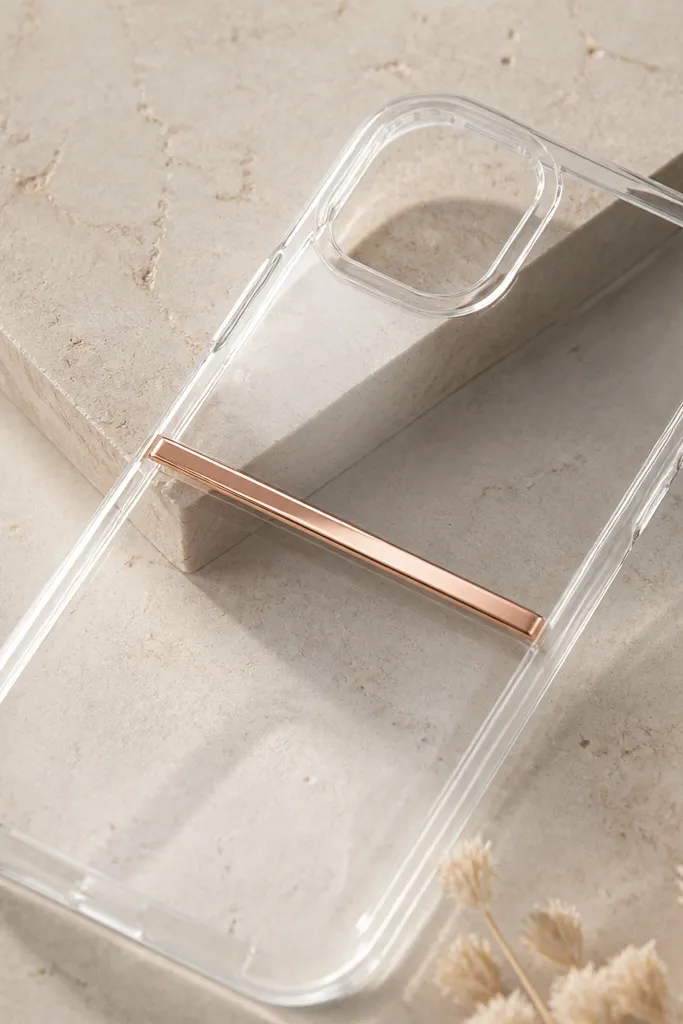
Foil makes minimalist cases look expensive because it reflects light with clean edges. I use a single strip of rose gold foil and intentionally leave a faint shadow by placing it slightly above the base layer, then topping it with clear resin. The warm metallic flatters olive and warm undertones, and it looks especially good on phones with rose gold hardware. The subtle depth is what keeps it from looking like a sticker. Principle: one metallic element, placed with a little lift for dimension.
Pour a clear base layer about 0.5 mm thick and wait until it’s tacky (or use UV resin and cure just enough to hold the foil). Place the foil strip with tweezers, pressing lightly so it sticks without wrinkles. Mix a tiny amount of transparent tint (or use a very light rose tint) and brush a thin layer behind the foil area only, then cure. Add a full clear topcoat to seal everything and level the surface. Once cured, buff the top with polishing compound and a microfiber cloth.
Cut foil with small scissors and trim the ends into straight lines so the strip looks graphic.
Don’t press foil too hard — wrinkles show through the resin and ruin the clean look.
5. White Linework Minimal Art (Single Stroke)
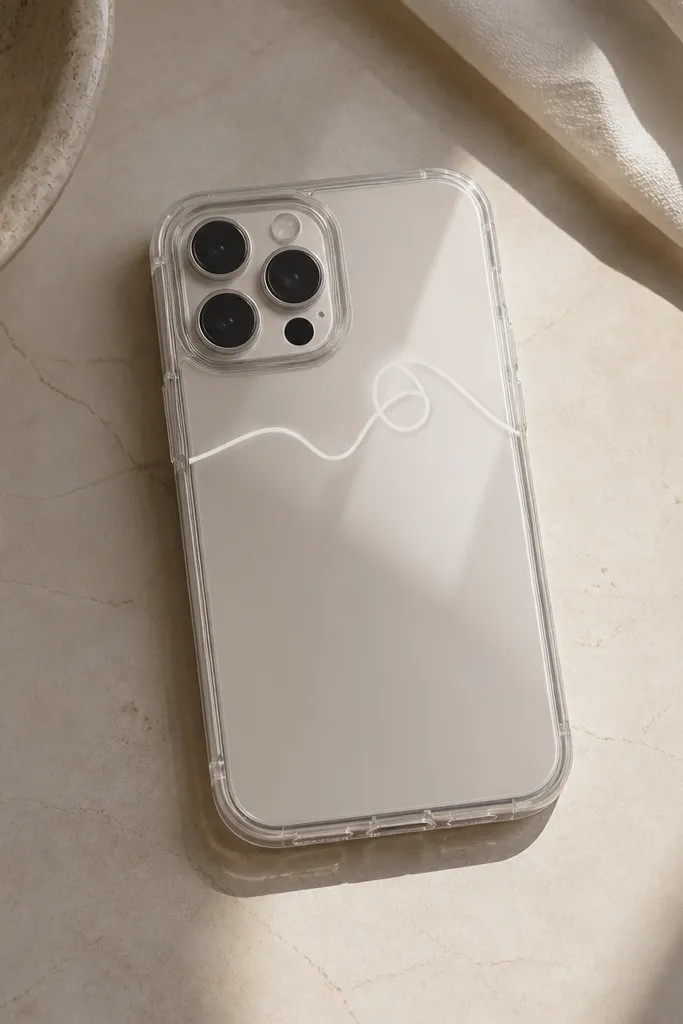
This is the one I make when I want the case to look like a design print. I use a white pigment paint pen meant for resin or mixed white acrylic ink sealed under clear resin. The line stays crisp because it’s thin and because you control the number of strokes — I do one continuous stroke and stop. It looks best on darker phone finishes and with silver rings because the white pops cleanly. The minimalist principle is graphic simplicity: one line, one curve, no extra elements competing.
Pro tipUse a printed phone silhouette as a guide so your curve sits centered even if your hand shakes.
Clean the case thoroughly with 70% isopropyl alcohol and let it dry fully. Pour a thin clear resin layer, then use a fine needle or toothpick to trace a line template lightly in the resin surface. Wait until it’s tacky, then add your white linework with a paint pen — keep it one stroke and let the pen glide. Seal with a clear topcoat in two thin layers so the line stays sharp and doesn’t sink. Cure fully, then sand only the edges and polish the top until it looks flat and glossy.
AvoidAvoid thick paint — it turns the line into a raised ridge.
6. Matte Black Bottom Half with Gloss Top
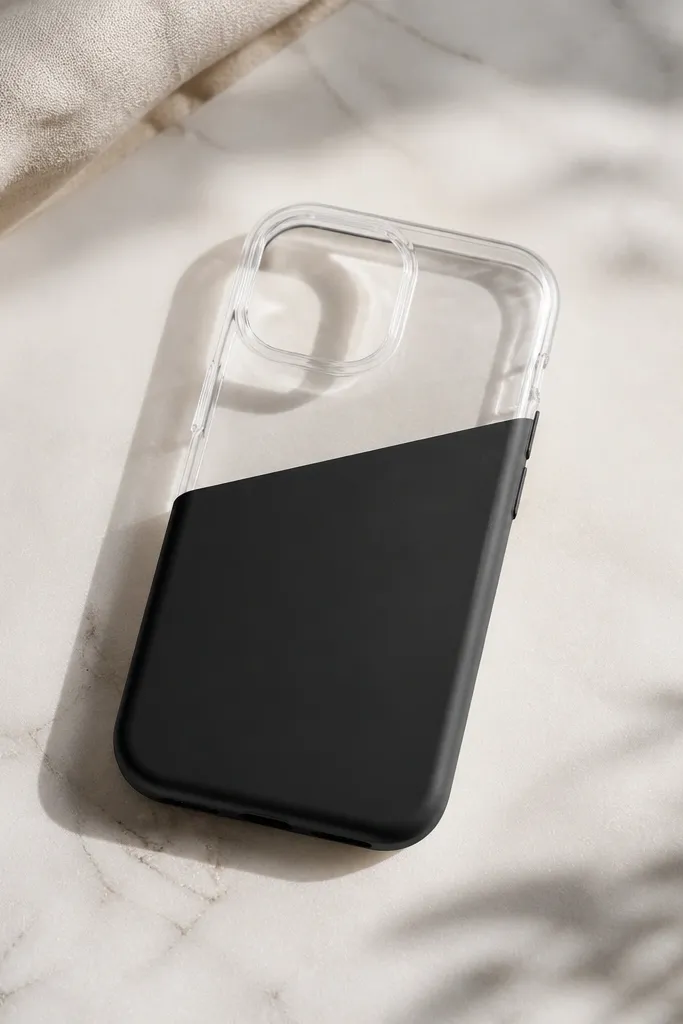
The contrast is what makes this modern and minimalist. Matte black on the bottom hides tiny imperfections and makes the phone feel grounded, while the glossy top keeps it bright and reflective. I use black resin tint plus a matte additive only on the bottom half so the finish difference is real, not accidental. This style looks great for people who wear mostly black, grey, or denim — it matches fast. Principle: finish contrast instead of lots of color.
Pro tipIf the matte looks patchy, stir longer — matte additives settle.
Tape a straight line across the case using painter’s tape, leaving the top exposed. Pour and cure a clear thin base layer first, then mix black resin with matte additive and pour it only into the taped bottom area to about 1 mm thickness. Cure, then remove the tape slowly so you don’t tear the edge. Add a clear glossy topcoat over the whole case in thin layers so the boundary stays crisp. After curing, lightly sand the boundary edge with 1000 grit if needed, then buff the top only.
AvoidDon’t put matte additive in the whole case unless you want a dull, fingerprint-prone finish.
7. Translucent Lilac Smoke Swirl
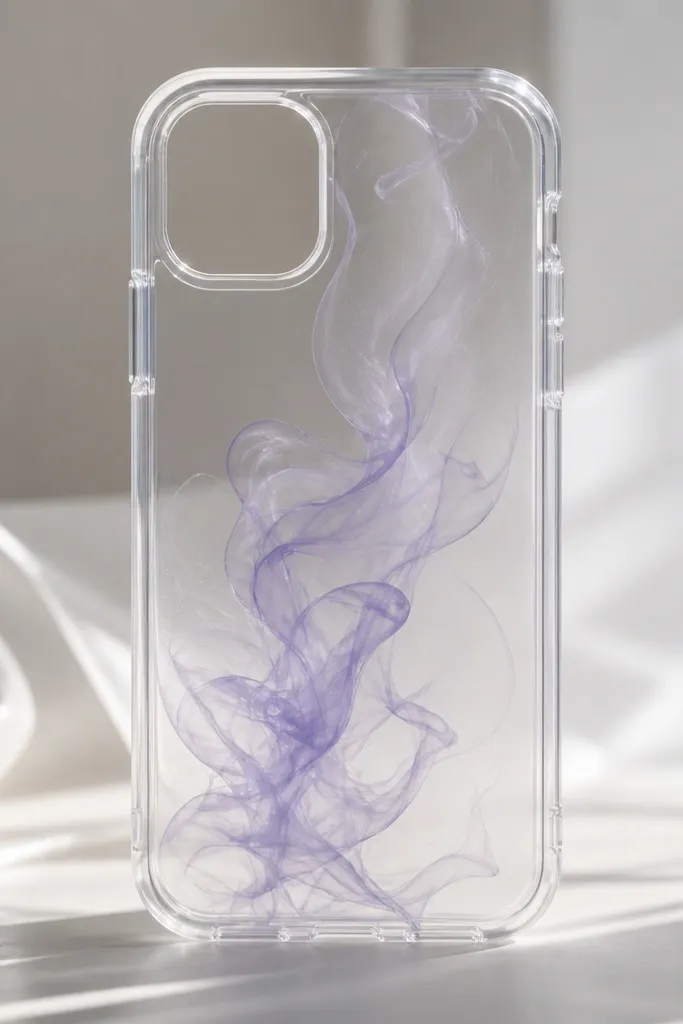
This one is minimalist because the swirl stays semi-transparent. I mix lilac pigment into clear resin so it looks like haze, not opaque paint. The swirl is placed slightly off-center for a calm, editorial feel. Lilac looks especially good on light to medium skin tones because it adds a cool tint without screaming color. Principle: opacity control — you’re aiming for “glow,” not “painted surface.”
Pour a thin clear base layer and cure it until tacky. Add a drop of lilac-tinted clear resin near the center, then drag it outward with a silicone tool or toothpick to create wisps. Keep the swirl under 20 mm wide so it stays minimal and doesn’t cover the whole back. Seal with clear resin topcoat, then cure fully. If you see streaks you don’t like, add one more thin clear coat instead of trying to fix the swirl mid-cure.
Use a darker purple only at the center point, and keep the edges lighter for a smoke effect.
Don’t use opaque acrylic — it looks chalky under resin.
8. Clear Window with Tiny Gold Leaf Specks
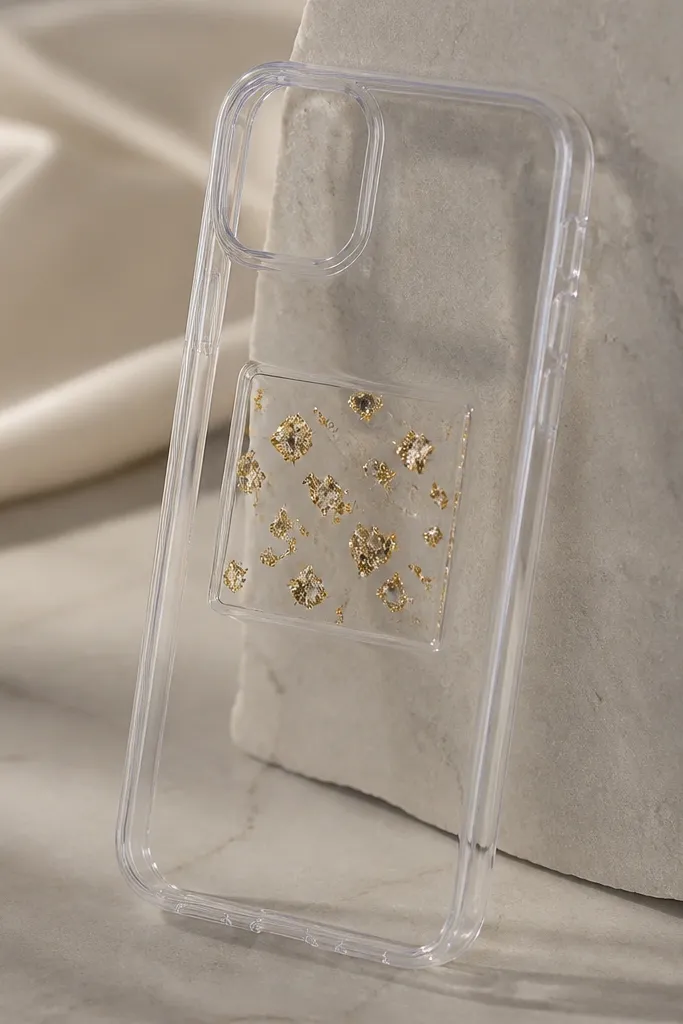
Gold leaf specks look delicate when you limit them to a small window. I like a square window because it feels modern and architectural, but you can keep it centered so it reads clean. The gold flecks catch light in micro flashes instead of big sparkles, which keeps it minimalist. This style works for any skin tone because gold sits neutral, and it pairs with both warm and cool metals. Principle: scale and placement — tiny elements, one defined area.
Tape a 16x16 mm square on the case using painter’s tape to create a boundary. Pour a clear base layer around the square area, then add a thin layer inside the taped window. Tear or cut small gold leaf fragments and place them sparingly — I use tweezers and place about 10-20 flecks. Pour clear resin to seal the window, cure, then remove tape after it fully gels. Finish with a topcoat across the entire back so the surface stays level.
Press gold leaf with a dry cotton swab to break up larger flakes into smaller pieces.
Don’t flood the window with leaf — too many pieces turn it into a shiny blob.
9. Monochrome Grid with Tiny Raised Dots
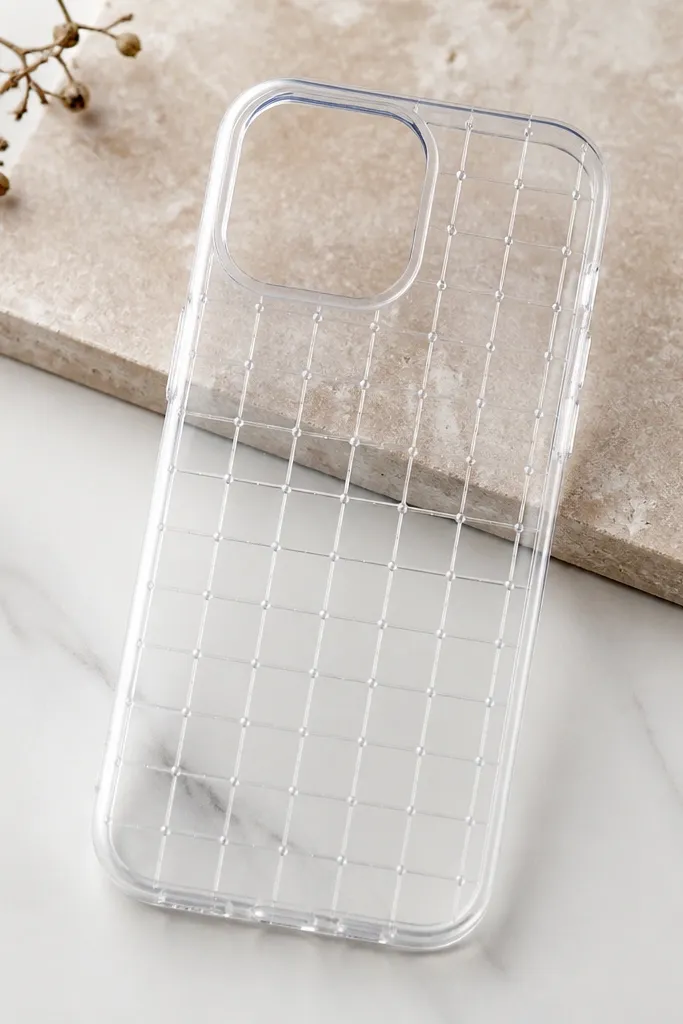
This is minimalist tech-cool, like a design prototype. The grid is subtle — I keep it light grey so it doesn’t overpower the phone. Raised dots add tactile interest without going full “3D art.” It looks great with neutral outfits and silver accessories because the palette stays calm. Principle: texture is controlled and repetitive, not random.
Use a printed grid template under the clear case as a guide. Mix light grey tint into clear resin and brush or dab a thin grid background — you want it barely visible. Place tiny dots of thicker tinted resin along two grid rows (about 6-10 dots total) and cure them separately so they stay raised. Add a thin clear topcoat over everything to level the surface. After curing, sand only the dots' edges lightly with 1200 grit so they feel smooth, then buff the top.
Use a toothpick loaded with very little resin for each dot so the dots stay consistent in size.
Don’t make the grid dark — it reads like a craft stencil instead of design.
10. Brown Leather-Look Strip Texture (Resin + Powder)
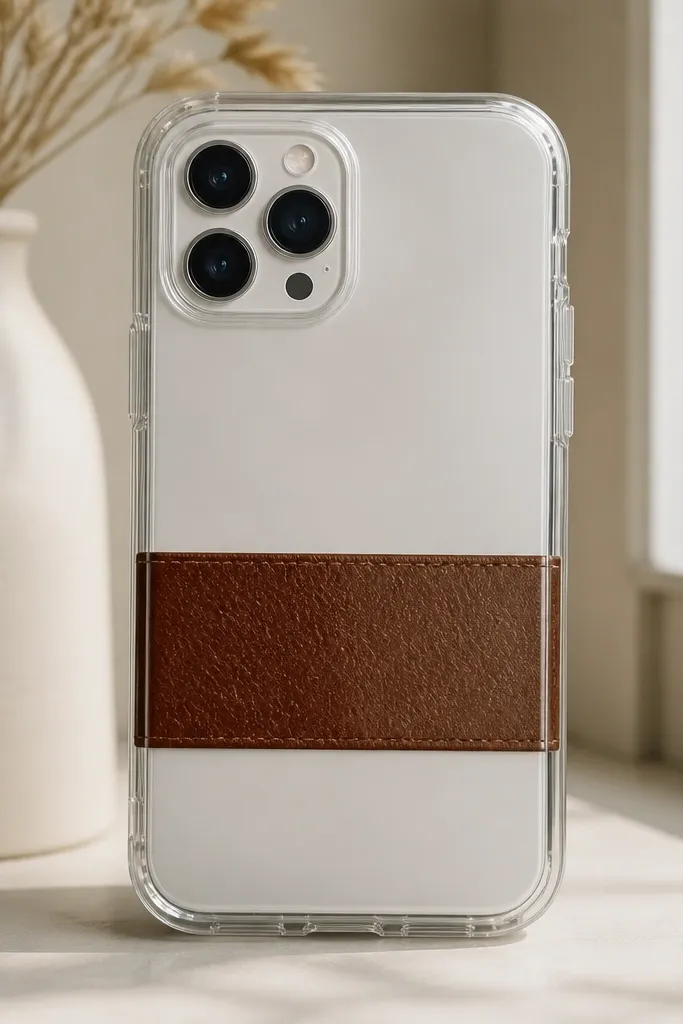
If you want minimalist but warm, this leather-look strip nails it. I use a thin brown resin base and mix in a tiny amount of micro texture powder (or very fine cocoa-brown pigment) so the strip has grain. The rest of the case stays clear, so the texture looks like a material panel, not a stain. This looks amazing with tan bags, caramel shoes, and gold jewelry. Principle: use texture as a single accent, not a full cover.
Pro tipTest the brown on scrap resin first so you land on a warm chestnut, not a muddy brown.
Pour a clear base layer, then mark a 10-12 mm wide strip area with painter’s tape. Mix brown resin tint with a small amount of micro texture powder until it looks like wet sand, then spread it within the strip area to about 0.8-1 mm. Press gently with a silicone stamp or crumpled plastic wrap once to create light grain marks. Cure, then add a clear glossy topcoat over the entire case to lock the texture down and smooth it. Sand edges lightly and buff the top so the gloss is even.
AvoidAvoid thick texture powder — it creates gritty bumps that snag pockets.
11. Pearl Center Dot with Tiny Ring
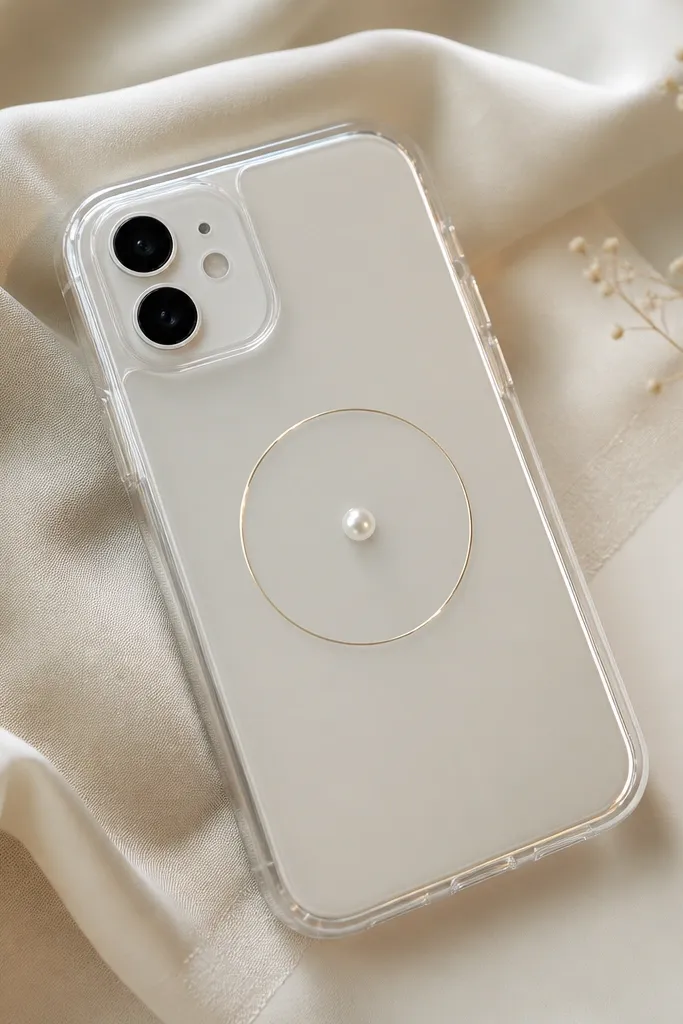
This is the cutest minimalist look because it uses one scale element and one shape element. The pearl dot gives soft highlights, while the ring adds structure. I use pearl mica powder mixed into clear resin for the dot, and a separate thin resin line for the ring. It flatters hands with softer, lighter jewelry tones and looks clean in photos because it sits dead center. Principle: two elements, same color family, one focal spot.
Pour a clear base layer and cure it until tacky. Mix pearl mica into clear resin so it turns milky, then place one small dot (about 4-6 mm) in the center using a toothpick. For the ring, load a thin line of clear tinted resin onto a small circle stencil (I use a paper circle with a hole cut out) or a silicone ring guide. Cure the ring and dot fully, then add a final clear topcoat in one smooth pour. Once cured, buff the surface with polishing compound for a glass finish.
Keep the ring line under 1 mm wide so it reads as a detail, not a thick border.
Don’t make the dot too large — it stops looking minimalist fast.
12. Negative Space Star Corner
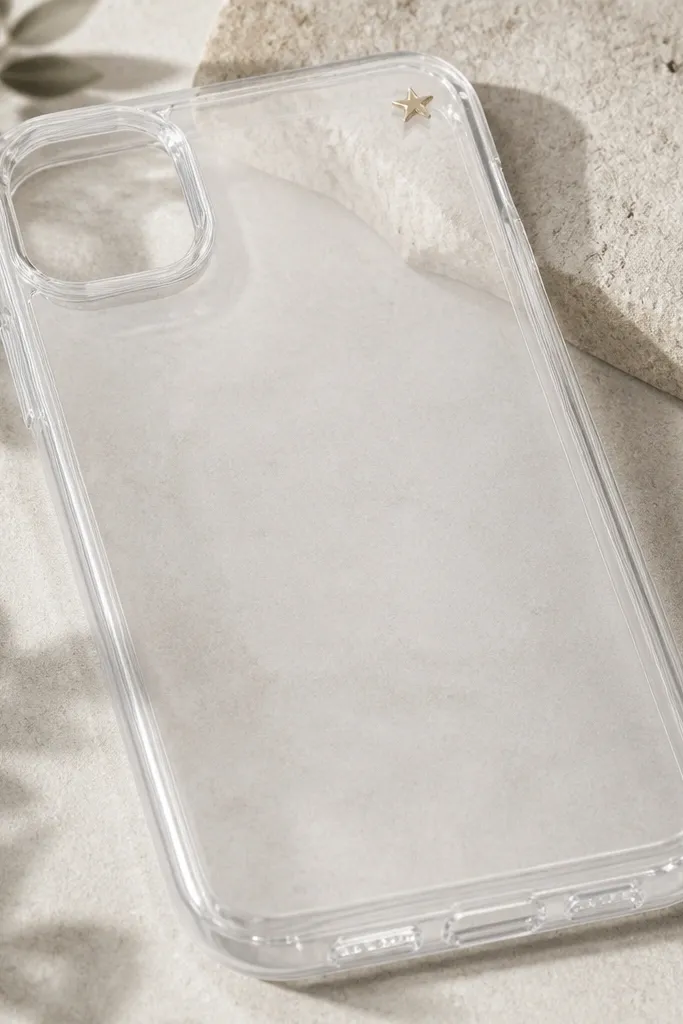
Negative space is your best friend here. The star is small, placed in one corner, and the rest of the case stays clear so it looks intentional. I cut a tiny star shape from thin gold or silver foil-backed paper, seal it under a thin resin layer, then topcoat for gloss. This style works for anyone who wants something fun but doesn’t want sparkles covering the whole phone. Principle: one tiny symbol + lots of clean air.
Cut a star shape about 10-12 mm wide and seal it on a scrap surface with a thin clear resin coat so it doesn’t fray. Tape the case so only the top-right corner is exposed, then pour a thin clear layer in that corner. Place the star and add just enough resin to cover it — stop before it spreads. Cure fully, remove tape, then pour a final clear topcoat over the whole back for an even surface. After curing, check around the camera cutout and sand any thin resin lip with 1200 grit.
Use foil-backed paper for cleaner edges than loose foil sheets.
Avoid placing the symbol too close to the edges — it chips as you drop.
13. Cobalt Blue Vertical Band with Gloss Edge
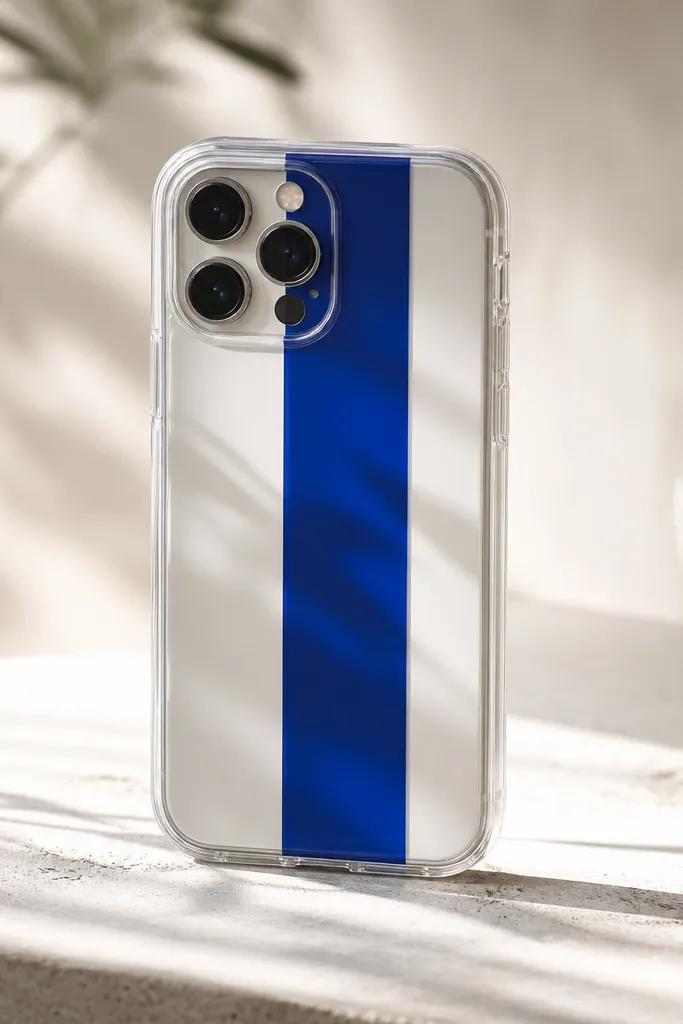
A vertical band makes the phone look taller and more modern. I use cobalt resin tinted to a strong blue, then keep the band width narrow (about 12-14 mm) so it feels graphic and not bulky. The glossy edge is important: it should look like a smooth panel, not a smear. Cobalt is flattering with both warm and cool outfits because it’s vivid but controlled. Principle: bold color, narrow shape, clean edges.
Pro tipUse a metal ruler as your guide for tape placement so the band lines up straight with the phone buttons.
Tape two straight vertical lines on the case to create a band window, leaving 3-4 mm of clear space on each side of the band. Pour a thin clear base layer and cure until tacky. Mix cobalt tint into clear resin and pour inside the band window to about 1 mm thickness. Cure, remove tape carefully, then flood the entire back with a clear topcoat. If the band edge looks slightly uneven, sand the edge lightly with 1000 grit and buff the top.
AvoidDon’t make the band too wide — it stops reading minimalist.
14. Faint Smoke Gray Backdrop with One Clear Bubble
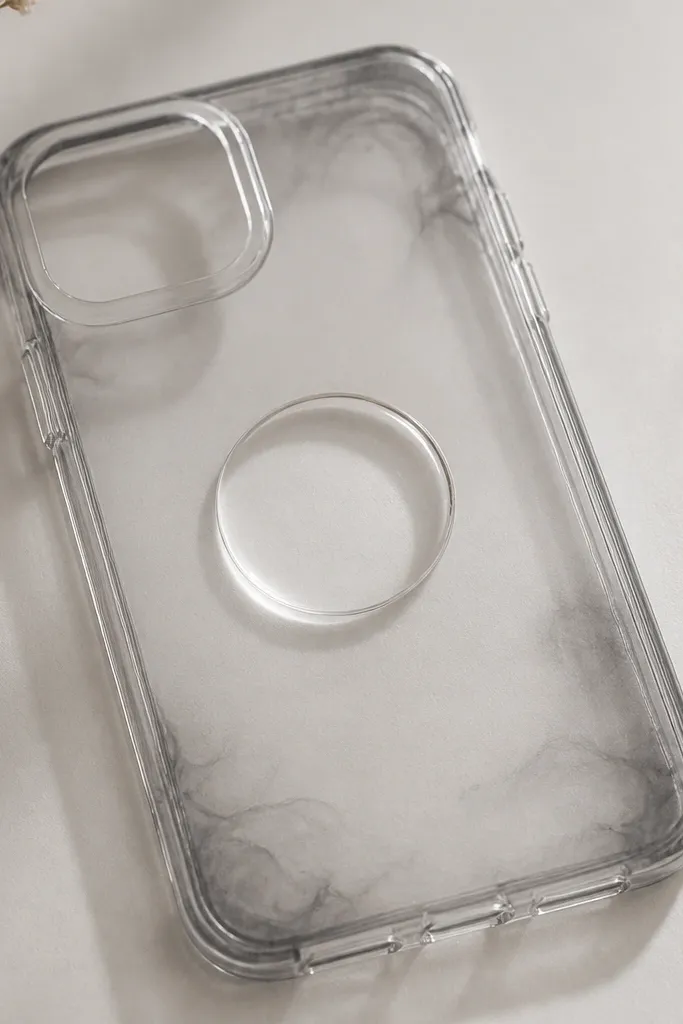
This one looks like a studio sample because it uses one unexpected feature: a single clear dome. I tint the edges with a very faint grey smoke effect, then seal one “bubble” by trapping a small resin drop and doming it under topcoat. The result is subtle and airy, not cartoony. Grey smoke plays well with any skin tone and any outfit color. Principle: one surprise element, everything else stays calm.
Pour a clear base layer and cure until tacky. Add a grey-tinted clear resin to the corners only, then swirl it outward with a silicone tool so it stays faint. Place one small drop of clear resin in the center and leave it domed; for UV resin, cure it in short bursts so it holds shape. Add a final clear topcoat carefully, aiming to cover the dome without dragging it off-center. Cure fully, then inspect the surface under bright light and buff until the dome is smooth.
If the dome drifts, pop the case in the fridge for 3-4 minutes to slow resin flow before topcoating.
Don’t add multiple domes — it turns into random bubbles.
15. Tiny Opal Chips in a Center Column
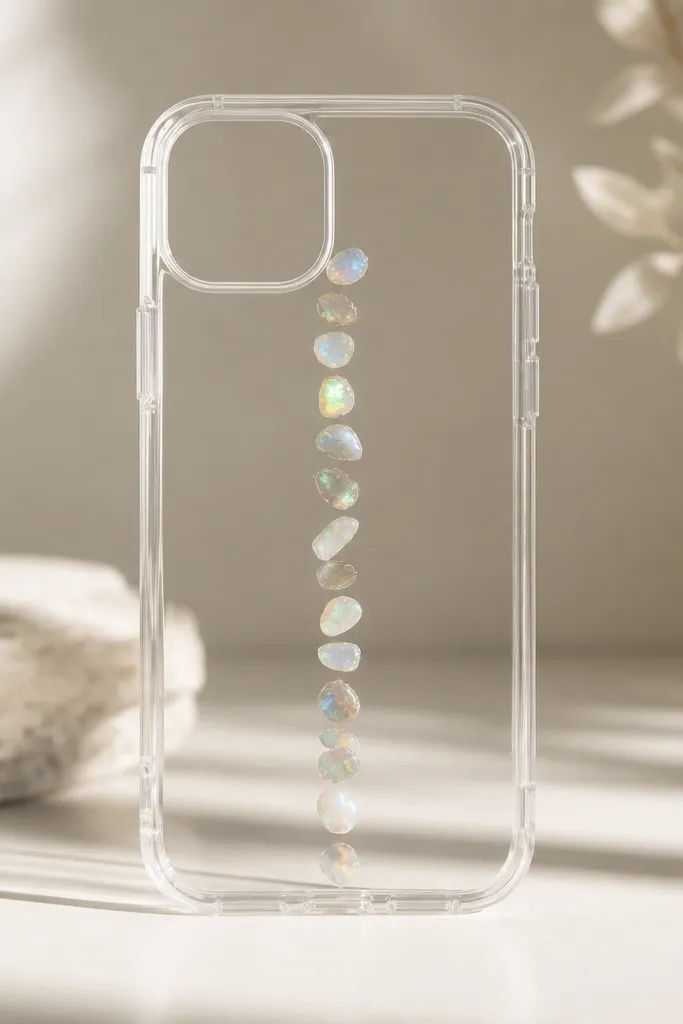
Opal chips look minimalist when they’re arranged, not scattered. I keep them in a single vertical column about the width of a pencil eraser, so the iridescence reads like a design detail. The clear base makes the chips flash rainbow tones as you move, but because they’re grouped, it doesn’t look chaotic. This style looks great on phones with gold or rose gold accents and pairs nicely with warm neutrals. Principle: group the shimmer so it behaves like a single element.
Pour a thin clear base layer and cure until tacky. Place opal chip fragments in a straight column, leaving 3-4 mm gaps so each chip can catch light. If your chips are sharp-edged, lightly sand them first so they don’t create scratches on topcoat. Seal with a clear resin layer, then pour a final topcoat to create a smooth, even surface across the whole back. Cure fully, then buff with polishing compound in small circles until the top looks uniform.
Mix a tiny amount of clear resin with a drop of alcohol and use a clean brush to nudge chips into alignment before curing.
Avoid random scattering — loose chips look messy fast.
16. Silver Foil Corner Frame
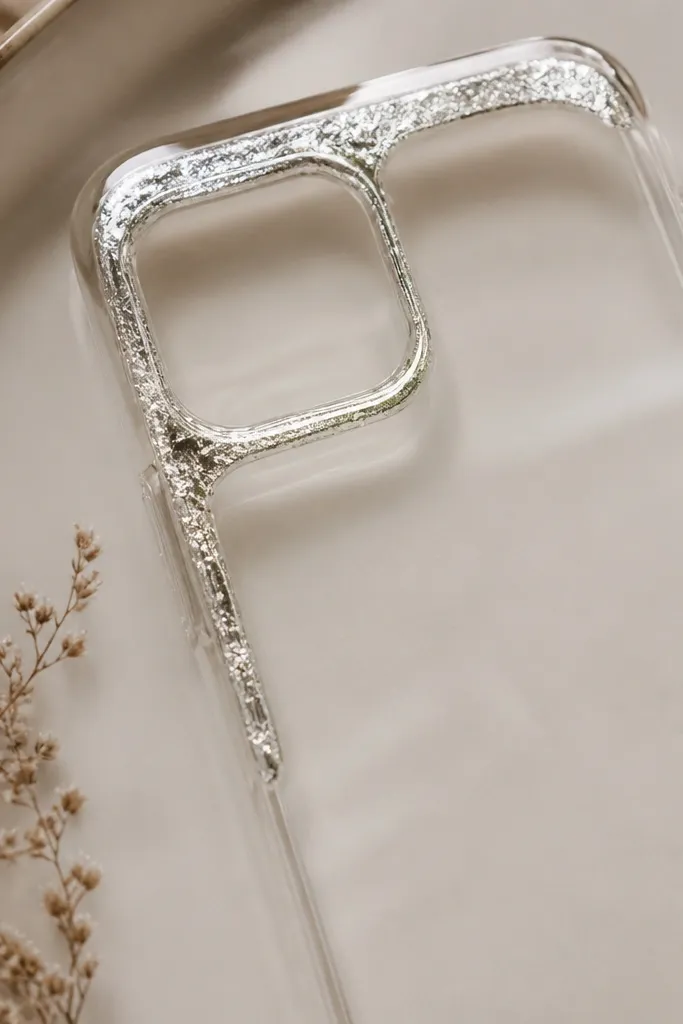
This is minimalist framing, and it makes the phone feel like a photo. I use narrow foil strips and place them at two edges of a corner, leaving a tiny gap inside so it looks like a clean UI icon. Silver foil is crisp against clear resin and looks great with cool-toned outfits and silver jewelry. The frame sits at the corner so it doesn’t cover the center of the phone back. Principle: partial framing + negative space for a graphic look.
Cut two foil strips: one horizontal about 18-22 mm long and one vertical about 18-22 mm long, both around 2-3 mm wide. Pour a thin clear base layer and cure until tacky. Place the strips in the top-left corner with tweezers, leaving a small interior gap. Cover with clear resin and cure, then do a final topcoat across the entire back. After curing, use a soft sanding pad around the topcoat edge where it meets the case rim so it feels smooth in hand.
Use matte silver foil if you want a softer look that doesn’t glare in photos.
Don’t use thick foil — it makes the resin topcoat uneven.
17. Monochrome Wave Band (Cream + Charcoal)
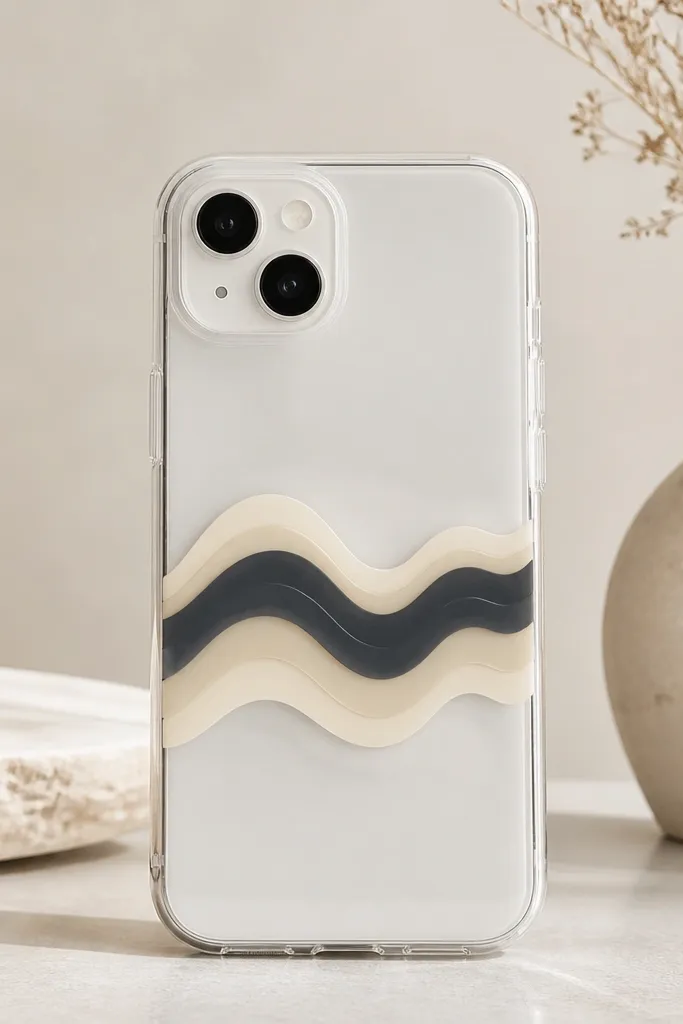
Waves look minimalist when the palette is tiny and the band is one continuous shape. I use cream resin tint and charcoal tint, then blend them with a toothpick so the wave looks smooth and graphic. This style reads calm and modern, and it looks good on both light and dark phones because the band sits in the middle. It’s flattering for people who like black-and-white outfits because it matches without being boring. Principle: limit colors to two and keep one shape spanning the case.
Pro tipIf the wave looks muddy, reduce charcoal amount and increase cream — contrast makes it feel designed.
Tape a 12-16 mm horizontal band across the case, leaving clear space above and below. Pour a thin clear base layer and cure until tacky. Mix cream resin tint and pour it inside the band, then add small charcoal streaks on top. Use a toothpick to drag the charcoal into the cream in a wave motion — one pass, then stop. Cover with clear topcoat in two thin layers so the wave edges stay crisp and don’t flatten.
AvoidAvoid extra color drops — three tones turns the wave into a smear.
18. Color-Matched Button Glow (Around Cutouts)
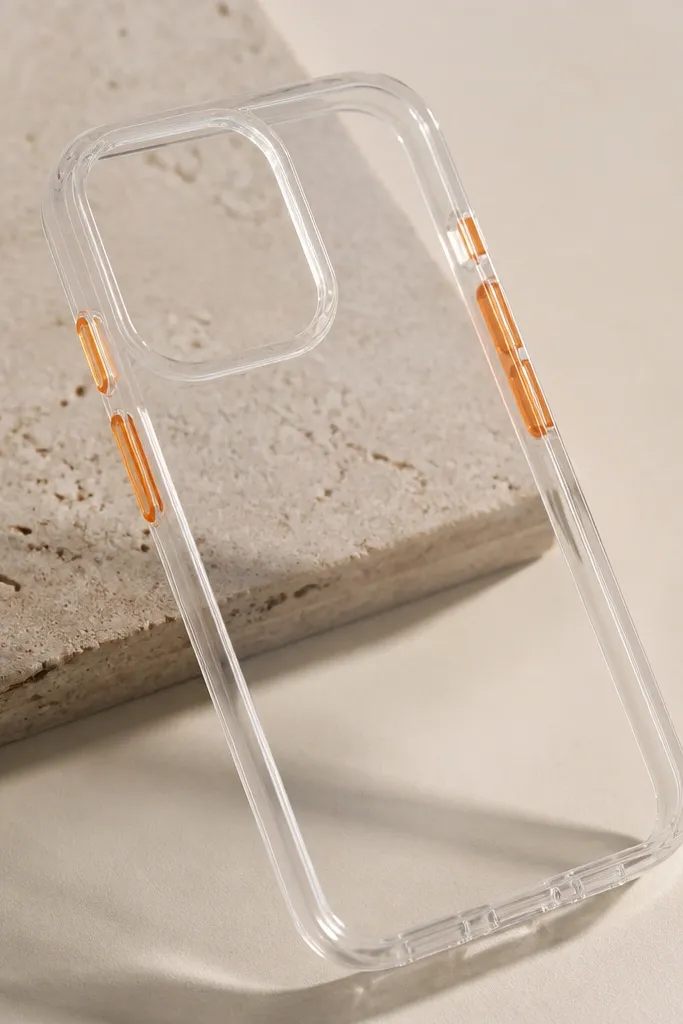
This one is minimalist because it’s “invisible design” until you look closely. I color-match a single strip resin to your outfit or phone hardware, then place it only around button cutouts and side edges. The result looks like a factory finish because the color sits where your fingers already go. It looks great on people who wear neutral clothes and want a subtle pop. Principle: decorate the functional edges, not the whole surface.
Use painter’s tape to protect the back area and expose only the side button channels. Mix your chosen tinted resin (I use a bright but clean tone like teal or warm blush) and apply with a tiny brush into the cutout rim area. Cure in thin bursts if using UV resin so it doesn’t run. Once cured, remove tape and add a clear topcoat across the back only, not onto the side rim texture unless you want it thicker. After full cure, check button movement and sand any resin flash with 1200 grit.
Test the tint on a scrap scrap case first so you get the exact shade under glossy resin.
Don’t fill the cutout gaps — thick resin makes buttons feel stiff.
19. Tiny Film Strip (Cutout Look) with Clear Frame
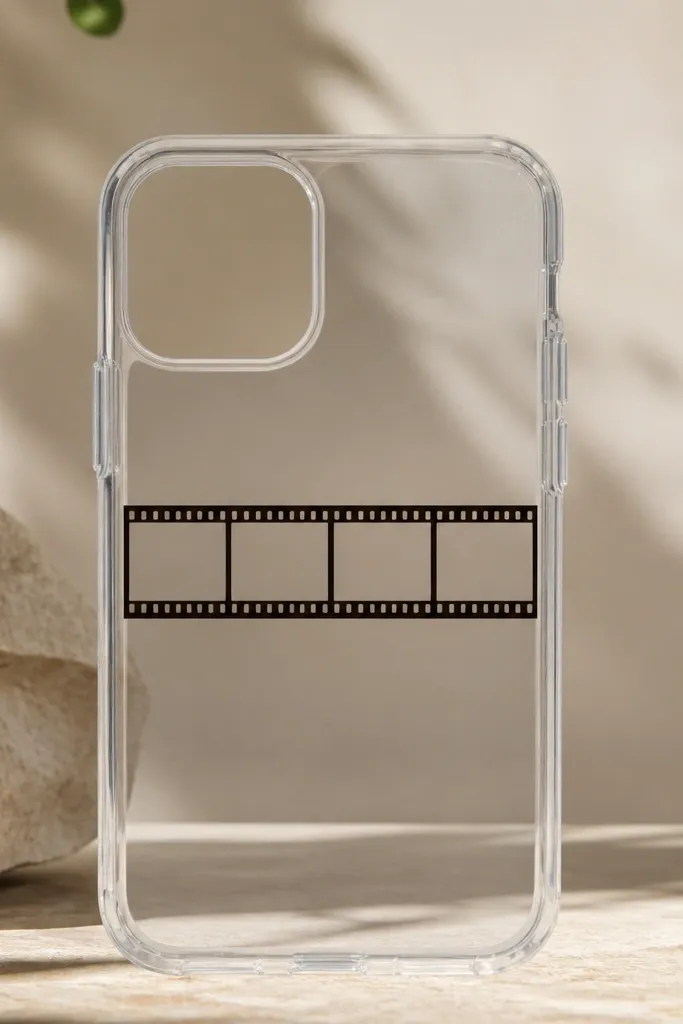
Film strips feel vintage, but this version stays minimalist because it’s tiny and framed. I print or draw a miniature film strip with perforation holes, then seal it under a clear rectangle so it looks like it’s floating. The clear frame keeps the graphic from blending into the background. This looks great for people who carry a camera bag or love film photography, and it pairs well with black, tan, and grey outfits. Principle: keep the graphic small and put it under a defined clear boundary.
Cut a film strip graphic to about 18-22 mm wide and 5-7 mm tall. Place it in the center and tape around it with thin acetate strips to create a rectangle boundary. Pour a thin clear base layer, then seal the film strip with a light resin coat so it doesn’t shift. Build the rectangle frame with clear resin to about 1 mm thickness and cure. Finally, pour a full clear topcoat across the back and buff the top for a level finish.
If the printed graphic curls, flatten it under a heavy book for a day before sealing.
Don’t use thick paper — it creates texture bumps under the topcoat.
20. Speckled Chalk White with Clear Center
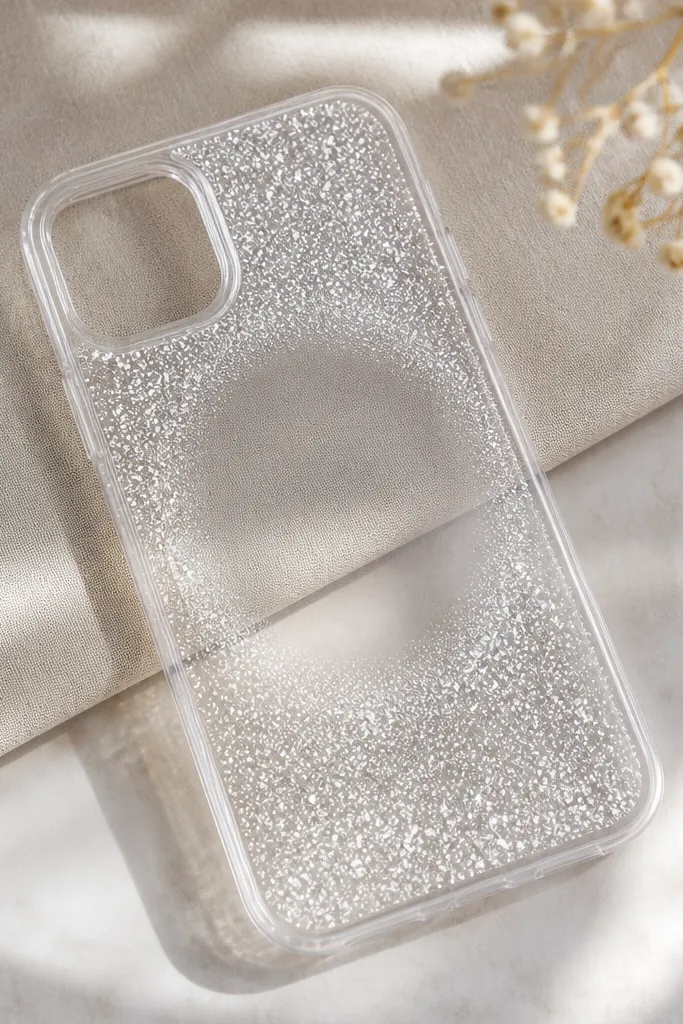
This is minimalist chaos done right. The speckles look like chalk dust, but the clear center keeps it from turning into a full cover. I use chalky white pigment powder mixed into clear resin very lightly, so it stays semi-matte under the topcoat. It flatters anyone who loves soft neutrals because the white reads clean instead of stark. Principle: edge-only texture with a protected negative-space focal area.
Pour a clear base layer and cure until tacky. Use a circular paper template (about 12-14 mm) to mask the center area, then apply white pigment-resin speckles around the edges by tapping with a small brush. Remove the center mask once the speckles are in place and cure lightly so they don’t move. Add a clear topcoat across the whole back to level everything, then cure fully. Sand the outer edges only if you see any rough speck buildup, then buff.
Tap speckles onto a scrap first to learn how much pigment transfers.
Avoid heavy speck coverage — it looks dirty instead of designed.



