
1. Matte Black + Gold Triangle Witch Hat Face
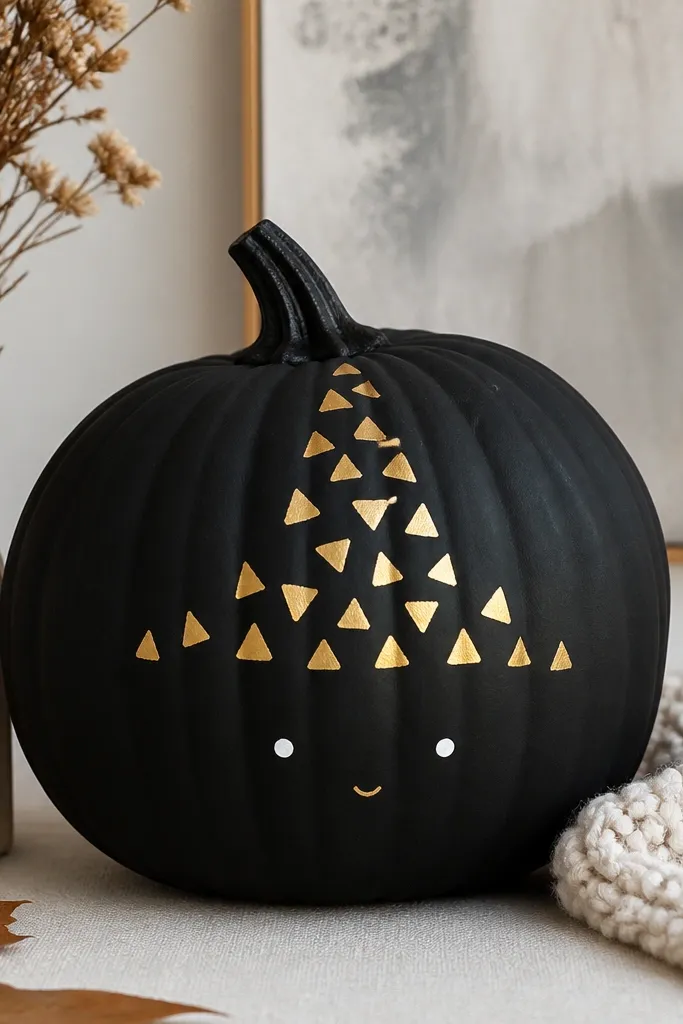
I like this one because it looks designed even when you keep the details simple. Paint the whole pumpkin matte black so the orange doesn’t bleed through at the edges. Then use gold craft paint (or gold paint marker) to draw a clean triangle “hat” that sits slightly above the pumpkin’s stem, where it reads like a character’s silhouette. The gold pops hard against black under porch lights, so it looks good at night and in daylight. This design flatters warm skin tones and most decor styles because black and gold work with everything from farmhouse to glam.
Start by wiping the pumpkin and letting it dry 10 minutes. Paint one full coat of matte black acrylic, then do a second coat after it dries to kill any orange shine. Use painter’s tape strips to block in two slanted triangles for the hat, then fill them with gold paint and remove the tape once the gold is still slightly tacky. Add two small white dot eyes using a dotting tool or the eraser end of a pencil, then finish with a tiny gold triangle nose or a small curved mouth. Place it on a black tray or wooden riser so the gold looks even brighter.
Seal with a matte clear spray only after the paint fully cures overnight so the gold doesn’t turn dull.
Avoid glittery gold on matte black unless you seal it — loose glitter catches moisture and flakes.
2. Washed Denim Pumpkin with Stitch Lines
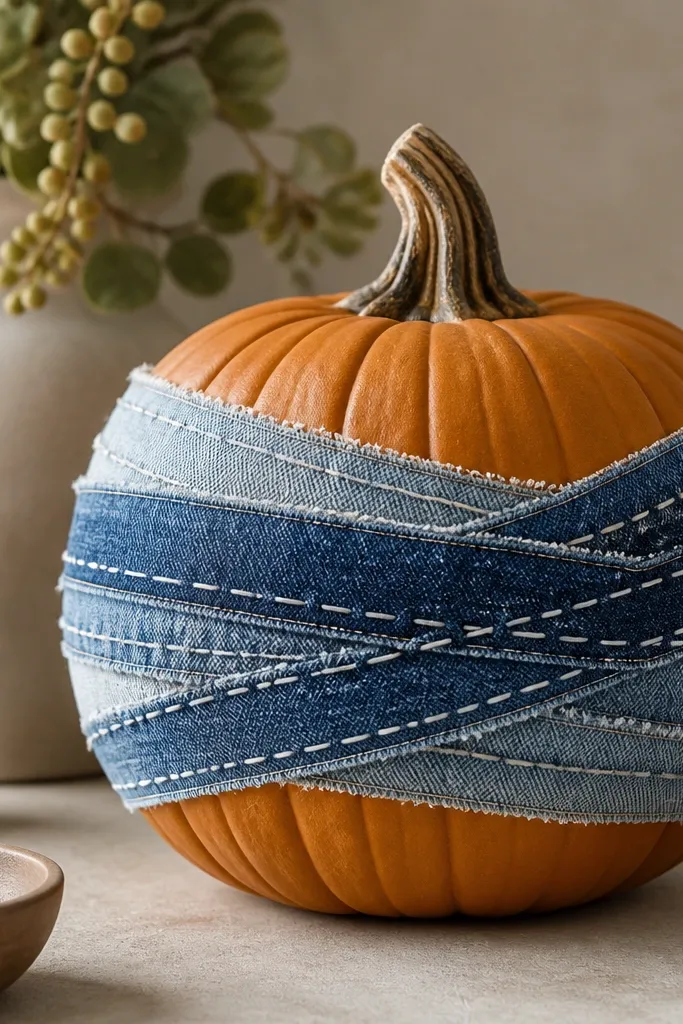
This is my go-to when I want pumpkins to look “soft” instead of spooky. The denim texture makes it feel cozy, and the faded blue plays nicely with off-white, cream, and warm wood tones. I use fabric glue and keep the design around the pumpkin’s widest point so it looks intentional from every angle. It flatters homes with farmhouse decor and also looks cute with neutral wreaths. If you’re styling for photos, denim reads like a prop even when you’re using a $3 pumpkin.
Pro tipUse a fabric paint marker with a fine tip so your stitch lines stay crisp.
Cut a denim strip about 3-4 inches tall and long enough to wrap the pumpkin’s circumference with a 1 inch overlap. Glue it around the middle using a thin, even bead of fabric glue, then press with your hands for 30 seconds per section. After it sets, draw stitch lines with a white fabric paint marker or use a zigzag acrylic paint line carefully with a small brush. Add two smaller “stitch” lines near the top and bottom edges of the denim band to frame it. Finish by trimming frayed ends so they look deliberate, not messy.
AvoidDon’t glue denim all the way to the stem — it lifts and looks sloppy after a day.
3. Cardboard Leaf Vine Monogram
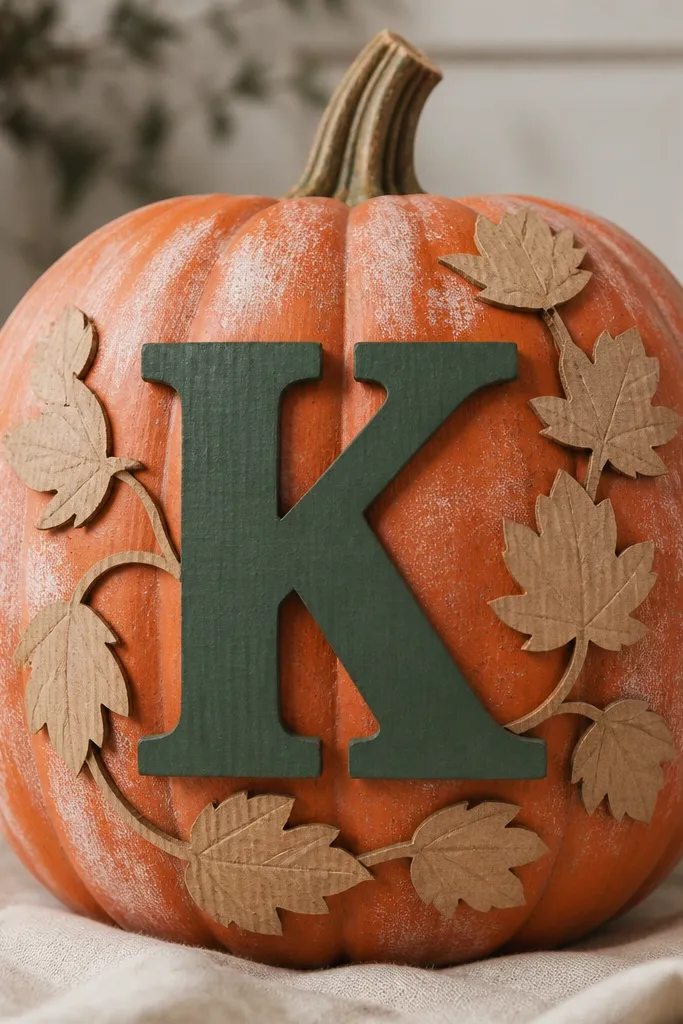
This one makes a cheap pumpkin look like a craft store project. The cardboard leaf shapes create a layered, dimensional look without buying foam sheets. I keep the pumpkin mostly its original color, then add a light coat of matte white under the monogram so the green letter reads clearly. It looks great for fall parties because it gives a natural vibe without going full “Halloween face.” It flatters rustic porches and neutral table settings because the palette is brown, green, and orange.
Start by tracing a single letter onto cardboard and cutting it out. Paint the letter dark green and let it dry flat on a piece of scrap paper. Cut 10-14 small leaf shapes from brown cardboard, then paint a lighter green on the veins with a thin brush. Glue the leaves in a loose vine pattern around the letter, leaving some gaps so the pumpkin shows through. Finally, mount the monogram at the pumpkin’s center with hot glue dots, so it sits slightly raised.
Use a foam brush for paint so the cardboard doesn’t get streaky.
Avoid covering the whole pumpkin in paint if you’re using cardboard — the texture clash can look heavy.
4. Cinnamon Stick Stripe Pumpkin
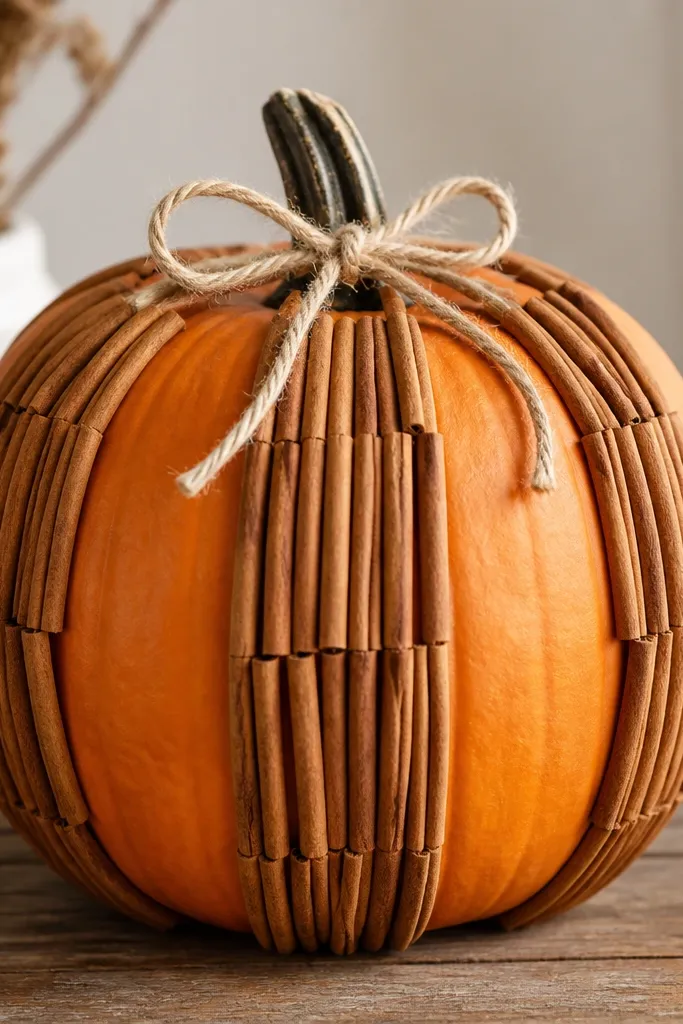
This is the one that makes people stop and smell the porch. Cinnamon sticks look expensive, and the stripes create clean structure without needing precision carving. I like leaving the pumpkin orange between the sticks because it keeps the design bright instead of dark and heavy. It works especially well for warm-toned decor and for anyone who wants a “fall kitchen” vibe. The twine bow at the top gives a focal point that reads in photos.
Pro tipBuy cinnamon sticks in a size that matches your pumpkin height — short sticks look patchy in close-up.
Wipe the pumpkin and let it dry fully. Plan three evenly spaced vertical stripes, then lay cinnamon sticks on the surface to check spacing before gluing. Use hot glue in small dots along the stick length, pressing each one down for 10 seconds so it bonds. Tie a small twine bow and glue it near the stem, then add a tiny curled piece of twine if you want a little extra texture. Place it near candles or a doormat so the cinnamon smell matches the atmosphere.
AvoidDon’t use liquid glue — cinnamon sticks slide until it dries.
5. White Paint + Black Cat Eyes
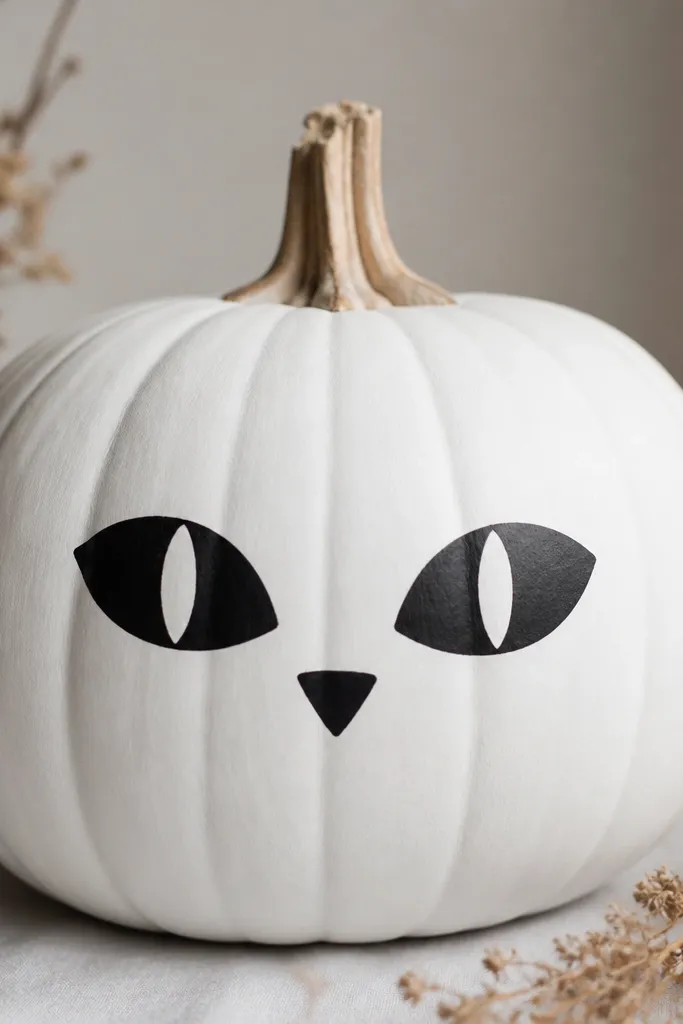
This design is clean, cute, and fast. White paint makes the pumpkin a blank canvas, and black cat eyes give instant personality even if you keep the rest minimal. It photographs well because the contrast is high and the eyes sit at the pumpkin’s widest point. I like it for people who want Halloween-adjacent decor without full gore vibes. It also looks good in a group because each pumpkin can have slightly different eye shapes and still match.
Start with matte white acrylic paint, applied in two thin coats so you don’t get drips. Let it dry between coats, then lightly sand any bumps with a fine sanding sponge if you see texture lumps. Use a black paint marker to draw two almond cat eyes centered on the pumpkin, then add pointed pupils. Add a tiny triangle nose and a small curved mouth under the eyes. Place it on a black or dark gray tray so the white pops.
Use a stencil for the eyes if your hand shakes — painter’s tape holds stencils better than you’d think.
Avoid glossy white paint — it shows every fingerprint and looks cheap under flash.
6. Foam Snowflake Pumpkin Topper
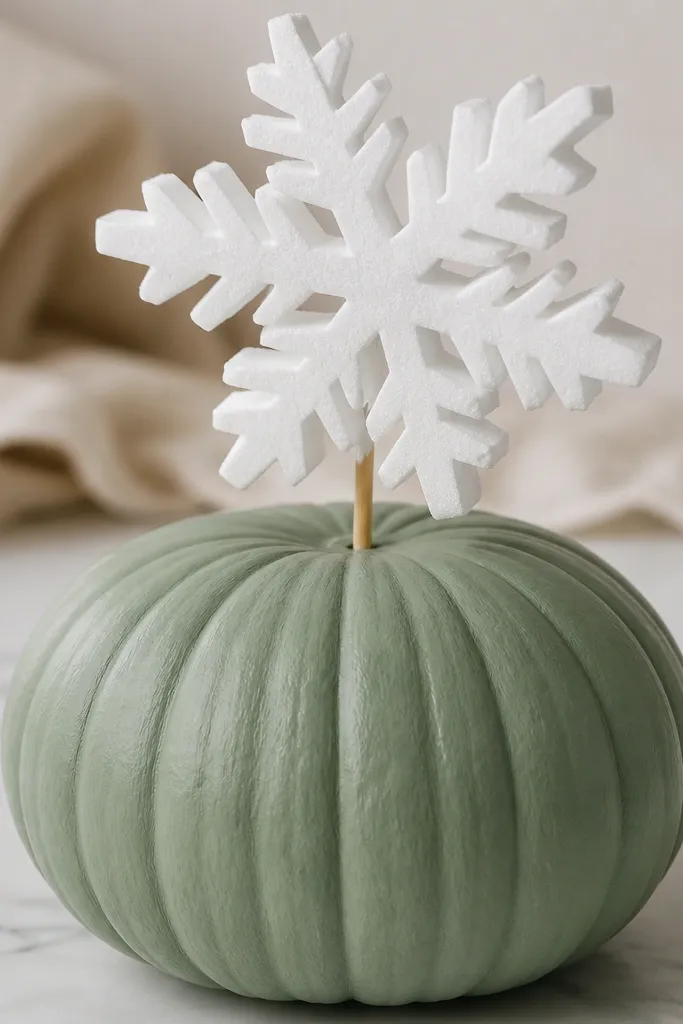
This is for the people who want to keep pumpkins in the house through winter without turning every piece into a Halloween face. A sage green base feels calm and modern, and the white foam snowflake reads holiday immediately. I attach it at an angle so it catches light from the side, which makes it feel more “decorated” than flat. It works with silver ornaments and neutral textiles, and it looks especially nice on entry tables with a runner. The texture contrast — smooth painted pumpkin plus crisp foam snowflake — keeps it from looking plain.
Pro tipUse foam snowflakes with thick edges — thin ones bend and look flimsy on a pumpkin.
Paint the pumpkin sage green with two coats of acrylic, then let it dry fully. Hot glue a wooden skewer into the snowflake’s center, then press the skewer into the pumpkin stem area. If the stem is too small, wrap the skewer with a bit of tape first to thicken it. Add two small faux pine sprigs around the base of the snowflake, gluing them where the skewer meets the pumpkin. Finish with a light dusting of white craft paint on the foam edges for a slightly frosted look.
AvoidSkip heavy glitter on foam — it sheds and makes the pumpkin look messy fast.
7. Vinyl Chalkboard Labels with Tiny Pumpkins
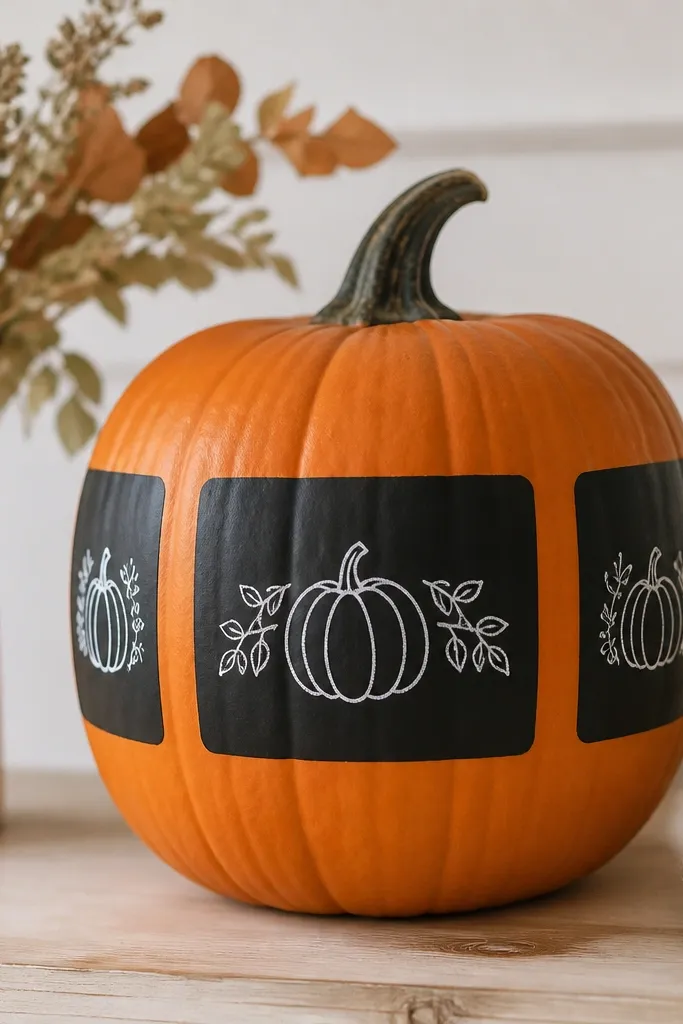
This looks like you bought it from a seasonal shop, but the supplies are cheap. Chalkboard vinyl gives you a matte black surface that hides small wrinkles in the pumpkin skin. I like placing two or three labels around the pumpkin, not covering the whole thing, so it still feels like a pumpkin. The white chalk marker lines read crisp and modern. This style flatters farmhouse and minimalist decor, and it looks great in a row on a shelf.
Clean and dry the pumpkin. Cut vinyl rectangles or circles (about 2x3 inches for small labels), then stick them where you want text. Use a chalk marker to write short words like “spice,” “sweet,” or a simple date, plus a tiny pumpkin doodle under each label. If you want a clean border, draw a thin line around the label with the marker. Seal lightly with a matte clear spray only after the marker dries so it doesn’t rub off.
Press vinyl with a credit card edge so you don’t trap air bubbles.
Don’t use thick paint marker directly on the orange skin — it bleeds into the texture.
8. Gold Leaf Look with Adhesive Shelf Liner
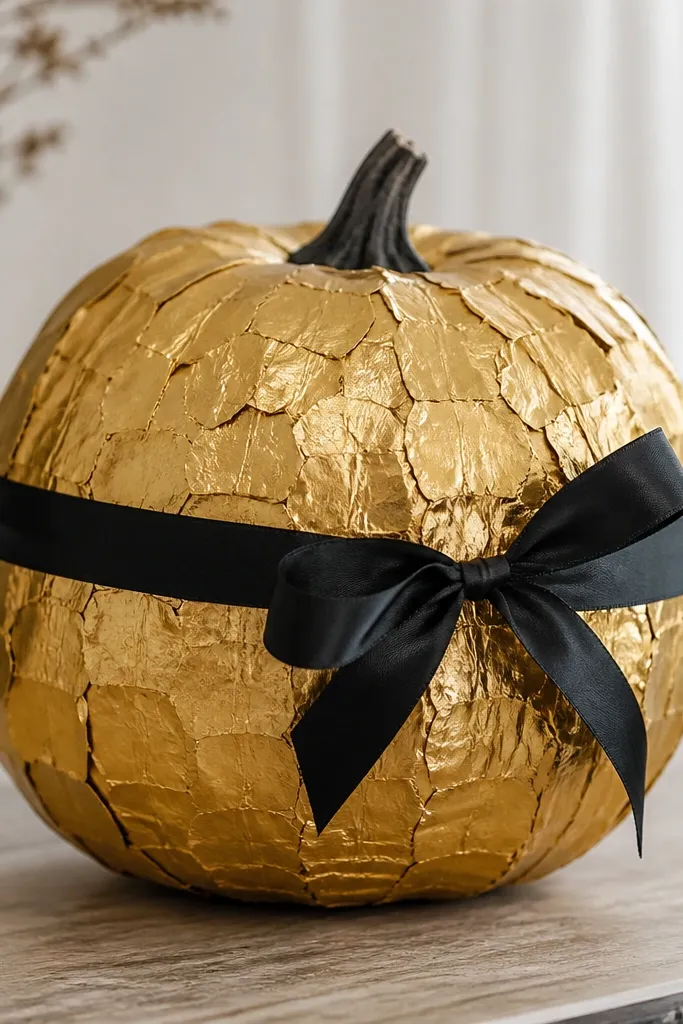
You get that gold leaf look without the mess of real leaf sheets. Adhesive shelf liner sticks quickly, and the overlapping pieces create a foil texture that looks fancy in photos. I wrap a black ribbon around the middle to break up all that sparkle so it doesn’t look like a disco ball. This style works with black, cream, and deep green decor. It also looks good on larger pumpkins because the scale pattern fills the surface.
Pro tipWear thin gloves if you hate sticky fingers — it saves your hands.
Wipe the pumpkin and let it dry. Tear the gold liner into small irregular squares and press them onto the pumpkin in overlapping rows from top to bottom. Work in sections so the adhesive doesn’t grab your fingers too early. Once covered, trim the bottom edge with scissors so it looks neat. Wrap a 1-inch black ribbon around the pumpkin’s widest point, then tie it into a simple bow at the front.
AvoidAvoid covering the stem area in tiny pieces — it looks lumpy and messy.
9. Stripe Tape Pumpkin with One Color Pop
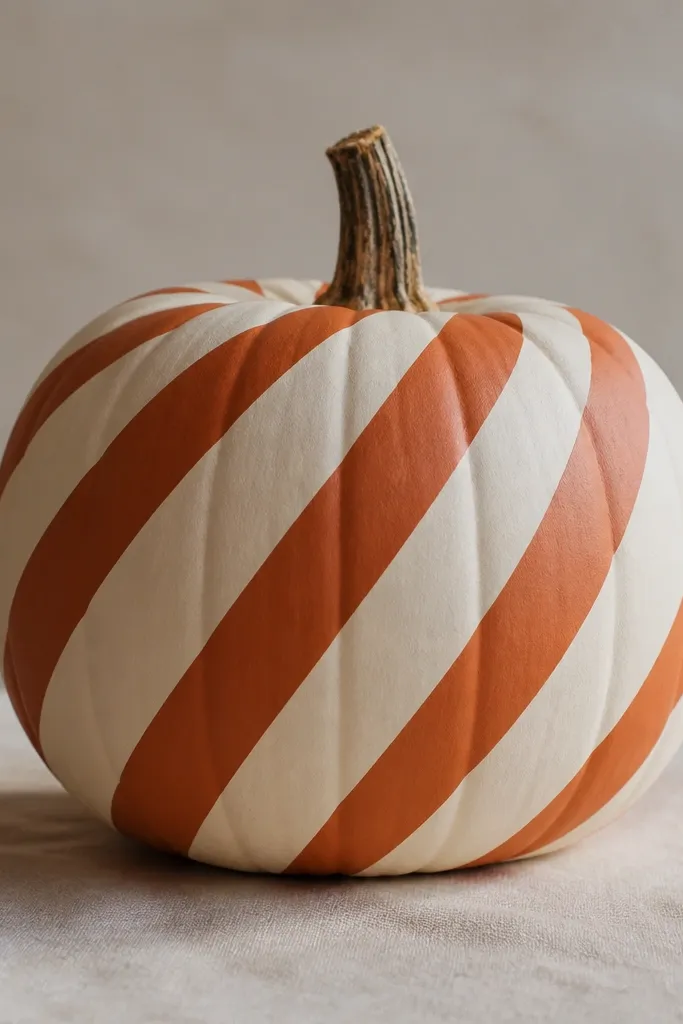
This is my favorite “I need it to look modern fast” option. Tape gives you crisp lines, and the limited palette makes the design look intentional even if you’re using basic craft paint. I pick one pop color (rust, burnt orange, or deep teal) against a cream base so it looks graphic instead of chaotic. It flatters any porch because it matches fall neutrals and doesn’t scream Halloween. In a group, the stripes look like a set.
Pro tipUse painter’s tape, not duct tape — duct tape pulls paint and makes jagged edges.
Paint the pumpkin pale cream in two thin coats and let it dry fully. Lay masking tape in diagonal strips with even spacing, pressing edges down hard with your fingernail. Paint over the exposed areas with rust orange acrylic, then remove the tape while the paint is still slightly wet for the cleanest edges. Add one extra thin stripe in a second shade if you want a subtle dimension. Tie a small raffia loop around the stem to soften the graphic look.
AvoidSkip rushing the base coat — tape won’t seal to paint that’s still tacky.
10. Rope Bow Pumpkin with Faux Twine Curls
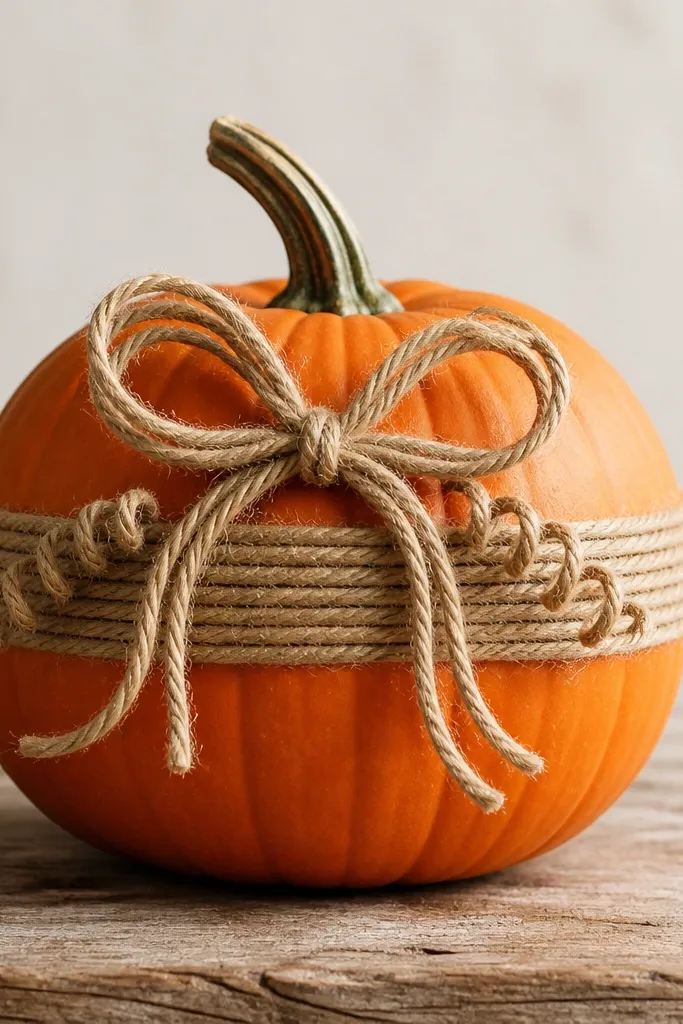
This one makes a plain pumpkin look styled without painting. Rope and twine have a warm texture that reads expensive, and the bow gives you a clear focal point. I keep the pumpkin orange so the rope feels like an accent, not a full costume. This works especially well for earthy decor and for people who want a softer look than black-and-orange faces. It also looks good on both small and big pumpkins because the bow scales with the size.
Start by wrapping jute rope around the pumpkin’s middle in a tight spiral, using hot glue dots every few inches. Leave a small gap where the bow will sit so it doesn’t look flattened. Make a bow using two loops of rope, then glue the center knot at the top of the spiral. Add 3-4 small rope curls by twisting extra twine and gluing the ends in place. If you want extra polish, brush the rope lightly with a tiny bit of watered-down brown acrylic so it matches any uneven rope color.
Keep rope coils tight by wrapping them around a book spine while you glue.
Avoid hot glue everywhere — too much glue makes shiny lumps that show in close-up.
11. Paint Marker Emoji Pumpkins
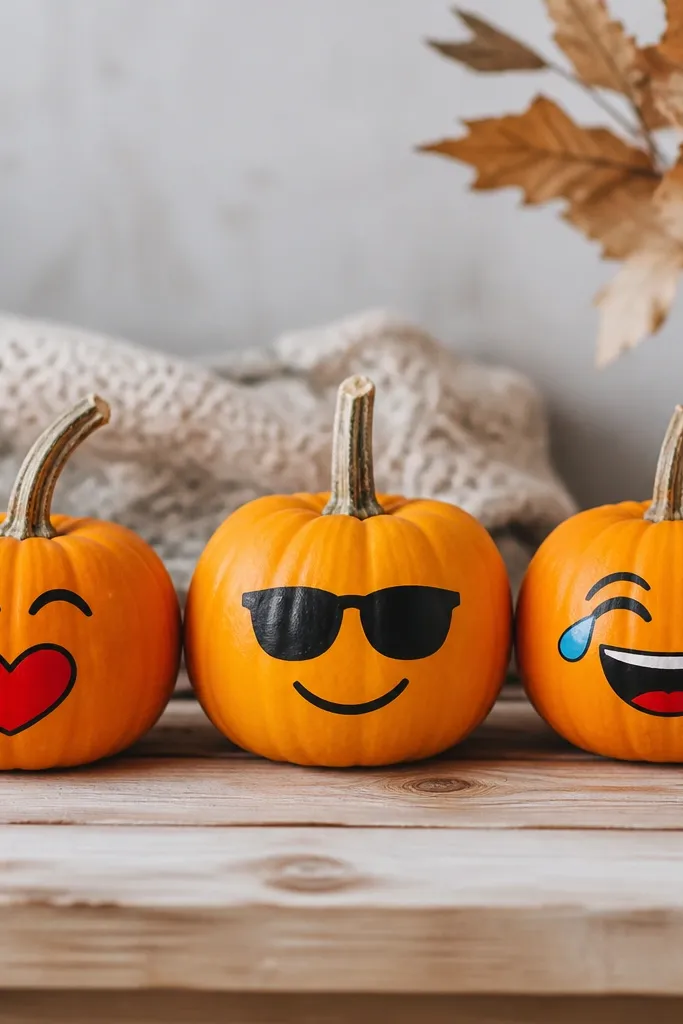
Emoji pumpkins are the fastest way to make cheap budget pumpkins look fun and modern. Paint markers give you clean, thin lines that don’t blur into the pumpkin’s ridges. I stick to small pumpkins for this because the faces fit the curves without warping. Bright accents — red, teal, yellow — look great on porch steps and in photo clusters. This style flatters younger decor themes and also works for family parties where you want something playful instead of scary.
Choose 3-5 small pumpkins and wipe them clean. Use a white paint marker or a quick dab of white acrylic as a base for the eyes and mouth so the orange doesn’t interfere. Draw each emoji face with fine-tip paint markers, starting with the eyes, then the mouth, then the details like hearts or sunglasses. Let everything dry 20 minutes, then add a thin outline around the face with black marker for definition. Group them on a tray with matching color ribbon so they look like a set.
Test your marker on paper first — some brands skip on pumpkin skin.
Don’t use permanent marker — it smears when you touch the ridges.
12. Fabric Rosette Pumpkin Centerpiece
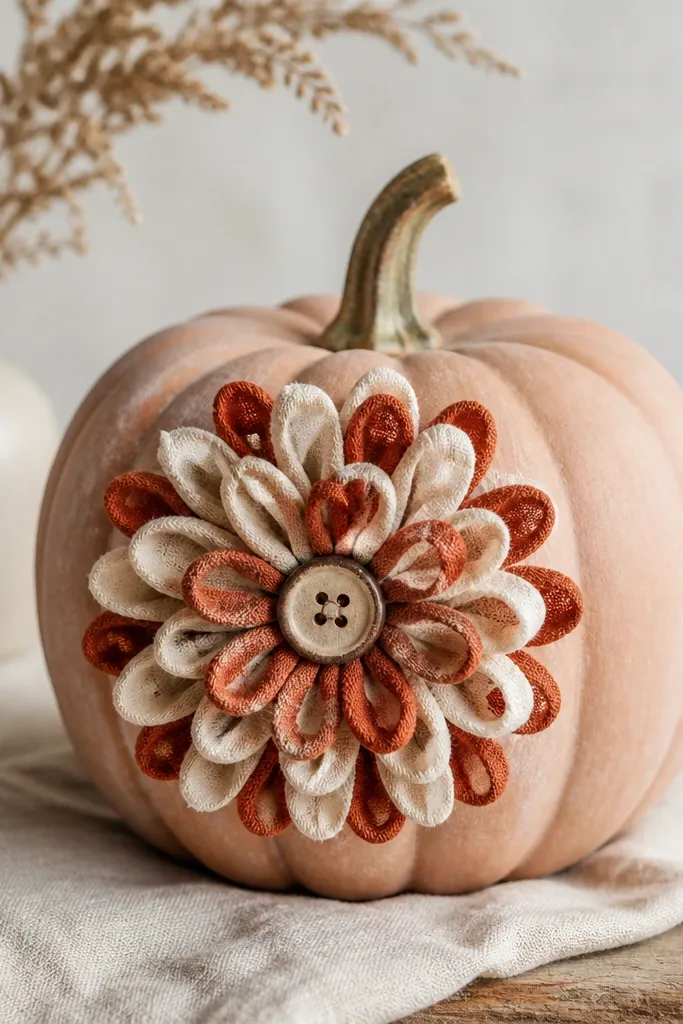
Fabric rosettes make pumpkins look like a centerpiece, not a craft project. The layered loops add volume, and the button center gives a finished look. I use a chalky matte base on the pumpkin so the fabric doesn’t fight with glossy paint. This style looks great for fall dinners and Thanksgiving tables because it reads soft and warm. It also flatters most color palettes since cream and rust sit in the same family as fall leaves.
Paint the pumpkin with matte chalky paint in cream and let it dry fully. Cut fabric strips about 2.5 inches wide, then fold and glue into loops to form a rosette, stacking layers from largest to smallest. Glue the rosette to the pumpkin’s front at the widest point. Add a small button or wooden bead in the center, then glue 2-3 tiny fabric leaves tucked under the edges. Finish with a thin ribbon band around the middle if you want extra symmetry.
Use hot glue for quick attachment, then reinforce the edges with fabric glue so it doesn’t lift.
Avoid stiff fabric — it won’t curl into loops and the rosette looks flat.
13. Silver Glitter Chevrons on Black Pumpkin
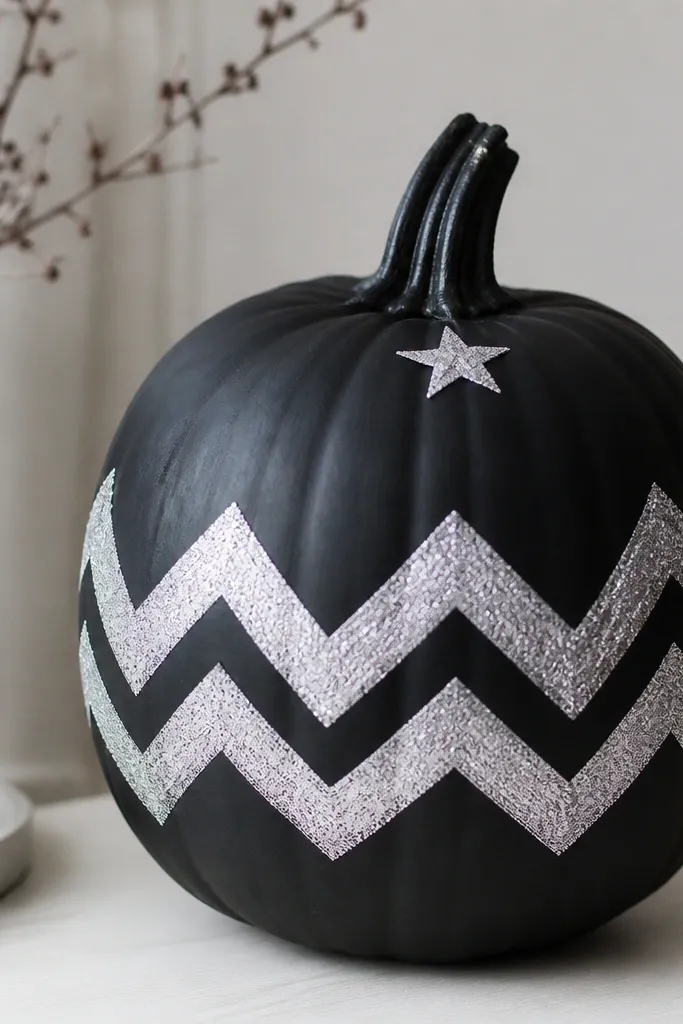
Chevrons make any pumpkin look designed because the pattern leads your eye. I paint the pumpkin matte black first so the silver glitter looks sharp instead of muddy. Glitter applied in stripes stays controlled, and the matte background keeps it from looking like cheap loose craft glitter. This style is great for holiday parties because it reads winter-sparkly without needing snow. It also looks good against dark doorways and black planters.
Pro tipMix chunky glitter with fine glitter so it catches light without looking patchy.
Paint the pumpkin matte black in two coats and let it dry. Tape chevron shapes using painter’s tape, pressing down edges firmly. Paint the exposed lines with a thin layer of clear craft glue or glitter glue, then sprinkle silver glitter and tap off excess. Remove the tape once the glue is set but not fully dry so the edges stay crisp. Add a small silver star sticker near the stem and place it in a dark corner for maximum contrast.
AvoidDon’t cover the whole pumpkin in glitter — it sheds and looks uneven fast.
14. Paper Doily Lace Pumpkin
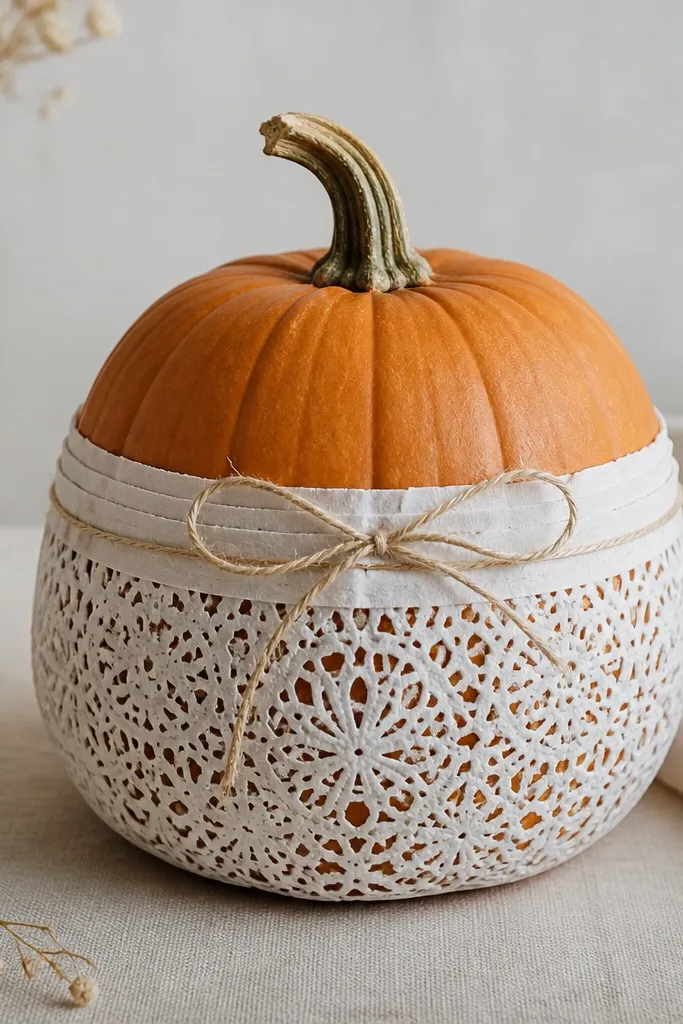
This is a sweet, not-scary option that makes pumpkins feel like decor, not a Halloween prop. Paper doilies give you lace-like texture, and if you wrap them around the lower half, the pattern looks intentional rather than messy. I keep the top orange so the doily doesn’t overwhelm the pumpkin’s shape. It looks good with vintage-style table settings and warm white string lights. If you’re decorating for a fall brunch, this is the one that gets compliments.
Cut a doily into a ring shape and wrap it around the pumpkin’s lower half. Use paper glue or Mod Podge to stick it down in small sections, smoothing as you go. Cut thin strips from the leftover doily pieces and layer them along the seam so it hides any gaps. Tie twine around the stem area and tuck one small doily scrap behind it like a little fan. Let it dry fully before moving it.
Use Mod Podge on a foam brush so you don’t tear the doily.
Avoid wetting the doily too much — it warps and the pattern turns wavy.
15. Scrapbook Paper Decoupage Panels
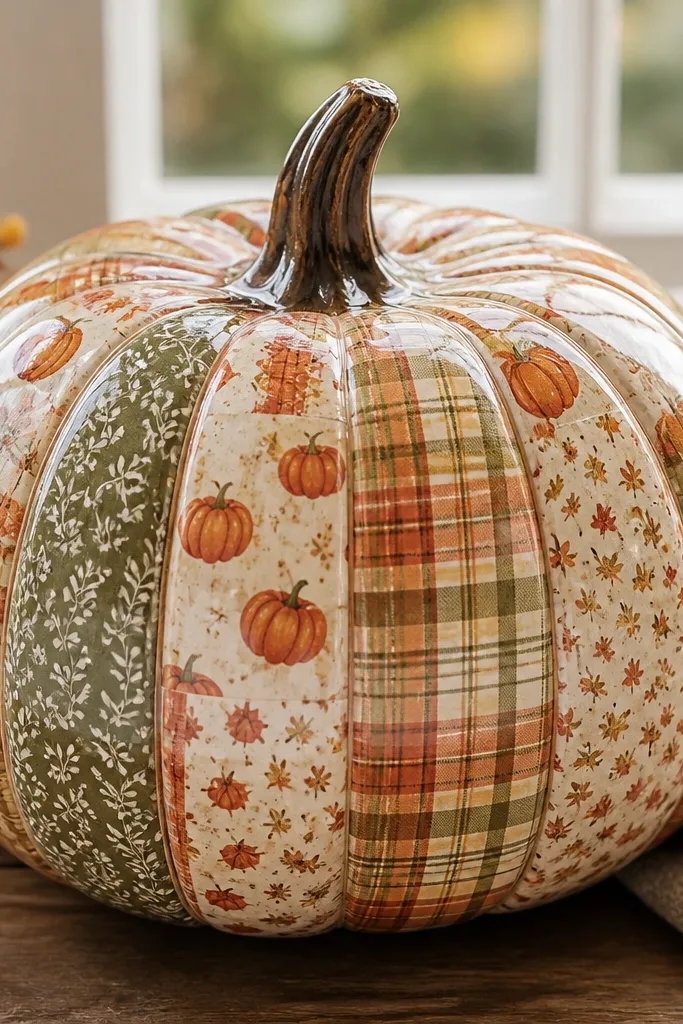
Decoupage looks like you paid for designer paper, even when you’re using leftovers. The key is to cut panel shapes that follow the pumpkin’s ridges so the paper lays flat. I choose one theme sheet for the face area and use two coordinating patterns for the rest, so it doesn’t look random. This style is great for parties because it’s colorful and easy to match to your table. It also looks good in photos because the patterns are crisp and readable.
Pick 3 scrapbook papers that match your decor, then cut small rectangles about 2-3 inches wide. Apply a thin layer of Mod Podge on one panel area, press the paper down, and smooth from center outward. Trim excess with scissors so it fits between ridges. Repeat until the pumpkin is covered, then seal with a final Mod Podge layer. For a polished look, let it dry overnight so the finish hardens.
Use a craft knife for trimming near ridges so edges stay straight.
Skip thick paper — it bubbles and shows air pockets.
16. Stencil Splash Paint Pumpkin
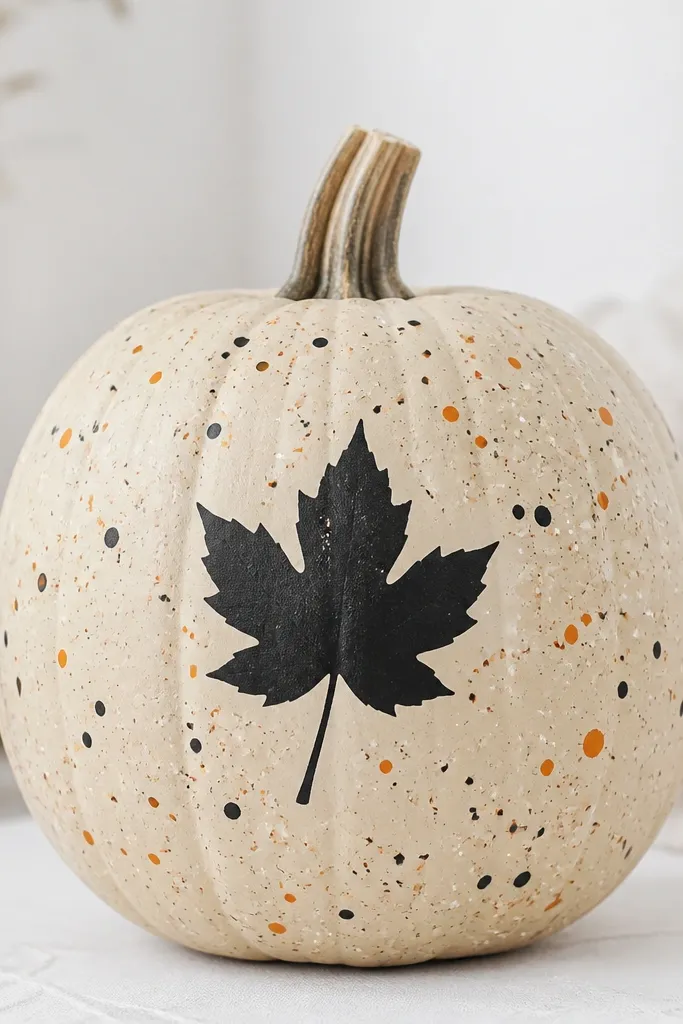
Splash paint looks artsy, but it can still look clean if you control the stencil and splatter amount. I use a cream base so the splatters pop, then I choose two accent colors plus black for definition. The stencil shape — like a bat, leaf, or small pumpkin — gives the design a focal point. This works for anyone who likes modern fall decor and doesn’t want a face. It also looks good on a mantel because the central shape reads even from a distance.
Paint the pumpkin cream and let it dry completely. Tape a stencil to the pumpkin’s front and press edges down. Load a toothbrush or small brush with diluted paint, then flick gently over the stencil area for splatters. Remove the stencil carefully once the paint is set enough not to smear. Add one small line of black paint under the main shape to ground it, then let everything dry 1-2 hours before handling.
Put a piece of cardboard inside the pumpkin so splatter doesn’t stain the surface underneath.
Avoid heavy splatter — it turns into a muddy layer and looks cheap fast.
17. Felt Pumpkin Garland Face
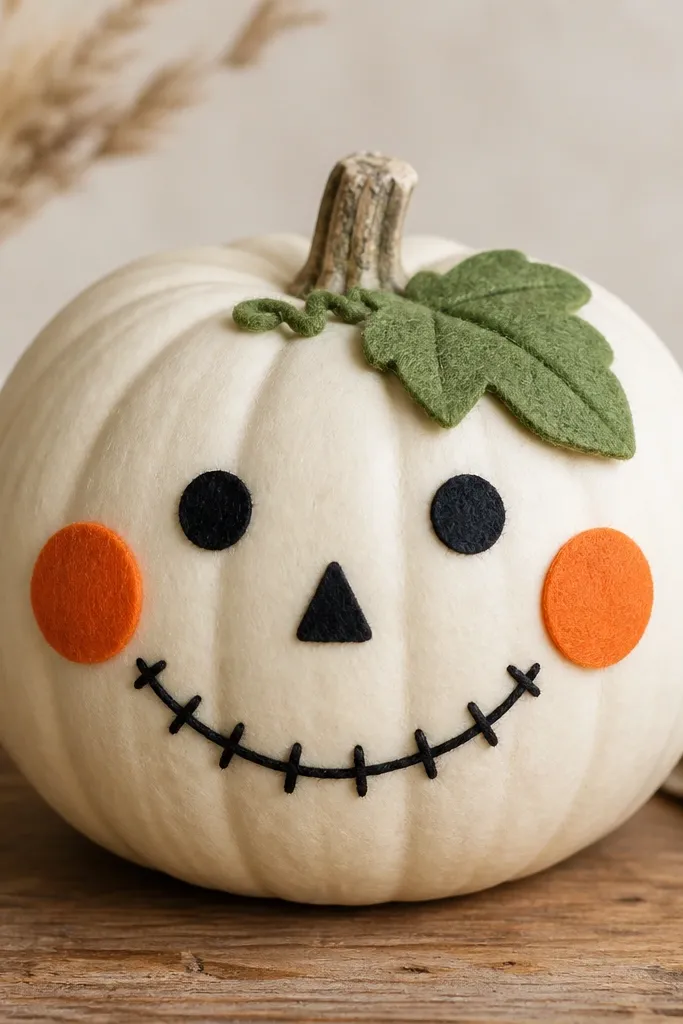
Felt makes pumpkins feel kid-friendly and warm, and it hides carving mistakes instantly. I like adding a leaf on top and cheek circles because it gives the face dimension without needing paint. Felt also works for people who don’t want to deal with paint drying time or marker smudges. This style flatters casual decor and looks cute on a porch table with kids' books or a warm throw. It reads soft in daylight and holds up better than paper when humidity creeps in.
Pro tipUse pre-cut felt sheets for speed — 8.5x11 sheets are easy to manage.
Cut felt shapes for eyes, cheeks, and a mouth, using a white or cream felt base for the eyes so they stand out. Glue the leaf on first near the stem, then place the eyes and cheeks at the widest point. Add a mouth using brown felt and glue it in a slightly curved smile. For a stitched look, outline the felt edges with a thin fabric glue line and sprinkle a little cinnamon-colored glitter on top of the glue. Press everything down and let the glue cure before moving the pumpkin.
AvoidAvoid thin felt — it curls at edges and looks wrinkled.
18. Ribbon Wrap with Tiny Pine Sprigs
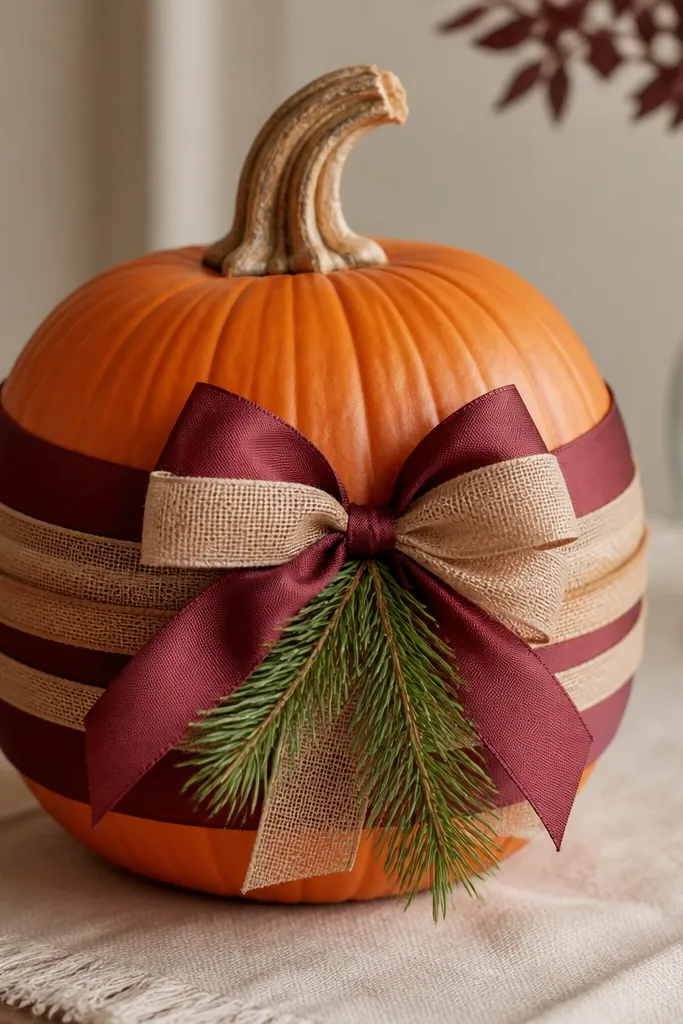
Ribbon wraps make pumpkins look like they belong with your wreath and garland. The layered ribbon adds depth without needing paint, and pine sprigs bring in a winter crossover vibe. I like burgundy with tan because it reads rich without turning overly dark. This style looks good on mantels, entry steps, and dining tables. It flatters almost any home palette because ribbon colors are easy to match to existing decor.
Cut two ribbon strips: one wider (about 1.5 inches) and one narrower (about 0.75 inches). Wrap the wider ribbon around the pumpkin’s middle and secure the ends with hot glue on the back. Layer the narrower ribbon so it sits slightly above the first wrap, then tie a bow at the front. Glue two tiny pine sprigs under the bow so they angle upward. If you want it cleaner, add a short length of raffia just under the pine sprigs.
Use satin ribbon with a matte backing so it doesn’t look glossy and cheap.
Avoid loose ribbon ends — they catch light and look sloppy.
19. Charcoal Face with White Stitch Outline
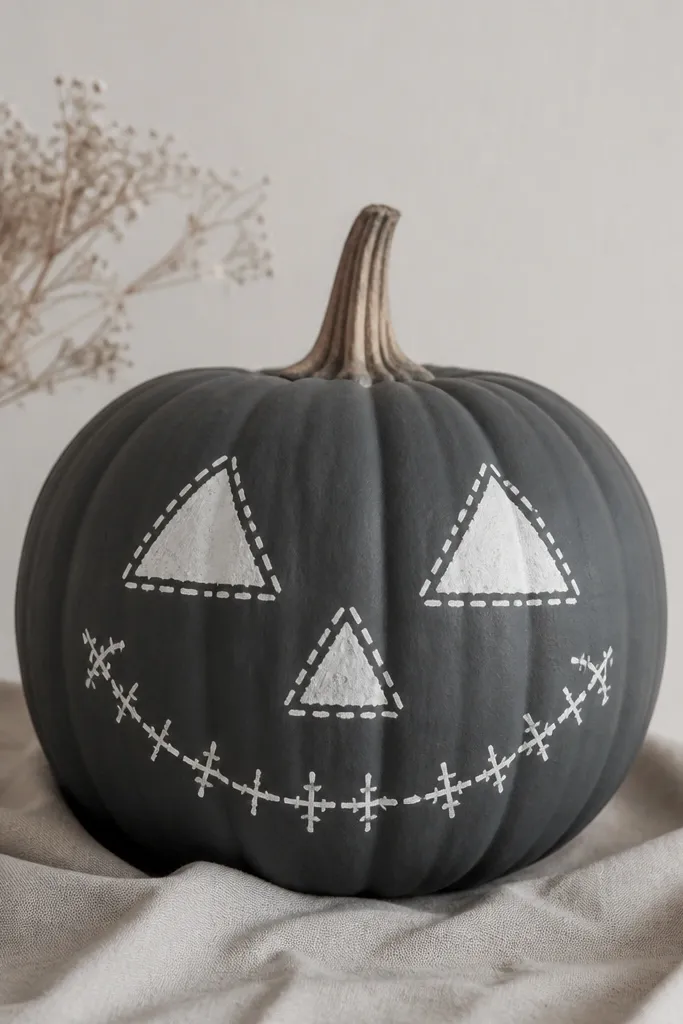
This design is for when you want Halloween without orange overload. Charcoal gray makes the pumpkin look like a modern prop, and the white stitch outline turns it into a “handmade” character. I keep the face simple: two eyes and a small mouth, then outline with stitch lines so it looks intentional. It works for people who decorate with black, gray, and cream and don’t want bright orange on the porch. In photos, the white stitching reads clean even when the pumpkin is slightly out of focus.
Paint the pumpkin charcoal gray in two thin coats and let it dry fully. Use a white paint marker to draw the eye shapes first, then add the mouth. Outline the eyes and mouth with small stitched lines — short dashes in a curve — rather than one thick line. If you want extra depth, add a small white dot on each cheek for a “freckle” look. Finish with a tiny fabric scrap leaf or a small bow at the stem area.
Shake your paint marker hard and test on paper so you get consistent line thickness.
Avoid thick paint strokes — they crack as the pumpkin dries.
20. Rolled Paper Flower Pumpkin
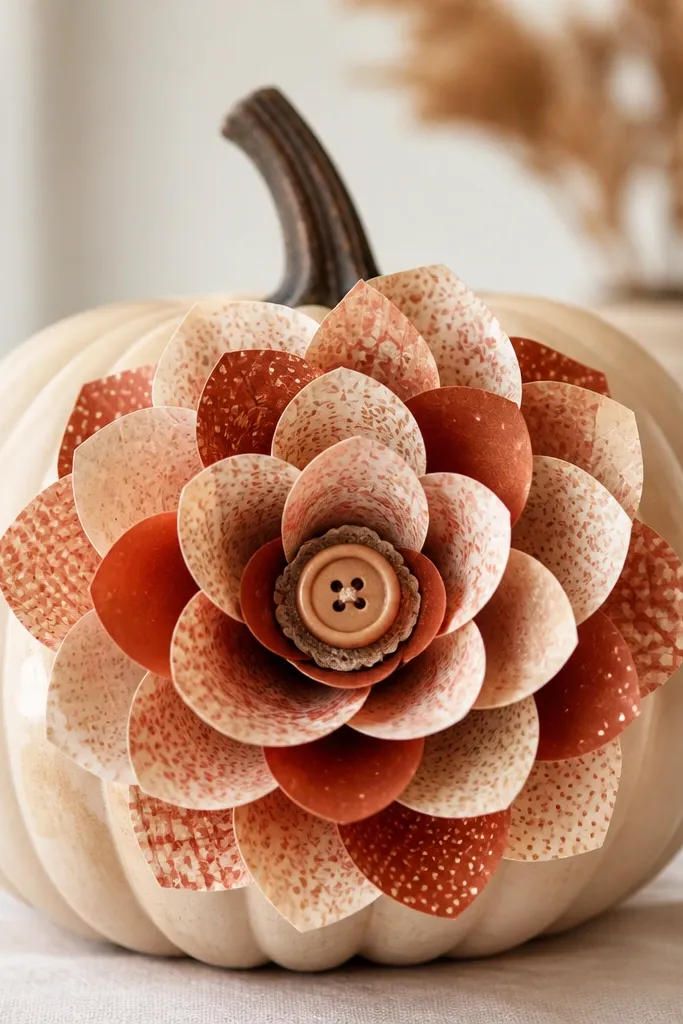
Rolled paper flowers look way more expensive than the materials cost. They add a big soft focal point, and you can match the paper to your fall table colors. I like mounting the flower on the front so it reads like a centerpiece, not a random craft. This style flatters warm neutrals and works for Thanksgiving, birthday parties, and “fall but not spooky” setups. Because it’s paper, it also stays crisp for indoor displays where you don’t have constant humidity.
Cut paper strips about 1 inch wide and 8-10 inches long from patterned scrapbook paper. Roll each strip tightly, then loosen slightly and glue the end to form a petal shape. Make 10-14 petals, then glue them in a circle around a small center circle. Glue the finished flower to the pumpkin’s front with hot glue dots, then add a small button in the center. If your pumpkin has ridges, press the flower gently and hold for 20 seconds per section so it seats fully.
Use heavier cardstock paper so petals hold their shape on the pumpkin curve.
Avoid thin printer paper — it collapses and the flower looks flat.