1. Matte Black Witch Hat Face
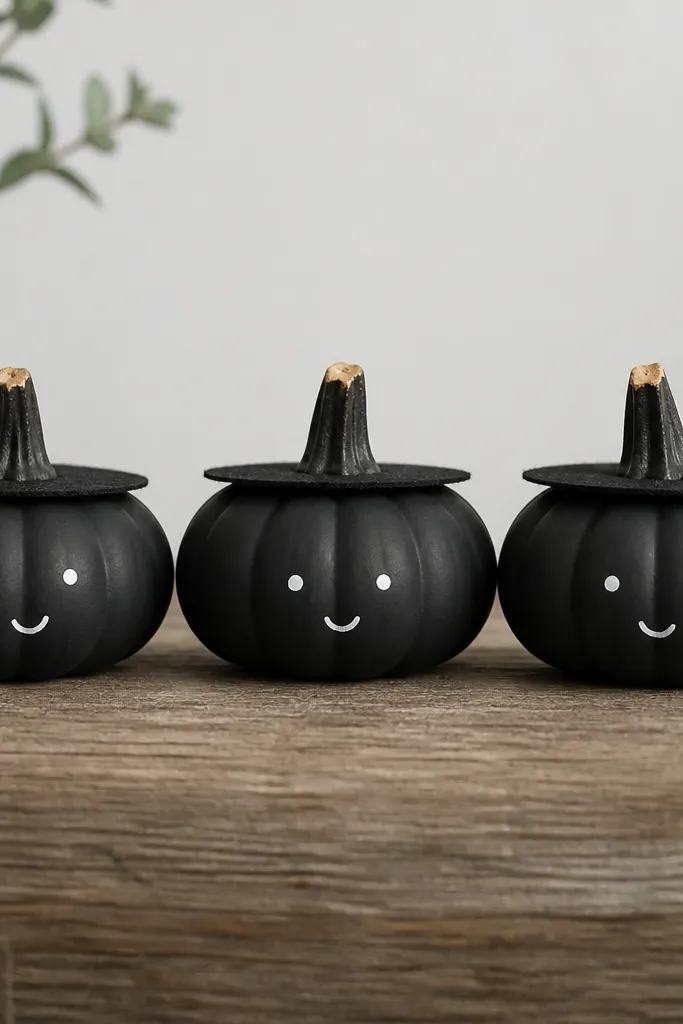
First, wipe the mini pumpkins dry and paint the whole surface with matte black acrylic in thin coats. After it dries, use a fine-tip white paint pen for two eye dots and a small curved mouth. Cut a felt strip about 1 inch tall and wrap it around the top like a brim; glue only the edges so it stays flat. Finish with a tiny dab of black paint on the felt seam so it blends.
I do this one when I want a spooky vibe that still looks tidy on a shelf. Start with a matte black base so the pumpkin stops looking orange underneath, then add two small white dots for eyes and a short curved smile. The felt brim gives the illusion of a hat without making the pumpkin taller, which matters for tight spaces. This style looks best on mini pumpkins with a rounder shape because the face sits evenly. It also flatters lighter skin tones in photos since the contrast is clean and bright.
AvoidDon’t use glossy black spray — the shine makes the painted edges look messy on small pumpkins.
Pro tipAdd a pinhead-sized highlight dot on each eye with a white gel pen for extra “alive” charm.
2. Cream Pumpkin with Cinnamon Dot Trim
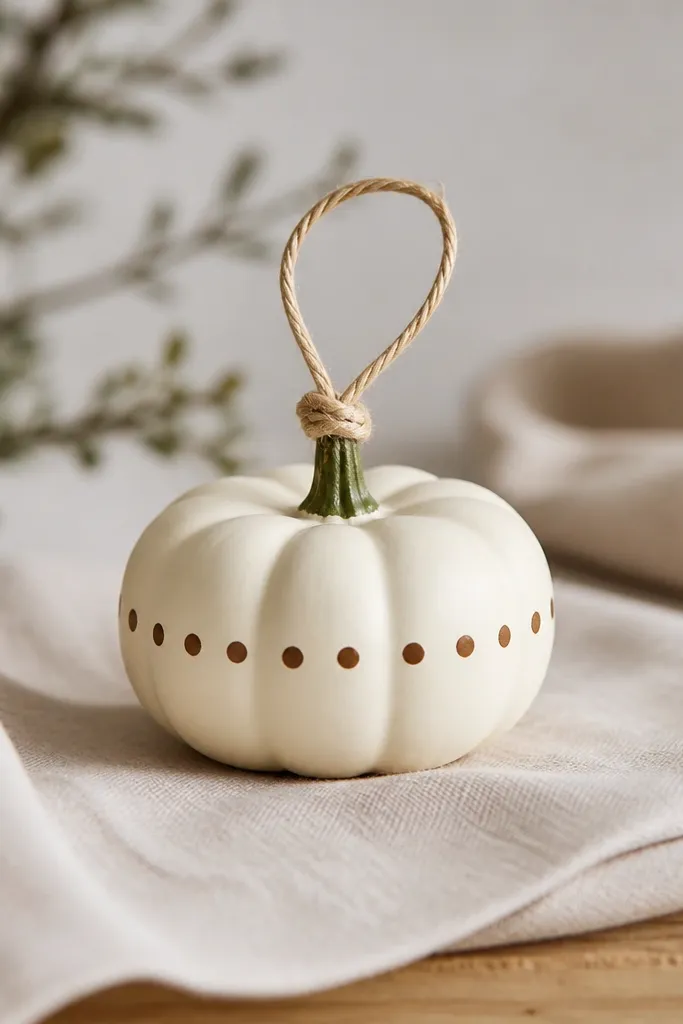
First, paint the mini pumpkin with two thin coats of cream acrylic, letting each coat dry fully. Next, load a round sponge or a dotting tool with warm brown craft paint and press a neat ring of dots around the pumpkin’s widest area. Tie a small loop of twine (about 6 inches) around the stem area and tuck the ends under the top. Let the twine sit loosely so it doesn’t flatten the stem.
This is my go-to when the rest of the room is neutral and you still want fall. The cream base makes the orange pumpkin disappear, so the design reads soft and calm. I paint a dotted ring in warm brown (think cinnamon) around the widest part, then leave the stem natural green or darken it slightly with brown. It looks great on small pumpkins because the dot ring acts like a visual belt. It flatters warm undertones in decor — beige wood, oatmeal textiles, and gold accents.
AvoidSkip heavy paint — thick layers on mini pumpkins create bumps that catch light and look cheap.
Pro tipIf you want the dots to look uniform, count 10 dots per pumpkin and keep your spacing consistent.
3. Gold Leaf Accent Stripe
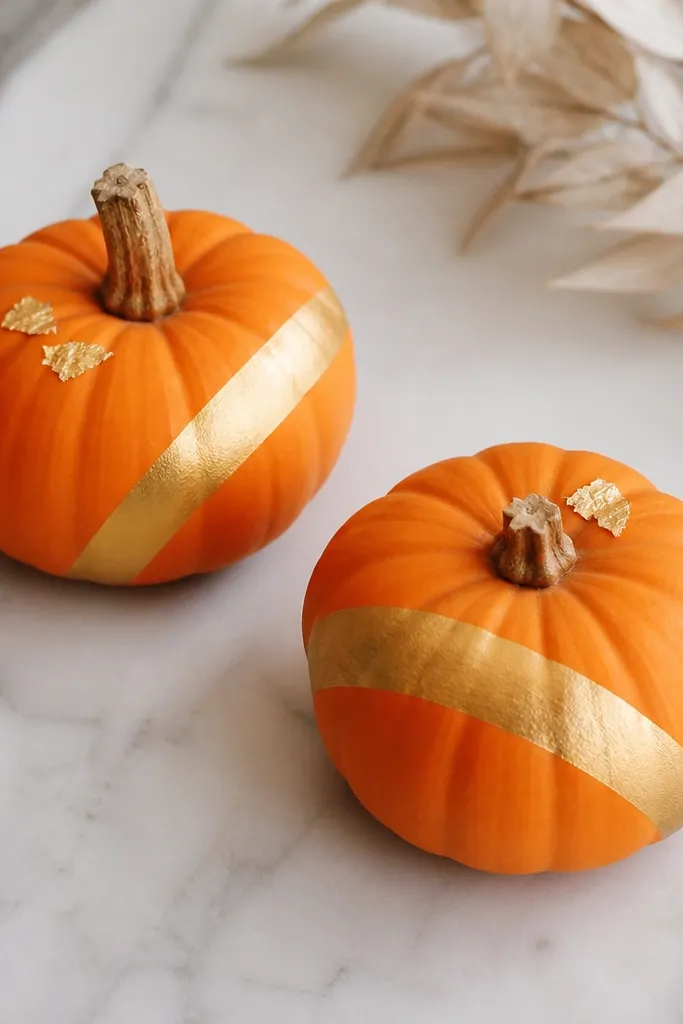
Start by cleaning the surface and lightly sanding any rough spots so paint grips. Use painter’s tape to mask a diagonal stripe about 1/4 inch wide; paint it with metallic gold acrylic. Remove the tape while the paint is still slightly tacky for sharp edges. Finally, press small pieces of gold leaf at the top around the stem and seal with a light matte clear spray so it doesn’t shed.
This one is for people who hate clutter but still want a “fall moment.” You keep the orange base and add a diagonal stripe in metallic gold, which reads classy without taking up extra space. I also place two small gold leaf pieces near the stem so the pumpkin looks layered. It’s especially flattering for mini pumpkins on a dark shelf because the gold reflects light. If you’re doing this with warm-toned decor like terracotta pots or caramel candles, it ties everything together.
AvoidDon’t cover the whole pumpkin in gold leaf — it gets heavy and can look like foil craft paste.
Pro tipUse a foam brush for the stripe so the metallic paint goes on smooth, not streaky.
4. Mini Pumpkin Monogram Sticker Face
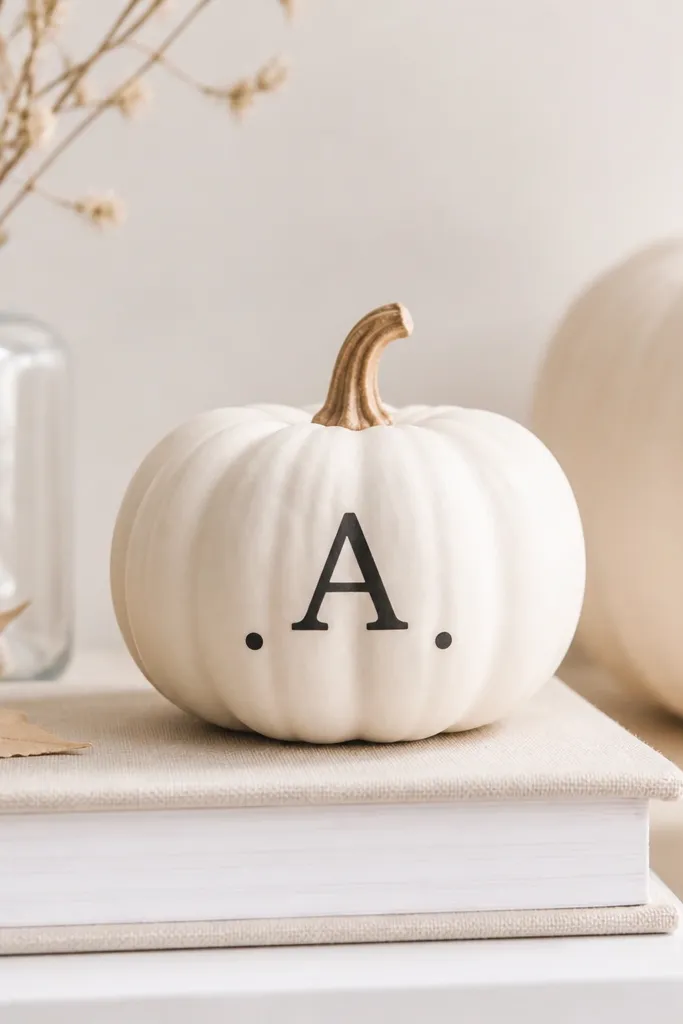
First paint the mini pumpkin with white acrylic and let it dry completely. Place the letter sticker centered; press firmly around the edges with a plastic tool or your fingernail. Add two small dot cheeks using a black paint marker placed left and right below the letter. Finish with a tiny mouth line using a fine brush or pen, then seal with matte spray if you want it to last.
This is the fastest way I’ve found to make mini pumpkins look custom without painting every line. You paint a white base, then place a vinyl letter sticker (or cut a letter from black craft vinyl) centered where the face would go. Add two tiny dot cheeks and a small curved mouth in black so it reads like a character, not just a label. It looks great for seasonal entryway displays because the letters are readable even at a distance. It also works well for any skin-tone color palette because it’s neutral and high contrast.
AvoidAvoid glossy white paint — it highlights roller marks on mini pumpkins.
Pro tipChoose a thick font style for the sticker so it doesn’t look thin on the curved surface.
5. Twine Wrap with Tiny Burlap Bow
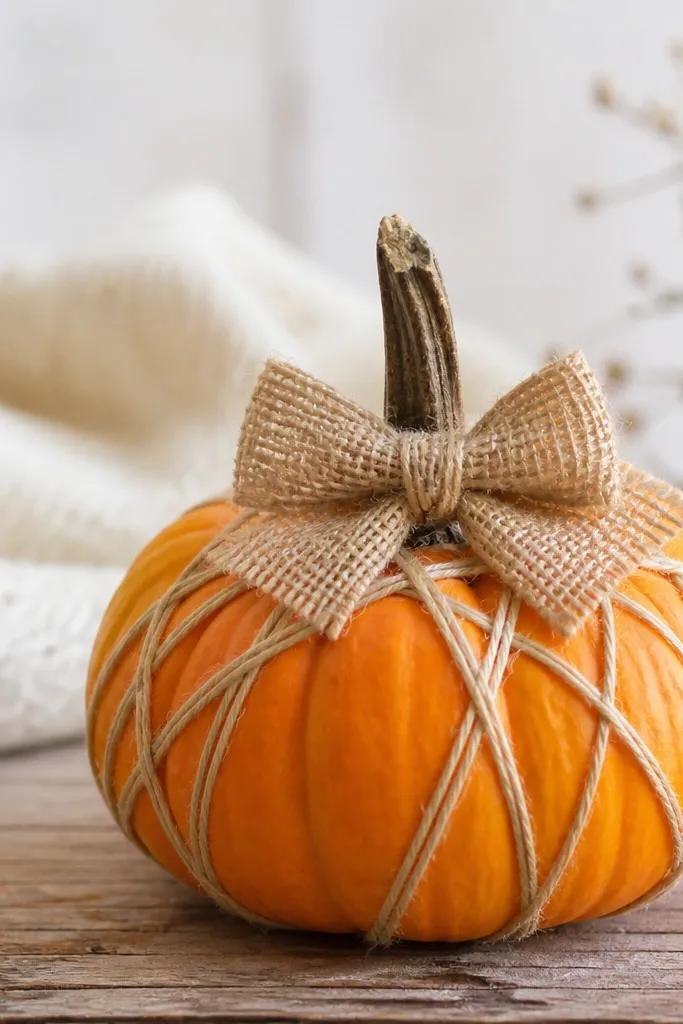
Start by tying one end of twine at the top near the stem with a small knot. Wrap downward in tight coils, then do a second crisscross layer by weaving horizontally. Keep the twine tension snug but not so tight you deform the pumpkin. Tie a burlap ribbon bow using a strip about 2 inches wide; glue only the center knot to the top.
When you want “farmhouse” without the heavy look, twine is the answer. Wrapping the mini pumpkin in thin twine gives texture while staying lightweight, and a small burlap bow adds the holiday vibe. I like leaving the stem visible so the top doesn’t look stuffed. This style looks best on mini pumpkins placed in a cluster because the texture catches light from different angles. It also plays nicely with warm woods and woven baskets.
AvoidDon’t glue twine in giant puddles — it turns shiny and can peel off.
Pro tipUse two shades of twine (light + slightly darker) for a subtle “handmade” look.
6. Floating Confetti Sparkle Pumpkins
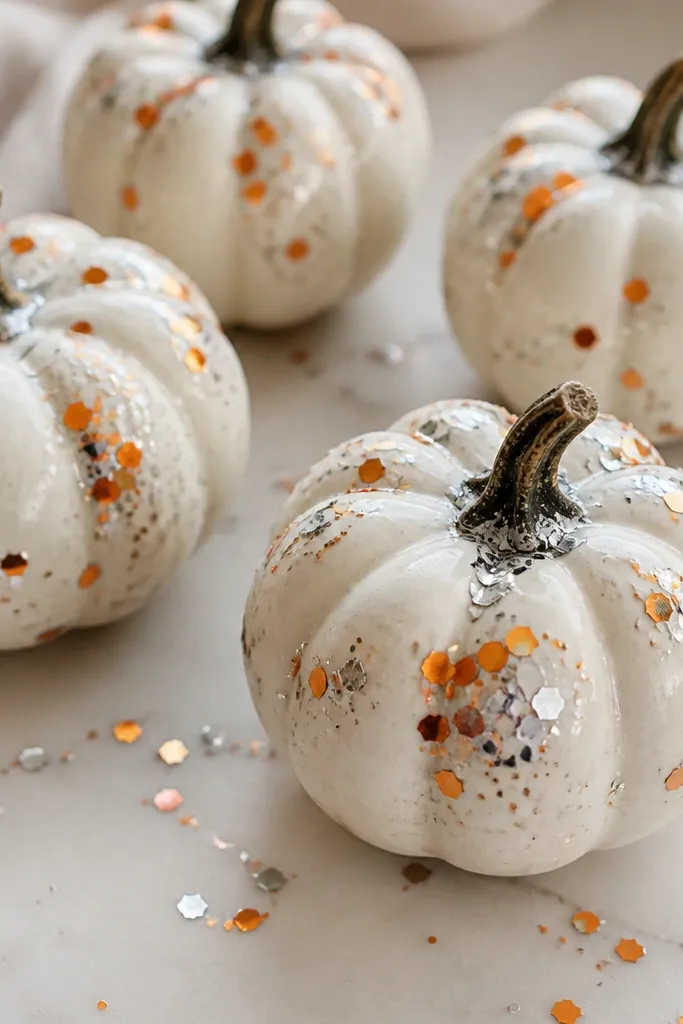
Paint the pumpkin if needed with a thin coat of orange or leave it natural; let it dry. Brush clear craft glue onto 3 to 4 curved patches around the pumpkin, about the size of a quarter each. Sprinkle fine glitter over each patch, then tap off the excess into a paper sheet. Let it dry for at least 2 hours, then mist once with matte clear spray to lock the glitter down.
This is the one I do when I want the pumpkin to look festive but not fully covered. Instead of glittering the whole surface, you place glue in small arcs and scatter fine glitter so it looks like it’s floating. The orange pumpkin underneath keeps warmth, and the glitter adds light without making it bulky. It’s great for party tables because it looks fun up close and still reads from a distance. If you have guests with kids, this stays safer than big glitter chunks because you control the coverage.
AvoidDon’t pour glitter directly from the jar — it clumps and looks uneven on mini pumpkins.
Pro tipUse glitter labeled fine or “cosmetic” so the pieces look like sparkle dots, not glitter dust storms.
7. Polka Dot Pumpkin with Green Stem Accent
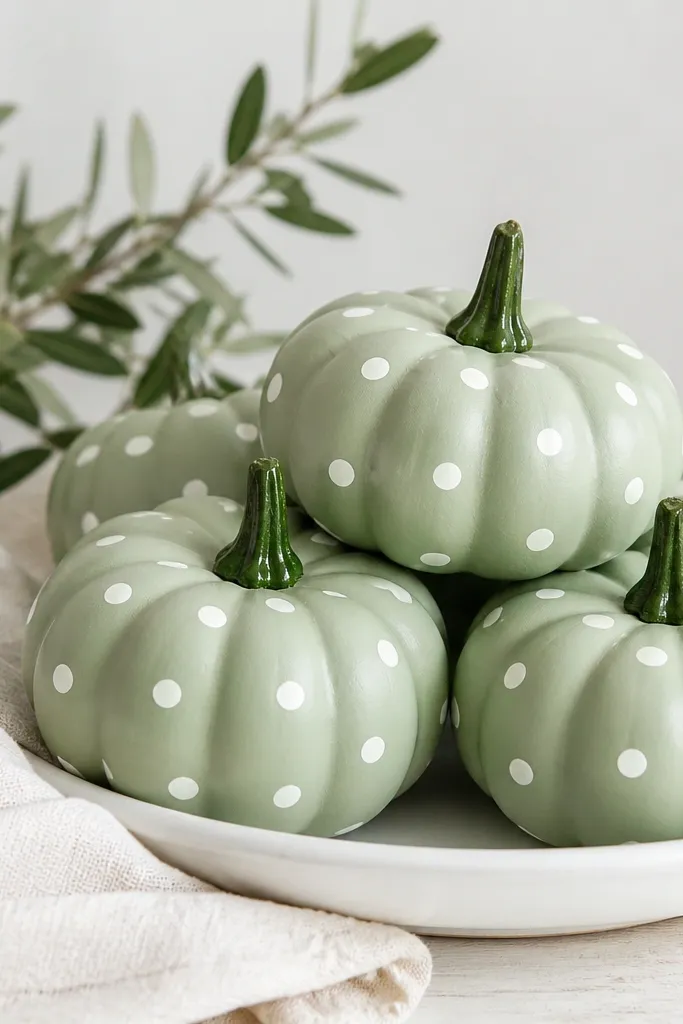
Pastel polka dots look adorable on small pumpkins because the pattern scales nicely. The sage base makes it feel modern, and the white dots keep it playful. I paint the stem a deeper green to anchor the look so the top doesn’t disappear into the pastel body. This style works in kitchens and bathrooms because it’s not too dark or spooky. It also looks flattering in photos with warm lighting since sage + white is forgiving.
Start by painting the mini pumpkin sage using a foam brush for a smooth finish. While it’s dry but not tacky, place dots using a dotting tool or the back of a small paintbrush handle. Aim for 12 to 16 dots per pumpkin, evenly spaced around the curve. Paint the stem with deeper green acrylic and leave it slightly glossy by skipping matte seal on the stem only.
Press the dot tool straight down for round dots instead of smudged circles.
Don’t overcrowd the dots — too many dots make the pumpkin look messy at arm’s length.
8. Black-and-White Stripe Face (Classic Halloween)
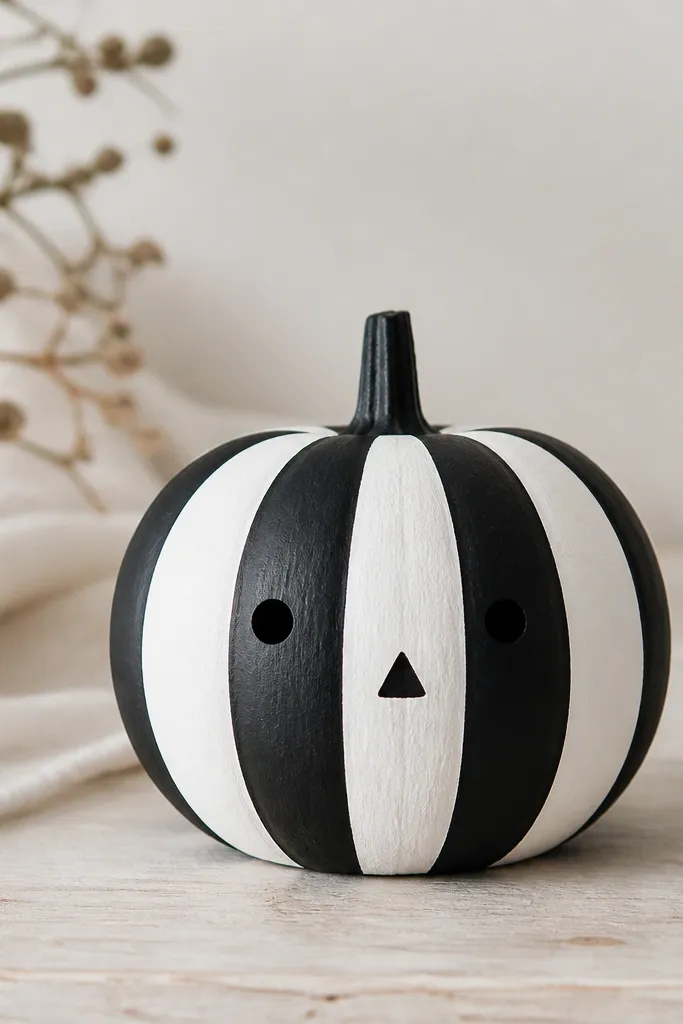
First, base coat the mini pumpkin white and let it dry. Tape off narrow sections (about 1/8 inch) and paint black stripes, then remove tape after each coat sets slightly. Once stripes dry, use a fine black marker to draw two stick eyes and a small triangle nose. Add a short mouth line and seal with matte spray to keep markers from rubbing.
This one looks bold and clean because stripes give you instant graphic structure. I paint alternating vertical stripes so the pumpkin looks like it has a costume, then add simple stick eyes and a tiny triangular nose. It’s a great option for small spaces because the contrast reads clearly even when the pumpkin is tucked behind other decor. This style flatters black metal candle holders, white ceramics, and any monochrome shelf. It also makes mini pumpkins look like “designed objects,” not crafts.
AvoidAvoid thick paint stripes — they crack on the curved surface.
Pro tipUse painter’s tape and pull it slowly — rushing tape removal makes jagged edges.
9. Watercolor Leaf Wash
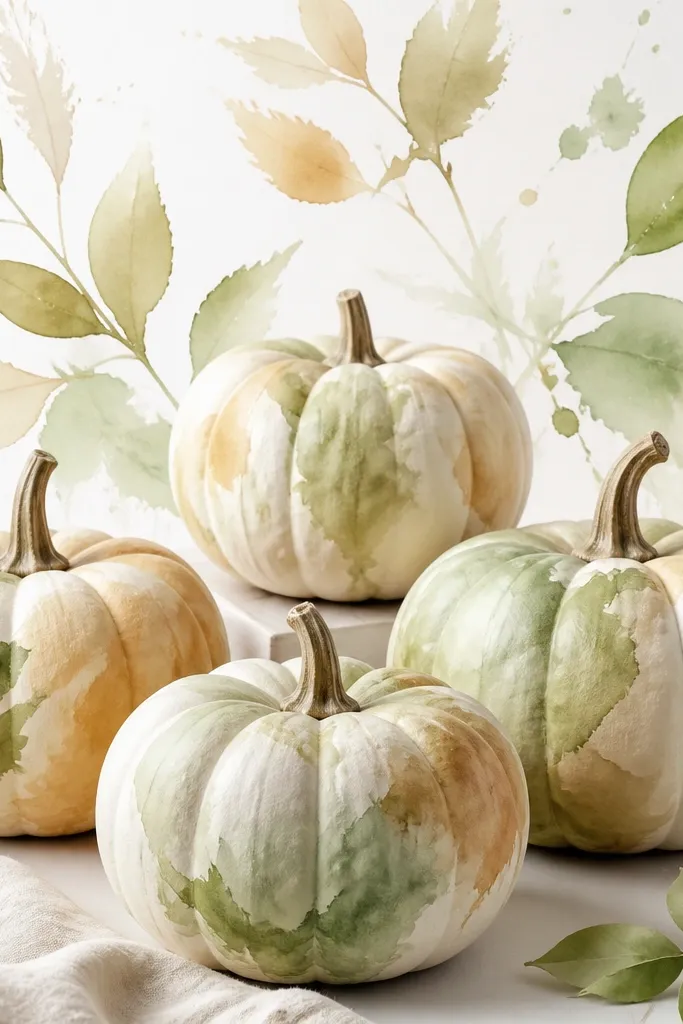
Mix a light watercolor-like paint by thinning acrylic with water until it looks like tinted milk. Brush a loose wash over the upper half of the pumpkin and let some orange show through. Paint 4 to 6 small leaf shapes around the washed area using a small round brush. Add a light tan vein line inside one or two leaves, then seal with a very light matte spray once dry.
Watercolor-style pumpkins feel airy and soften the whole fall look. You’re not covering every inch — you’re letting the orange show through, then painting leaf shapes in pale green, tan, and a touch of gray. This works well when you want pumpkins that match linen, wood, and neutral farmhouse decor. It also looks good on mini pumpkins with a slightly textured skin because the watercolor blends naturally. The result reads gentle, not loud.
AvoidDon’t over-layer — too many washes turn muddy on tiny pumpkins.
Pro tipPractice leaf shapes on paper first — the tiny scale needs confident brush flicks.
10. Striped Fabric Wrap Pumpkin
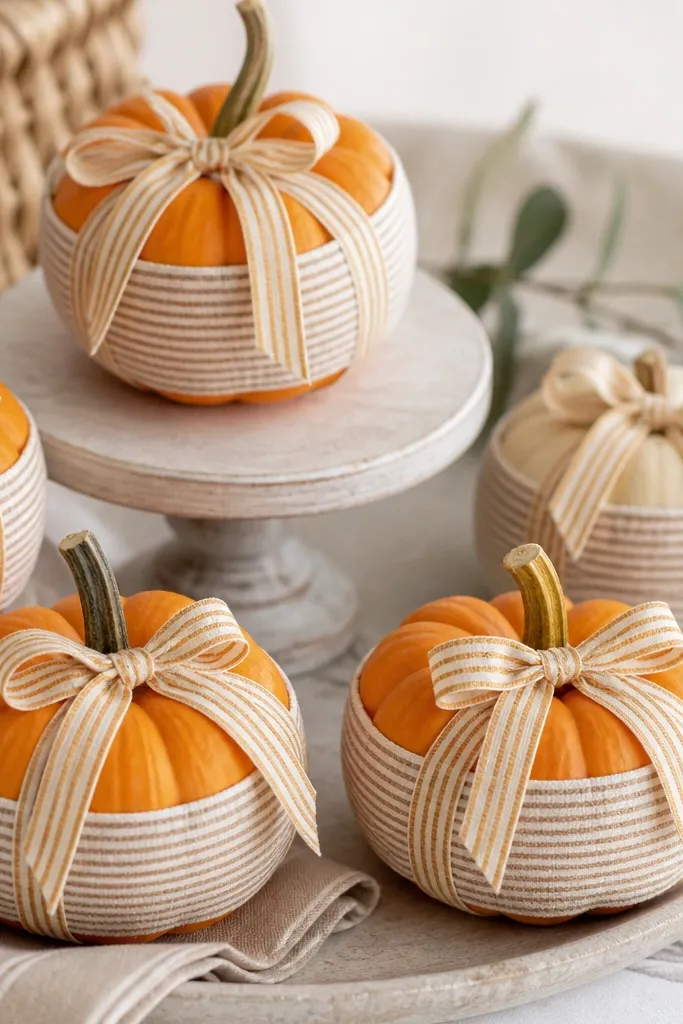
Cut a fabric strip long enough to wrap once around the pumpkin plus overlap, about 1 inch taller than the band height. Glue the strip around the widest area with a thin line of hot glue at the overlap only. Press and hold for 10 seconds so it grips. Tie a small ribbon bow on top and glue only the center knot, leaving the loops free.
Fabric wraps make mini pumpkins feel like decor, not a paint job. I use a thin band of striped fabric around the widest part, leaving the rest of the pumpkin visible so it doesn’t get bulky. The ribbon bow at the top adds height in a controlled way without making it top-heavy. This looks best on mini pumpkins placed on a stack of books or a tray because the fabric band catches light. It also flatters warm neutrals and makes a small shelf look dressed.
AvoidSkip stretchy fabric — it twists and looks wrinkled on curved pumpkins.
Pro tipUse cotton fabric with a tight weave so frayed edges don’t shed onto your shelf.
11. Painted Face with Polished Eyes
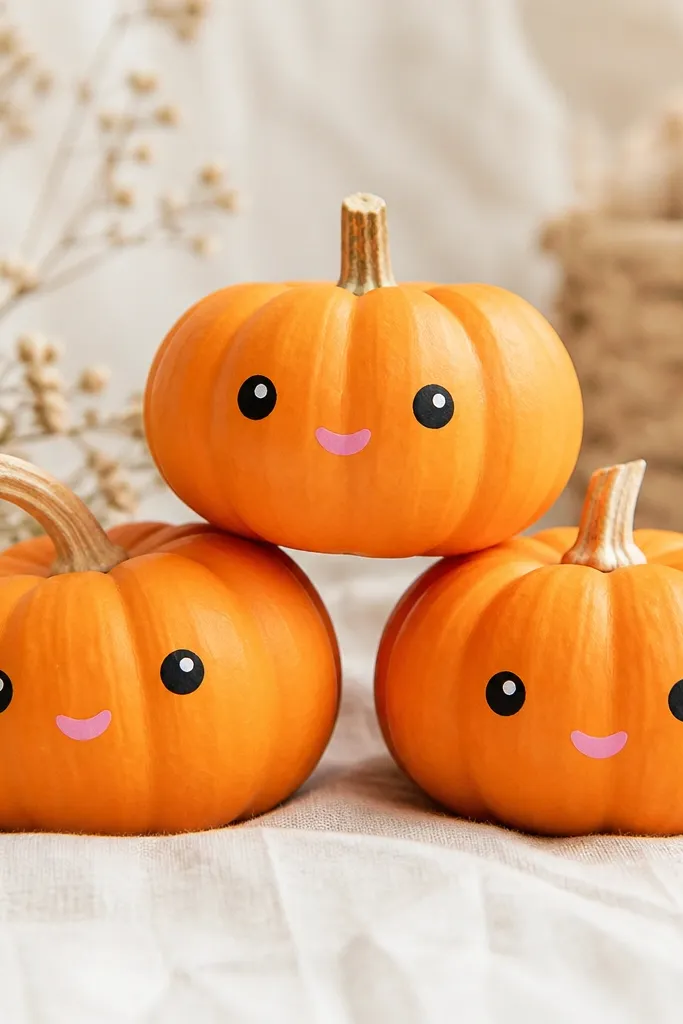
Use a matte base coat only if your pumpkin surface is uneven; otherwise paint directly lightly. Draw two black dot eyes using a paint marker and add a tiny white dot in the top right of each eye. Add a small blush pink dot on each cheek or just one cheek for a more natural look. Finish with a short curved mouth and seal with matte spray after 30 minutes so the highlights stay crisp.
If you want something friendly and photo-ready, this is it. The face is simple, but the trick is adding a tiny white highlight in each eye, which makes the pumpkin look glossy and “alive.” I paint the mouth slightly off-center and add a small blush dot on one cheek for personality. This works on any mini pumpkin color because you’re letting the face do the work. It’s also a great choice for kids' rooms because it looks sweet, not scary.
AvoidDon’t use big glitter on the face — it makes the eyes look messy on mini scale.
Pro tipMake the eyes the same height — mismatched eyes look like the pumpkin is surprised.
12. Rust Orange Ombre with Burnt Sienna Tip
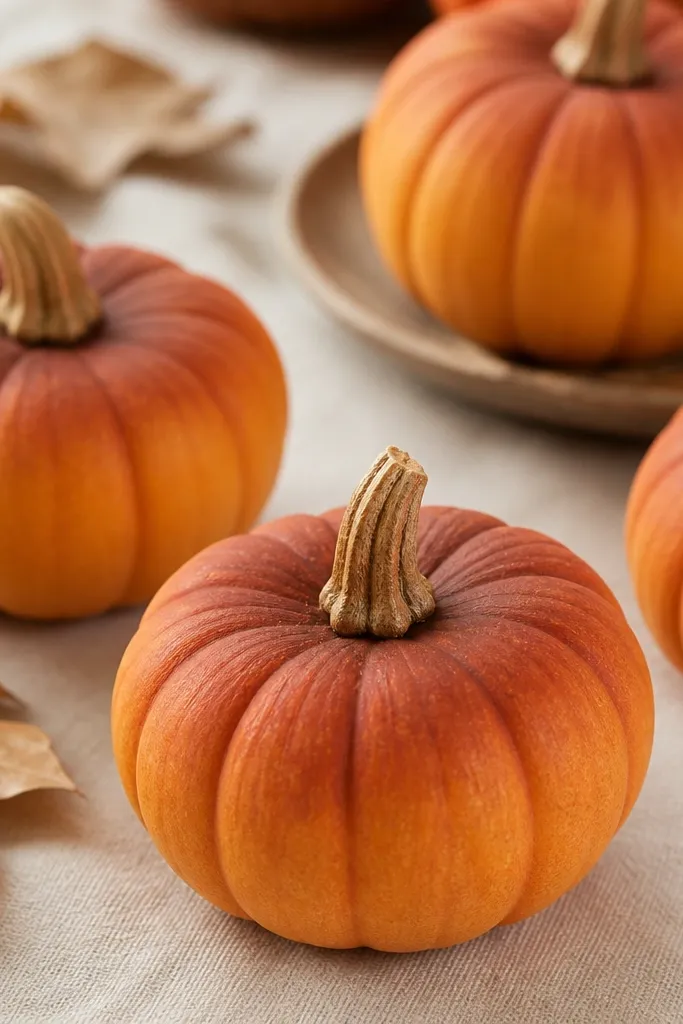
Start by painting the top half with rust acrylic, then blend downward with a dry sponge so the transition is soft. Once dry, add a light orange layer to the bottom third and blend again with minimal paint. Use a small brush to paint a thin band around the stem area in burnt sienna. Seal with matte clear spray so the gradient doesn’t rub off.
Ombre makes mini pumpkins look more expensive because the gradient hides any tiny imperfections in the skin. I keep it subtle: darker rust at the top fades into lighter orange near the bottom. Then I add a thin burnt sienna band around the stem area so the top looks finished. This style looks great on a tray with candles because the color blends with fall lighting. It also flatters wood tones and warm metals like copper.
AvoidDon’t let ombre go too dark at the bottom — it makes the pumpkin look dirty.
Pro tipBlend in small circles with a sponge — straight brush strokes show on curved mini pumpkins.
13. Mini Pumpkin with Burlap Fringe Collar
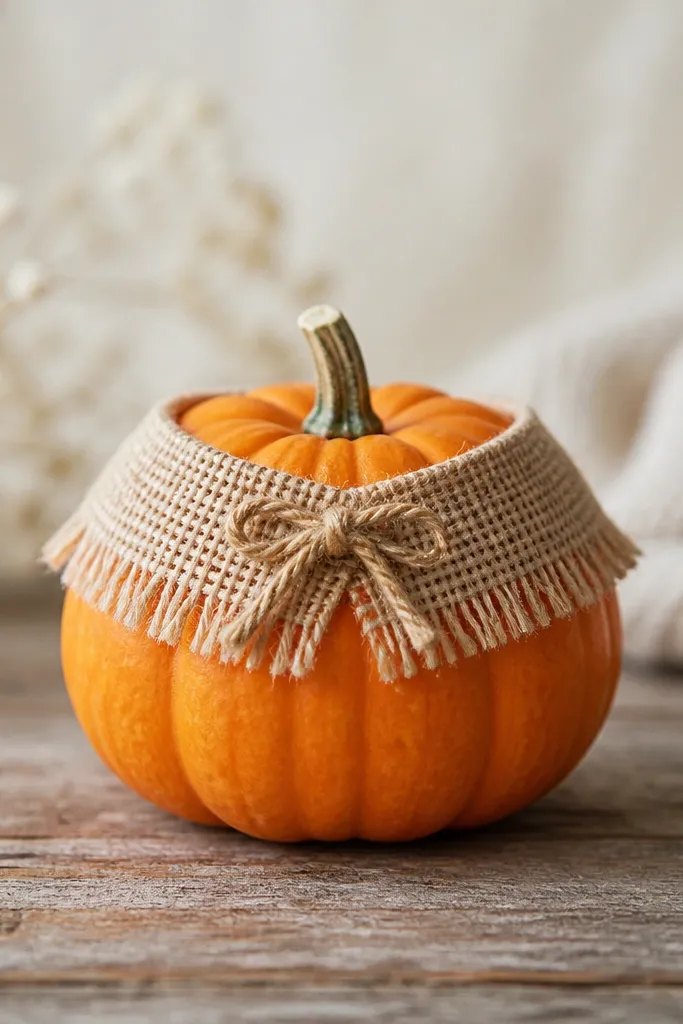
Cut a burlap strip wide enough to wrap around the pumpkin once, with extra for overlap. Cut short fringe along one long edge so the fringe hangs downward about 1/4 inch. Wrap the strip around the upper third of the pumpkin and glue the overlap at the back. Tie a short piece of twine into a tiny knot at the front to cover the seam, then trim the fringe ends so they sit evenly.
A collar style is perfect for small space mini pumpkin decorating ideas because it adds texture where your eyes already look. The fringe hides the seam so it looks intentional, and the collar doesn’t make the pumpkin taller like a hat would. I keep the collar narrow, around 1 to 1.5 inches tall, so it stays proportional. This works especially well on mini pumpkins in baskets because the collar shows even when the pumpkin is partially tucked in. It also looks good with plaid throws and woven chargers.
AvoidAvoid stiff burlap — it stands away from the pumpkin and looks like a costume collar.
Pro tipCut fringe before gluing — doing it after is slower and you get uneven lengths.
14. Terracotta Clay Look Paint (No Pot Required)
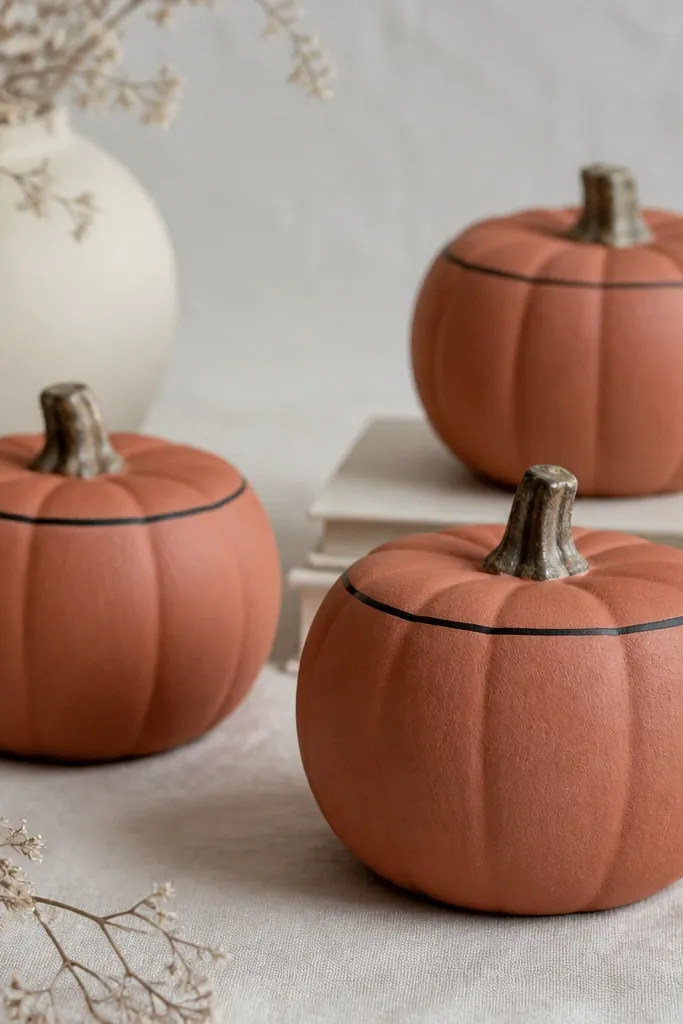
Mix terracotta acrylic with a pinch of white acrylic to soften it, then paint the pumpkin in thin coats. For texture, dab the final coat with a sponge instead of brushing smooth. After it dries, use black paint and a thin brush to draw a single straight line about 1/2 inch below the stem. Add a small dot of terracotta on the stem base to blend the rim line.
This gives you the look of a tiny clay pot without buying anything extra. The terracotta paint makes the pumpkins look like they belong with planters and succulents. I add a thin black line near the top to mimic a pot rim, then leave the stem natural. It looks sharp on a small shelf because terracotta is warm and grounded. If your decor is more modern than farmhouse, this still works because the finish is matte and simple.
AvoidDon’t use glossy terracotta — it reads plastic on mini scale.
Pro tipIf you want extra clay realism, use matte clear spray only, not satin.
15. Coffee Stain Pumpkin with Tiny Cardamom Dots
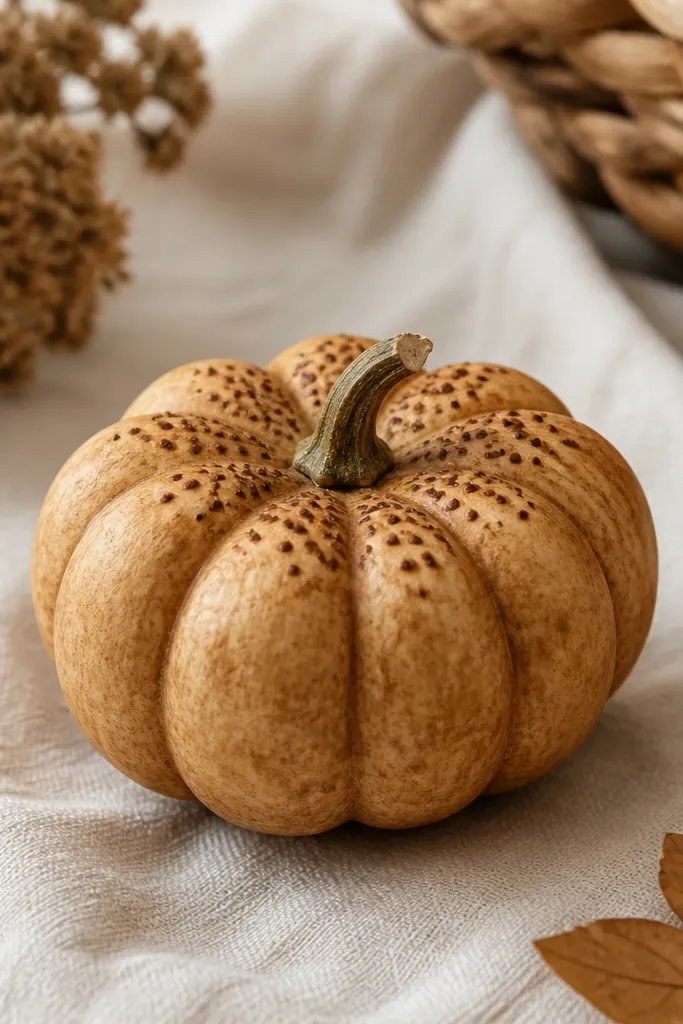
Brew strong coffee and let it cool. Brush or sponge a thin coffee wash over the pumpkin, then let it soak for 5 minutes and blot lightly with a paper towel. Repeat once for deeper color, then let it dry fully. Use a small paintbrush to add 6 to 10 darker brown dots near the stem area and seal with matte clear spray once dry.
This one smells like fall even before you light anything. I do a coffee stain wash to make the pumpkin look aged and warm, then add a few darker dots near the top like little spices. It’s not as loud as bright paint and it looks great with candle jars, kraft paper, and brown ceramic. I like it for desks and narrow entry tables where strong colors feel too intense. It also works well for people who want a “no paint” look, since the stain wash is forgiving.
AvoidAvoid soaking too wet — mini pumpkins can warp or get tacky if you flood the surface.
Pro tipAdd a tiny pinch of instant espresso powder to the coffee for a richer stain.
16. Tiny Knit Scarf Pumpkin (Ribbon-Only Style)
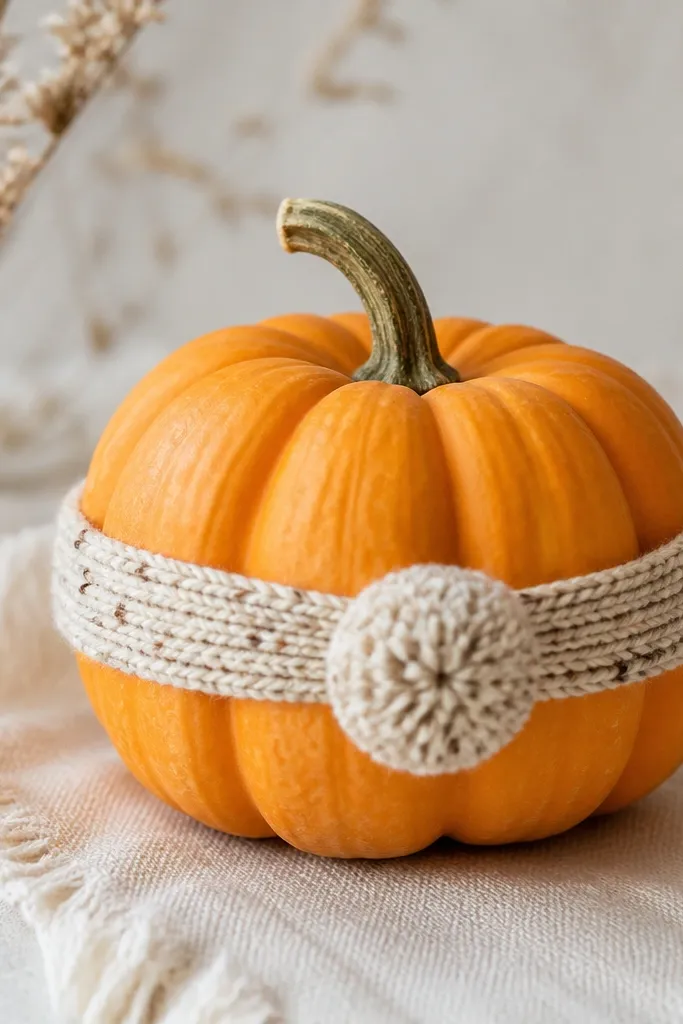
Cut a ribbon strip about 10 inches long so it wraps once around the pumpkin with overlap. Glue the overlap at the back and keep the ribbon tight so it sits flat. Tie a small knot or add a dab of glue at the center front. If your ribbon has frayed edges, snip them after gluing so the band looks neat. Finish by adding a mini pom-pom using a needle and thread or a tiny glue dot.
A scarf look makes mini pumpkins feel cozy without needing real knitting. I use a narrow knit-texture ribbon and wrap it like a scarf band, leaving the top open so the stem stays visible. Add one small pom-pom or a mini button at the front for a focal point. This style looks great on a small tray beside a mug because it matches the cozy texture you already have in fall. It also flatters neutral skin tones in photos since the palette is soft and warm.
AvoidDon’t use a wide scarf band — it covers too much and makes the mini pumpkin look bulky.
Pro tipChoose ribbon with visible texture — smooth satin makes the scarf illusion look fake.
17. Matte White Pumpkin with Black Jack-O-Lantern Teeth
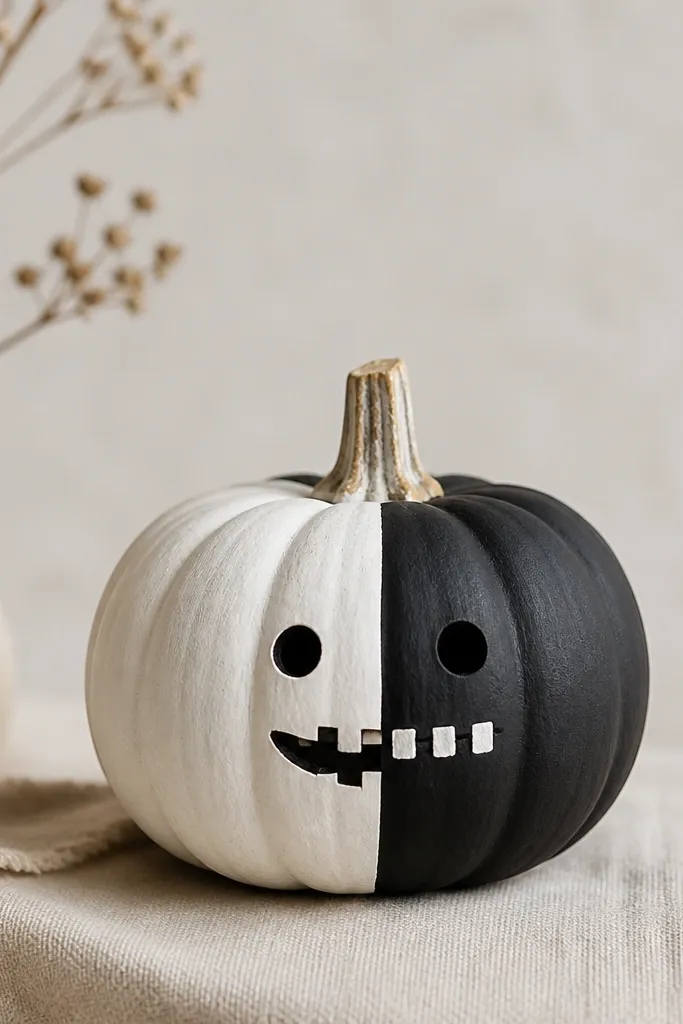
Paint the mini pumpkin matte white in two thin coats and let it cure for an hour. Use a black paint marker to sketch a mouth shape across the front, then fill it with black acrylic. Add tiny rectangular teeth along the top edge of the mouth — I do 7 teeth so it fits the scale. Let dry, then seal with matte clear spray. Keep the stem natural or lightly dry-brush it with gray for a worn look.
White pumpkins with black teeth look graphic and modern, not cutesy. I paint a half-mouth so you see teeth peeking out, which keeps it from feeling like a full costume. The matte white base makes the black shapes look crisp. This style looks great on a small mantle or stacked books because it has strong contrast. It also photographs well with overhead lighting since matte finishes reduce glare.
AvoidAvoid thick black paint blobs — they smear easily on curved surfaces.
Pro tipUse a ruler to space teeth — even tiny teeth look better when they match.
18. Copper Metallic Chevron Top Band
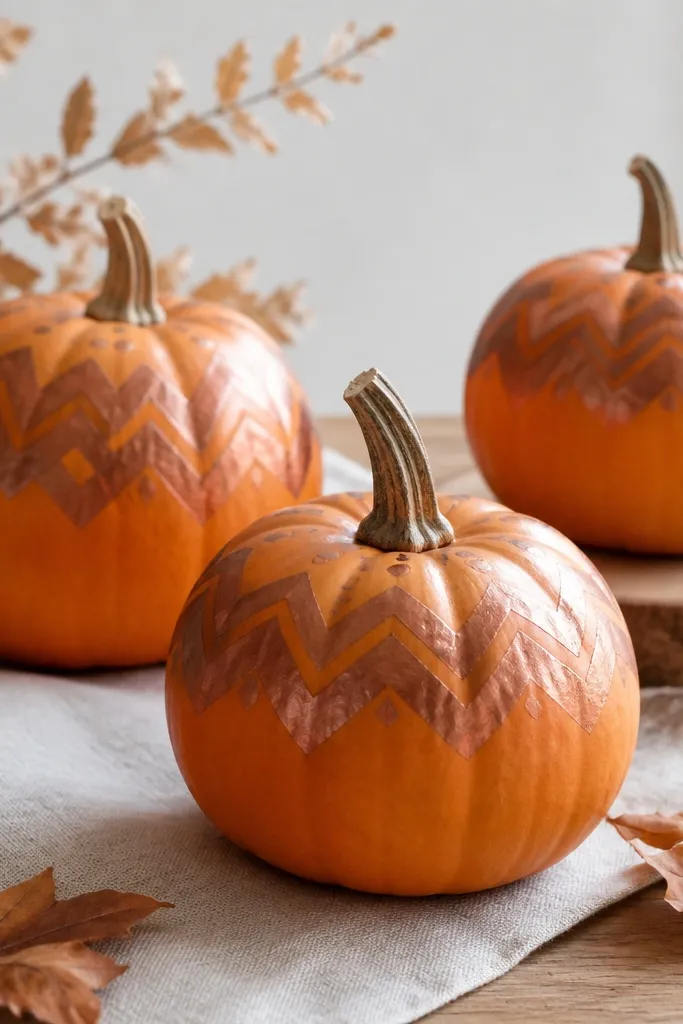
Chevron bands read instantly as “decor” because the pattern has direction. I keep the pumpkin mostly natural orange, then paint a chevron band in copper only on the top third. That keeps it light for small spaces while still looking intentional. It’s especially good if your decor has copper candle holders or warm brass frames. The copper adds shine without feeling like glitter craft.
Clean the pumpkin and mark the top third area lightly with a pencil. Tape off small sections to form a chevron pattern, then paint with copper metallic acrylic. Remove tape once the paint sets enough to hold edges. Add one small copper dot near the stem to balance the pattern. Seal with matte clear spray if you want the copper to stay from rubbing, but test first on a hidden spot.
Use thin painter’s tape and burnish the edge with a fingernail for crisp chevrons.
Don’t paint copper over wet tape — it bleeds under and ruins the pattern.
19. Pastel Lavender Face with Tiny Star Cheeks
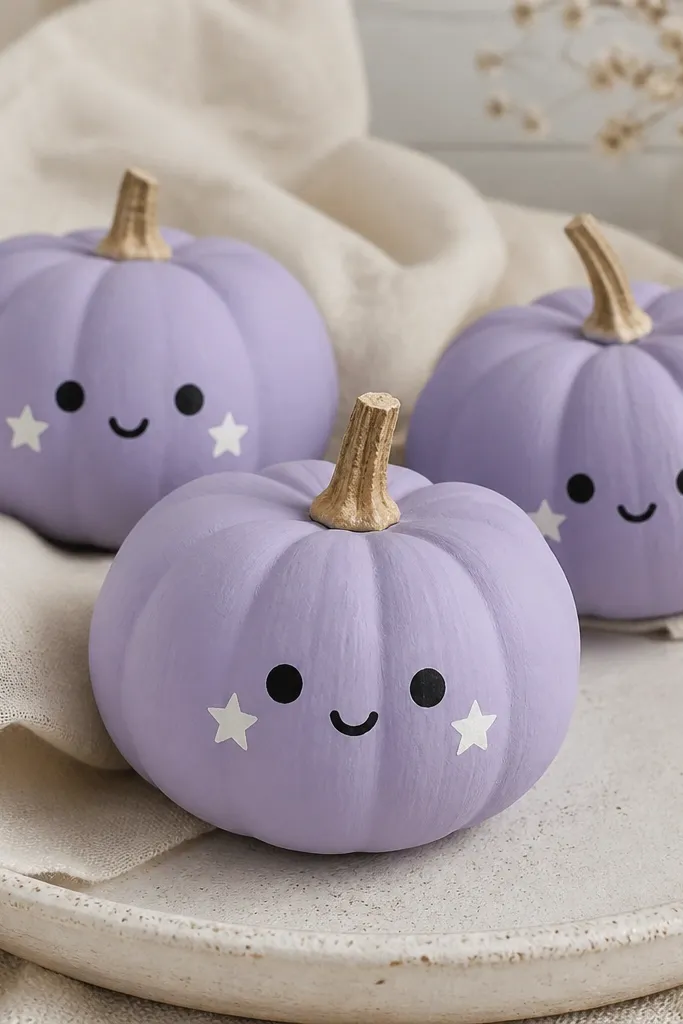
Paint the mini pumpkin lavender and let it dry fully. Draw the eyes as small ovals with white paint pen, then dot inside with black. Sketch a small curved mouth and fill lightly with white or leave it outlined. Add two tiny star cheeks by tracing with a small stencil and painting black. Seal with matte clear spray once the details dry.
Lavender pumpkins make fall feel playful without going full cartoon orange. I paint the mini pumpkin lavender, then use a white paint pen for eyes and mouth outlines, adding small black dots inside. For extra cuteness, I make tiny five-point star cheeks using a craft star punch or a stencil. This looks great on a small bathroom shelf or nightstand where you want something softer than traditional Halloween. It also pairs well with silver decor and light wood.
AvoidAvoid dark purple — it can overpower the mini scale and look grim.
Pro tipIf lavender looks streaky, do a second thin coat instead of thickening the first.
20. Mini Pumpkin with Leafy Vine Base Wrap
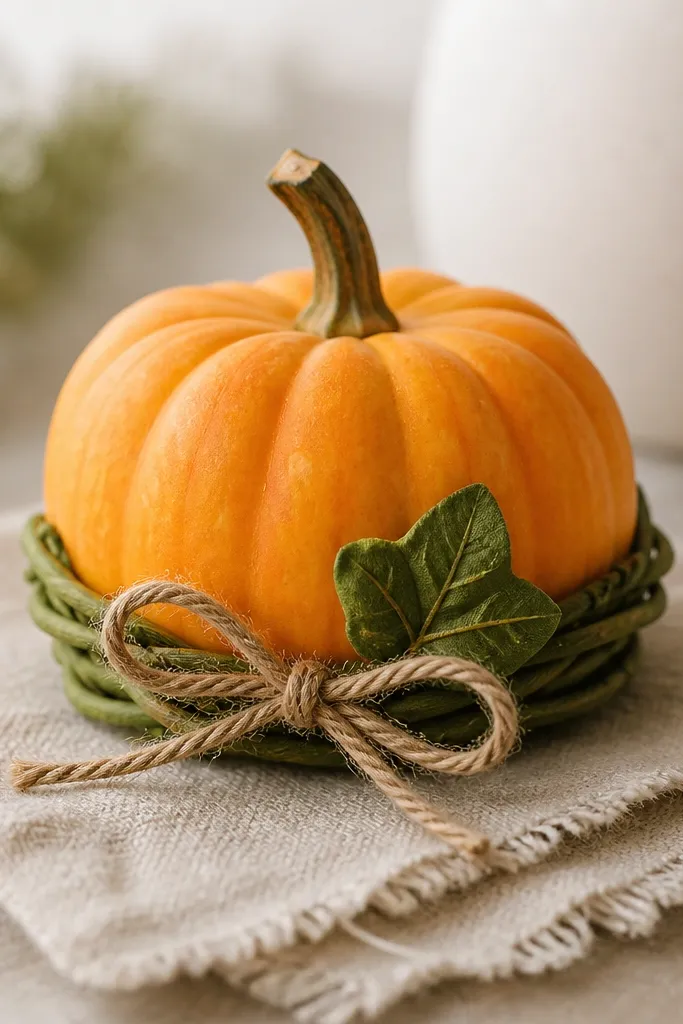
Wrap a faux vine around the bottom 1/3 of the mini pumpkin and adjust so it sits evenly. Glue the vine ends at the back with small dots of hot glue. Place one curled leaf on the front-left side and glue it in place. Tie a tiny twine bow at the seam to hide the glue and trim loose ends so nothing sticks out.
This style makes a mini pumpkin look like it grew there, which is perfect when you’re placing it on a tray with other greenery. You wrap a faux vine around the bottom edge so it frames the pumpkin without covering the whole body. Add one curled leaf for height and a small twine bow for fall texture. It looks best when the vine color matches your existing plant leaves — bright green with bright green, muted with muted. It also makes small spaces look more layered without clutter.
AvoidDon’t use thick garland — it looks heavy and hides the pumpkin shape.
Pro tipChoose vine with small leaves so it scales to mini pumpkin size.
21. Glazed Ceramic Look Pumpkin (Satin Seal Trick)
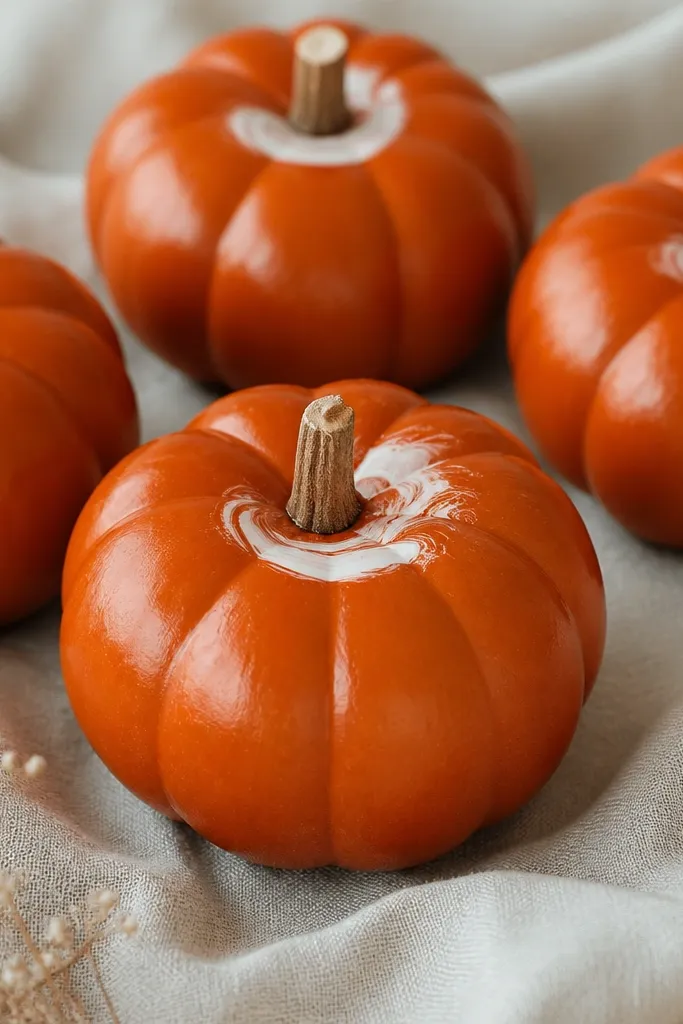
Paint the mini pumpkin deep orange with acrylic in thin coats until the surface looks even. Let it dry completely, then add the white swirl with a small brush — keep it about the size of a dime. Seal with satin clear spray, two light coats, letting each coat dry between. If you want extra glaze, lightly mist again after a full dry time and avoid touching during curing.
If you want a “ceramic” look, you need smooth paint and a satin clear coat. I paint the pumpkin deep orange, then add one small white swirl near the stem like a glaze highlight. The satin finish reflects light softly, which looks expensive on a tiny object. This style looks great on a glass tray because the satin sheen catches the light. It also works well with modern decor — black, white, and warm copper.
AvoidDon’t use matte spray here — matte kills the ceramic effect.
Pro tipWipe the pumpkin with a dry cloth before sealing — dust shows up on satin.
22. Monochrome Green Pumpkin with White Stripe
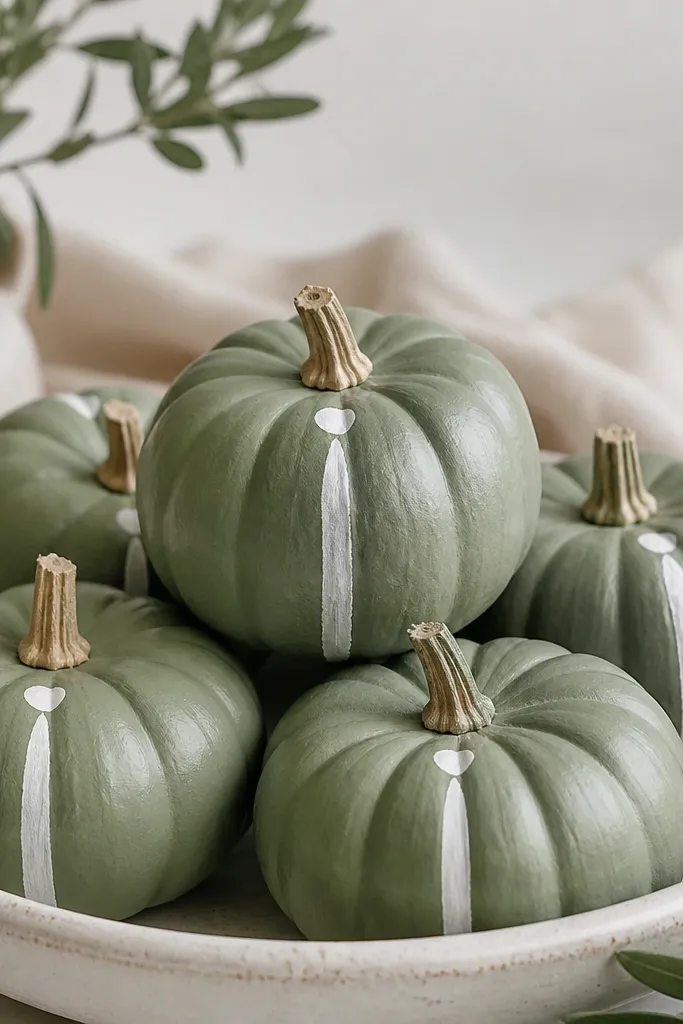
Paint the pumpkin muted green and let it dry. Use painter’s tape to mask a vertical stripe about 1/4 inch wide down the center. Paint the stripe with white acrylic and remove tape immediately after the paint sets. Add a small white dot near the stem with a paint pen. Seal with matte clear spray for durability.
Muted green pumpkins look fresh and calm, especially if your fall decor leans more botanical than Halloween. The single white stripe gives it a graphic, modern look without covering the entire pumpkin. I also add one tiny white dot near the stem to balance the design. This is perfect for small space mini pumpkin decorating ideas because it’s clean and doesn’t compete with other objects on a shelf. It flatters warm neutrals and looks good against dark wood.
AvoidAvoid multiple stripes — two or three makes the mini pumpkin look busy.
Pro tipIf the stripe edges look uneven, repaint just the edges with a small flat brush.
23. Mini Pumpkin Topiary Button Border
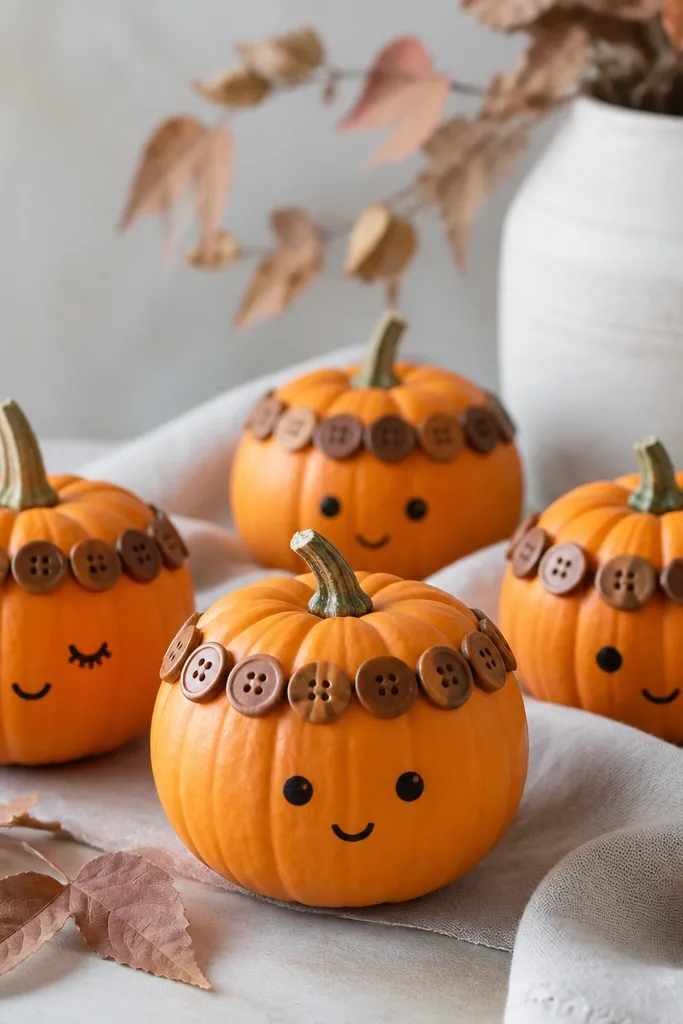
Lay out 8 to 10 buttons for size matching — you want them small enough to fit the curve. Glue buttons around the top third in a circle, spacing them evenly. Leave a clear center area for the face. Draw eyes and a small mouth in black marker, then add blush dots with a small brush if you want. Seal with matte spray lightly so the marker stays put.
Buttons add a handmade border that looks good even when the pumpkin is partially hidden in a grouping. I glue small brown buttons in a ring around the top third, then draw a simple face in the center with a marker. The border creates structure, so the face doesn’t need lots of paint. This is a great option if you like sewing supplies and want to reuse them. It also looks cute in kids' craft displays because it’s tactile and sturdy.
AvoidSkip oversized buttons — they look like accessories from a craft bin, not decor.
Pro tipUse a mix of matte and slightly shiny buttons for depth without extra work.
24. Rusty Nailhead Stud Pumpkin
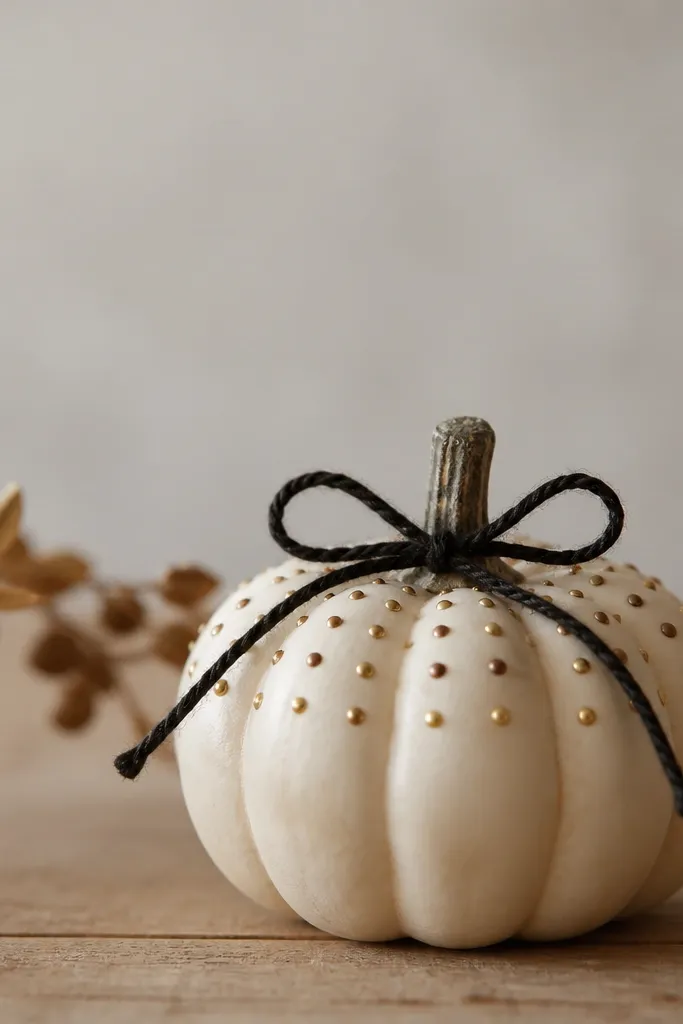
Pick nailhead studs small enough to fit around a mini pumpkin — I use about 6 to 10 per pumpkin for a top cluster. Glue the studs in a tight grid near the top third, leaving the rest plain. Tie a black twine bow around the stem area and glue the center knot. If the pumpkin skin shows through around studs, touch up with a matching acrylic wash so the stud holes don’t look messy. Let glue cure fully before moving.
This one has a hardware vibe, and it looks surprisingly good in small spaces. I place tiny nailhead studs in a small grid pattern near the top third so it feels intentional, not like you covered it in random hardware. The studs catch light like jewelry, and the twine bow keeps it fall-themed. This style looks best on mini pumpkins that will sit on a dark surface or near metal decor. It also flatters cool-toned palettes like gray, black, and silver.
AvoidDon’t put studs all over — the mini pumpkin turns into a heavy-looking prop.
Pro tipPress each stud for 5 seconds so it seats flat on the curved skin.
25. Mini Pumpkin Leaf Vein Stencil
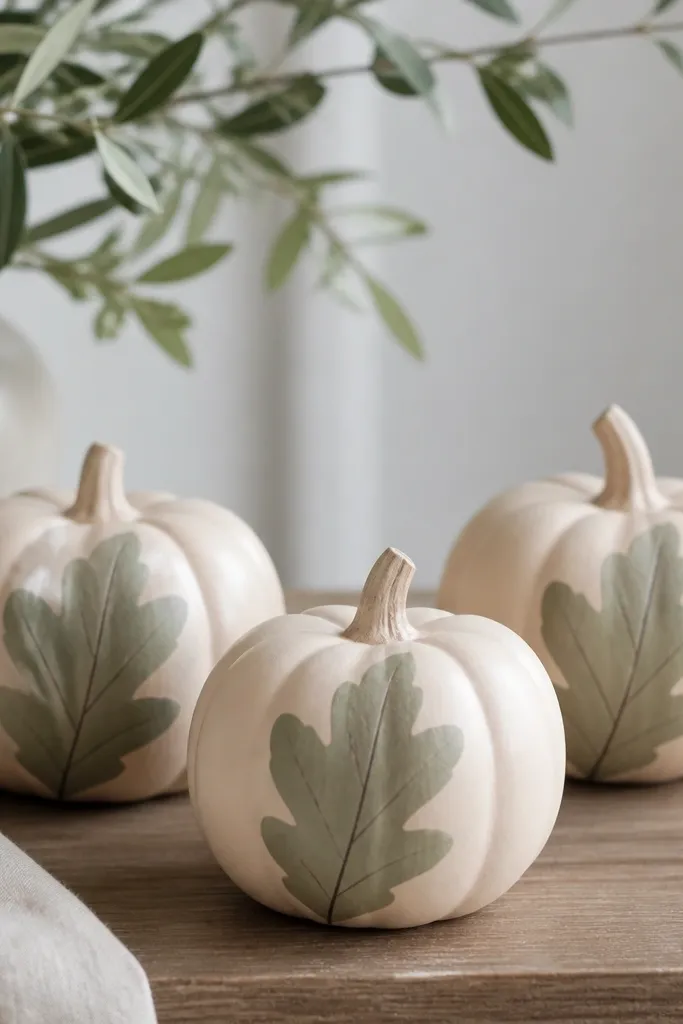
Paint the mini pumpkin beige and let it dry. Hold a leaf stencil centered on the front and secure it with a tiny piece of painter’s tape so it doesn’t slip. Dab muted green paint with a foam brush over the stencil, then remove the stencil carefully. Use a fine brush to draw one or two vein lines in darker green, then seal with matte spray.
Stencil work looks clean on mini pumpkins if you keep it to one shape. I paint the pumpkin beige or cream, then stencil one leaf across the front using muted green. Add a darker green vein line so it looks like a leaf print, not a blob. This style works well for minimal shelves because there’s one clear graphic element. It also looks nice with botanical decor and light-colored textiles.
AvoidDon’t overwork the stencil area — too many passes make fuzzy edges.
Pro tipUse foam dabbers instead of a brush — it prevents stencil bleeding.
26. Mini Pumpkin Glitter Ring at the Base
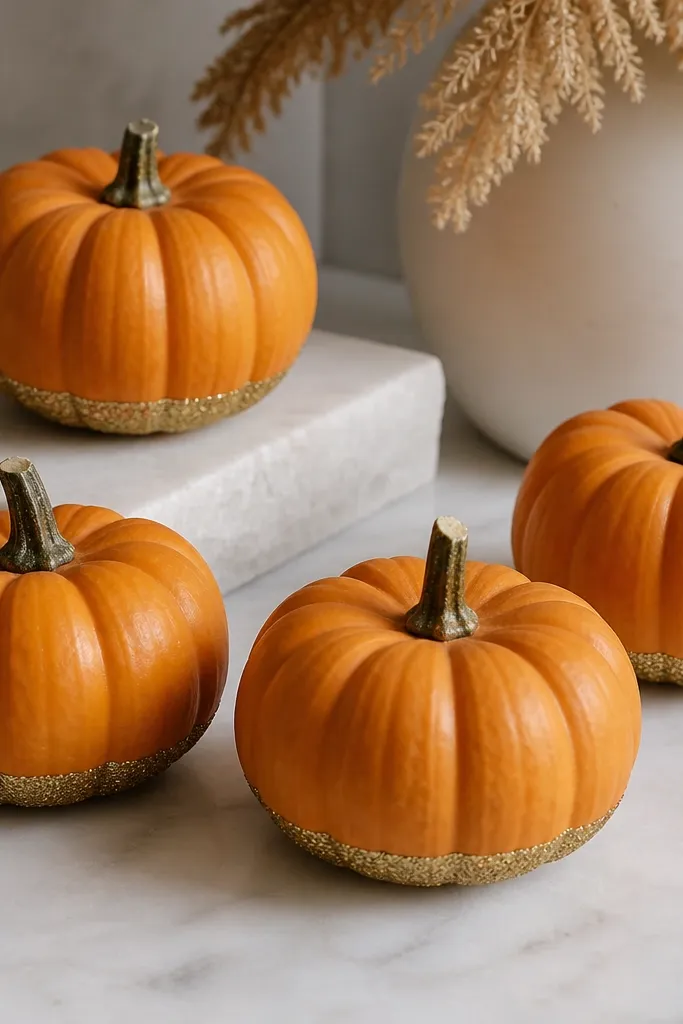
A glitter ring is the easiest way to make mini pumpkins feel festive without turning them into a full glitter mess. I paint a thin line of glue around the base and sprinkle glitter only there, so the top stays clean and readable. It looks like a decorative “foot” when the pumpkins sit on a tray. This is ideal for small spaces because it adds sparkle at the lowest point without cluttering the front. It also photographs well because the glitter catches light from below.
Leave the pumpkin natural or paint with a thin matte orange base if needed. Brush clear craft glue in a horizontal band around the bottom edge, about 1/4 inch tall. Sprinkle fine gold or orange glitter over the band and tap off excess. Let dry fully, then mist with matte clear spray to lock it in. Keep the stem area free of glitter so it stays neat.
Gold glitter looks more “fall” on orange pumpkins than silver — it warms the whole piece.
Avoid glitter bands too high — if the ring climbs, it looks like accidental mess.
27. Chalkboard Paint Mini Pumpkin with White Script
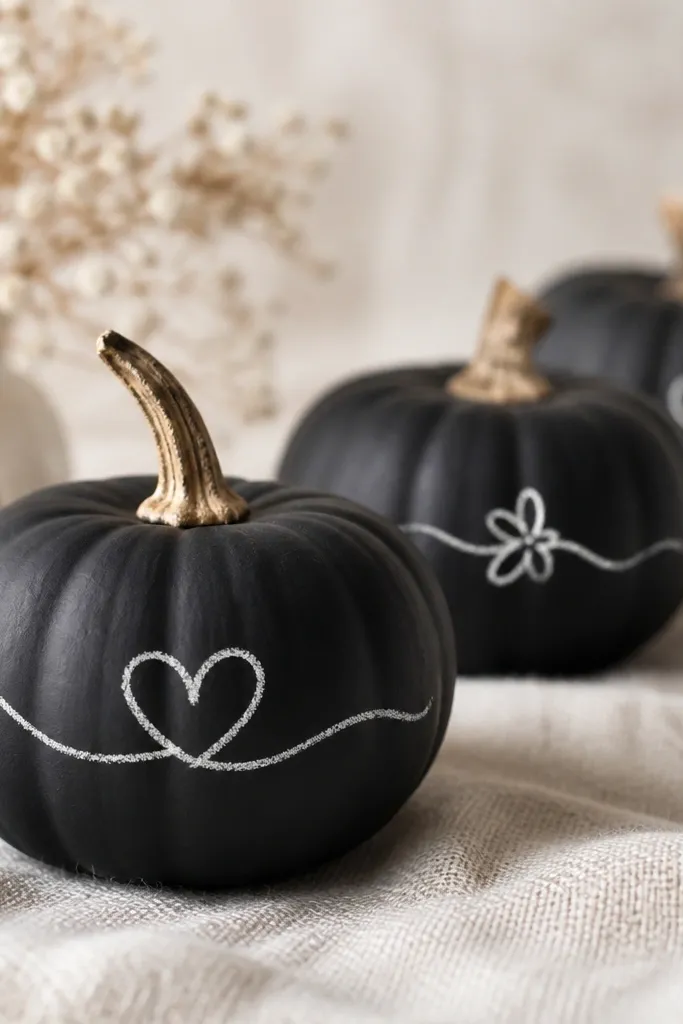
Paint the mini pumpkin with matte chalkboard paint in two thin coats. Let it cure the full recommended time, then use a white paint pen or chalk to write a short script on the front. If you use chalk, seal lightly with a matte clear spray after writing so it doesn’t smear. Add a small white dot near the bottom like a punctuation mark. Keep the stem natural or paint it black for a uniform look.
Chalkboard paint is a fun way to change your mini pumpkin look week to week. The matte black surface makes white script pop, and it hides uneven pumpkin skin. I keep the text short — a single word or a tiny phrase — because the surface is small. This works best for entry tables where you want something cute but flexible. It also looks good with farmhouse and modern decor because the chalkboard finish is neutral.
AvoidDon’t skip curing time — the first touch smears chalkboard paint.
Pro tipWrite on the pumpkin while it’s held steady on a folded towel so your lines don’t wobble.
28. Mini Pumpkin with Leather-Look Band and Tiny Buckle
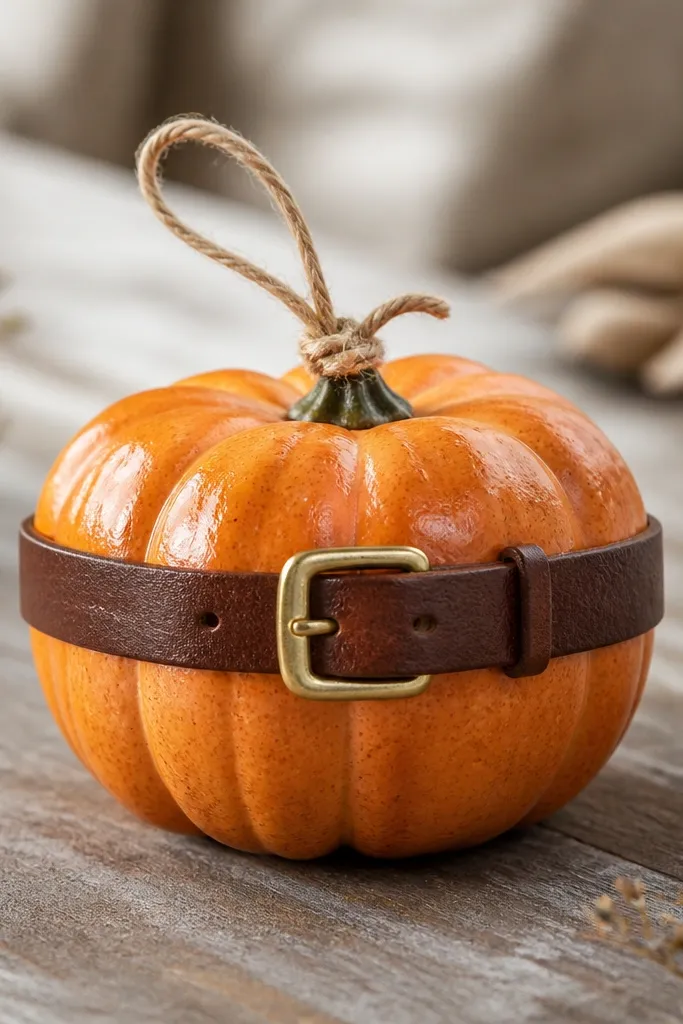
Cut a leather-look strip about 1 inch tall and long enough to wrap around the pumpkin once. Glue the ends at the back seam with a thin hot glue line. Place a small gold buckle on the front seam and glue it down securely. Tie a small twine loop at the stem and tuck the ends under the top so it doesn’t look stringy. Seal painted pumpkins with matte spray if you used paint.
Leather-look bands make mini pumpkins feel like they belong on a modern shelf. The brown band gives structure, and a tiny buckle creates a focal point without adding height. I keep the rest of the pumpkin either natural orange or painted deep caramel so the band stands out. This looks great with black frames, leather bags, and dark wood. It also flatters warm undertones because the brown reads rich and calm.
AvoidSkip wide belts — they cover too much pumpkin and make it look like a costume.
Pro tipUse a strip with a slight matte finish; shiny faux leather looks plastic on mini scale.
29. Mini Pumpkin with Orange Rind Textured Paint (Carving Illusion)
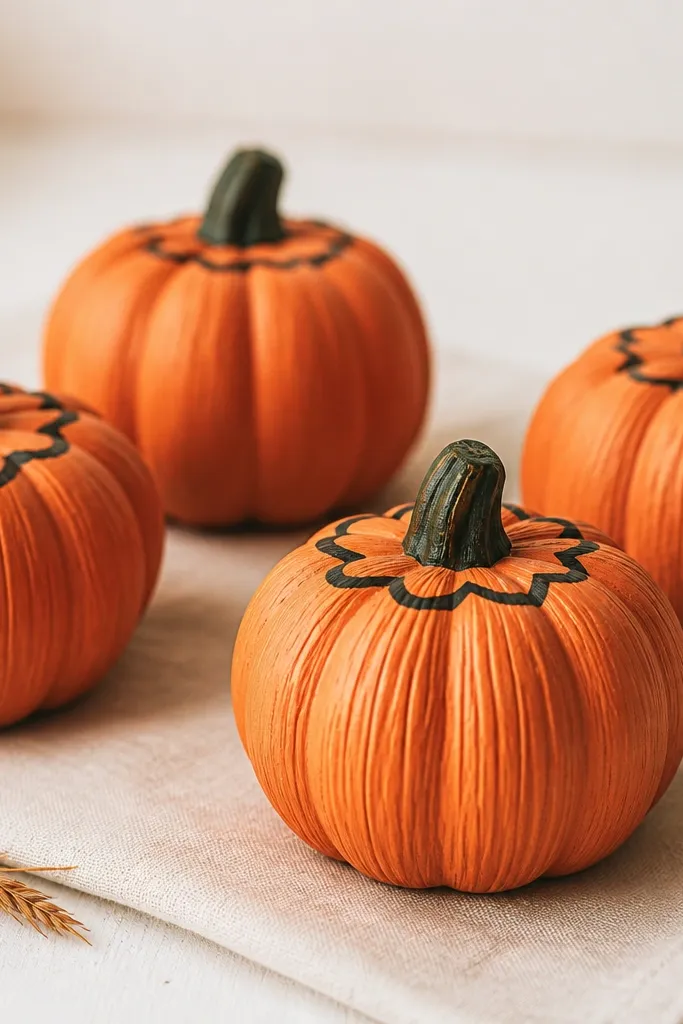
You can get a carving illusion without cutting anything, and it looks great in small displays. I use textured paint or a thickened acrylic mix to draw shallow grooves like pumpkin rind lines. Then I add a thin black outline around the top to frame the stem area. The texture catches light and makes the pumpkin look more dimensional than a flat paint job. This style looks good on shelves where the pumpkins get side light from a window.
Mix orange acrylic with a texture medium or thicken it with a little glue until it holds a ridged line. Use a small brush to paint 8 to 10 shallow vertical grooves from top to bottom. Let it dry fully so it stays raised. Add a thin black outline around the top edge with a fine brush, then seal with matte clear spray to keep the texture from rubbing off. Keep the face area blank for a clean look.
Draw grooves with light pressure — deep ridges crack on mini pumpkins.
Don’t use heavy texture everywhere — keep it to rind lines for a realistic effect.
30. Mini Pumpkin Snowy Frost with Faux Sugar Crystals
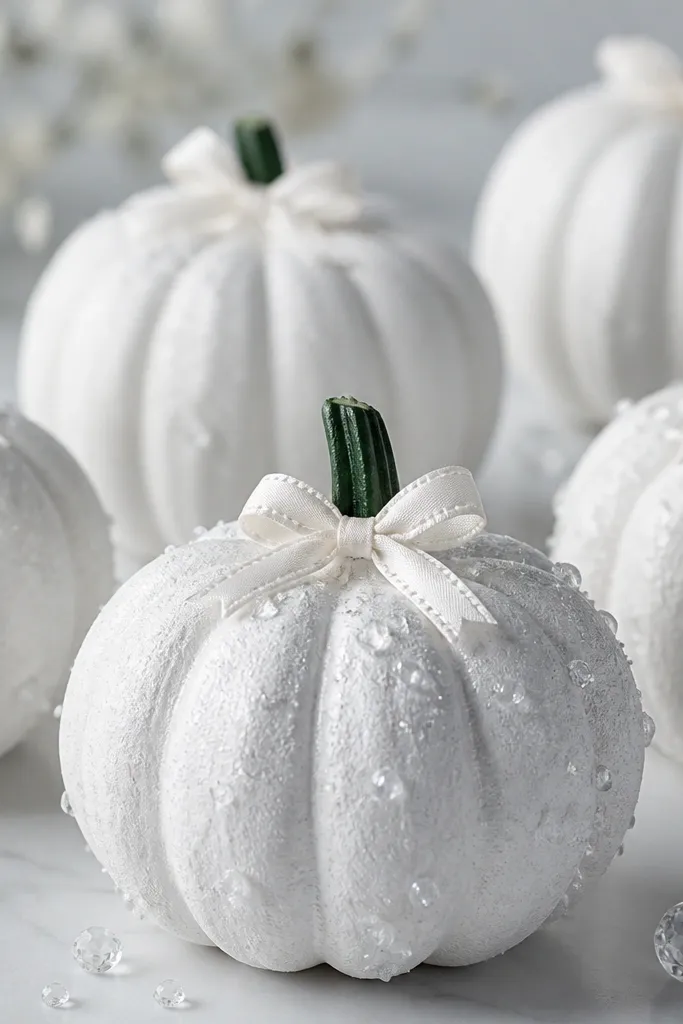
Paint the mini pumpkin with white frost paint or water-based craft white in thin coats. While the paint is still slightly tacky, sprinkle faux sugar crystals over the surface and tap off the excess. Let dry completely, then paint the stem dark green or keep it natural and touch it up with a green wash. Tie a tiny bow in white or silver ribbon to the top and glue it lightly. Seal with matte spray only if the crystals are shedding — otherwise skip sealing to keep sparkle.
This gives you a winter-fall crossover look that still feels seasonal. I paint a white frost layer over the pumpkin, then sprinkle faux sugar crystals so it looks dusted with snow. The stem stays dark green so the top doesn’t vanish in the white. It looks stunning on a small entry shelf with winter decor nearby — white candles, glass vases, and silver trays. In photos, the crystals sparkle and make the mini pumpkins feel special.
AvoidAvoid over-spraying — matte spray can dull the crystals.
Pro tipUse clear or white crystals, not chunky colored ones, so it reads like frost.