1. Washer-Safe Ghost Face Basket with Felt Fringe
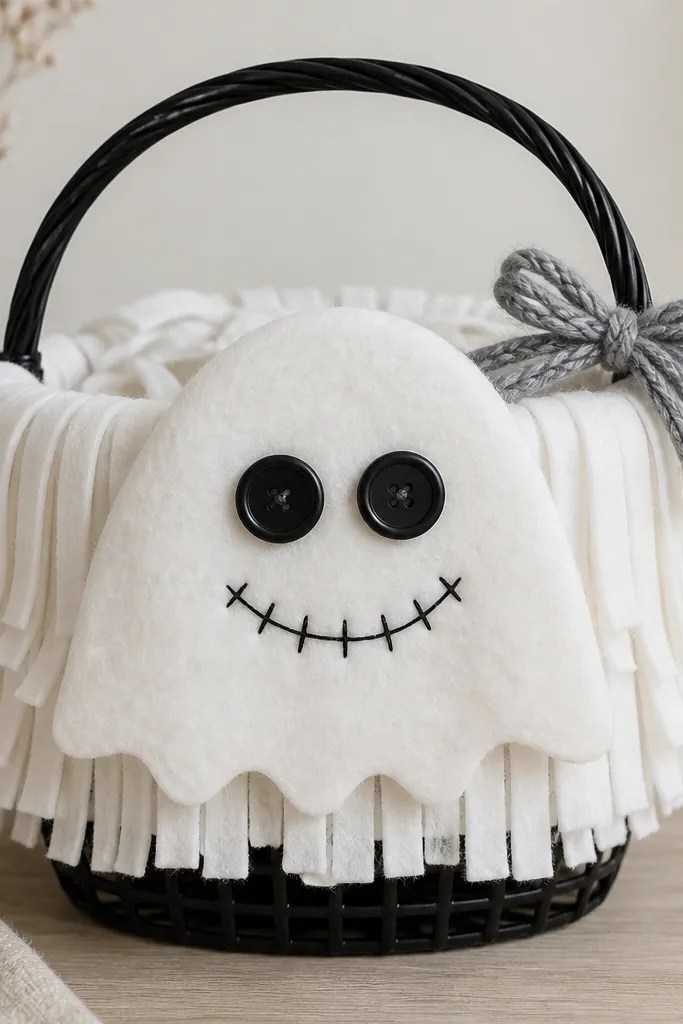
This one works because felt takes shape without looking wrinkled, and the fringe hides gaps where you cut fabric. I use a white felt ghost face with matte black buttons so the face stays readable from a few feet away. The basket is black (or very dark brown) so the white reads cleanly. If you’re putting this on a porch with mixed lighting, the matte textures keep it from looking shiny or cheap. It’s flattering for pretty much everyone in photos because the high-contrast ghost face gives a clear focal point near the center.
Start by lining the basket with a single sheet of white felt cut to fit the inside bottom and up the sides by about 3-4 inches. Cut 1-inch-wide strips of white felt for fringe and glue them along the upper rim so they hang down evenly. Make the ghost face by cutting a rounded top with a slightly tapered bottom, then glue on two matte black buttons and a stitched mouth using black embroidery thread. Finally, add a small gray yarn bow to the handle area and press the fringe so it frames the ghost without crowding it.
If you want it to last longer, use fabric glue for the felt and hot glue only for the buttons so you can detach parts later if needed.
Don’t use thin craft foam for the ghost face — it curls after a few days of humidity.
2. Black Lace Knit Wrap Basket with Cotton Witch Hat
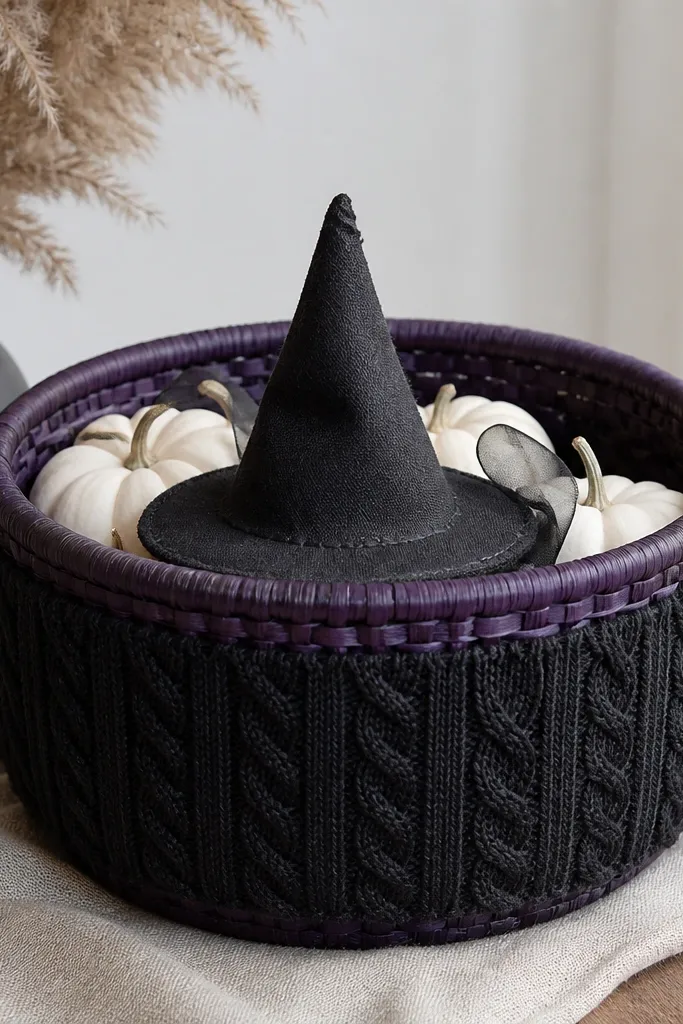
This basket looks fancy without fragile materials because the knit fabric is forgiving and doesn’t snag like lace. I wrap the basket like you’re dressing a bottle — smooth, then slightly bunch at the corners. The cotton witch hat is a stable shape that holds up to handling, and the white mini pumpkins add a clean contrast that keeps the dark palette from feeling heavy. If you have lighter decor around it (white porch columns, light wood steps), the purple basket and black knit read intentional instead of gloomy. It also photographs well because the knit texture shows depth.
Start with a deep purple basket and measure the circumference of the outside. Cut a black knit rectangle large enough to wrap around with a 1-inch overlap, then hot glue the overlap seam. Place the witch hat in the center and build the base filler around it with mini faux pumpkins so the hat sits about 2-3 inches above the rim. Add a few strands of sheer black ribbon at different lengths by tucking them under the filler, not by gluing the whole strand down. Finish by trimming the ribbon ends so they look deliberate, not messy.
Press the knit wrap seam with a warm glue gun tip for 3 seconds so it bonds flat and doesn’t lift.
Skip real lace unless you’re keeping this indoors — it frays and looks ragged fast.
3. Matte Silver Bat Basket with Washable Ribbon Bow
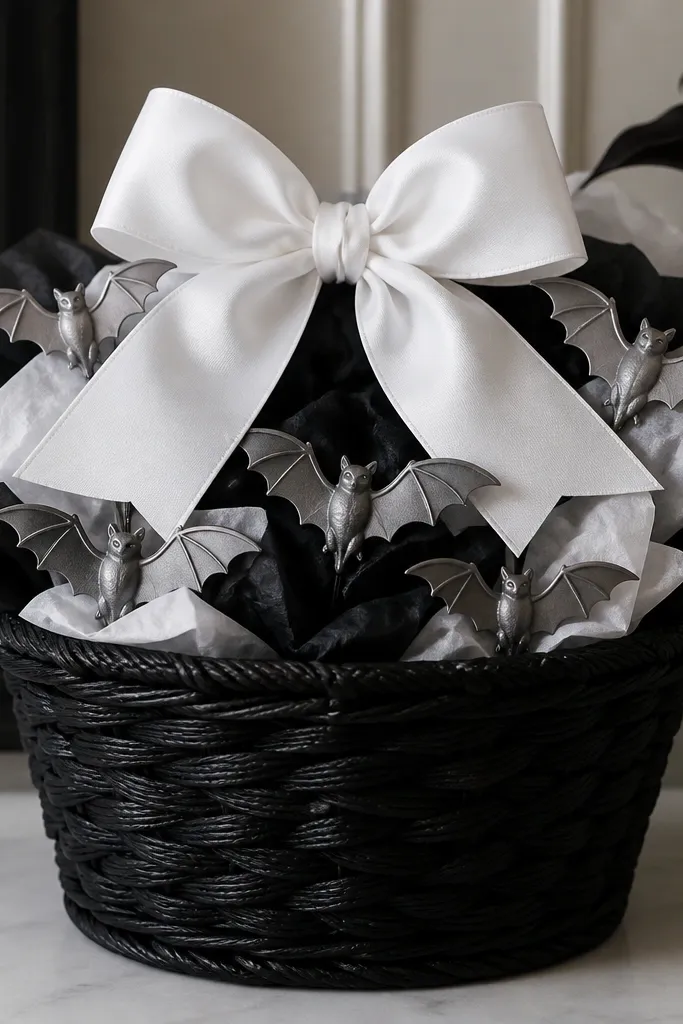
Start by crumpling black-and-white tissue paper into 2-inch balls and packing them around the basket base until you get a fluffy mound. Insert matte silver bat ornaments into the top layer by poking the stems or attaching with hot glue dots at the base of each bat. Add a fabric ribbon strip across the top rim in a cross pattern, then tie your bow directly over the center point. Trim the ribbon tails to about 10-12 inches so they drape without touching the tissue. Finally, adjust bats so they fan outward — I aim for a triangle shape with one bat slightly higher.
This is my go-to when I want spooky but clean. Matte silver bats don’t look glittery or messy, and they reflect light just enough to look crisp on a porch. The tissue paper adds volume quickly, but you keep it contained by tucking it under a ribbon layer. A washable ribbon bow keeps the whole thing from going limp — I use fabric ribbon or cotton ribbon with a stiffener, not cheap shiny polyester. This one flatters darker doorways because the silver pops against black.
AvoidDon’t use wet glue directly on tissue paper — it turns soggy and loses shape.
Pro tipSpray a light coat of clear matte sealant on the bats if they feel powdery from storage.
4. DIY "Potion" Boo Basket with Glass-Look Bottles and Labels
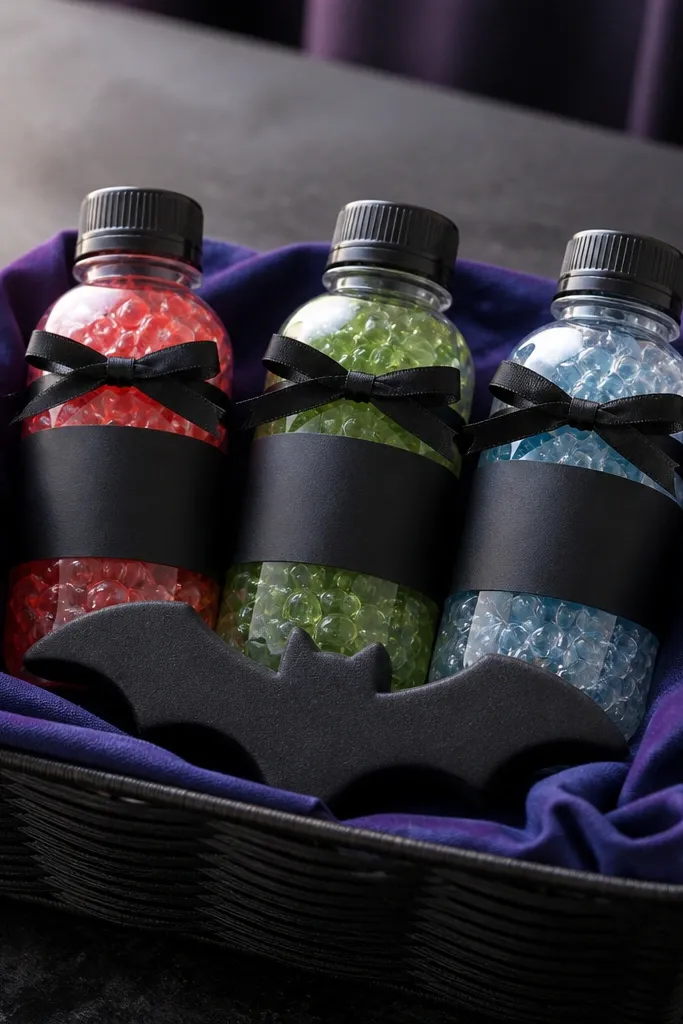
Start by lining the basket with dark purple felt or fabric so the bottles pop. Place three bottles in a row, then wedge extra felt strips behind them so they don’t tip — you want them stable even if someone bumps the basket. Make labels on white paper with black marker or printed text, then seal the label with a thin layer of clear packing tape to make it wipeable. Tie small black ribbon loops around each neck and position a small foam bat or paper bat at the front edge. Add filler like shredded black paper or crinkle ribbon only around the base so the bottles stay the focal point.
This basket sells the theme because it looks like a scene, not just decorations. I use plastic bottles with a glass-like finish (the sturdy kind that don’t crack), and I fill them with water gel or clear craft beads for that slow, cloudy look. The labels make it feel curated, and you can wipe fingerprints off the bottles with a damp cloth. The color combo — cloudy blue, green, and a little red — gives a Halloween punch without turning everything muddy. It looks great against light-colored entryways and also reads well for photos from above.
AvoidSkip real glass bottles — they’re not low maintenance when you’re handing the basket out.
Pro tipUse a drop of hot glue under each bottle’s base point to lock the position before you add any ribbon.
5. Creepy-Clean Monochrome Boo Basket with Faux Fur Liner
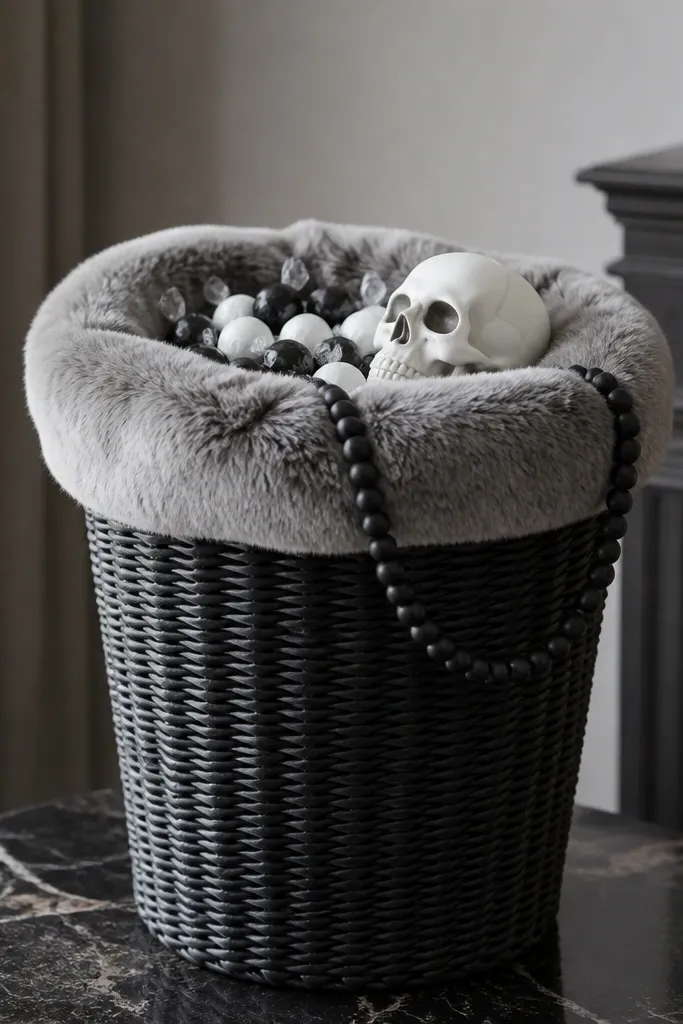
Start by cutting faux fur to line the inside bottom and lift it over the rim by 2-3 inches. Pack the basket with black-and-white candy so the fur has something to support — aim for a level top surface. Place the skull ornament slightly off-center, then tuck the matte black bead strand around the base of the skull so it doesn’t wander. Add one or two extra small items (like a mini black candle holder or a tiny web ornament) but keep the count low so the fur stays the star. Finish by brushing the fur gently with your hand so it lays in one direction.
Faux fur is the secret weapon when you want “spooky cozy” without fragile props. It hides the mess of candy wrappers and also makes the basket look expensive even when the items are simple. The monochrome palette keeps it from turning into a crowded Halloween pile. I add a small white skull ornament because it gives a clean focal point — the fur frames it and makes the skull pop. This style looks best when your door decor is neutral (wood, gray, cream) because it brings texture without clashing.
AvoidDon’t pile too many small ornaments — the fur gets buried and looks messy.
Pro tipIf fur sheds, dab a lint roller over it once before you glue anything on.
6. No-Glue Pumpkin Patch Boo Basket with Felt Gourd Cutouts
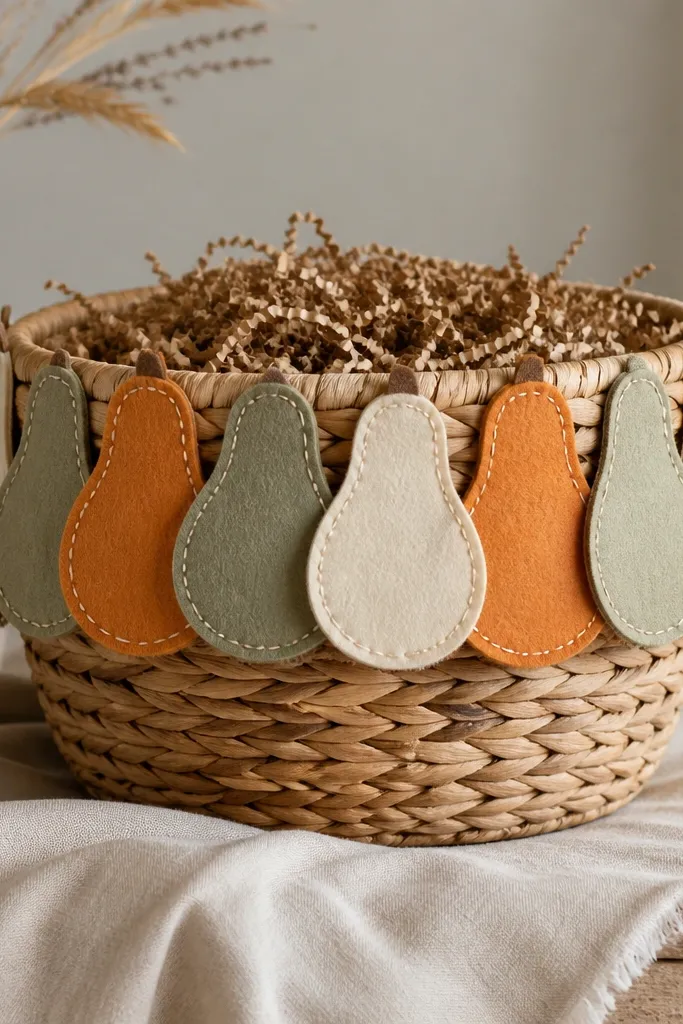
Start by filling the basket bottom with shredded brown paper until it’s about 2 inches deep. Cut felt gourd shapes and layer them along the rim like shingles, using small hot glue dots only at the top edge for each piece. Keep the largest gourd in the center and taper the sizes toward the sides so it looks arranged, not random. Add a few felt stems in brown and tuck them under the edge of the rim. Finally, place one small felt “pumpkin” near the front so there’s a clear face-forward element.
This basket is low maintenance because the decorations are felt and they sit on top — no fragile glue work needed. The layered gourd cutouts create a pumpkin patch vibe without the mess of real pumpkins. I use muted colors (burnt orange, sage green, cream) because they look warm under porch lights and don’t clash with black decor. The shredded brown paper gives a natural base that hides gaps and keeps the whole basket from looking empty. It’s also good for people who want to do this fast — cut, stack, done.
AvoidDon’t glue every edge — too much glue makes the rim look lumpy.
Pro tipUse a fabric marker to add tiny stitch lines — it makes felt look like craft store embroidery.
7. Sheer Organza Web Basket with Removable Center Spider
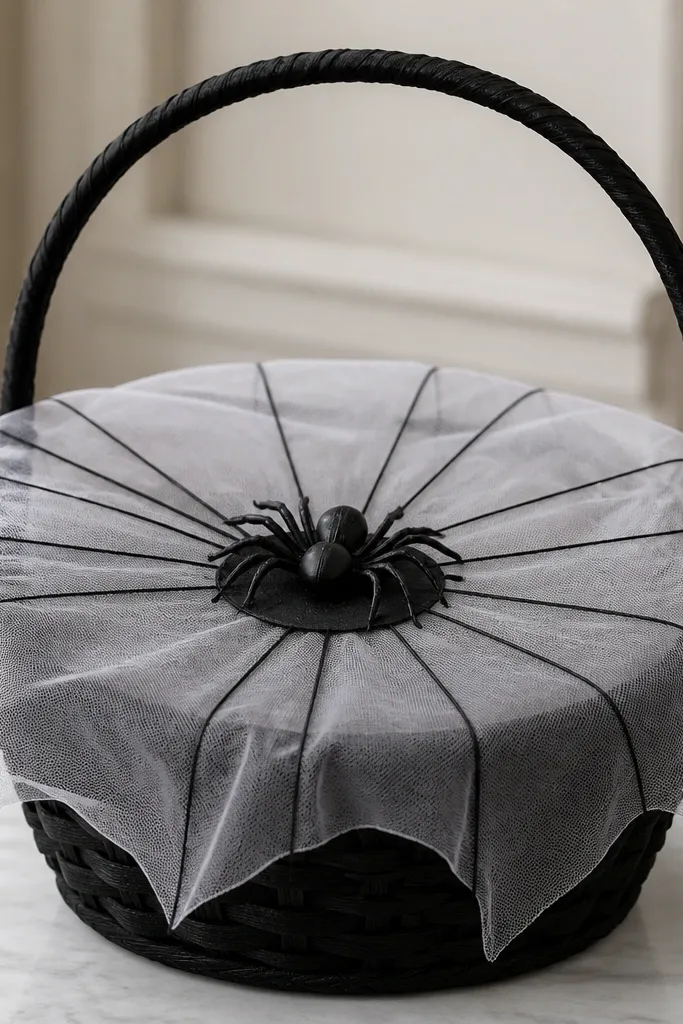
This one looks spooky from across the yard because the web effect spreads upward and outward. Sheer organza holds its shape better than thin tulle, and you can lift it off to shake off dust later. I keep the spider removable so you can store it without crushing the organza. The black string “web” lines add structure underneath so it doesn’t collapse into a random sheet. This style flatters anyone’s front step because it gives a clear shape and stays readable even in windy weather.
Start by placing a thin layer of crinkle paper or shredded fabric at the basket bottom so the top stays stable. Stretch organza across the top rim and secure it with hot glue only at 3-4 points around the edges. Create a simple web by running thin black string from the center to the rim — tie the string at the center point, then add 4-5 radiating lines. Add a looped spider base in the center by gluing the base but leaving the spider itself removable (use a small screw-eye and hook if you want it reusable). Adjust the organza so it forms a dome, then trim the organza ends to about 1 inch above the rim.
Use a lint roller on organza before display — sheer fabric shows dust fast.
Skip heavy glitter on the spider — it transfers to the organza and looks smudged.
8. Cozy Skeleton Crew Boo Basket with Sweater Cuff Handles
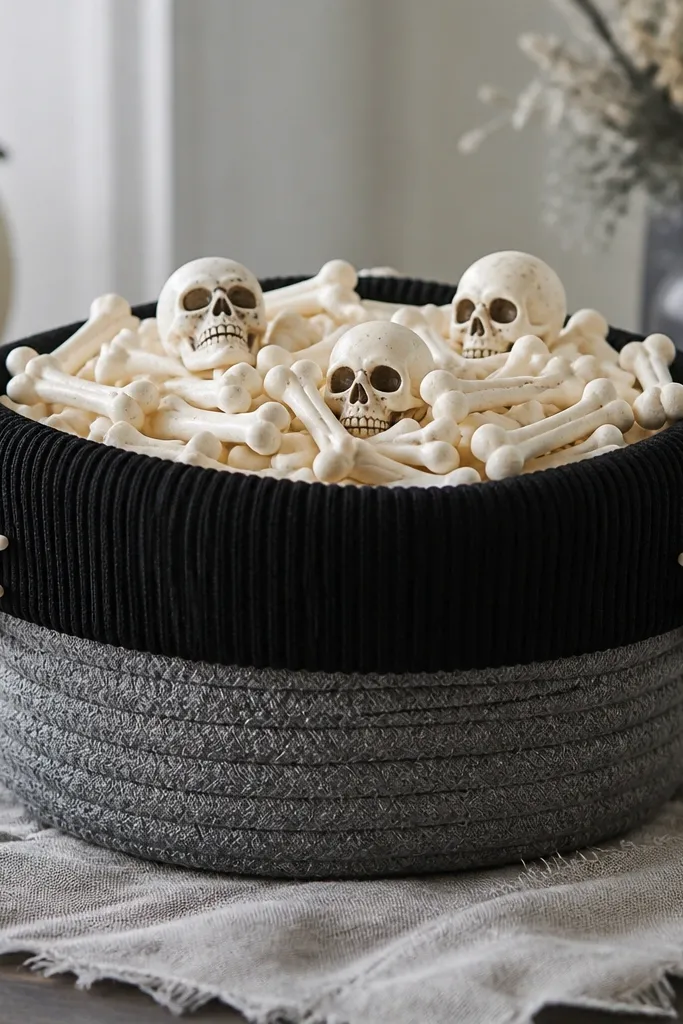
Start with a gray basket and wrap the top rim with a sweater cuff or knit strip that’s about 2.5 inches wide. Sew or hot glue the cuff seam so the knit edge sits outward like a collar. Fill the basket with a small handful of white bones or bone-shaped candies and tuck them so they form a shallow layer. Add skeleton hand cutouts by gluing them to the inside sides at a slight angle so they “reach” toward the center. Finally, place a few mini skull candies near the front and press the knit edge so it sits evenly all around.
When you want boo baskets that look cozy instead of costume-y, sweater fabric is your friend. The cuff gives you a thick, structured edge so the basket looks finished even if you’re only using a few items. I use skeleton hand cutouts because they frame the basket opening and make it feel interactive when someone leans in. The gray basket + black cuff keeps the theme consistent, and the white bones add contrast without adding clutter. This is also forgiving for different skin tones because the hands and bones are high-contrast neutrals.
AvoidDon’t use a thin scarf as the rim — it collapses and makes the basket look unfinished.
Pro tipIf the knit sheds lint, rinse it lightly and dry fully before using it.
9. Easiest Haunting Boo Basket with Pre-Made Felt Banners
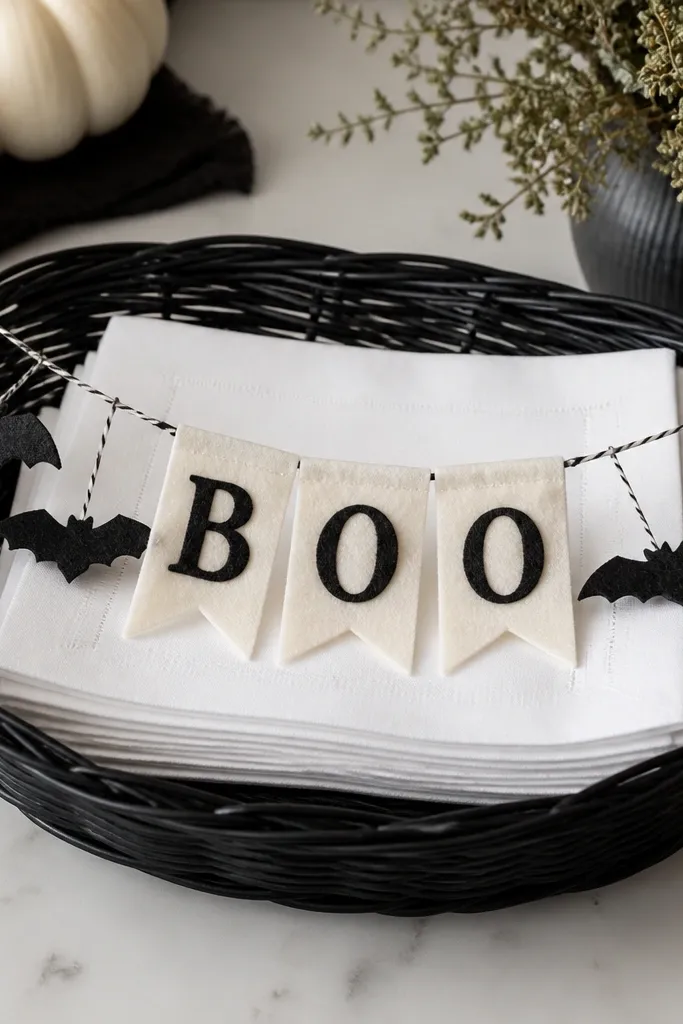
Start by folding white napkins into a stack and placing them inside the basket so they rise about 2 inches above the rim. Lay the felt banner across the top so the text sits centered at eye level. Secure the banner by tucking the ends under the napkin folds and adding two small glue dots at the back. Hang two felt bats by attaching them to short string loops that you glue to the inside edges near the banner. Add a small candy cluster in the front corner so the basket looks full even when the napkins are visible.
This is the fastest route to a “designed” basket without heavy crafting. Pre-made felt banners are cut cleanly and don’t require careful heat-pressing or delicate handling. I like white napkins as the liner because they form soft folds and give the banner a light background. The felt bats add a little movement when you carry the basket, and they look better than paper cutouts in person. This style works for people who want a clear message and don’t want to guess placement.
AvoidDon’t glue the banner flat across the front — felt needs a little lift to look dimensional.
Pro tipUse a washable fabric glue stick for the felt — it peels off cleanly if you change your mind.
10. Green-Gray Ghost Boo Basket with Reusable Fabric Mesh
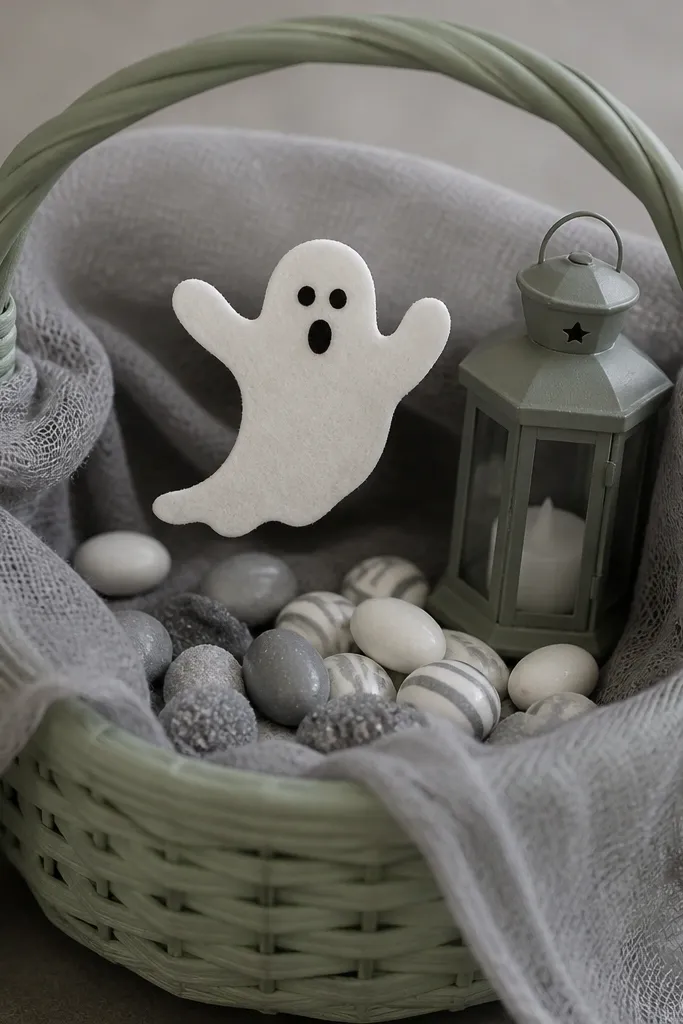
If you hate black-heavy Halloween decor, this colorway is the compromise that still reads spooky. The gray mesh layer looks like fog, and it hides what’s inside without making the basket feel stuffed. I use a muted green basket because it balances the gray — it doesn’t look like a random paint color. The felt ghost is placed slightly forward so it catches light and looks like it’s floating. In photos, the ghost and mesh give a soft, flattering look that doesn’t create harsh shadows.
Start by lining the basket bottom with shredded paper in light gray. Cut a piece of reusable fabric mesh and drape it over the rim so it falls in two uneven panels, one slightly longer. Glue the ghost cutout on a small foam backing (about 1/2 inch thick) and tuck it behind the mesh so it sits forward. Fill the basket with gray and white wrapped candies until the mesh barely covers the top layer. Add a small lantern decoration near the back so it peeks through the mesh like depth.
Pin the mesh with two small binder clips while you arrange, then glue after you like the fall of the panels.
Don’t use stiff plastic mesh — it looks shiny and cheap fast.
11. Mummy Wrap Boo Basket with Cotton Gauze Strips
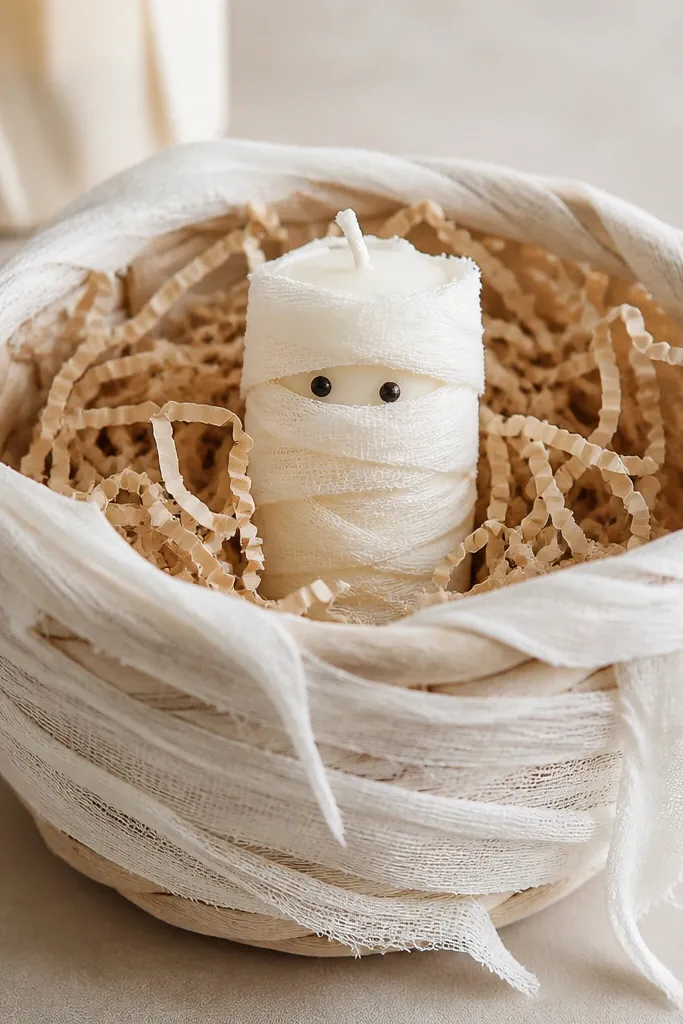
Start by wrapping the basket sides with cotton gauze strips overlapping like bandages. Secure the ends with small hot glue dots at the back corners so the front stays natural. Place a battery candle or short pillar candle in the center and wrap extra gauze around it, leaving a small opening at the top for the flame effect. Fill the basket base with beige shredded paper so the candle sits stable and doesn’t sink. Finish by trimming a few gauze ends to different lengths — about 2-4 inches below the rim.
Cotton gauze gives you the mummy look without the scratchiness or stiffness of some synthetic wraps. It also forgives mistakes: if a strip falls wrong, it still looks “mummified.” I use a beige basket so the gauze looks aged rather than stark white. The center candle is wrapped like a prop, then anchored so it doesn’t slide. This style is surprisingly flattering because it’s warm-toned and doesn’t create the harsh contrast that all-black decor can.
AvoidSkip thick plastic wrap — it looks shiny and ruins the mummy texture.
Pro tipUse fabric-friendly hot glue and wait 30 seconds before you touch the gauze so it doesn’t string.
12. Candy Corn Checker Boo Basket with Washable Felt Tiles
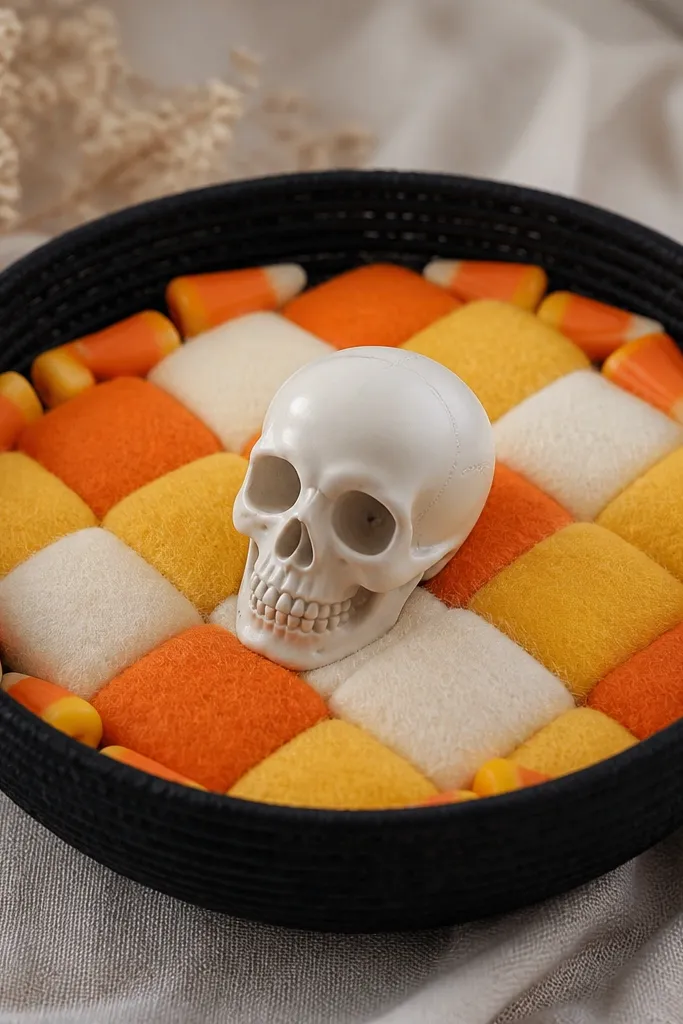
Start by cutting felt squares in three colors: orange, yellow, and cream. Cut them to about 2-inch squares and line the basket inside bottom in a checker pattern, then glue only the outer perimeter so it stays flexible. Add a thin layer of shredded paper on top of the felt to help stabilize candy pieces. Place the skull near the center front and tuck a few candy corn pieces around it like a frame. Finally, fold a couple felt squares into small “corn” shapes and place them at the back corners so the top looks full.
This is for people who want a Halloween theme that still looks orderly. Felt tiles give you crisp edges and a clean pattern that hides uneven candy piles. The candy corn colors — orange, mustard yellow, and cream — brighten the whole basket without adding clutter. I place a small skull on top because it anchors the pattern and makes the basket read as boo-themed from across a room. It also looks good on camera because the felt squares create a clear texture grid.
AvoidDon’t use fabric paint for the pattern — it cracks when you handle the basket.
Pro tipIf you’re worried about felt shedding, lightly steam it before assembly so the fibers lie flat.
13. Frosted Web Boo Basket with Clear Plastic Web and Wipeable Surfaces
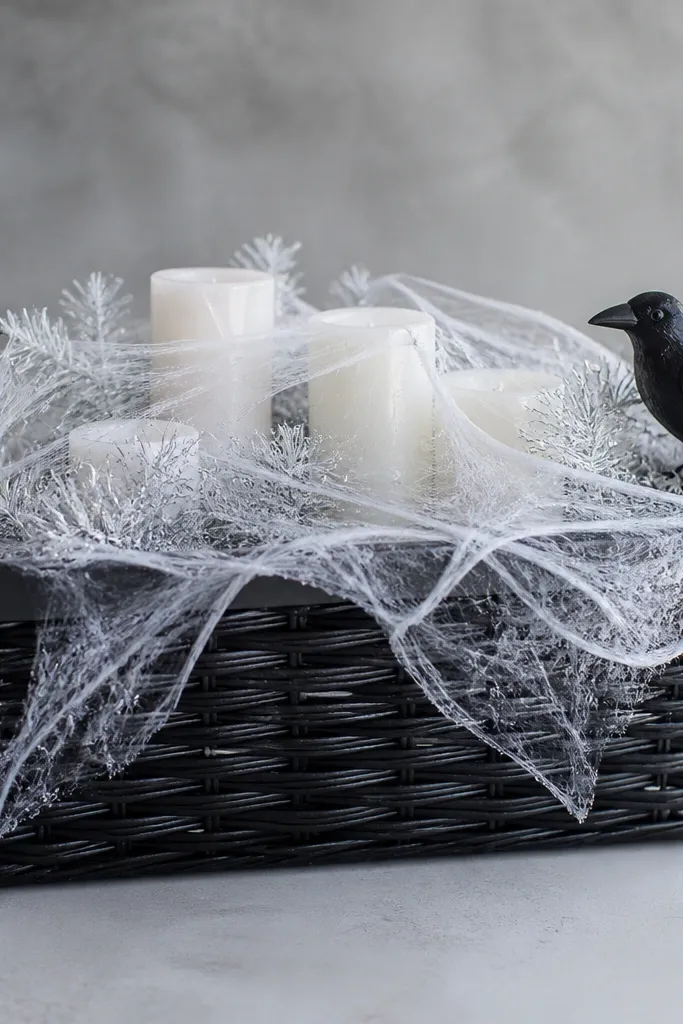
This one looks icy and spooky, and it stays low maintenance because the web is plastic and wipes clean. I use frosted-looking web material so it doesn’t look like cheap party decoration. White faux candles add height, and the raven gives the basket a sharp silhouette. The black basket keeps everything readable, while the white tinsel brings lightness without glitter fallout. It’s a strong pick if you want a “winter Halloween” vibe and you’re placing the basket where it might get misted.
Start by inserting two white faux candles into the basket so they stand about 3-4 inches above the rim. Add white tinsel around the base of the candles and tuck it under the rim so it doesn’t spill out. Drape the clear frosted plastic web over the top and secure it with small zip ties or hot glue points at the back rim only. Place the plastic raven on the front edge with a small glue dot at its feet. Adjust the web so it stretches outward in a gentle dome, then wipe the surface with a dry cloth before display.
Keep a microfiber cloth in your Halloween bin — one quick wipe makes the web look new.
Don’t use metallic tinsel with this — it smears onto the web and looks streaky.
14. Spooky Spa Boo Basket with Lavender Soap and Black Paper Fans
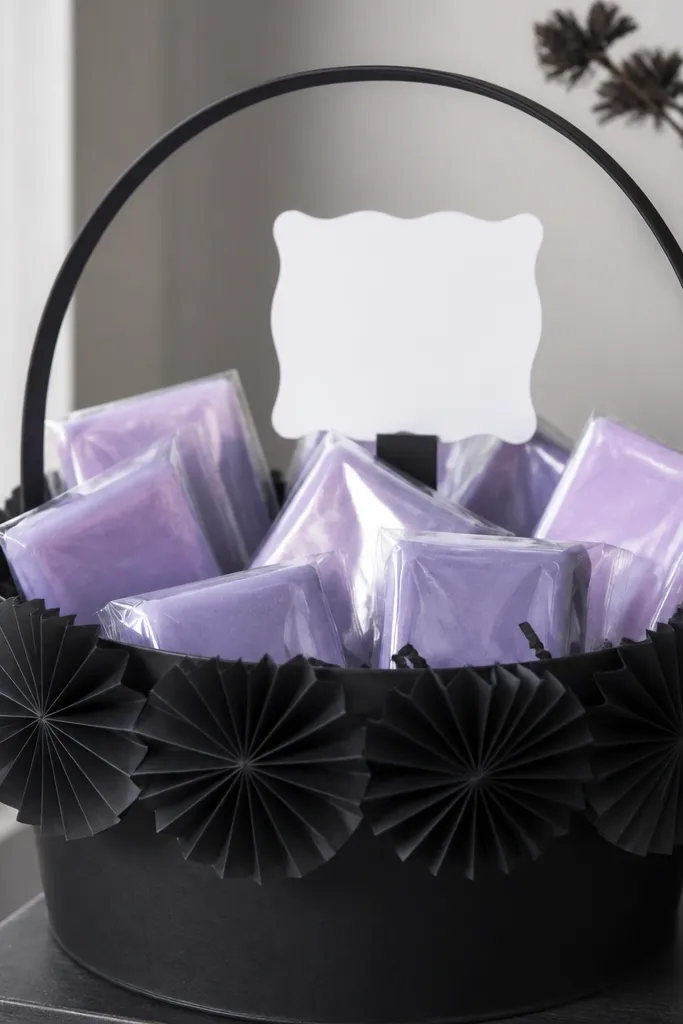
Start by arranging the lavender soap bars in a tight row so the basket looks full from the front. Make black paper fans by folding cardstock accordion-style and gluing the ends into a half-moon shape; create 6-8 fans. Glue the fans to the inside rim so they point upward like a choir of bats. Place a small wipeable “boo” sign card behind the soaps so it peeks above the top layer. Finish by adding one ribbon loop tied to the basket handle for a clean, finished look.
This basket is a hit because it feels thoughtful, not just decorative. The lavender soap is practical and people actually use it, which makes the basket worth keeping. Black paper fans add a spooky graphic shape without glitter or delicate pieces. I keep the “boo” message simple on a wipeable card so it doesn’t look like random handwriting scribbled on paper. This one looks great for guests who want something that smells good and doesn’t feel childish.
AvoidSkip open food items in a spa-themed basket — they attract bugs and ruin the vibe.
Pro tipChoose soap with clear packaging — it wipes clean and hides spills if something melts.
15. Laundry-Tag Skeleton Boo Basket with Wipeable Vinyl Pockets
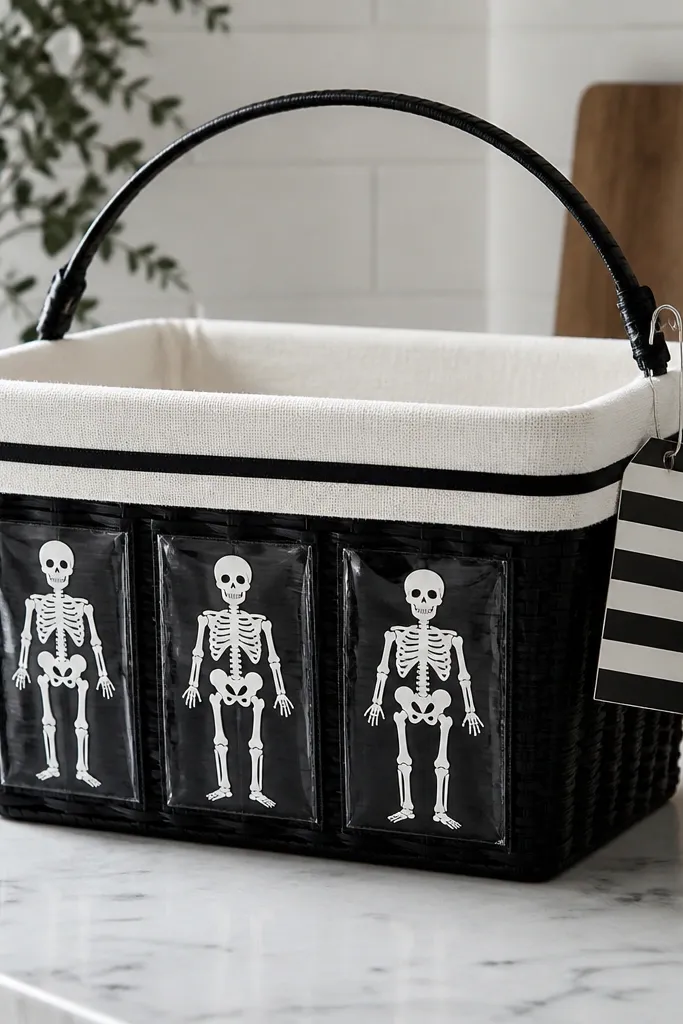
Start with a small basket that has a flat front — I used a black-rimmed wicker basket about 10 inches tall. Cut three vinyl sleeves from a clear shower curtain panel, sized to fit 4x6 cards, then punch two holes per sleeve and stitch them to the basket front with thick black thread. Make the skeleton cards by printing silhouettes on heavy cardstock, then seal the ink with a quick coat of clear matte acrylic spray so it wipes clean. Add a white cotton canvas liner inside the basket and tuck it under the rim so it doesn’t slide when you set the cards in. Finish by making a laundry tag from cardstock — cut a long rectangle, add a strip of black-and-white stripes down the center, then attach it to the handle with a safety pin.
This boo basket idea is low maintenance because everything you touch stays wipeable. I built it around clear vinyl pockets, so kids can grab the skeleton cards without smearing glitter on the basket. The skeleton theme looks sharp in black-and-white, and the laundry-tag detail makes it feel like a real “found” Halloween prop, not a craft pile. It also works for party favors because you can swap the cards each year without redoing the whole basket. The pockets keep the mess contained, which matters when you’re trying to clean up fast after a trunk-or-treat or Halloween movie night.
AvoidAvoid using paper-only pockets without a seal — the first spill soaks in and the cards look sad fast.
Pro tipSeal printed cards with clear matte acrylic so marker lines and fingerprints wipe off with a damp paper towel. If your vinyl sleeves crinkle when you stitch them, warm the vinyl under a hair dryer for 20 seconds and press it flat.