
1. Matte Black Velvet Bow Pumpkin
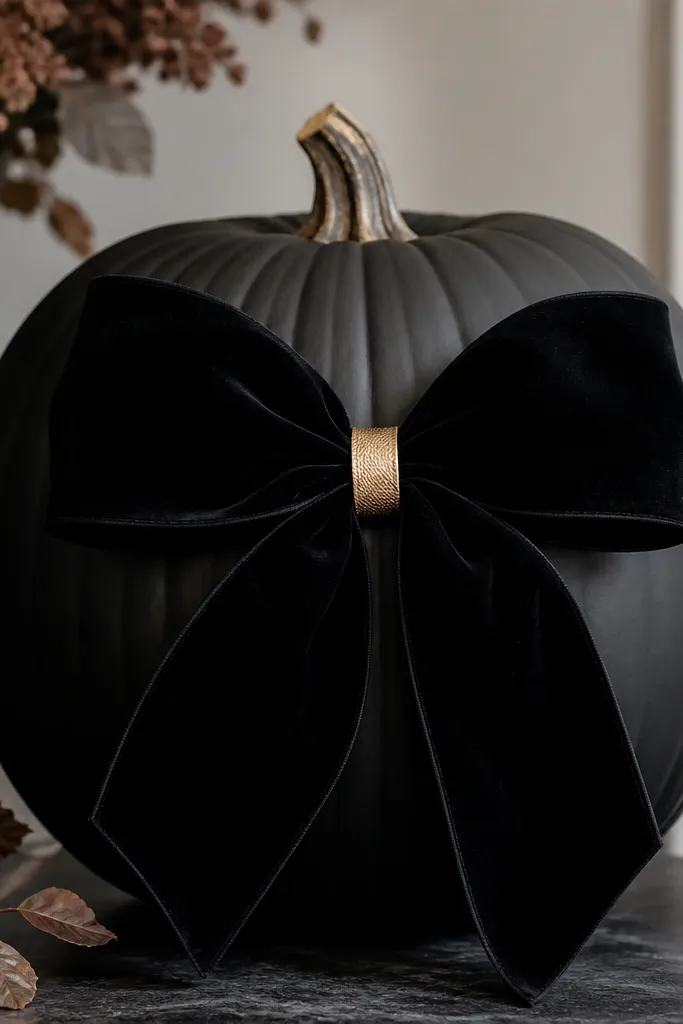
This one looks store-bought because the contrast is clean. The pumpkin gets fully painted matte black so the orange never shows through at the edges. I attach a velvet bow (black or deep plum) right over the front so the texture reads as “fall fashion,” not craft-store decoration. It flatters smaller pumpkins and slimmer shapes because the bow draws the eye to the center. It also works on lighter skin tones in photos because black-and-gold pops against warm backgrounds.
Start by painting the pumpkin matte black with a foam brush. Let it dry 45 minutes, then do a second thin coat so it doesn’t streak. Tie a velvet bow with two loops about 7 inches wide, then wrap a thin gold ribbon around the middle and knot it tight. Hot glue the bow onto the front, then add a small gold ribbon “tail” tucked under the knot for dimension.
After the bow is glued, spray a very light matte clear coat over the paint only — it keeps the finish from getting sticky in humid weather.
Don’t use shiny craft paint on this — the gloss makes the bow look cheaper and less intentional.
2. Vintage Lace Wrap with Pearl Dots
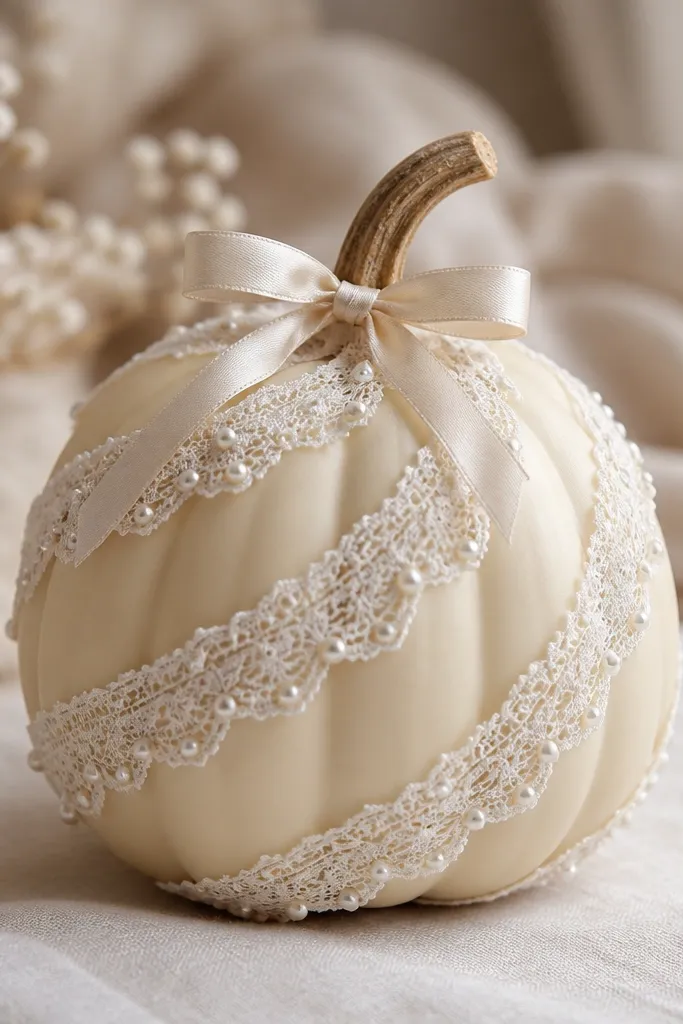
This style turns a plain pumpkin into a soft, romantic prop. I paint the pumpkin a creamy ivory first so the lace sits cleanly without orange ghosting. The lace wrap creates a vertical texture line, which makes round pumpkins look slightly taller in photos. Pearl dots on the lace edge feel delicate and read well at a distance. It flatters people who like a neutral wardrobe and looks great next to wood, burlap, and linen table decor.
Start by painting the pumpkin ivory using acrylic craft paint; two coats gives the best coverage. Cut lace into a strip about 2.5 inches wider than the pumpkin’s “midline” so it overlaps slightly as you wrap. Use hot glue in small dots along the overlap seam, then press the lace flat with your fingers for 10 seconds per section. Finally, glue pearl beads (or pearl stickers) spaced every 1.5 inches along the lace edge and tie a small satin bow around the stem.
Use lace with a tighter pattern so it doesn’t fray — the cleaner edges look higher-end.
Skip thick lace that bunches — bulky folds look messy on a pumpkin surface.
3. Twine Chevron with Cinnamon-Stick Border
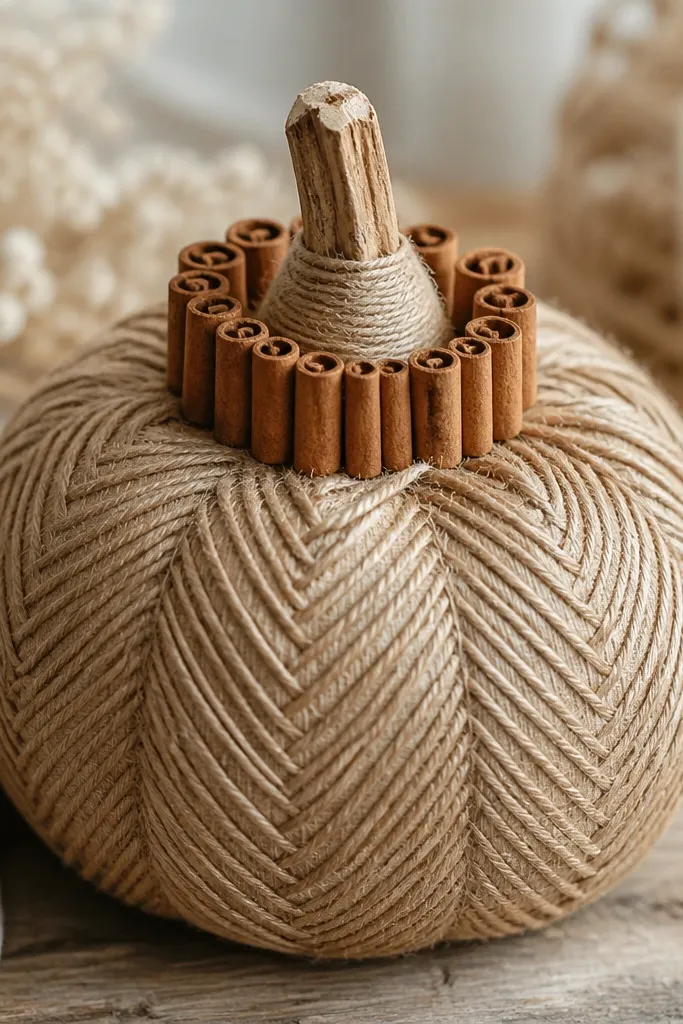
This is the one I reach for when I want “cozy farmhouse” without carving. Jute twine makes a crisp chevron texture that reads even in low light. The cinnamon-stick border adds a warm, practical detail you can smell — and it looks intentional because it’s one continuous ring. It flatters tall pumpkins and looks great on entryway steps where people pass quickly and still notice the pattern. The warm tan palette also photographs well in golden-hour lighting.
Start by painting the pumpkin a light tan (or leave it if it’s already the right shade) and let it dry. Cut a piece of twine and glue one end near the top, then wrap in chevrons: glue a diagonal line, press twine along it, then cross it with the next diagonal so it forms a V pattern. Keep rows about 1/2 inch apart around the pumpkin and trim the twine ends neatly. Glue cinnamon sticks in a circle around the middle, then wrap twine around the stem and tie a small knot.
If twine sheds fibers, mist it with a tiny bit of water and let it dry — it stops fuzzing after you glue it.
Don’t space the chevrons unevenly — lopsided rows make the whole thing look rushed.
4. Gold Leaf Drip with Spiced Orange Paint
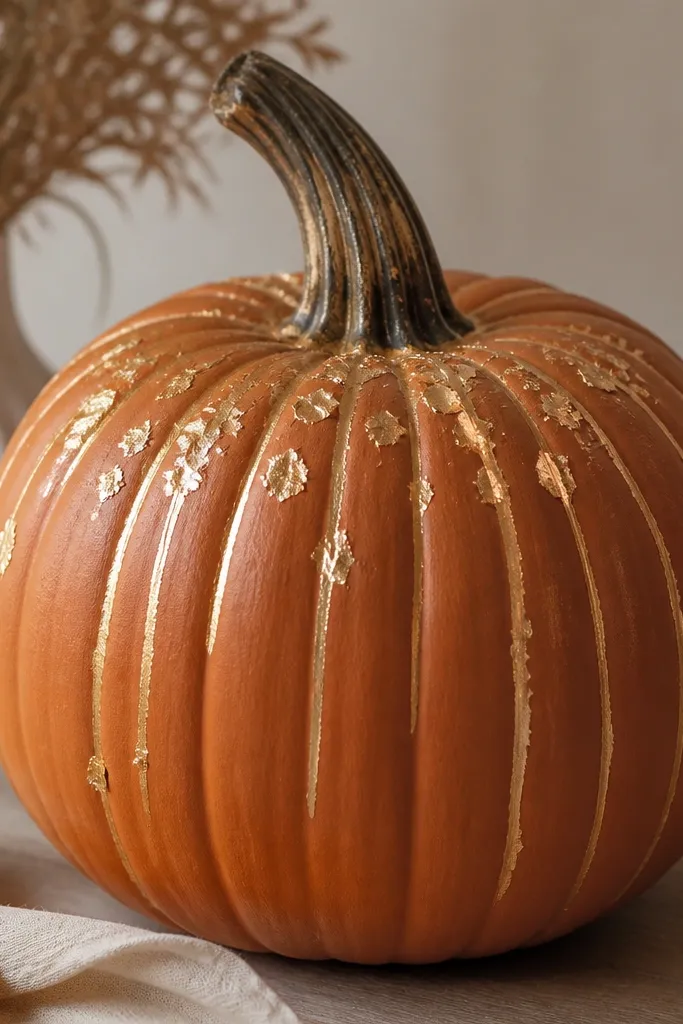
Gold leaf drips turn a pumpkin into something that looks like it belongs on a gallery shelf. I paint the base with a spiced orange (orange + a touch of brown) so it looks warmer than bright Halloween orange. The gold drips start near the stem and fall in uneven lines — randomness makes it look real, not stencil-perfect. This style looks best on medium pumpkins because the drip has enough space to breathe. It flatters any color palette because gold is neutral with attitude.
Start by painting the pumpkin spiced orange with a foam brush so the finish is slightly textured. Let it dry fully, then mix a small batch of clear-drying craft glue (or use gold leaf adhesive) and draw 6-10 drip lines from the top. Work in sections so the adhesive doesn’t dry before the leaf goes on. Press gold leaf flakes onto the sticky lines, then use your fingertip to tap off excess. Finish with a matte clear coat over the rest of the pumpkin, leaving the gold slightly less sealed so it keeps a soft shimmer.
Use a small makeup sponge to dab the gold leaf edges — it makes the drips look feathered instead of sharp.
Don’t cover the gold with thick glossy varnish — it kills the leaf texture.
5. Pom-Pom Stem Cluster Garden
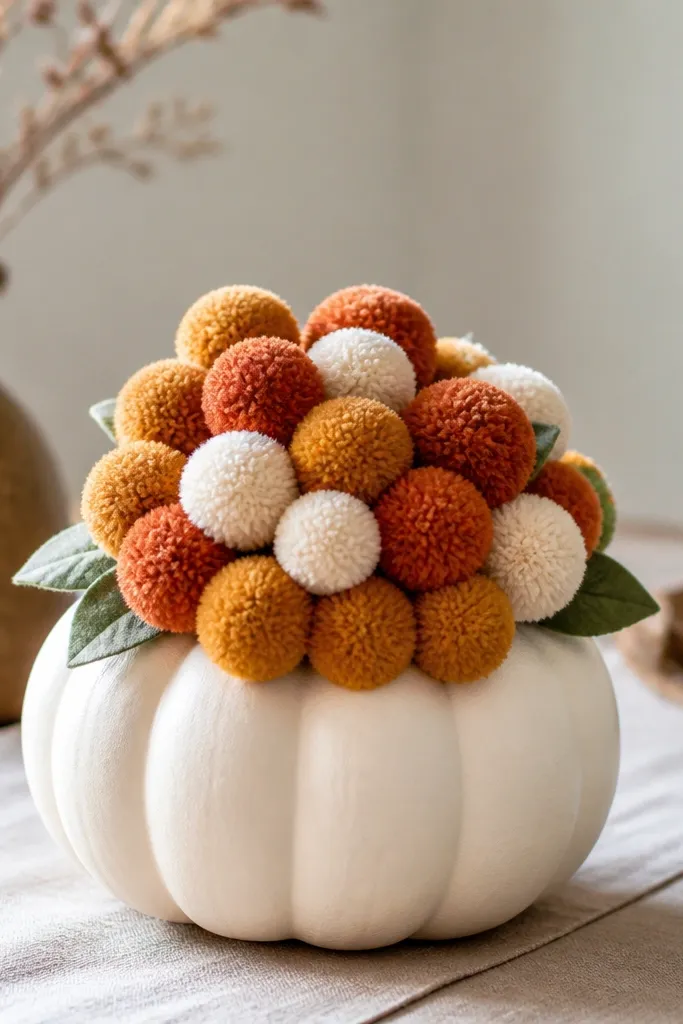
This is a cute, kid-friendly look that still looks intentional. The pom-poms create a “flower crown” effect at the stem, so you don’t need to cover the whole pumpkin. It flatters small pumpkins and works great for mantel styling where the top is what people see. Choose a limited palette — rust, mustard, and cream — and the pumpkin reads cohesive instead of chaotic. The soft round shapes also photograph well because they catch light without sharp edges.
Start by painting the pumpkin cream and letting it dry. Cut a small circle of felt to sit around the stem base so your glue has something to grab. Glue pom-poms in a tight spiral upward from the felt circle, mixing sizes: 1 inch for the outer ring, 1/2 inch for the center. Add 2-3 small felt leaves under the pom-poms for a natural break in color. If you want extra hold, wrap twine lightly around the stem first, then glue the felt circle over it.
Mist the finished pom-poms with a tiny amount of fabric spray to reduce shedding.
Avoid giant pom-poms on a small pumpkin — they look top-heavy and collapse the cluster.
6. Felt Leaf Applique with Embroidery Thread Veins
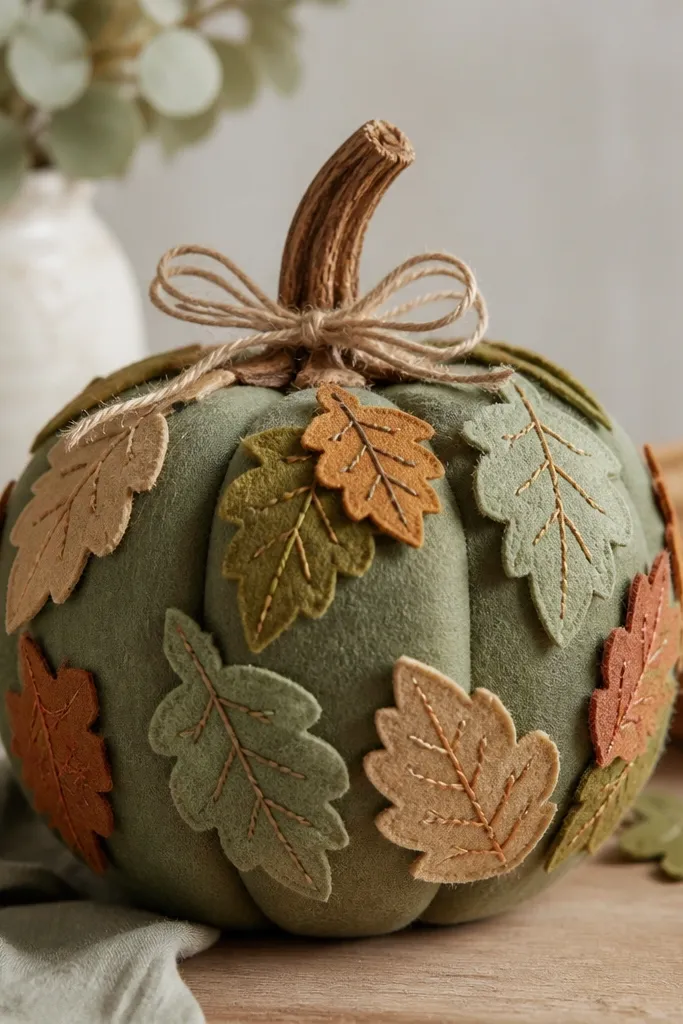
Felt applique makes pumpkins look like wearable fall decor. I use a muted green or sage base so the leaves feel like they belong outdoors, not like craft foam pasted on. The embroidery thread veins are the detail that makes it look hand-done, not store-bought. This design flatters pumpkins that aren’t perfectly smooth because felt can sit over texture. It also works for anyone who likes slow, careful crafts because it rewards patience.
Start by painting the pumpkin sage and let it dry overnight if you can. Cut felt leaves in two sizes: one about 3 inches long and one about 2 inches. Glue leaves in a loose cluster on the front using hot glue, then stitch veins with embroidery thread: run a simple curved line from base to tip and add 3 short cross lines. Tie a small twine bow around the stem and glue it down.
Use a slightly darker felt than your base — the leaf edges show up in photos even from far away.
Don’t glue every leaf flat — leave a tiny lift on one or two leaves so it has dimension.
7. Shiplap Sticker Stripes
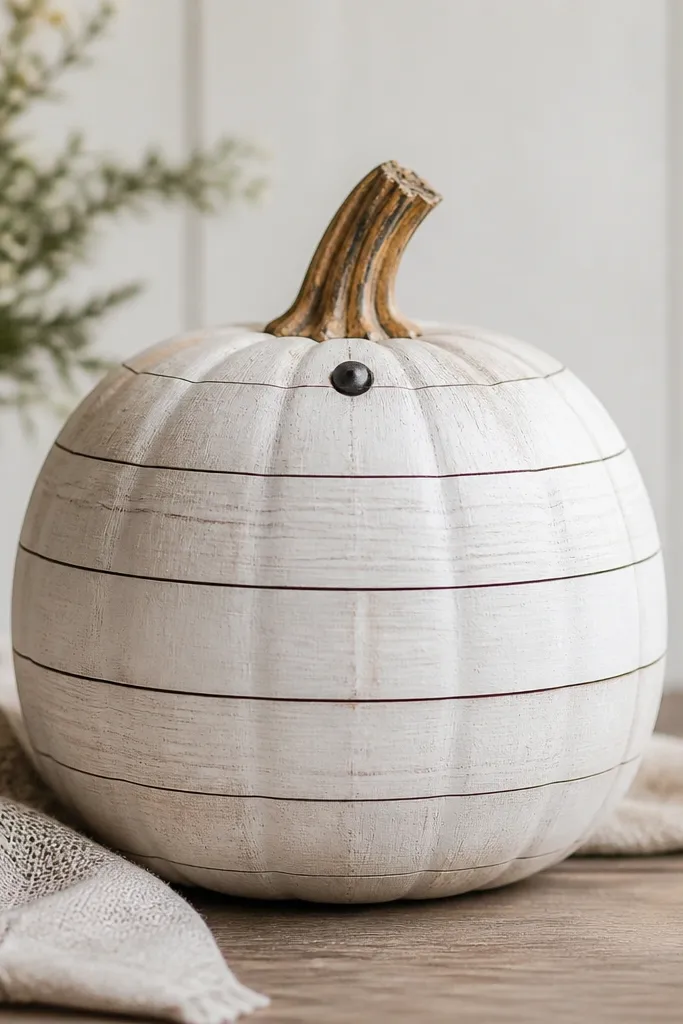
This is for people who love clean, graphic decor. The “shiplap” look comes from vinyl or sticker paper strips, and it makes even an orange pumpkin look like a farmhouse prop. It flatters long pumpkins because the stripes flow naturally. Keep the palette simple: white base, warm gray lines. It also works well if you’re setting up a themed entryway with matching signs and frames.
Paint the pumpkin white and let it dry completely. Cut or apply vinyl strips about 3/4 inch wide horizontally, leaving small gaps for the “wood seams.” Add thin lines in a darker gray between strips using a fine paint marker or thin brush. Place a small numeral sticker (like “3” or “7”) near the stem for a playful detail. Seal with matte clear spray so the vinyl doesn’t lift in humidity.
Press vinyl down with a credit card edge so it sticks without bubbles.
Don’t use thick stickers over deep pumpkin ridges — they wrinkle and look cheap.
8. Scrapbook Paper Tile Mosaic
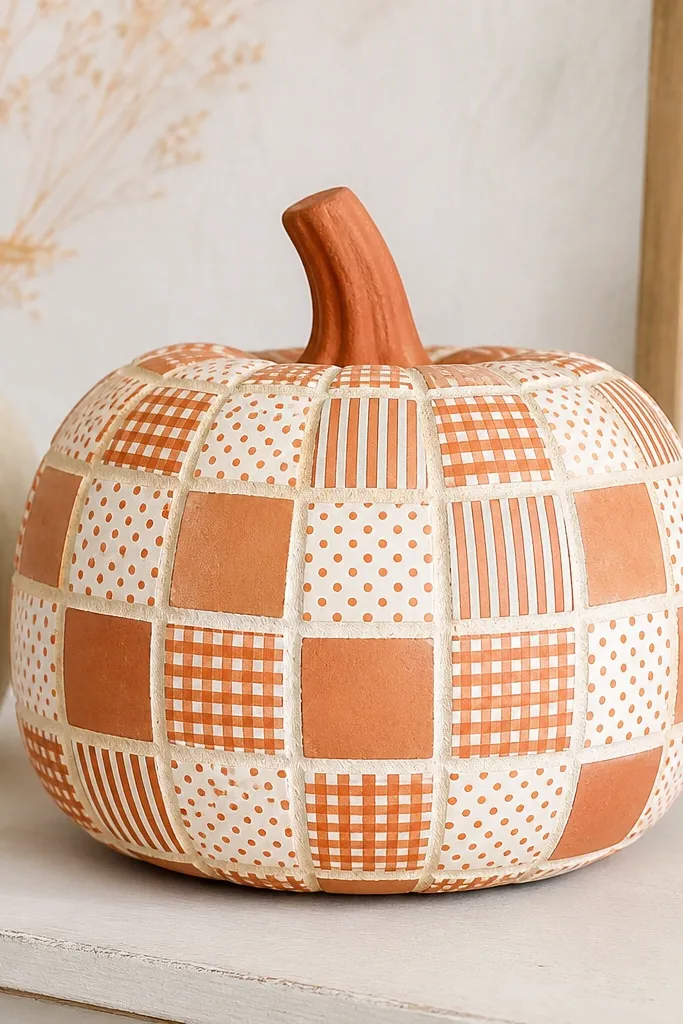
A paper tile mosaic looks like you spent hours, but it’s surprisingly doable. I use scrapbook paper in fall patterns and seal each piece so it stays crisp. The grout lines make it feel like real tile, and they also hide tiny gaps in placement. This style flatters pumpkins with a round shape because the tiles wrap smoothly. If you’re doing a group of pumpkins, this is the easiest way to make them match while still being unique.
Start by cutting small squares from scrapbook paper, about 3/4 inch each. Paint the pumpkin a warm base color (terracotta or cream) so any gaps don’t show bright orange. Brush a thin layer of decoupage medium on a small area, place a tile, then brush over the tile to seal it. Use a white paint marker to draw thin grout lines after the full surface is covered. Let it dry 24 hours, then add a final matte sealer coat.
Cut one paper pattern into smaller squares than the others — the mix looks richer, not random.
Don’t skip sealing — unsealed paper edges curl and look messy fast.
9. No-Carve Chalk Marker Faces
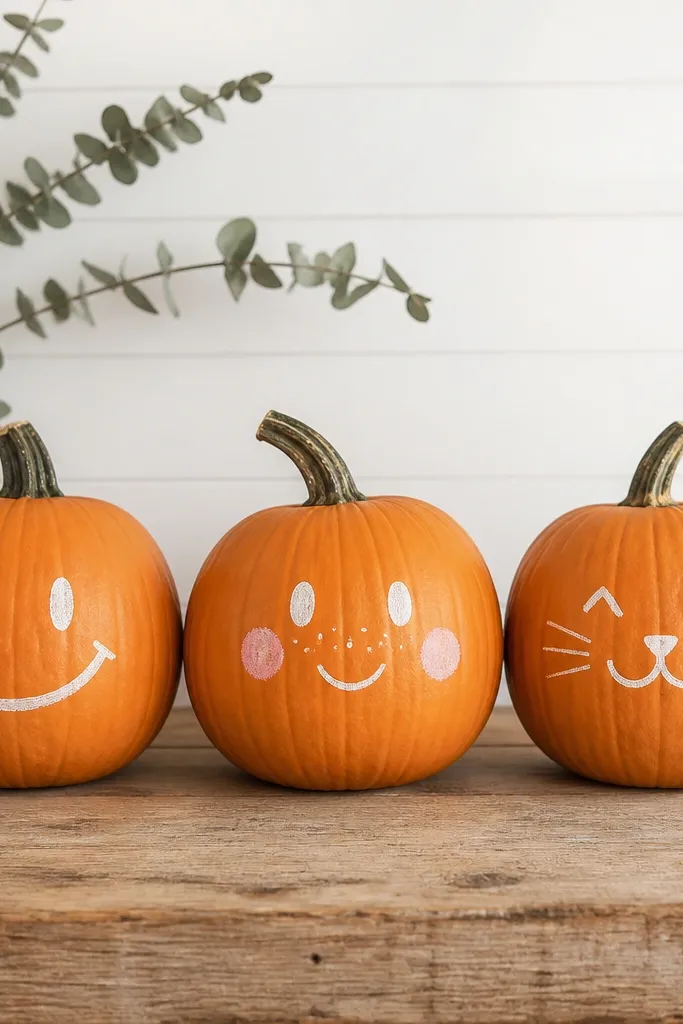
Chalk marker faces are my go-to when I want cute expressions without the mess of carving. The trick is using a limited set of marker colors: white for lines, a soft blush for cheeks, and black or charcoal for eyes. It flatters every pumpkin size because the face is placed just slightly above center, which makes the whole pumpkin look more “alive.” This works especially well for kids' parties because it’s forgiving — you can wipe mistakes with a damp cloth before it sets.
Wipe the pumpkin clean and dry, then sketch the face lightly with a pencil. Draw the eyes first, then cheeks, then the mouth, using white chalk marker for outlines. Add freckles by tapping the marker tip lightly with your finger or a cotton swab. If you want extra charm, draw a tiny leaf or bow above the stem. Seal with a matte fixative spray from about 12 inches away so the lines don’t smear.
Use a paper towel to gently buff the pumpkin texture before drawing — it makes marker lines look smoother.
Avoid thick marker strokes — they look like stickers when the pumpkin is lit.
10. Beaded Fringe Edge Around the Belly
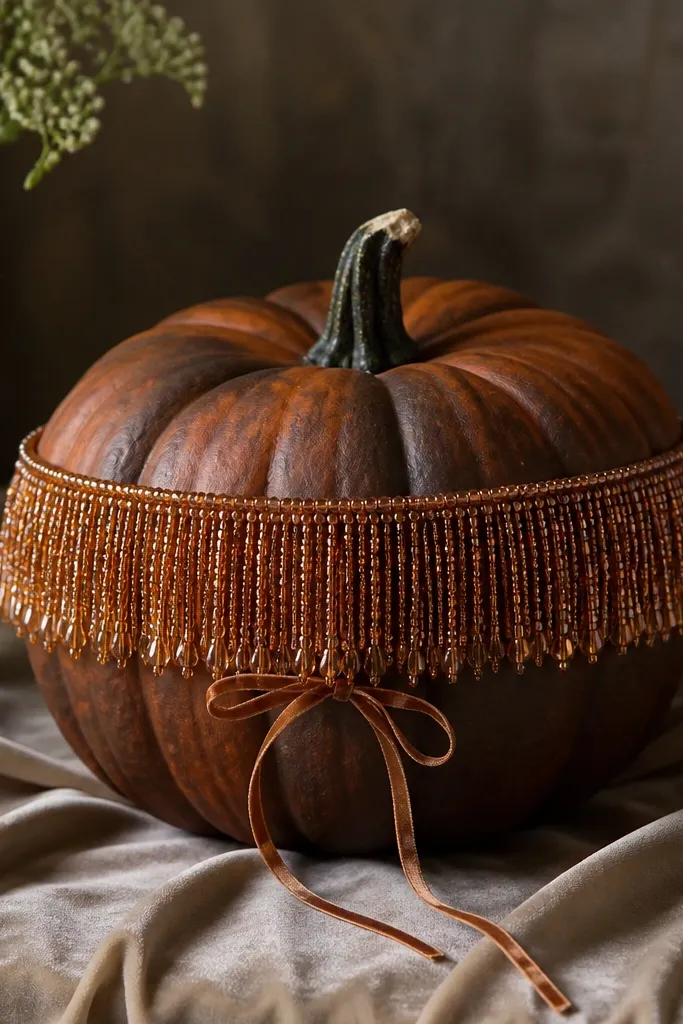
This looks fancy because the fringe moves slightly when someone walks by. I place it around the belly so it reads like a belt, and that makes the pumpkin look styled instead of decorated. Dark orange or deep copper base makes the beads pop. Choose beads in one finish (gold, bronze, or clear) so it doesn’t look like leftover craft supply. This style flatters medium and large pumpkins because there’s enough surface for a full belt.
Start by painting the pumpkin a deep orange or copper and let it dry. Measure a ring around the pumpkin’s midline and cut beaded trim to match, leaving a 1-inch overlap. Glue the trim along the top edge of the ring so the fringe hangs outward. Add a small ribbon bow at the overlap point to hide the seam. If the trim has a fabric backing, tack it with hot glue every 2 inches for secure hold.
Test the beads for snagging by lightly rubbing them with your finger — choose ones that don’t shed onto the floor.
Don’t glue beads directly without a backing — they pop off when the pumpkin shifts.
11. Fabric Ribbon Roses on a Cream Base
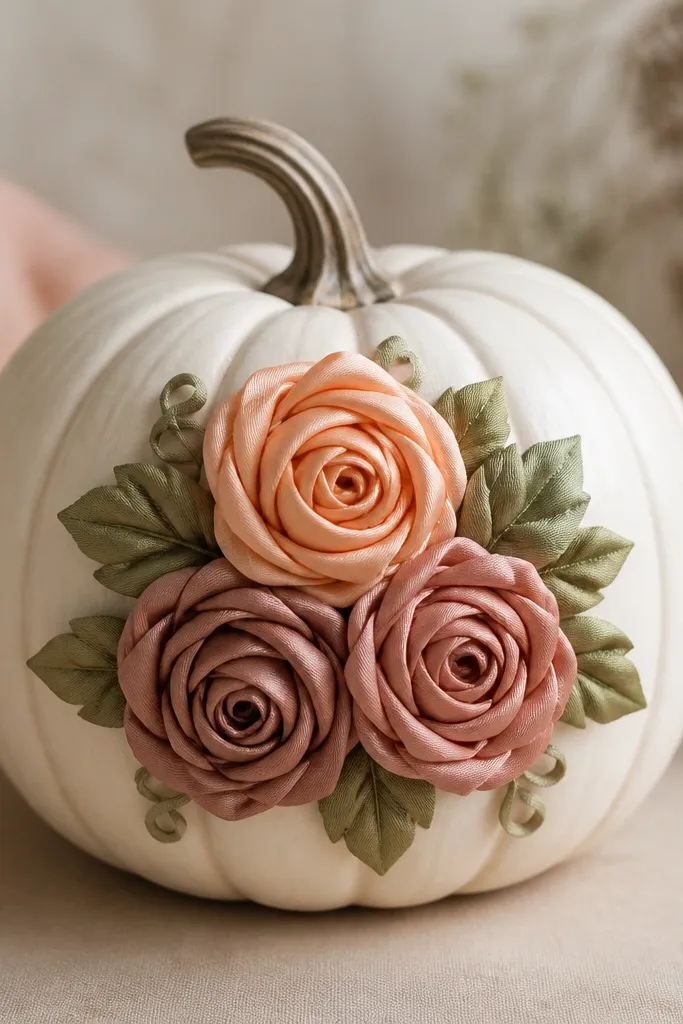
This is the “one statement piece” approach. Instead of covering everything, you place three ribbon roses in a triangular layout and let the cream base do the calming. It flatters pumpkins with a wider front because the roses sit nicely at eye level. The soft fabric texture looks good up close and doesn’t read like plastic. If you’re decorating for a dinner table or a photo backdrop, this is the one that looks expensive without being heavy.
Paint the pumpkin cream and let it dry fully. Arrange three ribbon roses: one centered slightly above the middle and two lower on either side, about 4 inches apart. Glue each rose with hot glue at the base layers, then add small green felt leaves underneath the roses for a realistic cluster. Tie a thin green ribbon around the stem or tuck it behind one rose for balance. Keep the rest of the pumpkin bare so the roses stay the focus.
Pro tipUse ribbon roses made from wired ribbon if you want crisp petal shapes that hold their curve.
AvoidAvoid matching rose colors to the pumpkin paint exactly — contrast makes the roses read clearly.
12. Sponge-Painted Ombre with Tiny Gold Dots
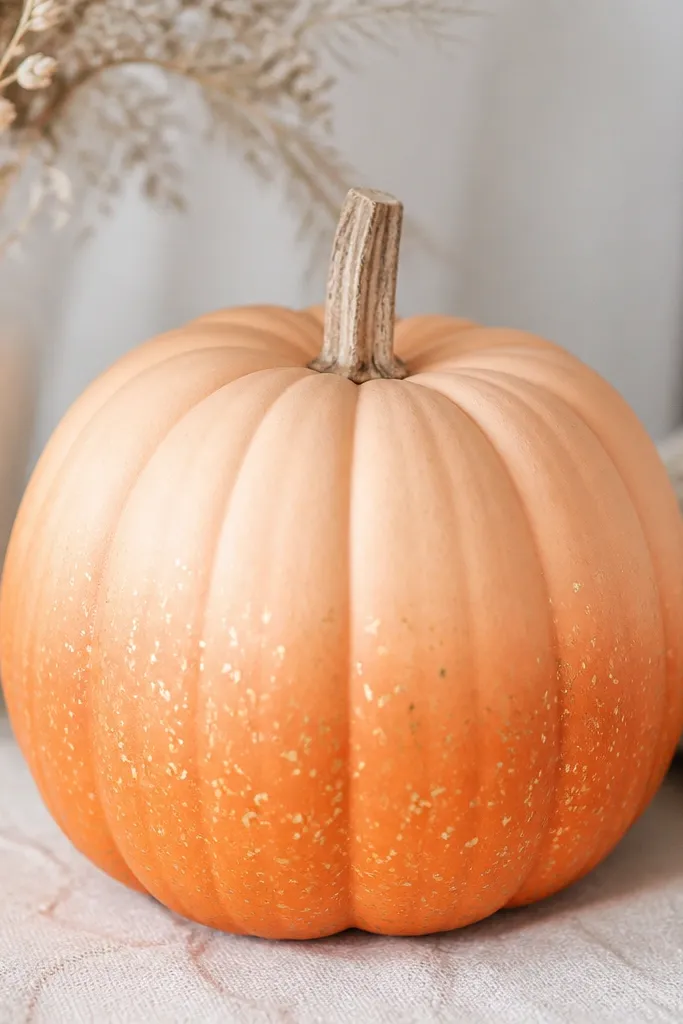
Ombre pumpkins look modern and they don’t require carving skills. I do a peach-to-orange gradient with a sponge so the finish has a soft, cloudy texture instead of harsh brush lines. Then I add tiny gold dots near the bottom like falling sparks. This flatters tall pumpkins because the color shift guides the eye downward. It also looks good in a monochrome fall palette where you have neutral decor pieces.
Paint the top third of the pumpkin light peach and let it dry. Sponge on the next color band with a slightly darker orange, blending at the edges with gentle dabs. Continue downward until you reach a deep orange at the bottom, then stop while it still looks smooth. Dip a small brush or toothpick into gold paint and flick tiny dots onto the lower half. Let everything dry, then seal with matte clear spray.
Pro tipUse a makeup sponge with a flat edge — it gives you cleaner ombre bands without streaks.
AvoidDon’t overwork the ombre while the paint is wet — you’ll lift color and get patchy spots.
13. Monogram Initials with Metallic Paint Strips
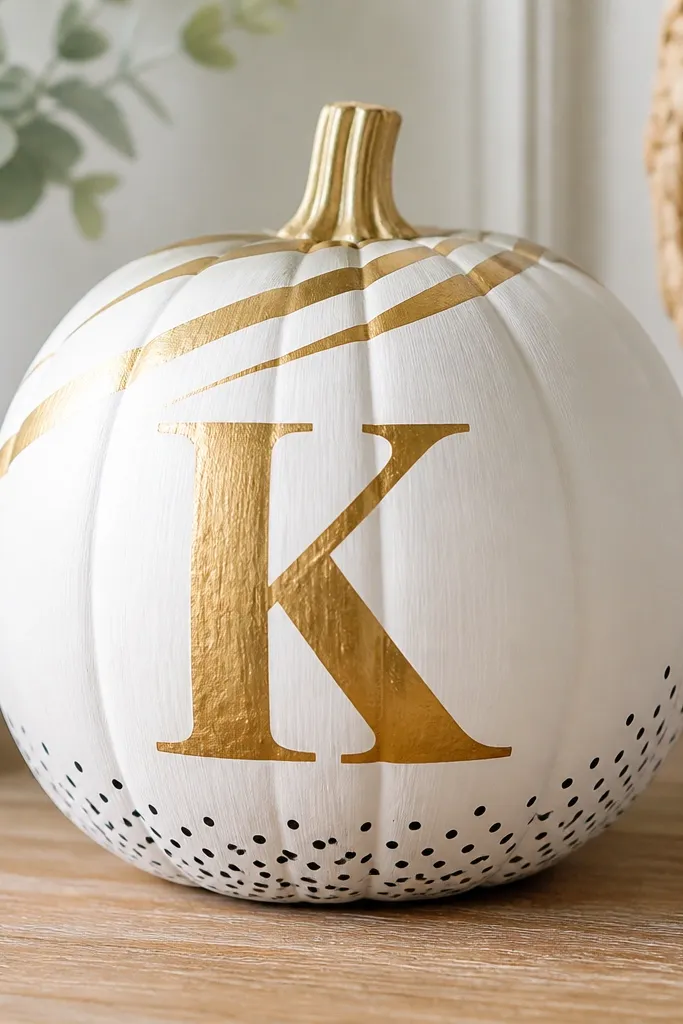
Monogram pumpkins make your fall decor feel personal fast. I like a white base because it makes metallic paint look sharp, not muddy. The initial is big and simple, and the diagonal metallic strips add movement. This style flatters medium pumpkins because the monogram sits right at eye height. It’s also great for hosting because you can make one pumpkin per name and keep everything cohesive with the same color palette.
Paint the pumpkin white with two coats. Use painter’s tape to create 2-3 diagonal metallic stripes near the top and apply metallic gold paint over the tape, then remove tape while paint is still slightly tacky. For the initial, trace a stencil onto the pumpkin with pencil, then paint over it with a fine brush and metallic paint. Add 8-12 small black dots around the base edge using a toothpick dipped in black paint. Seal with matte spray after drying.
Pro tipPress tape edges down firmly with a fingertip so paint doesn’t creep under.
AvoidSkip thin, wobbly letters — use a stencil or it will look shaky in photos.
14. Mini Chalkboard Label Pumpkins
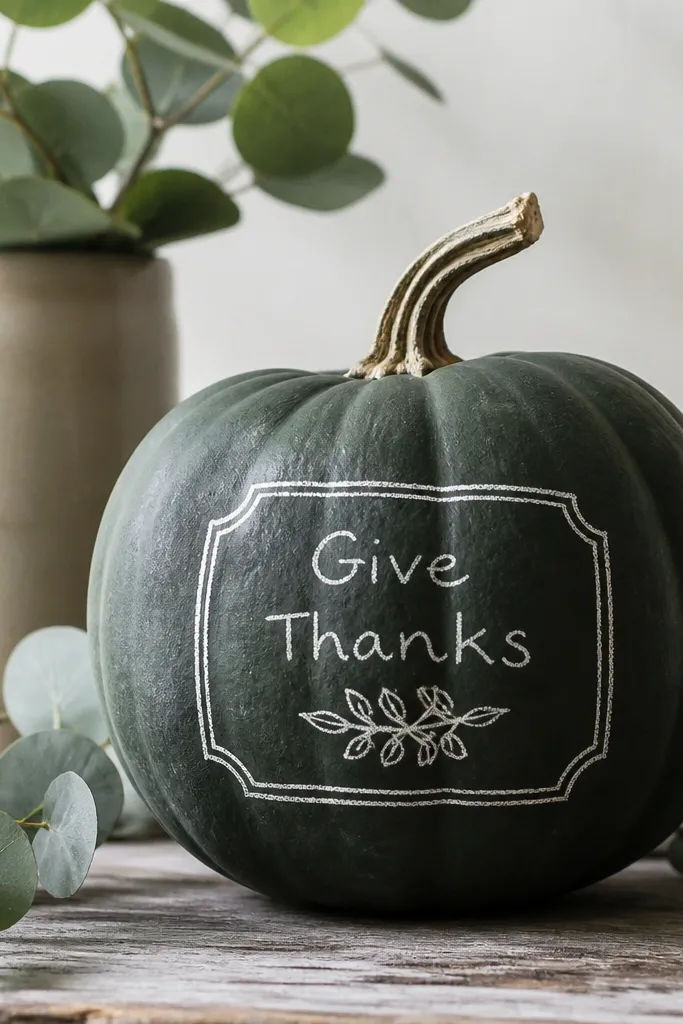
Chalkboard pumpkins look like they belong on a garden sign. Paint the pumpkin dark green and treat it like a chalkboard surface — the contrast makes your writing pop. I like using a label shape because it looks neat and gives you structure even if your handwriting isn’t perfect. This style flatters smaller pumpkins because the label stays proportionate. It also works for party decor where you want easy-to-read “menu” or “welcome” messages.
Paint the pumpkin with chalkboard paint and let it cure per the can directions, usually 24 hours. Lightly rub chalk over the whole surface, then wipe it clean to prep. Draw a rectangular label in the center and write your message in white chalk or a chalk marker. Add a small leaf doodle in the corner and underline the label with two thin lines. Seal isn’t usually needed for chalk, but keep it dry and avoid brushing too hard on the writing.
Use a chalk marker for smoother letters on curved surfaces like pumpkins.
Don’t write too close to the edges — pumpkin curves warp the letters and they look stretched.
15. Paper Feather Fan Centerpiece
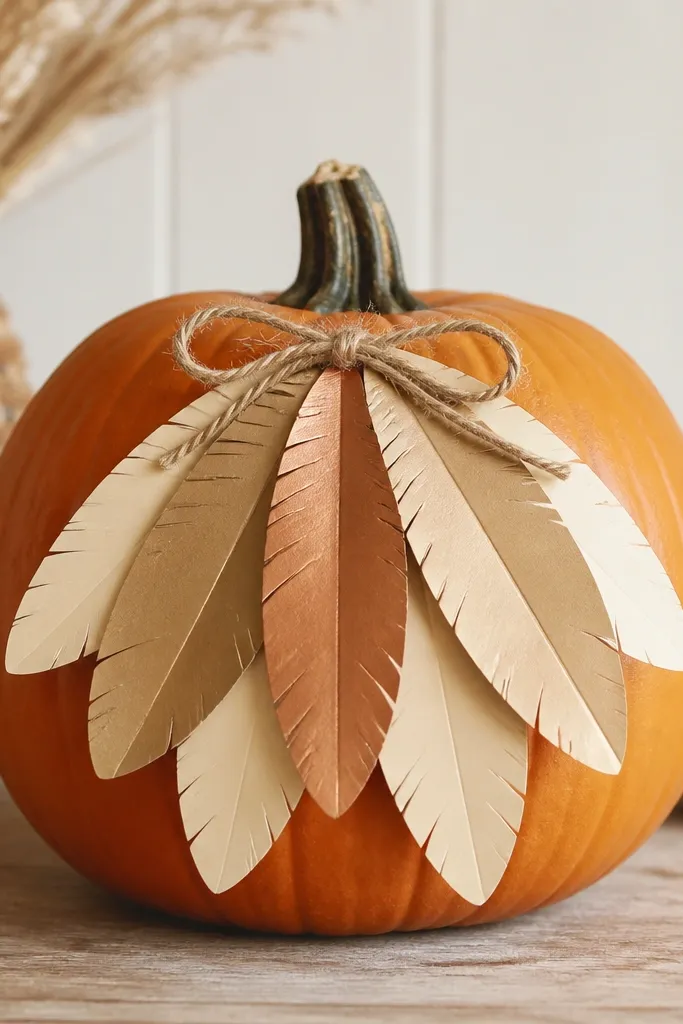
This looks like a party centerpiece and it feels lighter than you expect. The layered paper feathers create a radial shape that makes the pumpkin look fuller and more decorative without covering the whole surface. I use a warm neutral palette so it works with any fall table setting. This flatters pumpkins with a flatter front because the fan sits neatly. It also photographs well because the feathers create soft shadows.
Start with a solid base color: cream or light tan works best. Cut feather shapes from cardstock and layer them from largest to smallest, each about 1/2 inch shorter. Glue a small strip of cardstock at the back of the feathers to form a fan shape, then attach the fan to the front of the pumpkin with hot glue. Place the biggest feathers at the outer edges and tuck smaller feathers toward the center. Finish with a small twine bow under the top of the fan for a natural anchor.
Use slightly different shades of the same color family so the fan has depth instead of looking flat.
Don’t use flimsy paper — it droops and the fan loses its shape.
16. Faux Marbled Clay Look with White Veins
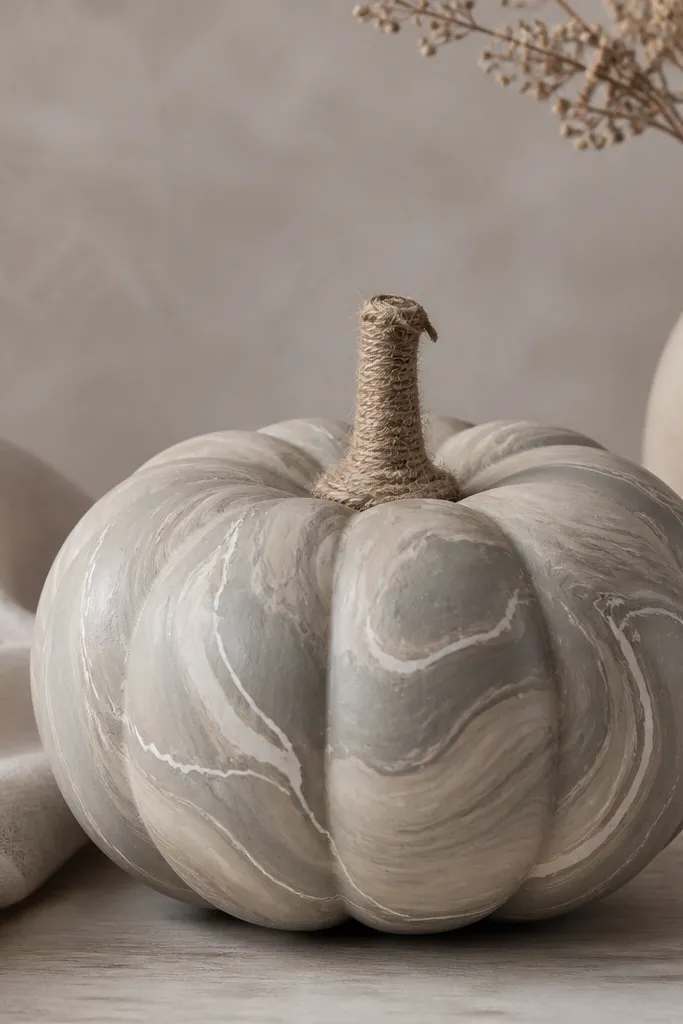
Marbled pumpkins look expensive because the pattern is irregular, like natural stone. I use a gray-beige base and then pull thin white “veins” through it with a small brush. This style works on any pumpkin size, but it especially looks good on medium ones where the veins have room. It flatters modern decor because the palette is calm. If you have black frames, neutral rugs, or ceramic pumpkins, this will match them without trying.
Paint the pumpkin gray-beige and let it dry. Use a sea sponge to dab slightly darker gray in random swirls, then blend edges with light taps. Mix a thin white paint with a little water so it flows, then drag the tip of a liner brush through the swirls in thin vein lines. Add 2-3 thicker veins and several hairline veins for realism. Wrap the stem with twine and seal the whole pumpkin with matte clear spray.
Pro tipPractice the vein motion on a paper plate first — the brush pressure controls how dramatic the lines look.
AvoidDon’t make every vein the same width — uniform lines look fake.
17. Glittery Ombre Glitter Film Layer
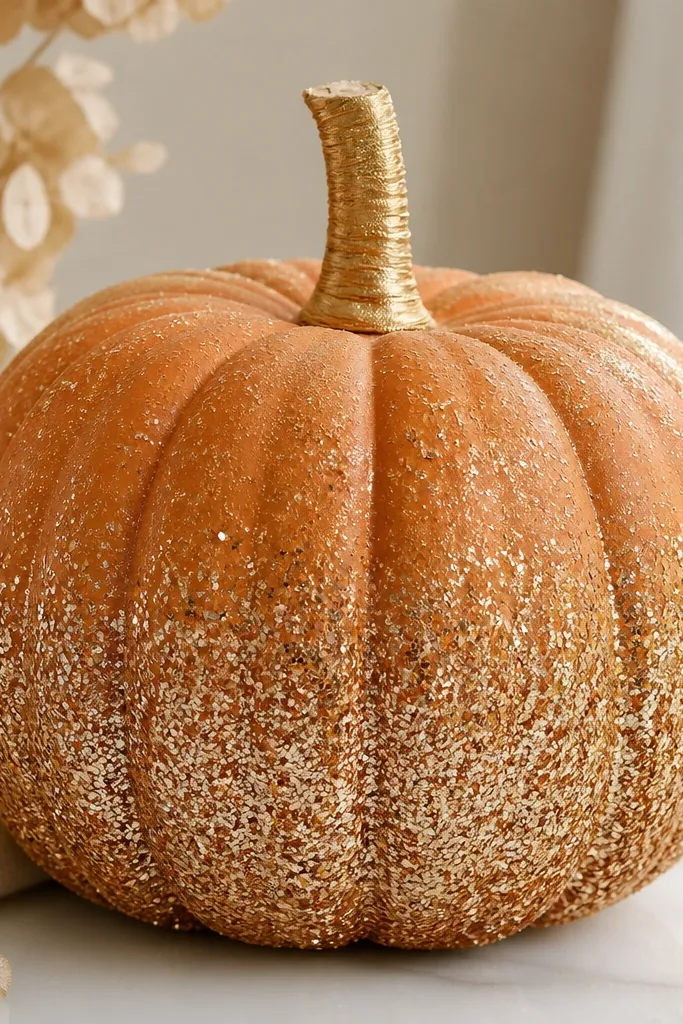
If you want sparkle that still looks neat, this is how I do it. I apply glitter film or glitter glue in a gradient so it doesn’t look like a costume. The bottom gets the heaviest coverage because gravity makes it feel natural. This flatters round pumpkins because the glitter settles in curves and reads as dimensional. It also works for holiday photos because the sparkle shows even when you’re not using direct flash.
Start with a base color that matches your glitter — warm gold or deep orange looks best. Apply glitter glue to the bottom third using a foam brush, then blend upward with lighter pressure so the glitter density fades. If you’re using glitter film, cut the film into a curved panel and press it onto the pumpkin, then trim the edges cleanly with scissors. Add a thin gold ribbon around the stem. Let it dry fully before moving the pumpkin so it doesn’t shed glitter.
Pro tipLay the pumpkin on a towel to dry — it keeps glitter from sticking to your workbench.
AvoidAvoid putting glitter on the stem — it looks messy when the pumpkin rolls.
18. Button and Felt Rosette Cluster
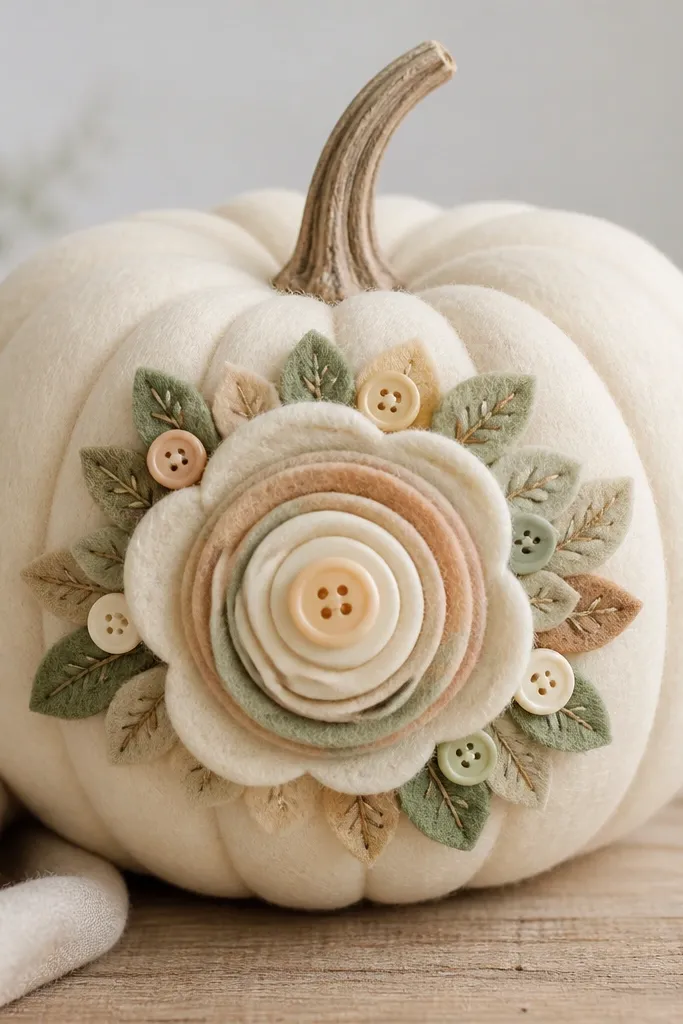
Buttons make pumpkins feel like a handmade flea-market find. I build a rosette from felt circles in two sizes, then stack buttons on top so the center looks dimensional. The cream base keeps the colors warm and lets the button shapes read clearly. This style flatters medium pumpkins and looks great on shelves where you can see the center detail. It also works well for people who like sewing-adjacent crafts but don’t want to stitch for hours.
Paint the pumpkin cream and let it dry. Cut felt circles: one large 5-inch circle, one medium 3-inch, and one small 2-inch. Glue the circles stacked and slightly offset so you see layers. Place buttons on the top circle in a tight pattern, then glue a few tiny felt leaves around the rosette edges. Add one button near the stem for a “repeat” detail and seal with a light matte spray over the felt and paint.
Use buttons with a matte finish — shiny plastic buttons catch light in a way that looks cheap fast.
Don’t choose too many button sizes — the rosette looks messy instead of layered.
19. Fabric Pumpkin Wrap with Hidden Velcro Seam
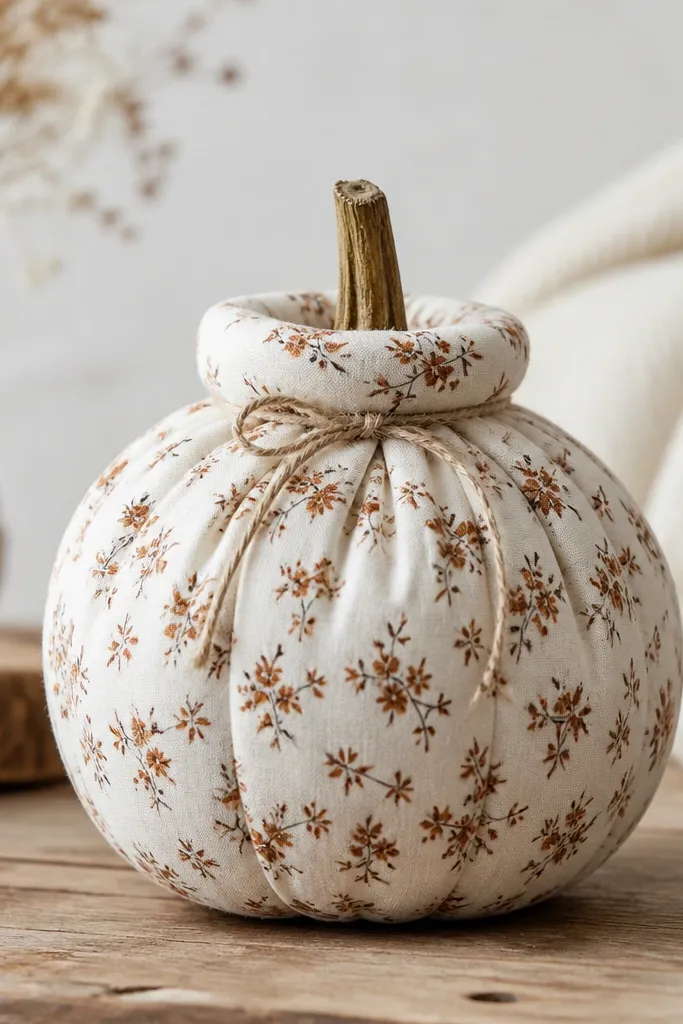
This is the one I use when I want to reuse the decoration year after year. Fabric wrap hides surface flaws and makes the pumpkin look like it’s part of a textile display. I keep the seam at the back and use Velcro so you can remove the cover to store it flat. It flatters any pumpkin size because the fabric stretches slightly and shapes around the curve. It also photographs beautifully next to knit throws and wooden trays.
Start with a cotton fabric rectangle that’s about 2 inches taller than the pumpkin and wide enough to wrap with a 1-inch overlap. Cut a strip of Velcro (hook or loop) and sew or glue it to the overlap edges on the inside. Wrap the fabric around the pumpkin and press the Velcro to close the seam. Fold a cuff at the top (about 1 inch) and secure it with a small piece of hot glue at the back only. Finish by tying twine around the stem base to anchor the cuff.
Pro tipUse medium-weight cotton, not thin quilting cotton — it clings and wrinkles less.
AvoidAvoid hot glue directly on fabric — it can stiffen and show shiny spots.
20. Wood Slice Number Tags
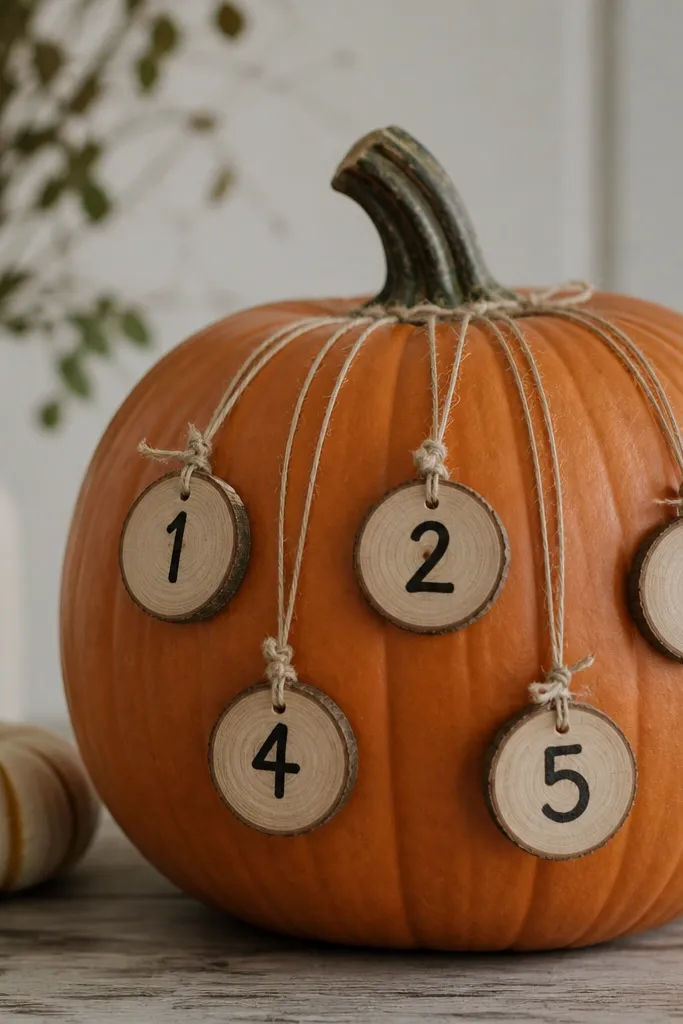
Wood slice tags make pumpkins look like you added real signage. I attach multiple small slices vertically so the pumpkin reads like a calendar or address marker. It flatters tall pumpkins and looks great in front of a porch where you want people to notice from a distance. The black numbers on warm wood also match almost any fall color scheme. It’s a clean alternative to carving because it adds structure without cutting.
Paint the pumpkin a warm neutral like tan or light gray. Tie thin twine loops and glue or knot them to the back of each wood slice tag. Position the tags along the front in a staggered vertical line, starting near the top and spacing them about 2 inches apart. Paint the numbers on the slices with black acrylic and let them dry. Tie a small knot at the stem with extra twine ends tucked under so the whole piece looks intentional.
Pro tipUse a flat black paint marker for the numbers — it stays crisp on wood slices.
AvoidDon’t hang tags too low — they can snag on coats and knock into each other.
21. Satin Ribbon Bow Tie Belt
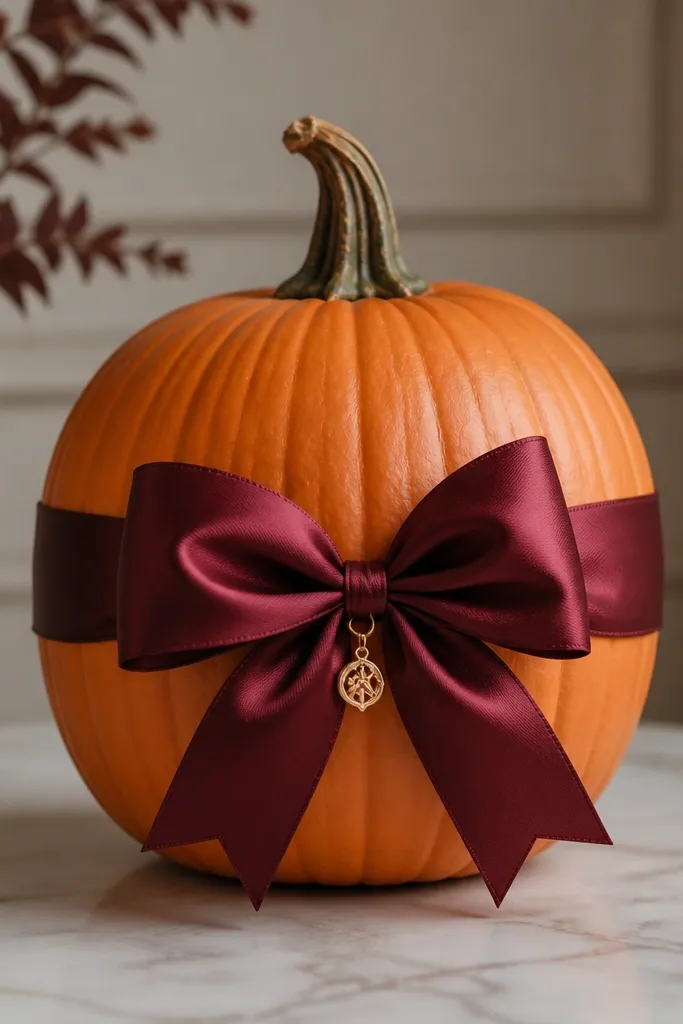
This is the easiest way to make a pumpkin look styled instead of decorated. A satin ribbon belt gives you instant structure and makes the pumpkin look like it’s wearing a dress. I use a bold ribbon color like burgundy or forest green so it shows clearly against the orange. Add one small charm at the bow for a “jewelry” effect. It flatters medium and large pumpkins because the belt has enough width to create a smooth line.
Cut a satin ribbon long enough to wrap around the pumpkin’s middle plus 6 inches. Wrap it around and tie a bow at the front, then secure the ends with hot glue behind the ribbon. Make the bow tails about 8 inches long so they fall nicely. Add a small gold charm by gluing it to the center knot or threading it onto a toothpick and tucking it under the bow. Smooth the ribbon with your fingers so it doesn’t twist.
Use double-sided tape under the ribbon ends before gluing — it prevents the ribbon from sliding while glue cools.
Avoid thin, wrinkly ribbon — it looks like gift wrap instead of a planned accessory.
22. Painted Geometric Face with Tape Edges
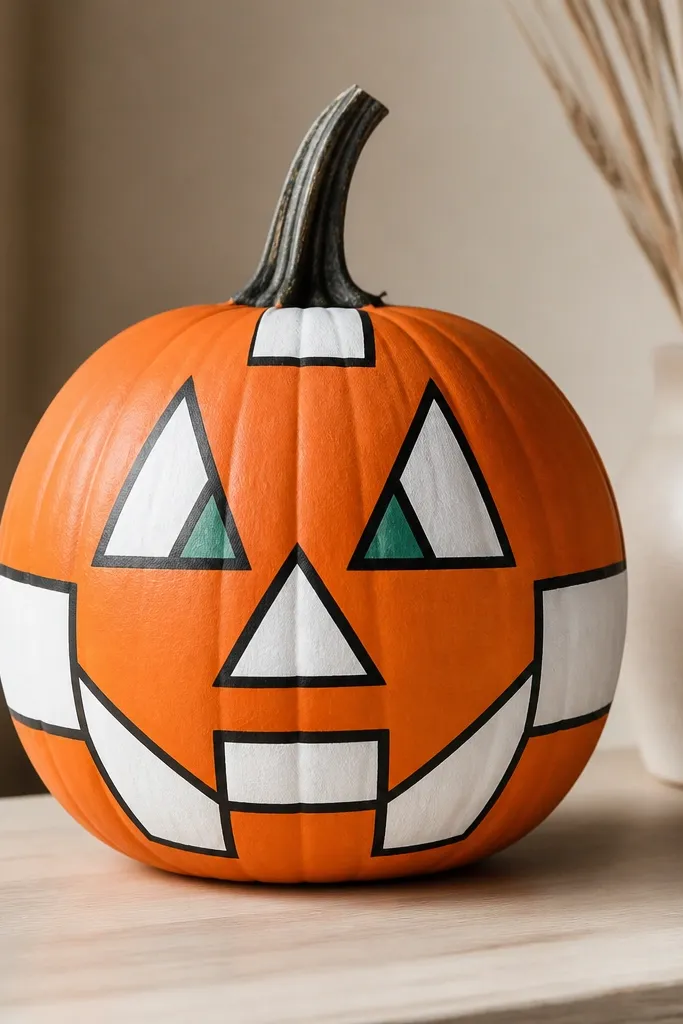
Tape-edged geometric faces look modern and they hide small mistakes. The crisp lines come from painter’s tape, not brush control, which is why this stays beginner-friendly. I like using black outlines on the shapes because it makes the face readable from across a porch. Add a tiny green accent near the eyes for charm. This flatters pumpkins with a symmetrical shape, but it still works if your pumpkin is a little lopsided because tape defines the design.
Wipe and dry the pumpkin, then paint a base color (orange or white). Tape off geometric sections for eyes, nose, and mouth — use short tape pieces so they curve with the pumpkin. Paint inside the taped shapes with white and black, then remove tape while paint is still slightly soft. Add a small green dot accent near one eye and a second small line to balance the composition. Seal with matte spray so the edges don’t smear.
Pro tipPress tape down firmly with a fingernail along the edges for sharp boundaries.
AvoidDon’t wait until paint fully dries to remove tape — you’ll peel up edges.
23. Chalk Ink Botanical Vines
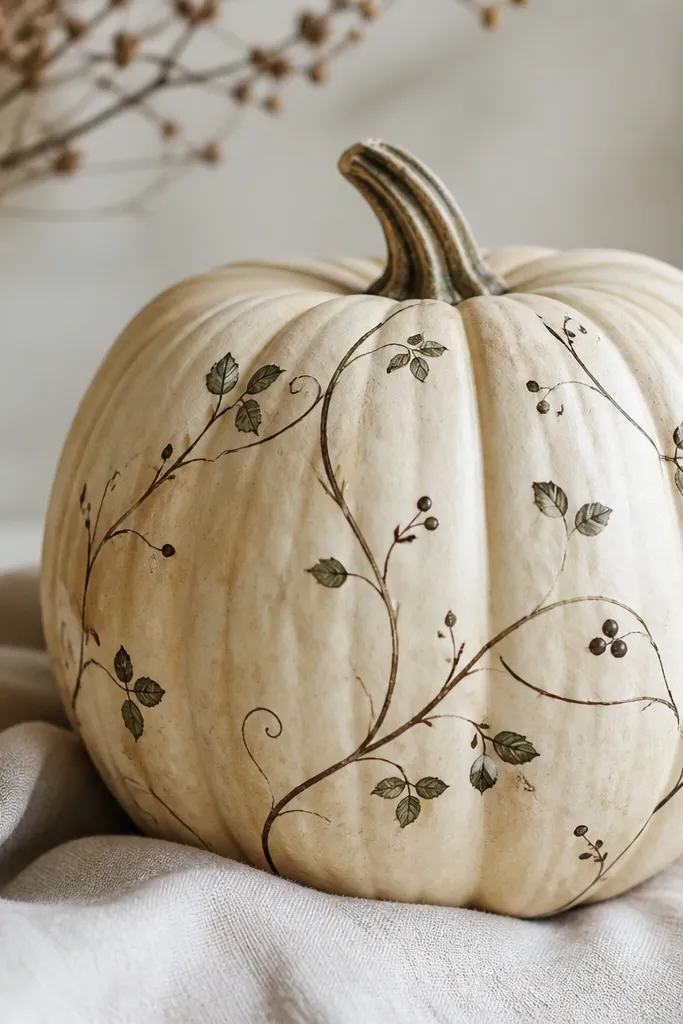
Botanical vines look calm and classy, which is why I use them when I’m decorating for more than one holiday. I keep the base light so the ink lines look crisp. Thin vines wrap around the pumpkin and create movement, and the tiny leaves make the design feel alive without being busy. This flatters people who prefer understated decor and it looks good on neutral porches. It also works for indoor displays where you want a softer look than cartoon faces.
Paint the pumpkin a pale beige or light cream and let it dry. Use a fine chalk ink pen or chalk marker to draw a main vine line starting near the stem and wrapping down the side. Add small leaf shapes along the vine and place 3-5 berry dots near the bottom. Fix the lines with a matte fixative spray from a distance, then let it dry completely. If you want extra contrast, outline some leaves lightly with a darker brown chalk.
Pro tipDraw vines on one “side” only — it looks intentional instead of covering the whole pumpkin like wallpaper.
AvoidSkip thick outlines — heavy lines make vines look like a sticker sheet.
24. Rolled Felt Flower Garland on a Single Stem
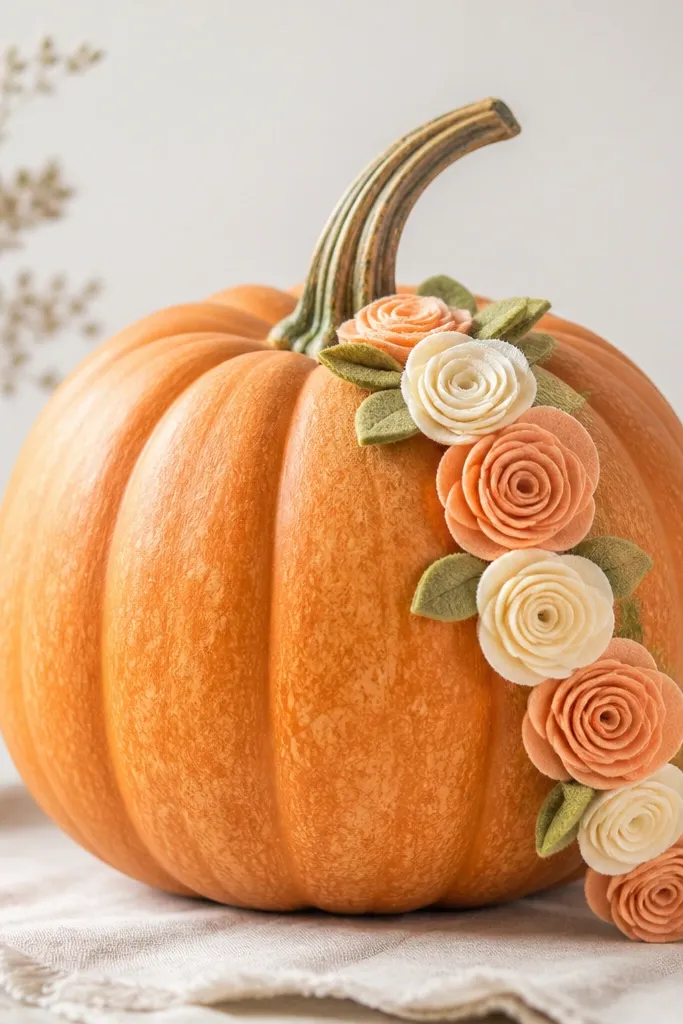
Draped felt garlands make a pumpkin look like it has a story, without covering the entire surface. I like placing the garland from the stem down to one side because it creates a diagonal line that makes the pumpkin look more dynamic. The rolled felt flowers are soft and layered, so they read as handmade. This flatters pumpkins you plan to photograph at an angle. It also works for fall weddings or dinner decor because it looks textile, not Halloween-cartoony.
Paint the pumpkin a neutral color like cream or light gray. Make rolled felt flowers by cutting strips of felt and rolling them into tight spirals, then gluing the base. Glue the first flower right at the stem base and then add the rest in a gentle arc down one side. Tuck small felt leaves between flowers to fill gaps and stop the garland from looking like a straight line. Finish by tying a tiny piece of twine around the stem so the garland feels anchored.
Pro tipUse a glue gun on the felt base only — keep glue away from the flower tops so they stay soft.
AvoidDon’t spread the flowers too far apart — the garland needs density to look lush.
25. Mini House Lantern Pumpkin with Faux Window Frames
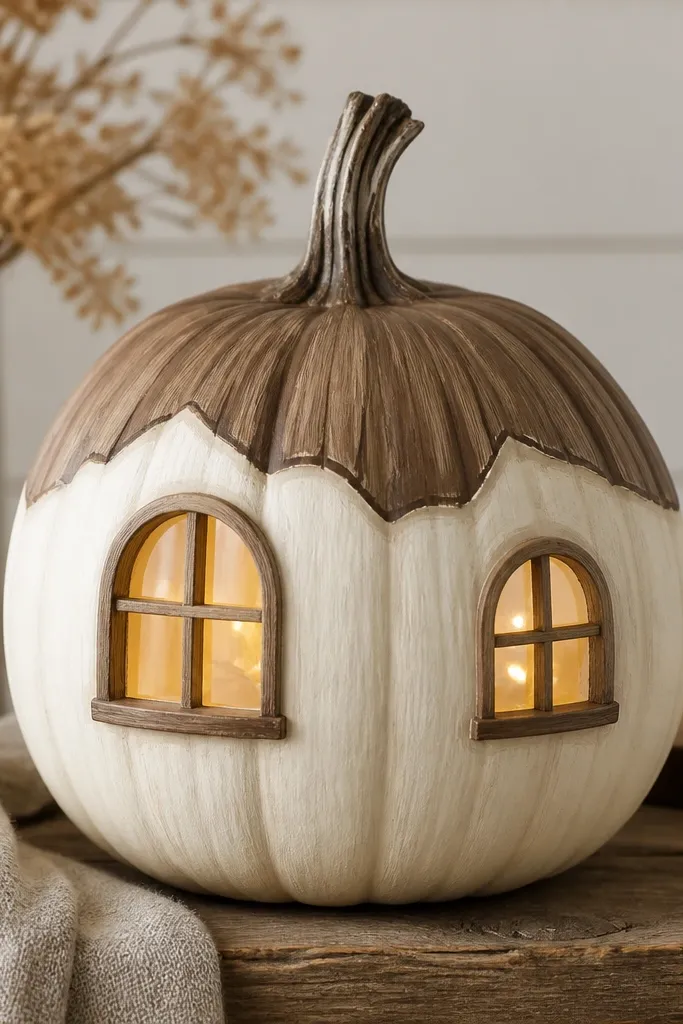
This is the “pumpkin as lantern” look that still avoids carving. The faux window frames make it read like a tiny house, and the warm LED glow gives you that cozy evening feel without cutting holes. I paint the pumpkin off-white so the light looks warm, not orange-blown-out. It flatters smaller pumpkins because the house shape fits the scale. This works great for porch steps where you want a focal point that lights up at night.
Paint the pumpkin off-white and let it dry. Cut thin wood strips or use craft sticks and glue them into two rectangles for window frames. Add a simple roofline by painting a brown triangle or using tape and paint. Place warm white LED tea lights inside from the opening at the top — keep glue away from where the light sits. Add a tiny “curtain” effect by dabbing a little brown paint around the window openings, then seal the exterior with matte spray.
Use warm white LEDs, not cool — cool LEDs make the house look like a flashlight.
Don’t glue frames too close to the top opening — you’ll struggle to place the light.



