
1. Walnut-Top Key Catch Tray From a Repurposed Cutting Board
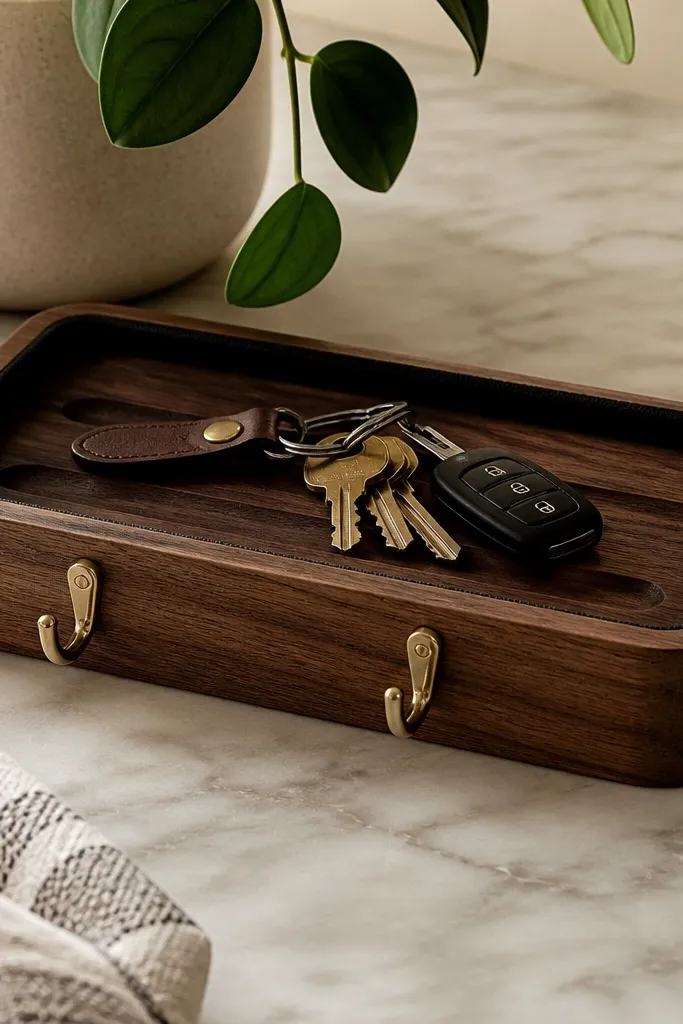
Start by cutting the cutting board top to about 10 inches wide and 6 inches deep, then sand the edges until they feel smooth with your fingertips. Line the inside edge with a strip of black waxed canvas or heavy denim, glued down with contact cement, so it resists keyring dents. Mount two brass-colored hooks centered along the front edge, leaving 2 inches from each side. Finish the top with 2 coats of wipe-on poly, sanding lightly between coats. Finally, add small felt pads on the bottom corners so it doesn’t slide on laminate or tile.
This is the gift that gets used on day one. I made it from an old cutting board because the shape already looks “designed,” and the wood grain reads warm instead of cheap. The storage part is simple: hooks for keys plus a shallow tray so he sets the keyring down without scratching the wood. I like walnut or walnut-like stain paired with a black liner because it hides scuffs and makes the brass hardware pop. It looks best with a boyfriend who has a desk or entryway that runs dark wood tones, but it also works in bright apartments if you keep the stain mid-tone instead of jet dark.
AvoidSkip thin craft wood — it chips around the hook screws and looks rough fast.
Pro tipBuy hooks in a “screw-in” style and test the screw length on scrap wood first so you don’t blow out the back.
2. Denim Cable Organizer With a Hidden Snap Pocket
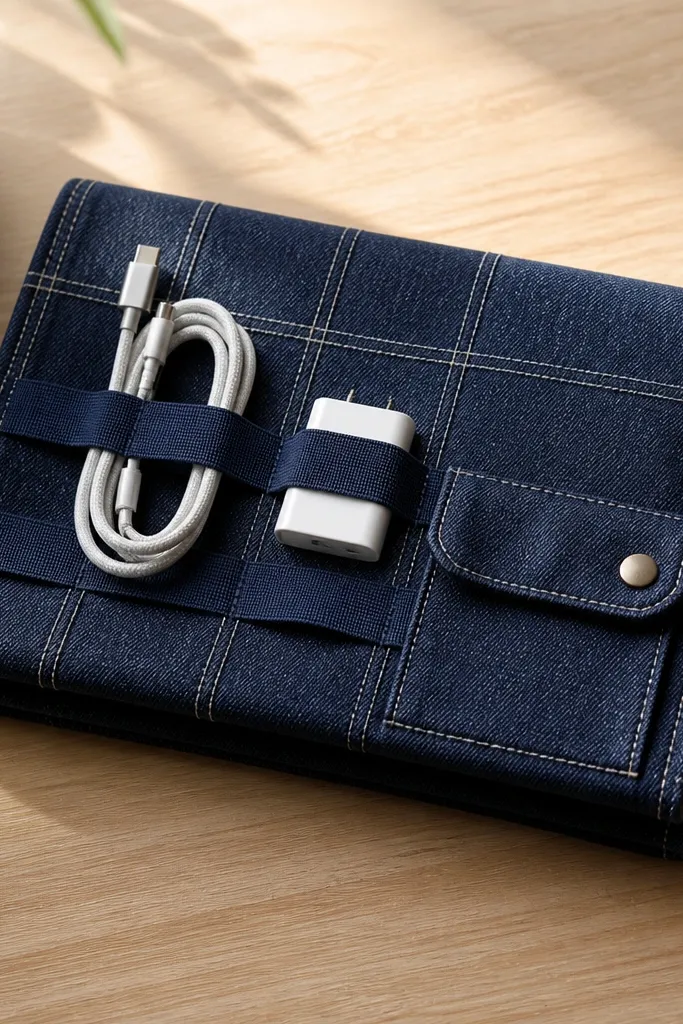
Start by cutting a rectangle of denim to 12 inches tall by 9 inches wide, then fold it so you have a front flap that overlaps by about 2 inches. Sew or glue a grid of elastic loops on the inside panel, spacing loops about 1.25 inches apart so cables don’t tangle. Add a small lining pocket on the flap face that measures roughly 4 inches by 3 inches, then stitch the pocket edges and install a snap closure. Keep the flap edges clean with a narrow bias tape finish or a folded hem. Finally, close the organizer with a second snap on the main body so it stays shut when he tosses it into a bag.
Cables are the mess that grows legs. I made this denim organizer because denim holds shape, hides fingerprints, and looks good draped on a nightstand. The storage is the elastic loop grid for the main cords, plus a hidden snap pocket for the tiny stuff like USB-C caps or earbuds tips. It flatters a boyfriend who travels or works at a desk, because he can pull it open and see everything without rummaging. The color choice matters: indigo denim with tan thread looks warm against most skin tones and works with both black and brown tech gear.
AvoidDon’t use slippery lining fabric like thin satin — cables slide out and the pocket looks empty.
Pro tipUse elastic that stretches back firmly — if it sags, the cords look messy even when neatly placed.
3. Upcycled Watch Roll From a Leather Belt Offcut
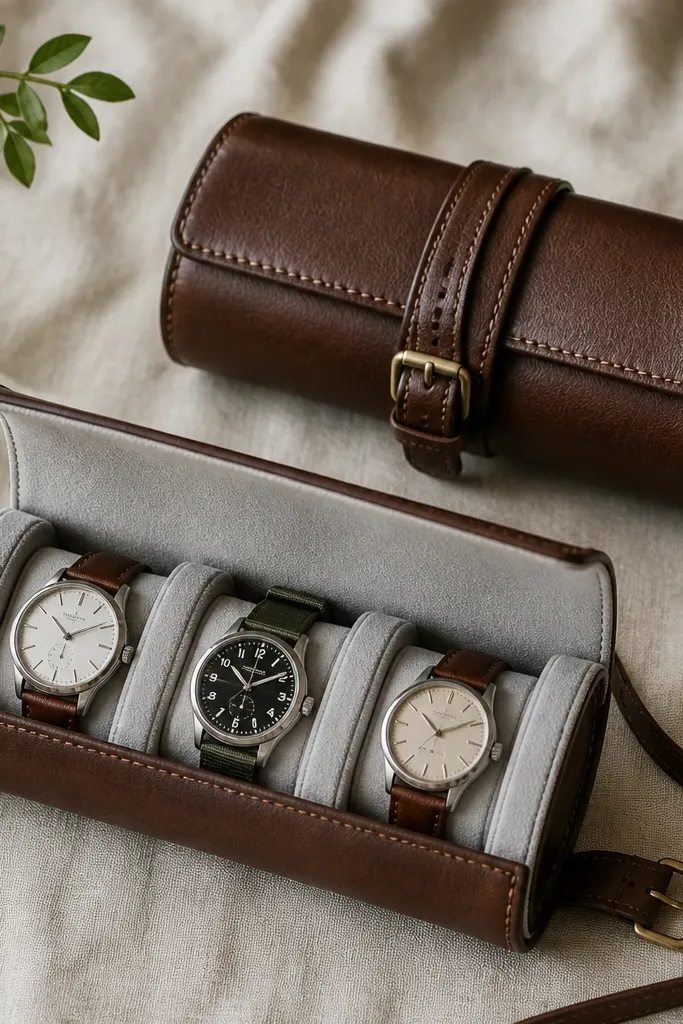
This one is for the boyfriend who wears a watch and hates hunting for it in the morning. I used a leather belt offcut because it already has thickness and a finished edge that looks intentional. The storage is built into three padded watch slots, so he can see each watch face without them rubbing together. Faux suede lining keeps the watches from sliding and makes the roll feel soft, which matters when it’s used daily. It looks best on guys who like neutral outfits — black, navy, gray — because the leather tone reads like a real accessory, not a craft project.
Start by slicing the belt into a rectangle big enough to wrap, then trim to about 9 inches long and 5 inches wide for three slots. Cut three inner pads from foam sheet (around 3/8 inch thick) and cover with light gray faux suede, then stitch the suede edges so they don’t fray. Mark slot centers and sew the pads into the inner roll so each slot has a 1/4 inch gap between them. Fold the leather outer around the inner section and stitch along the side seam using waxed thread. Finish with a simple leather tie made from a belt strip, plus a small hole-and-stud closure if the tie needs structure.
Condition the leather with a tiny amount of leather balm before you stitch if it feels dry — it prevents cracking along the stitch line.
Skip super-thin foam — watches will flop and the roll looks unfinished.
4. Desk Drawer Insert for Receipts, Pens, and Spare Wallet Cards
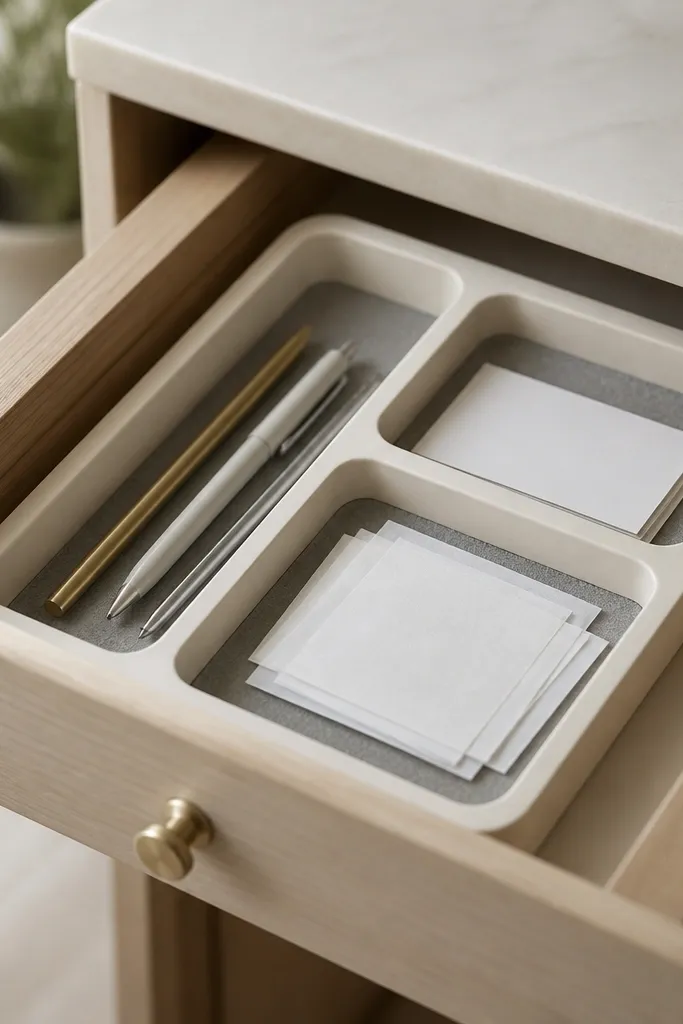
Measure the inside of the drawer first, then cut plywood to fit with a 1/8 inch clearance on each side for easy removal. Sand edges and round corners with 1/4 inch radius so it doesn’t catch. Cut three compartment walls: pens as a 10 inch by 1.5 inch channel, cards as a 3.5 inch square pocket, and receipts as a shallow tray about 10 inches by 4 inches. Glue felt to the base and walls, then glue the partitions in place. Finish with one coat of matte water-based paint, then seal with a thin poly coat so it wipes clean.
This gift is boring in the best way. It makes his desk drawer stop turning into a junk pit. I built mine as a drawer insert from thin plywood because it’s stable, and the compartments look crisp when you keep the edges rounded. Felt lining matters here: it stops receipts from sliding and makes pens feel like they belong. This works for boyfriends with ADHD-level “things everywhere” energy, because the insert forces a visual order without asking him to change his personality. The cream and gray combo looks calm and reads clean under a desk lamp.
AvoidDon’t leave sharp corners inside the drawer — they snag paper and make the organizer feel rough.
Pro tipUse a scrap test by sliding the insert in and out 10 times — if it scrapes, sand the high spots now.
5. Wall-Mount Phone Dock With a Cable Route Channel
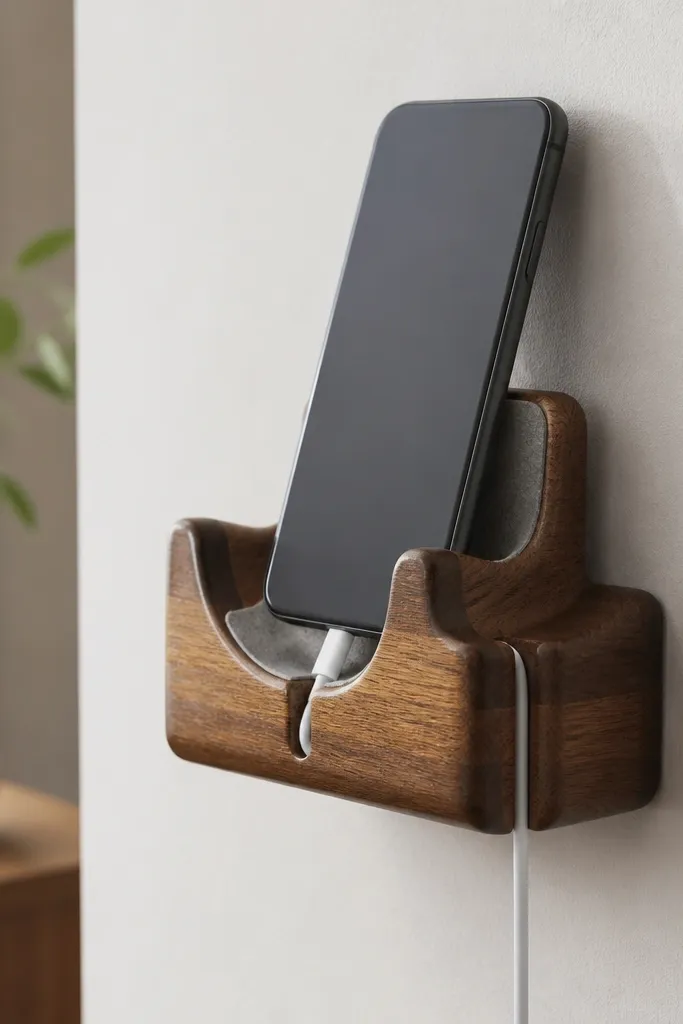
Start by cutting a back plate from 3/4 inch plywood, about 7 inches wide by 4 inches tall. Carve or route a phone cradle with a shallow curve, then sand smooth and seal with 2 coats of poly. Add a channel on the side about 3/4 inch deep and 1 inch wide, sized for the charger cable you actually own. Install a small notch at the bottom for the cable exit. Attach a 1/8 inch-thick rubber pad to the cradle base using contact cement. Mount the dock with two heavy-duty screws into a stud or use proper anchors, then test the angle by placing his exact phone case on it.
This is the “he stops charging on the couch” fix. I built a dock that holds his phone at a slight angle so he can grab it without twisting his wrist. The storage is the cable route channel — the cable goes from the charger into the wall area cleanly instead of hanging like spaghetti. I use a soft rubber or silicone pad in the cradle so the phone doesn’t slide and the wood never gets scratched. It looks best when the wood matches his furniture or his belt leather tone, but it also works in apartments if you choose a medium stain like chestnut. This is especially good for boyfriends who hate clutter on nightstands.
AvoidSkip glossy finishes if your boyfriend has oily hands — the dock gets slippery fast.
Pro tipMeasure his phone with the case on — the cradle should contact the case edges, not the screen.
6. Repurposed Suitcase Mini-Lock Box for Wallet and Sunglasses
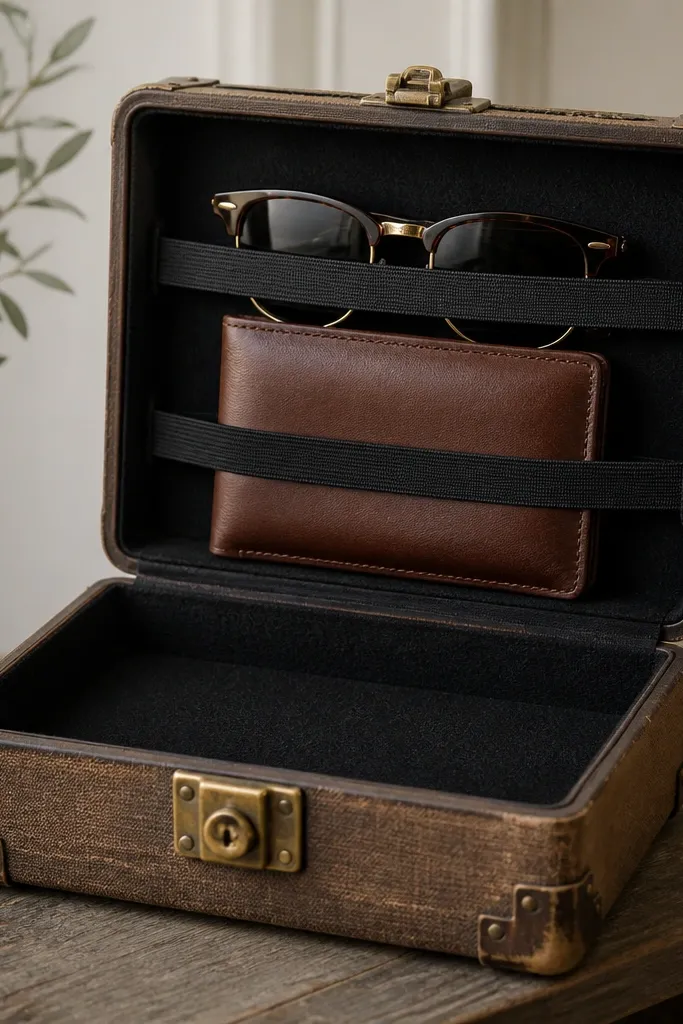
Start by cleaning the case and removing any loose hardware so the lid closes tight. Cut a base insert from felt or thin foam-backed felt to match the interior footprint. Add two elastic straps across the top insert, each strap about 6 inches long, so they can grab the wallet and sunglasses without crushing them. Glue the felt insert in place with fabric glue, then stitch or glue strap ends to the interior side walls. Install the lock hardware if it’s missing, or keep the existing one and just replace broken springs. Seal any exposed wood edges with clear varnish so it doesn’t shed fibers.
This gift feels like a secret place, and my boyfriend actually uses it. I repurposed a small suitcase section or a thrifted mini case because the hardware already looks like it belongs in an adult life. Storage is the fitted felt interior plus elastic straps that hold his wallet and sunglasses in place. The felt keeps items from sliding and reduces scratches when he tosses the box onto a shelf. It looks best with dark, moody interiors, but it also pops in bright rooms if you keep the interior felt black and the straps black elastic. It’s a great match if he keeps “important stuff” in random pockets.
AvoidDon’t overstuff the interior — if the lid presses down, the felt peels and the straps lose shape.
Pro tipUse elastic that stretches only a little — if it’s too stretchy, items slump and the box looks careless.
7. Patchwork Canvas Storage Pouch for Car Keys and Road Receipts
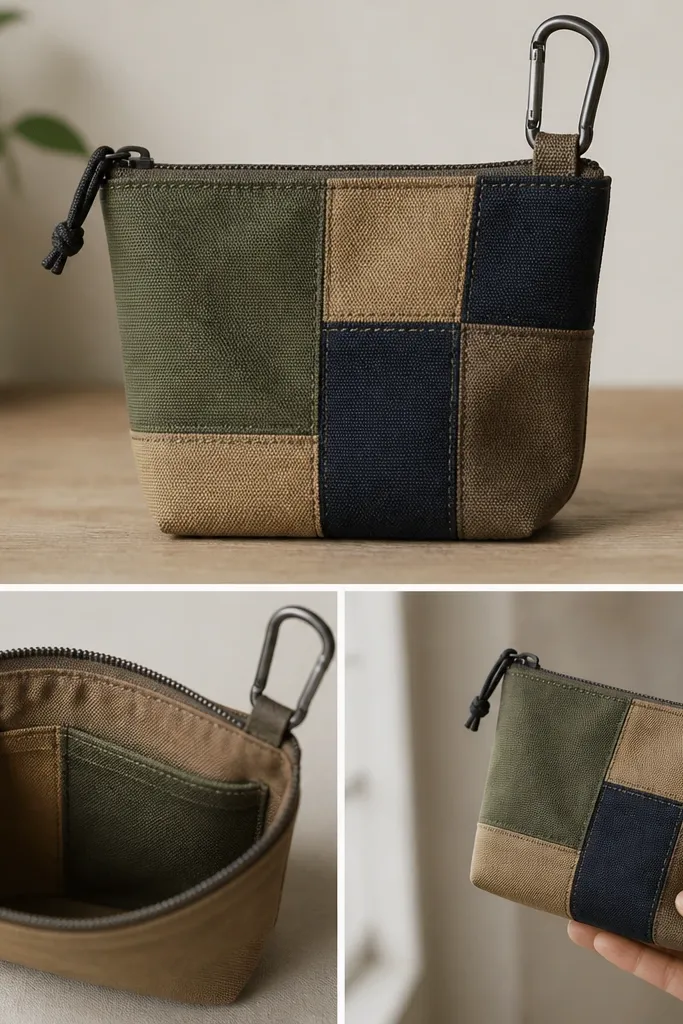
This is a practical gift that still looks handmade in a good way. I like patchwork canvas because it hides wear and gives you a “designed” look without needing fancy carving or engraving. The storage is split: a key clip to stop jingling chaos, and a flat slip pocket for receipts, parking cards, or toll tags. It flatters boyfriends who drive a lot and toss things into a center console — this gives him a single bag that stays together. The olive and navy palette looks good next to car interiors and work bags, and it doesn’t look loud.
Cut two outer panels from canvas scraps, then sew them together into one rectangle about 9 inches wide by 7 inches tall. Cut two lining panels in a matching cotton canvas and add a zipper opening on the top edge. Install a key clip on the lining side panel, centered about 2.5 inches down from the zipper, then stitch a small reinforced box stitch so the clip doesn’t tear out. Add a slip pocket on the opposite lining panel, about 8 inches by 5 inches, with 1/2 inch hem to keep receipts from catching. Sew outer to lining right sides together, insert zipper, and topstitch along both sides. Finish with a small carabiner loop at the top seam if he likes clipping it to a bag.
Use a zipper with metal teeth — plastic zippers look cheap after a few months of pocket friction.
Skip thin thread — the key clip pulls hard and weak stitching rips.
8. Magazine Holder-Style Blanket Ladder With a Pocketed Shelf
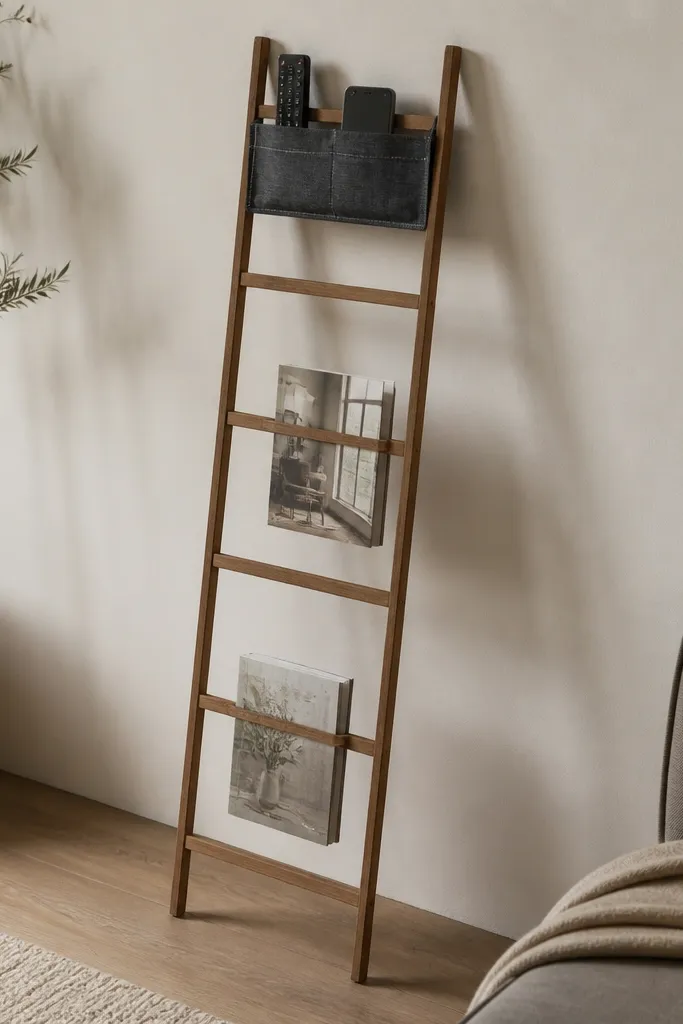
Start by cutting side rails from 3/4 inch wood, about 60 inches tall. Cut 6 rungs at roughly 10 inches long each, then sand and round the rung edges. Assemble with pocket hole screws so the ladder stays rigid. Attach the pocket shelf using a backing board (about 12 inches by 6 inches) screwed to the ladder, then sew a charcoal canvas pocket on top with a top opening and a hemmed bottom. Add a small elastic strap inside the pocket to stop remotes from sliding out. Place the ladder where he actually sits — I aim for the pocket shelf to sit about 48 inches from the floor.
If his living room has a couch that eats remotes, this fixes it without a big organizer. I built a ladder-style stand because it looks like decor even when it holds practical stuff. Storage happens in the pocket shelf attached near the top rung — it keeps a phone and remote together so he stops losing them behind cushions. I use charcoal canvas for the pocket because it hides lint and looks clean. This works best when his room has neutrals or warm wood — the ladder tone and fabric contrast look intentional. It also flatters taller spaces because the vertical shape makes the wall feel taller.
AvoidDon’t make the pocket too shallow — remotes should sit down, not perch on the rim.
Pro tipStain the ladder first, then attach fabric — the stain fumes won’t soak into your pocket later.
9. Leather Strap Wall Shelf for Sunglasses and Small EDC
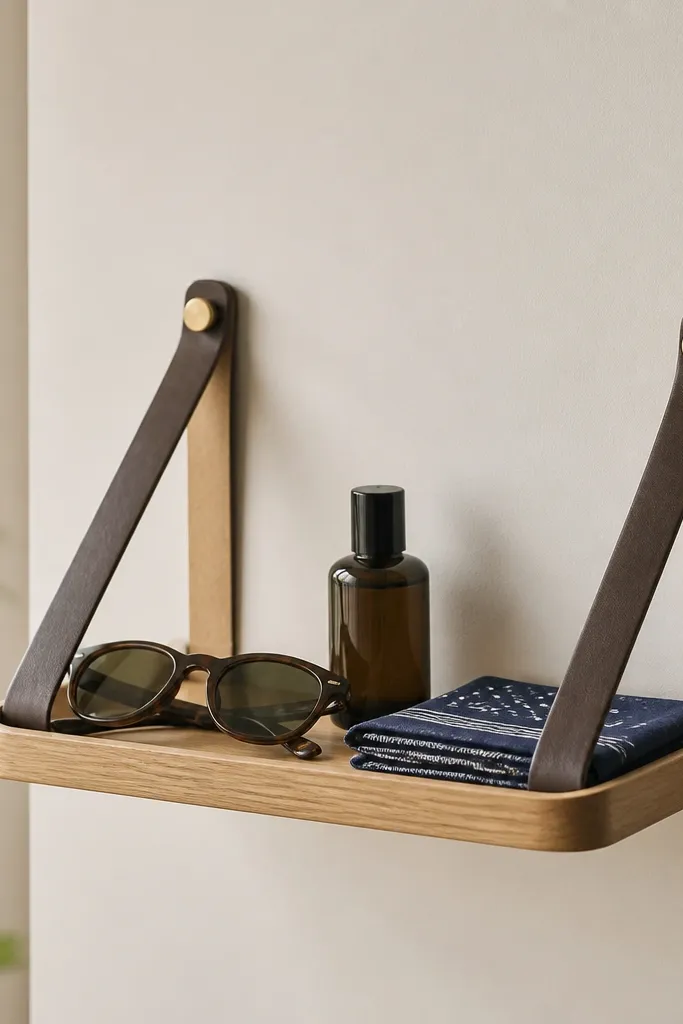
Cut a shelf board from 3/4 inch oak to 14 inches long by 5 inches deep. Round the front lip with sandpaper so it feels safe to touch. Stain with a light oak or honey stain and seal with satin poly. Mark two strap anchor points on the underside — about 2.5 inches from each end. Install wall anchors or studs, then attach leather straps that are 1 inch wide and 12-14 inches long, wrapping over the shelf and stitching the ends. Add a thin felt pad to the shelf base so sunglasses don’t slide. Mount so the shelf sits around eye level when standing, about 60 inches from the floor.
This is the “he sees it every day” storage gift. I made it with a small oak shelf and leather straps because straps hide hardware and give it that real accessory feel. The storage is shallow but wide — sunglasses sit on the lip, while small EDC items like a handkerchief or mini cologne fit in the flat area. Leather reads warm against most skin tones and looks good in hallways where you want something that feels personal. It’s best for boyfriends who keep their sunglasses on a counter right now and forget them until they leave the house.
AvoidSkip super-light shelf boards — thin wood flexes and makes the sunglasses wobble.
Pro tipUse strap ends with a clean edge finish — burnish or dye them so the underside looks finished.
10. Fabric-Covered Memory Box With a Lift-Out Organizer Tray
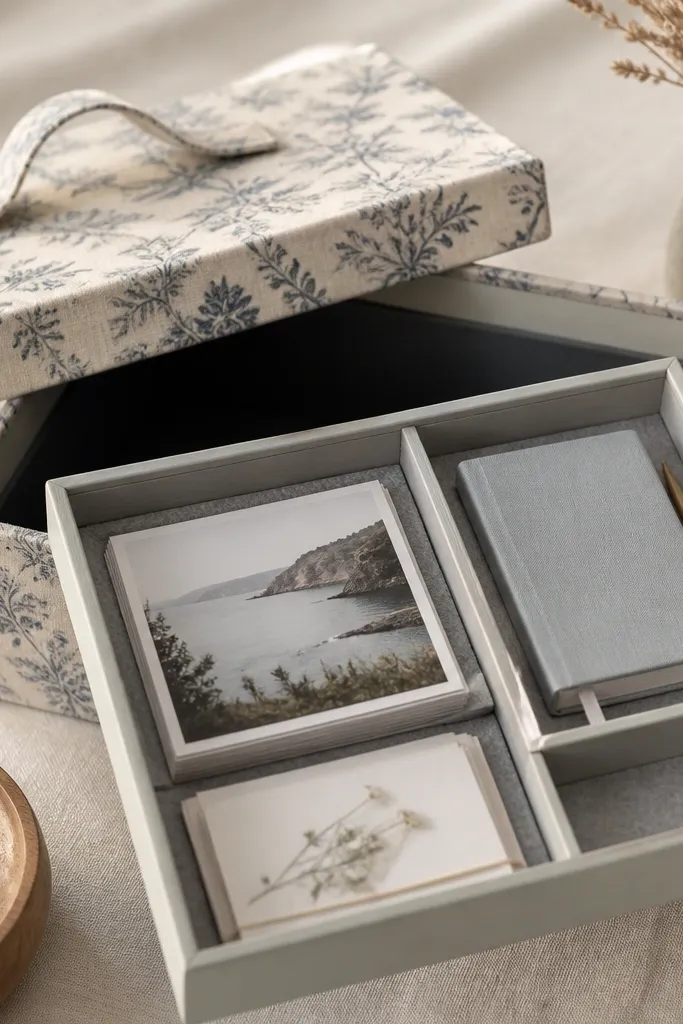
Start with a rigid box base from a craft store or a small storage case, about 12 inches wide by 8 inches deep. Wrap the outer with cotton fabric using spray adhesive, then trim the corners with clean folds. Paint the lift-out tray in a matching neutral and glue felt to the top and sides. Build compartments inside the tray with thin wood dividers: one for a small notebook (about 6 inches by 4 inches), one for cards (3 inches by 4 inches), and a narrow slot for photos. Install the tray so it lifts out easily, leaving a 1/4 inch gap for fingers. Add a simple fabric handle to the lid using straps sewn to the inside edge.
This is for the boyfriend who has one drawer for “life stuff” and everything spills out. I made a fabric-covered box because it looks soft and personal, but the storage stays structured thanks to a lift-out tray. That tray keeps small items from mixing and makes it easier to grab what he needs without dumping the whole box. The felt lining keeps paper edges from curling and reduces scuffs on photos. It flatters people who like sentimental items but dislike clutter, because the lid hides mess while the tray keeps order. I used a muted pattern so it doesn’t compete with his room colors.
AvoidDon’t skip the lift-out tray — loose items inside a fabric box turn into one tangled pile.
Pro tipUse a fabric that can handle wiping — I pick cotton duck or tightly woven cotton so it doesn’t fuzz quickly.
11. Tote Bag Organizer Insert for Gym Stuff and Daily Carry
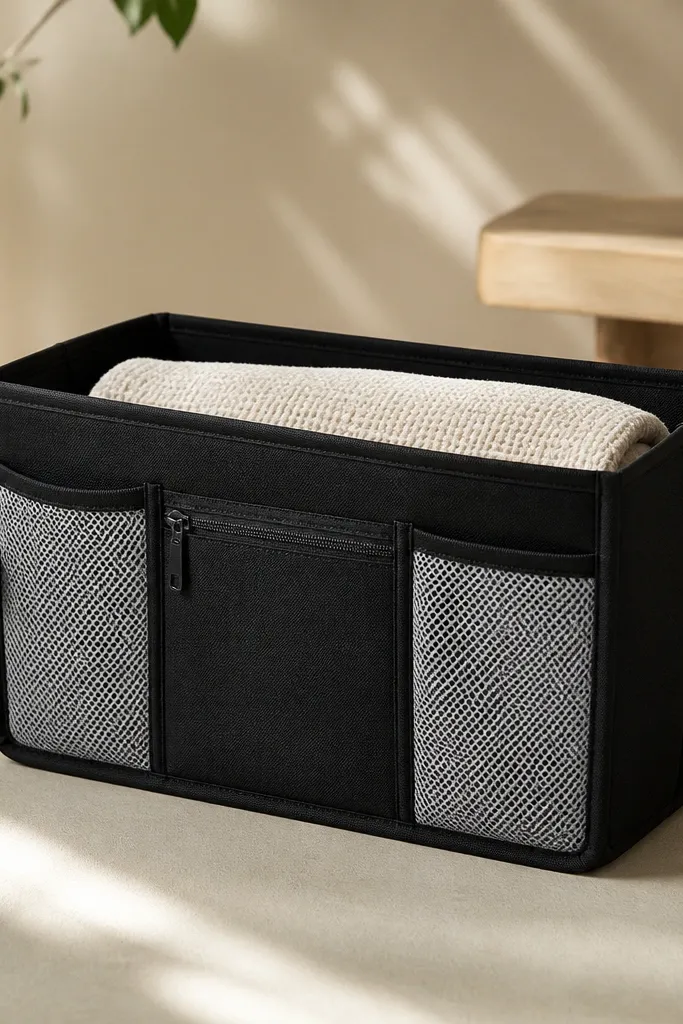
This is the storage gift that changes his routine. I made an insert instead of a separate pouch because it turns his tote bag into a system without him buying new bags. The storage is organized by access: zip pocket for his phone or wallet, mesh pockets for smaller items, and a wide open section for a towel or hoodie. I use black canvas sides because they hold shape and look clean even when his tote gets dirty. Light gray mesh lets him find things fast. This works for boyfriends who carry a bag to work and also go to the gym — one insert covers both without mixing smells.
Measure the inside of the tote bag and cut the insert base from medium-weight canvas, about 1 inch smaller than the bag footprint so it doesn’t snag. Sew side panels to the base and add a front panel with zip pocket dimensions: 9 inches wide by 7 inches tall. Add two mesh pockets on the side — each about 6 inches wide by 5 inches tall — and top-stitch around the pocket edges to keep them flat. Create a wide open back compartment by leaving that section unpocketed. Attach a stiff interfacing to the base so the insert stands up. Test-fit the insert in the tote and adjust pocket heights so his items reach the top opening.
Use a zipper with a pull tab he can grab one-handed — gym schedules are not gentle.
Skip floppy inserts — if it collapses, it looks messy and he stops using it.
12. Wall Shelf With Sliding Drawer for Charger Bricks
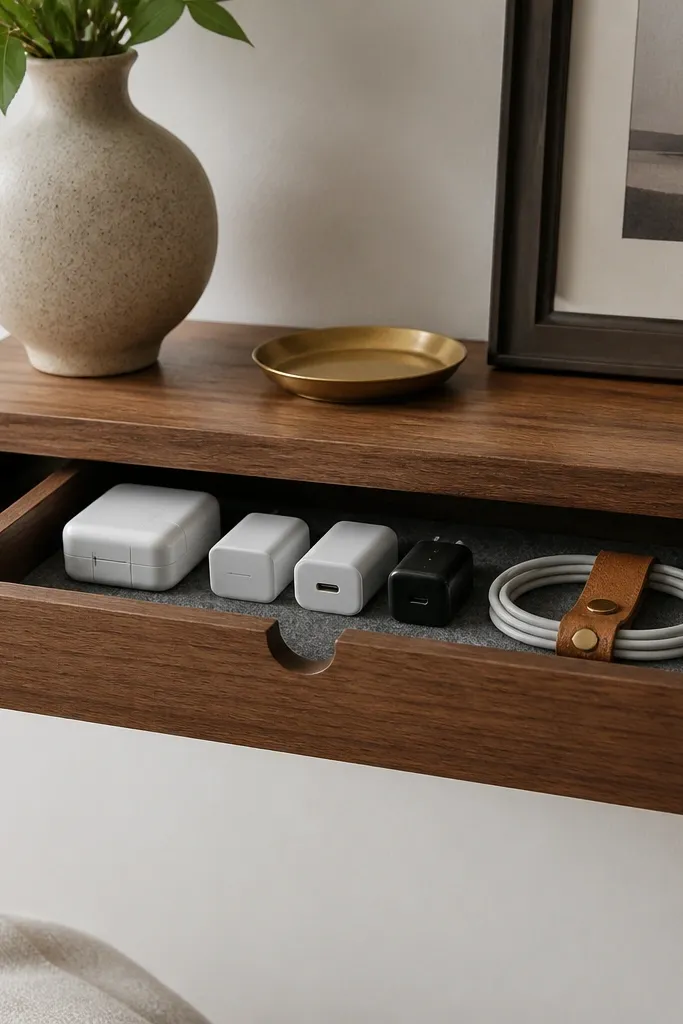
Build a shallow shelf frame from 3/4 inch wood, about 14 inches wide by 6 inches deep. Cut a drawer box that slides under the shelf with 1/8 inch clearance on all sides. Install drawer slides rated for small furniture weight, and add a felt base inside the drawer. Add a finger groove on the drawer face — carve it with a router or sand it by hand, about 1.5 inches wide and 1 inch deep. Create a cable loop on one side using a small screw eye and a strip of leather or waxed cord tied into a loop. Mount the shelf to studs if possible, or use proper wall anchors and keep the drawer light.
This is for the boyfriend who has chargers everywhere. I built a shelf with a sliding drawer because it keeps bricks hidden but still reachable when he needs them. The storage is inside the drawer: felt base so bricks don’t rattle, plus a cable loop that keeps cords from twisting. The shelf top can hold his watch or a small plant, so the piece looks like decor even when the drawer is closed. I like medium brown wood with a light gray felt because the combo looks calm and doesn’t show dust as fast. It’s a good match for apartments where he can’t drill a full desk organizer into the wall.
AvoidDon’t rely on friction-only drawers — they sag and look crooked after a few weeks.
Pro tipBefore final mounting, slide the drawer in and out 20 times — if it binds now, it will bind forever.
13. Round Coaster Set With Embedded Storage for Bottle Opener
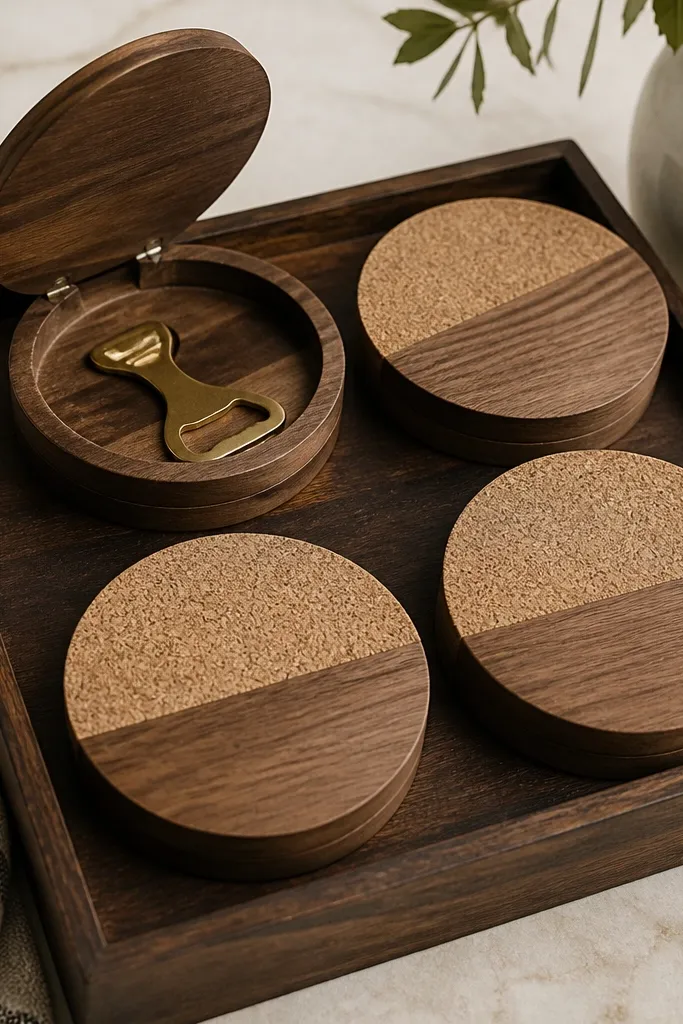
Start by making or buying four round coaster bases about 4 inches across, with cork on top and a thin backing. Choose one coaster base and cut a shallow slot on top for a hinged lid, leaving a 1/4 inch rim so it still feels like a coaster. Attach a tiny hinge to the lid and install a small magnetic catch on the underside so it closes tight. Glue a bottle opener into the compartment so it sits flat, then test the lid opening with one hand. Mount the coasters on a dark wooden tray or ring to keep them together. Seal cork with a light protective spray if you want extra stain resistance.
This gift is fun but still practical. I made it as a coaster set with one coaster that opens to store a bottle opener — the storage is hidden in plain sight. Cork coasters already handle drink rings, but when one has a hinged top, it becomes a daily-use “where is it?” solution. It flatters a boyfriend who hosts or drinks at home because it turns a missing tool into a built-in habit. Keep the colors simple: natural cork, dark wood tray, and a metal opener that matches his other hardware. It looks good on coffee tables and bar carts without screaming DIY.
AvoidSkip oversized compartments — if it’s too deep, the coaster stops being stable.
Pro tipUse a magnet that holds firmly under a quick tap test — weak magnets pop open during use.
14. Fabric-Edge Shoe Organizer Tray for Entryway Mail and Wallet
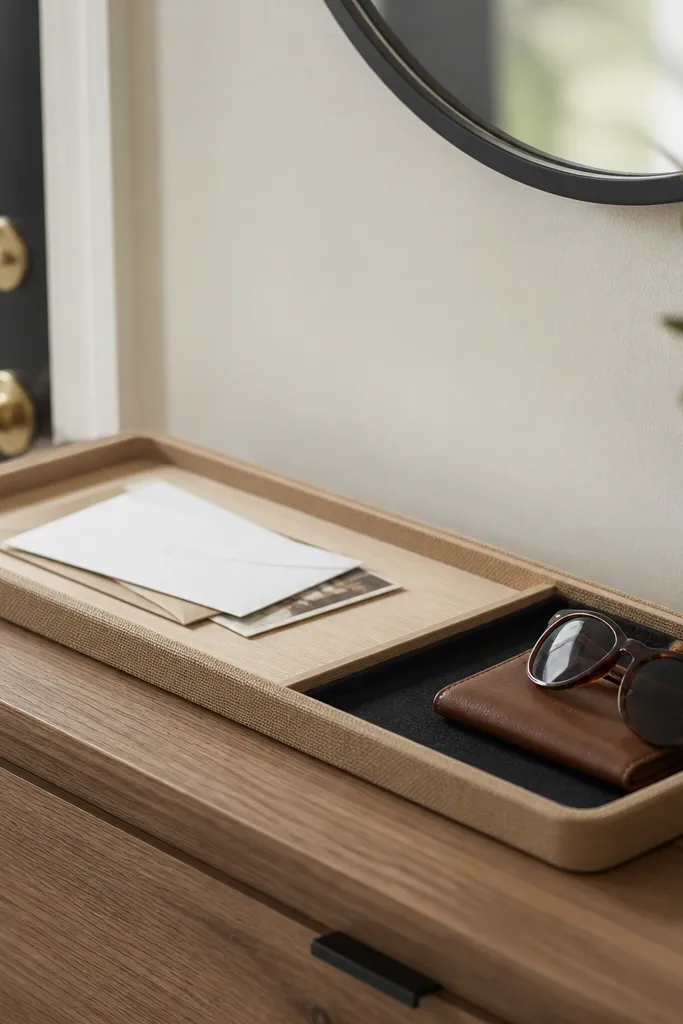
Cut a plywood base about 18 inches long by 7 inches deep, then build a shallow lip around the perimeter that rises 1 inch. Add a mail slot divider that stands 2.5 inches high from the base, leaving a gap of about 1/2 inch at the top so letters slide in easily. Line the pocket area with black felt, about 12 inches wide by 6 inches deep, and glue it down. Wrap the outer edges with fabric trim using contact cement and stitch the corners if your trim allows. Seal the outer wood with matte poly so it wipes clean. Place the tray by the door and test with his real mail thickness and his wallet size.
This one fixes the “mail pile + wallet pile” combo. I made the tray because a shallow organizer by the door is faster than a drawer he won’t open. The storage is two parts: a vertical mail slot for letters and a felt-lined pocket for wallet, sunglasses, or a small tech pouch. The fabric edge trim makes the plywood look softer and keeps it from scraping shoes or door frames. I like tan fabric trim because it looks warm next to most entryway floors. This is best for boyfriends who drop everything on a bench or the floor and then hunt for it later.
AvoidSkip tall dividers — they block the slip-in action and he stops using it.
Pro tipSand the lip edges until they feel rounded — door areas get bumped and sharp edges look worn immediately.
15. Upcycled Frame Shadow Box With a Removable EDC Insert
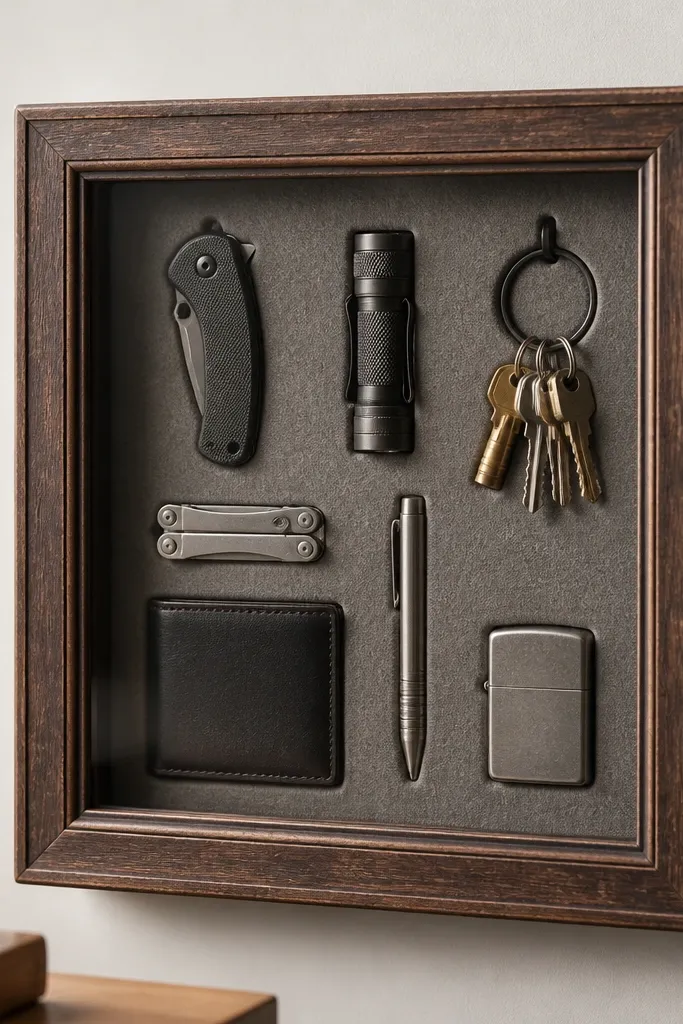
This is the storage gift for the boyfriend who likes his stuff organized but hates obvious organizers. I used an upcycled frame because the glass and wood already look like decor, and you can hide storage behind the removable insert. The storage is an EDC insert with slots for a key ring, a small notebook, and a couple of cards. Gray felt reads neutral and keeps items from sliding. It flatters guys who have a clean, minimal room and want the storage to look like wall art. It also works for boyfriends with light hair and skin tones because gray and warm wood tones don’t clash.
Take an old frame and remove the backing, then keep the glass if it’s intact. Cut a removable insert board from thin plywood or foam board to fit inside the frame opening, leaving a 1/8 inch gap so it slides out. Cover the insert with gray felt and glue it down smoothly. Add a key ring hook on the felt side by fastening a small screw hook through the board before covering or by mounting a hook hardware to the insert base. Cut slots for cards and a small notebook using a utility knife through the felt and board, then fold felt edges cleanly. Put the insert back and secure the frame backing so it can be removed for refilling.
Label only the inside, not the front — a tiny handwritten label on the felt looks intentional and stays hidden from guests.
Don’t use flimsy backing — if the insert bows, the frame looks uneven and the items fall out.



