1. Cream Dough + Champagne Handprint Veil
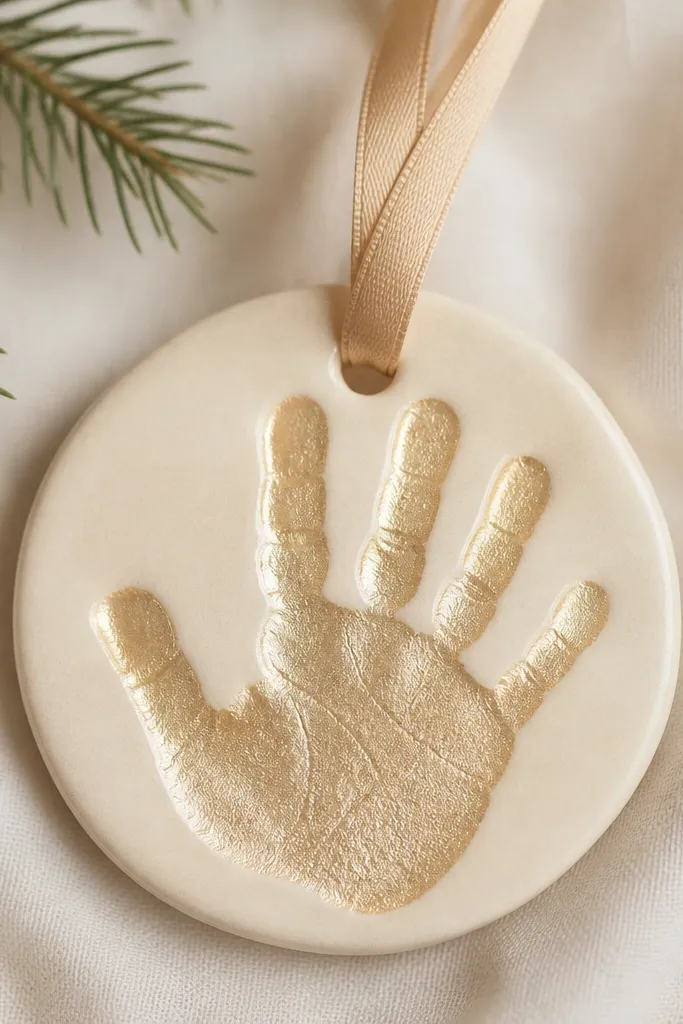
I make this one for people who want “soft luxury” without going full glam. The cream base is forgiving on skin tones because it doesn’t fight warm undertones — it reads cozy and expensive at the same time. For the handprint, I buff champagne mica into only the raised areas so the fingers catch light when the ornament moves. The result looks like a keepsake charm from a boutique gift shop rather than a craft project. This style flatters families because it looks good on camera even when hands are small or slightly uneven.
Start by rolling your salt dough to 9 mm and cutting a 3.5-4 inch circle or oval. Stamp the handprint firmly, then smooth the edges with a damp fingertip before it dries. After the ornament fully dries, sand with 220 grit so the surface feels smooth. Paint the entire piece warm cream, let it dry, then dab champagne mica mixed with a touch of clear medium on the handprint ridges only. Finish with a satin clear coat and thread a thin champagne ribbon through the hole.
Use a makeup sponge for the mica so you don’t streak the background.
Avoid glitter all over — it dries crunchy and makes the ornament look costume-y.
2. Cool Gray Stone + Silver Finger Highlights
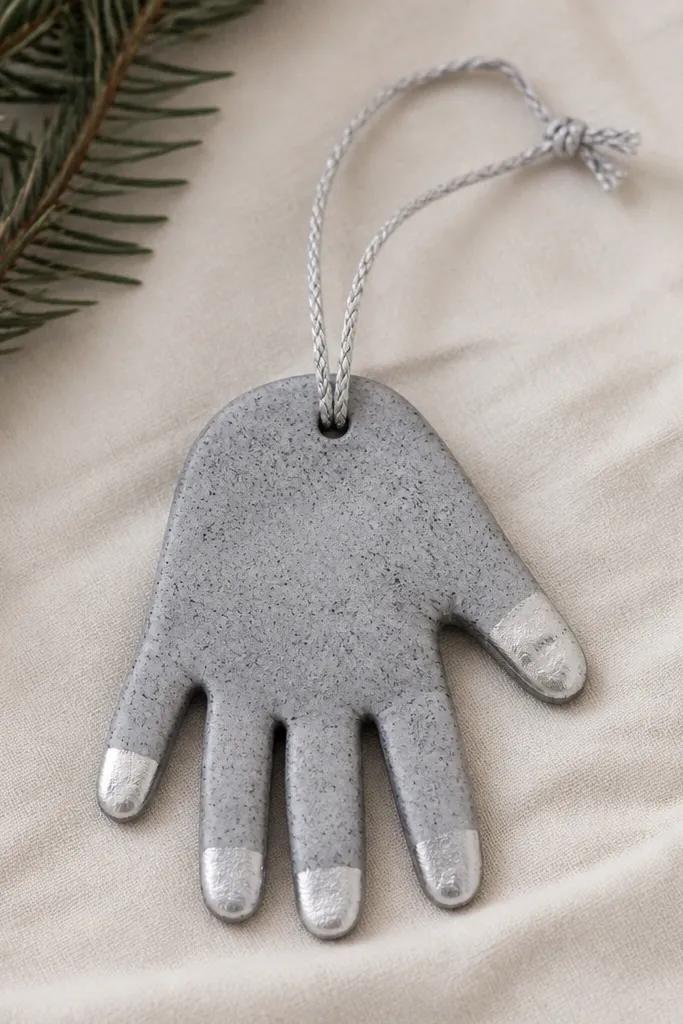
This one looks like modern decor because the base reads like stone. Cool gray hides tiny cracks and uneven edges better than bright colors, so it’s a lifesaver when your handprint isn’t perfectly smooth. I keep metallic only on fingertips and palm ridges so it looks intentional instead of “sprayed with stuff.” It flatters anyone who likes minimal holiday styling and works well for couples ornaments too. The silver highlights also photograph crisp against gray.
Roll dough to about 8 mm for a slightly lighter feel, then cut a rounded rectangle or circle. Stamp the handprint, then lightly press a texture stamp (like a subtle linen pattern) around the border only. Let it dry fully, then sand lightly. Paint the whole ornament cool gray, then add a tiny amount of white craft paint with a dry brush to create faint speckles. After that dries, brush silver mica or metallic paint only on the raised fingers. Seal with satin clear coat and tie silver twine through the hole.
If you want more stone effect, mix a pinch of charcoal powder into the gray paint before sealing.
Don’t paint metallic across the whole handprint — it turns flat and cheap-looking fast.
3. Deep Cocoa + Antique Brass Handprint
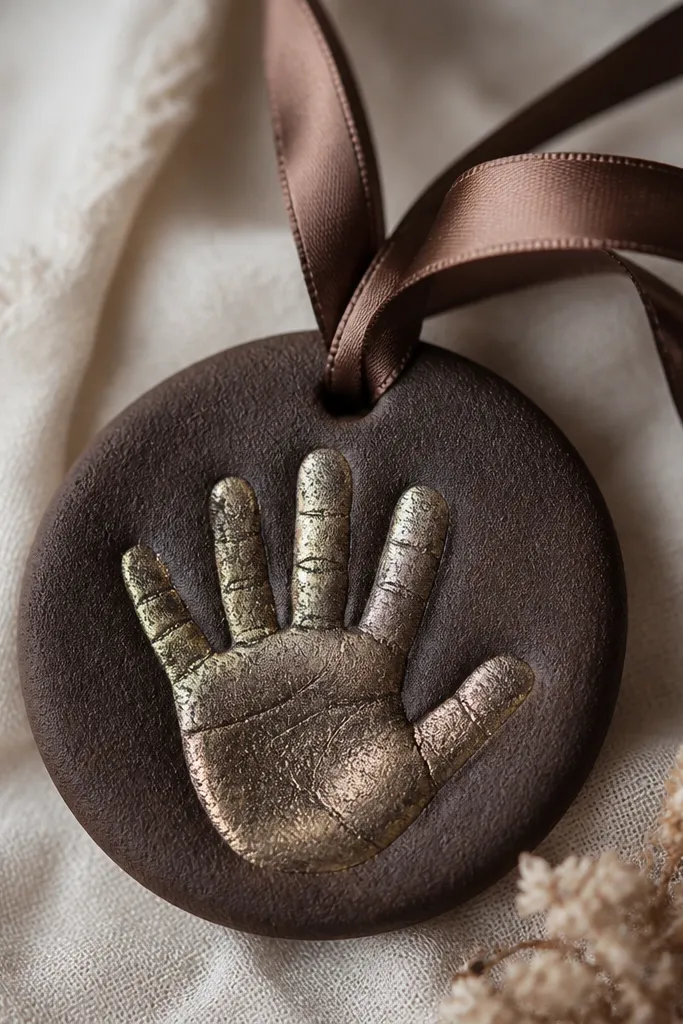
Chocolate brown plus antique brass is the combo that makes these look like heirloom holiday jewelry. The deep cocoa base makes the handprint feel dimensional even when the details are shallow. Antique brass is more forgiving than bright gold because it has depth — it looks aged instead of flashy. This style looks great for older kids' handprints and for gifts where you want a “winter coffee shop” vibe. It also pairs perfectly with warm white lights and brown tree ornaments.
Pro tipUse a cotton swab to keep brass only on the hand — it gives that museum-label finish.
Roll dough to 10 mm so it holds the darker color cleanly. Cut a 4 inch circle, then stamp the handprint. Dry completely, then sand edges until they’re smooth. Paint the entire ornament deep cocoa, including the background around the handprint. Once dry, rub antique brass metallic paint or mica into the raised handprint ridges, then wipe the excess off with a damp cloth so only the texture stays metallic. Add a thin wash of darker brown into the engraved areas, seal with semi-gloss, and thread a dark brown satin ribbon.
AvoidAvoid bright yellow gold on cocoa — it clashes and reads craft-store.
4. Pearl White Base + Soft Blush Palm
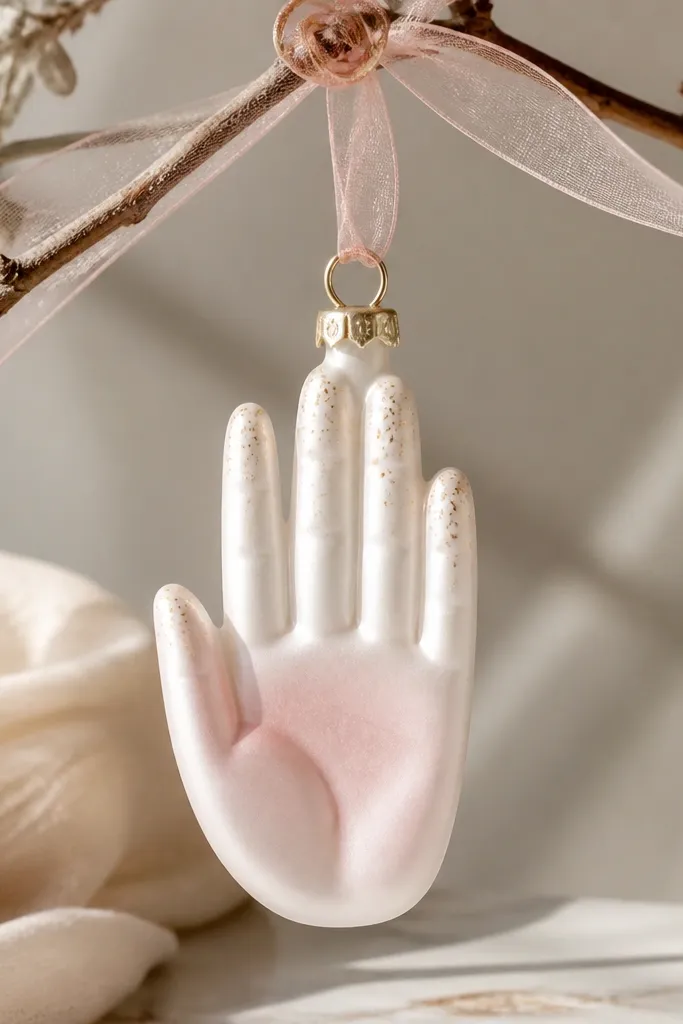
Pearl white with a blush palm feels delicate, like a ceramic keepsake. The blush is strongest on the palm area, which makes the handprint look fuller and more “finished” than a flat single-color stamp. I add tiny gold specks near the fingertips to create sparkle without making the whole piece look glittery. This style flatters light skin tones and also looks pretty for newborn handprints because it stays gentle. It also works for non-holiday uses like a nursery mobile ornament or a baby shower keepsake.
Roll dough to 8-9 mm and cut a scalloped oval for softness. Stamp the handprint and smooth the rim with a damp sponge. Dry fully and sand with 220 grit. Paint everything pearl white and let it cure. Mix blush paint with water or clear medium so it’s translucent, then brush it over the palm and lower fingers only. Add a few gold mica dots with a fine brush, seal with satin clear coat, and use a sheer blush ribbon through the hole.
Translucent blush looks more expensive than opaque pink — aim for milky coverage, not solid blocks.
Don’t add blush to every finger — it makes the handprint look muddy.
5. Black Velvet Effect + White Gilded Edges
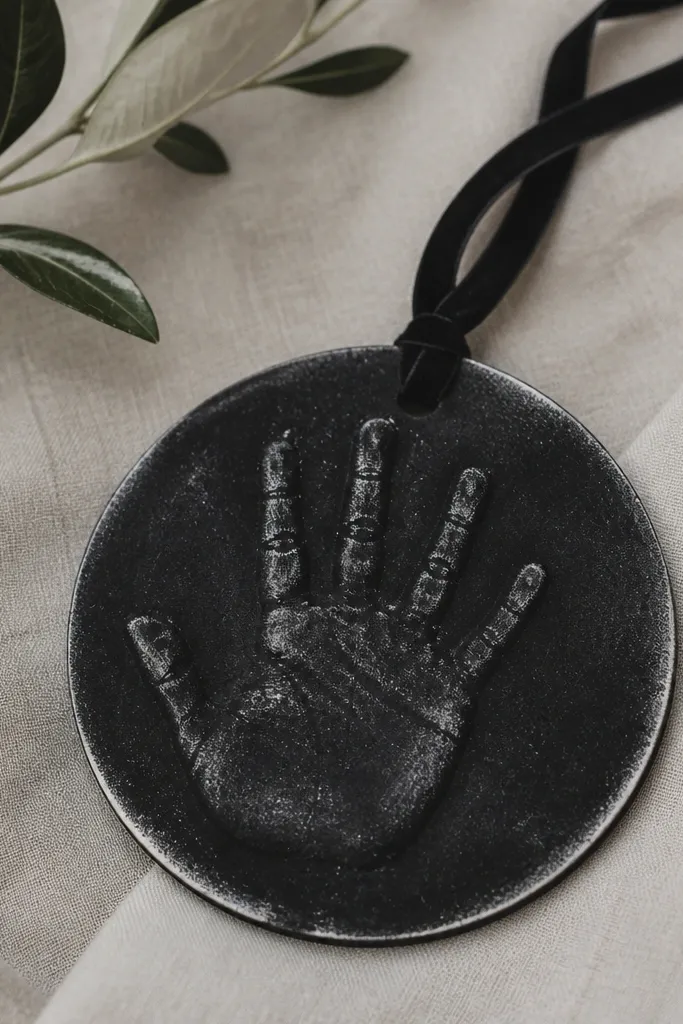
Black velvet effect is the quickest way to make salt dough look like it belongs on a styled tree. The trick is using a near-matte black base and then dry-brushing white only where light would hit. I keep the handprint mostly black with faint white speckles so it looks like frost on velvet. This style flatters dramatic holiday decor and looks stunning under warm lights. It’s also forgiving because black hides small surface imperfections better than light colors.
Roll dough to 9-10 mm, cut a 3.75 inch circle, and stamp the handprint. Dry fully, then sand the surface lightly so paint goes on smooth. Paint with a matte black acrylic, two thin coats. After it dries, dry-brush white paint mixed with a tiny bit of water across the outer rim and raised fingertips. Add a few speckles with an old toothbrush for snow-glow. Seal with a satin clear coat (not glossy), then thread black ribbon through the hole.
Use less paint on the brush than you think — dry-brushing should look like faint highlights, not stripes.
Avoid glossy black — it shows every bump and makes it look plastic.
6. Sage Green + Brushed Copper Fingers
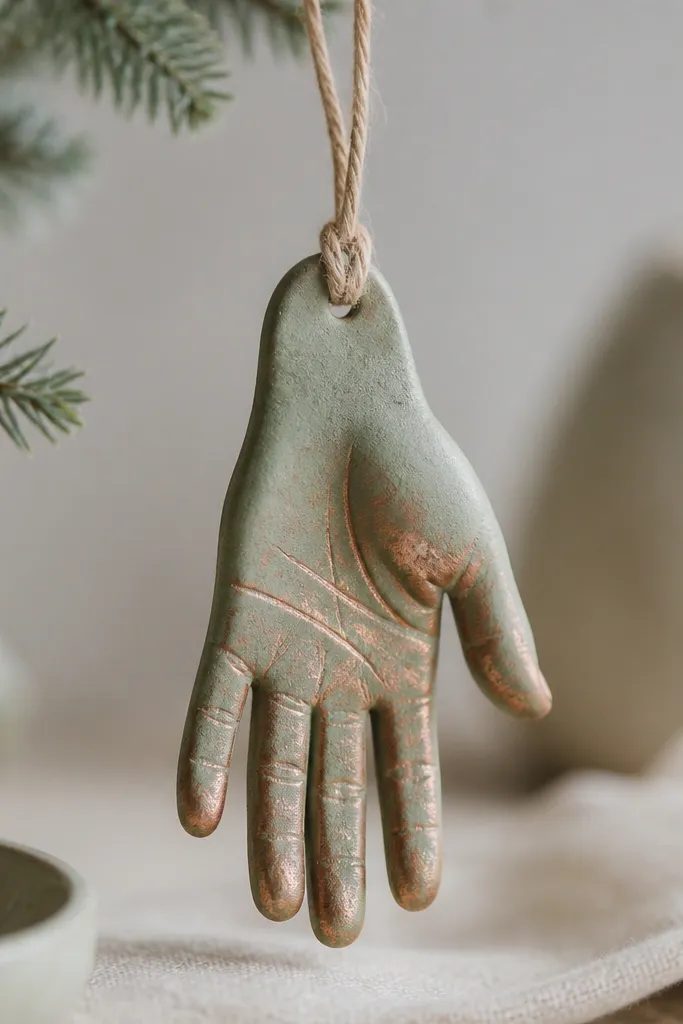
Sage green makes these feel like farmhouse-modern without looking rustic in a messy way. The copper is the expensive-looking part because it has warm undertones that look good against green. I brush copper in thin passes so it sits on texture instead of coating flat areas. This flatters neutral gift palettes and looks great with cream trees, wood shelves, and natural linen. It also gives a warm contrast for cool-toned skin prints.
Roll dough to about 8 mm and cut a rounded teardrop shape. Stamp the handprint, then carve a shallow border line around the edge to frame it. Dry completely and sand the edges. Paint the background sage green, let dry, then lightly glaze with a darker green wash in the border frame. When dry, apply copper mica or metallic paint with a soft brush only on the raised fingertips and palm ridges. Seal with satin clear coat and add tan twine through a centered hole.
If your copper looks too bright, tap it with a dry brush that has a tiny bit of black paint mixed in.
Don’t paint copper all the way to the background — that’s where it starts looking cheap.
7. Soft Sand + Gold Leaf Crackle
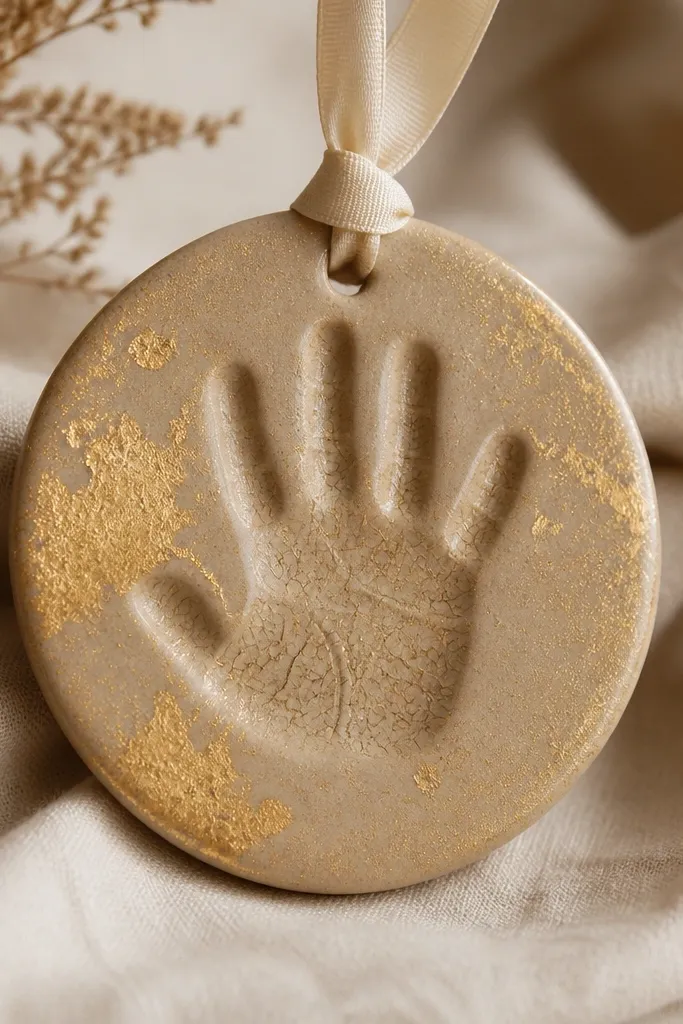
Gold leaf crackle makes salt dough look like it’s been framed in a gallery. The sand base is neutral and upscale, and the crackle gives movement to the handprint. I use crackle medium only on the raised handprint area so the background stays clean. The gold leaf sits in the broken lines, so it looks like aged metal rather than craft paint. This style works for older kids' handprints because the fingers create great crackle detail.
Roll dough to 9-10 mm and cut a 4 inch circle. Stamp the handprint and let it dry fully. Sand with 220 grit, then paint the whole piece soft sand. Once the base coat dries, brush crackle medium over the handprint ridges only. Apply gold leaf after the crackle medium reaches tacky stage, then press gently with a leaf tool or soft foam. Seal lightly with satin clear coat so you don’t dull the leaf. Thread a cream ribbon through the hole.
Use a small artist brush to keep crackle medium inside the handprint — clean edges matter.
Don’t crackle the whole ornament — the background turns busy and looks messy.
8. Ivory + Tiny Pearl Bead Border
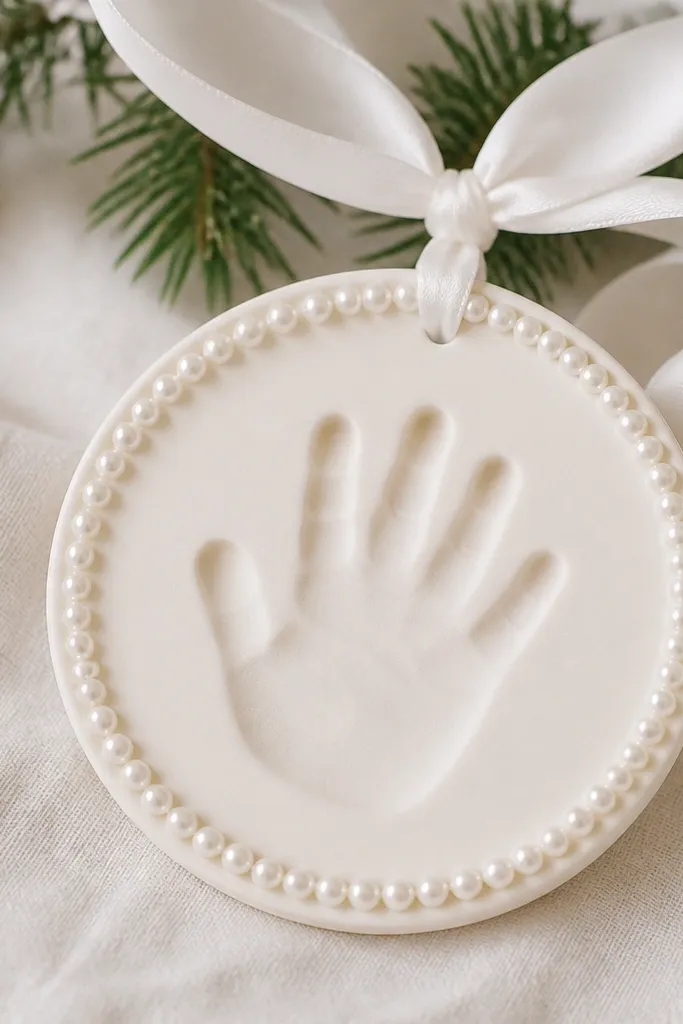
This is the one I make when someone wants “wedding ornament energy” without adding a ton of paint. The ivory background keeps everything calm, and the tiny bead border frames the handprint like a jewelry setting. I keep the handprint mostly plain and add only a faint gold wash so the beads do the talking. It flatters most skin tones because it doesn’t compete with the handprint details. It also looks expensive in close-up photos.
Pro tipUse tweezers for bead placement — it keeps spacing even and prevents wonky rows.
Roll dough to 8-9 mm and cut an ornament shape with a little extra border area, like a 3.5 inch circle with a slightly raised rim. Stamp the handprint, then dry completely and sand. Paint the entire ornament ivory and let it dry. Apply a thin line of clear-drying craft glue along the border and place tiny pearl beads (2-3 mm) in a tight circle. Add a very light gold mica dusting on the handprint ridges only. Seal carefully, then add a pearl-white ribbon through the hole.
AvoidAvoid big beads — they make salt dough look like a cheap craft kit.
9. Matte Terracotta + Handprint Outline Ink
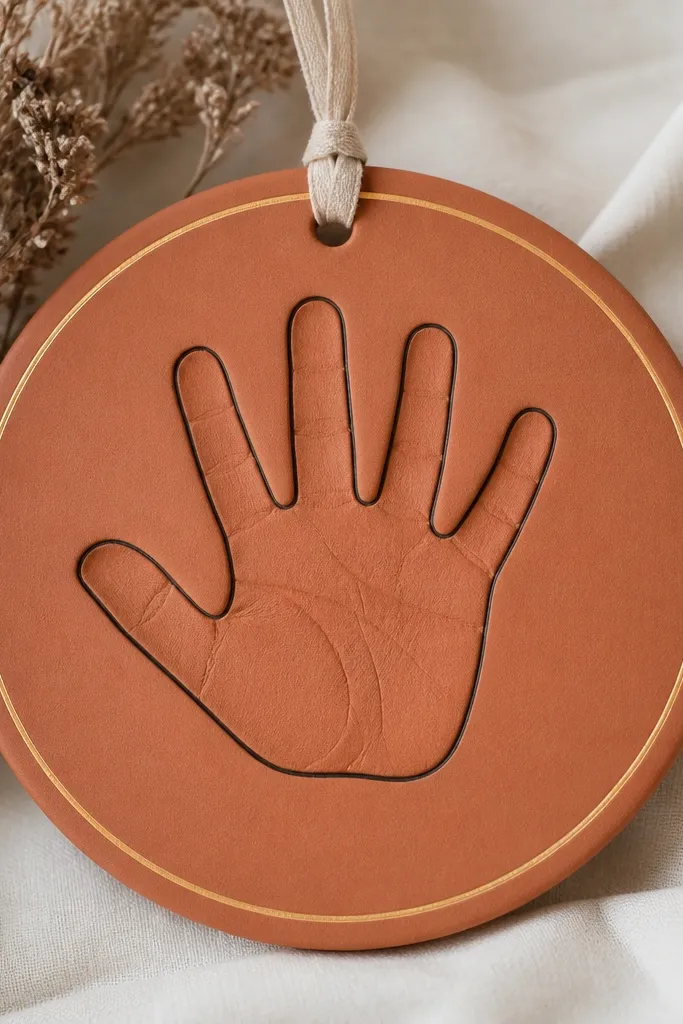
Terracotta looks expensive when it’s matte and when the handprint has crisp definition. The outline ink trick gives your handprint a “stamp” feel, like a printed illustration on pottery. I use dark brown ink so it looks natural against terracotta, not harsh black. This style flatters warm skin tones and looks gorgeous on a neutral tree with white and wood accents. It also makes imperfect handprints look intentional because the outline defines the edges.
Roll dough to 9 mm and cut a 4 inch circle. Stamp the handprint and smooth the rim. Dry fully and sand. Paint with matte terracotta acrylic in two thin coats. After it dries, use a fine liner brush and dark brown acrylic or waterproof ink to trace the handprint edges and fingertips. Add a thin gold line around the outer rim using a paint pen. Seal with satin clear coat and thread a cream twine loop through the hole.
Trace slowly with a paint pen; steady pressure gives a smooth line without blobs.
Don’t outline with thick paint — chunky lines read handmade in a bad way.
10. White Marble Look + Gray Vein Handprint
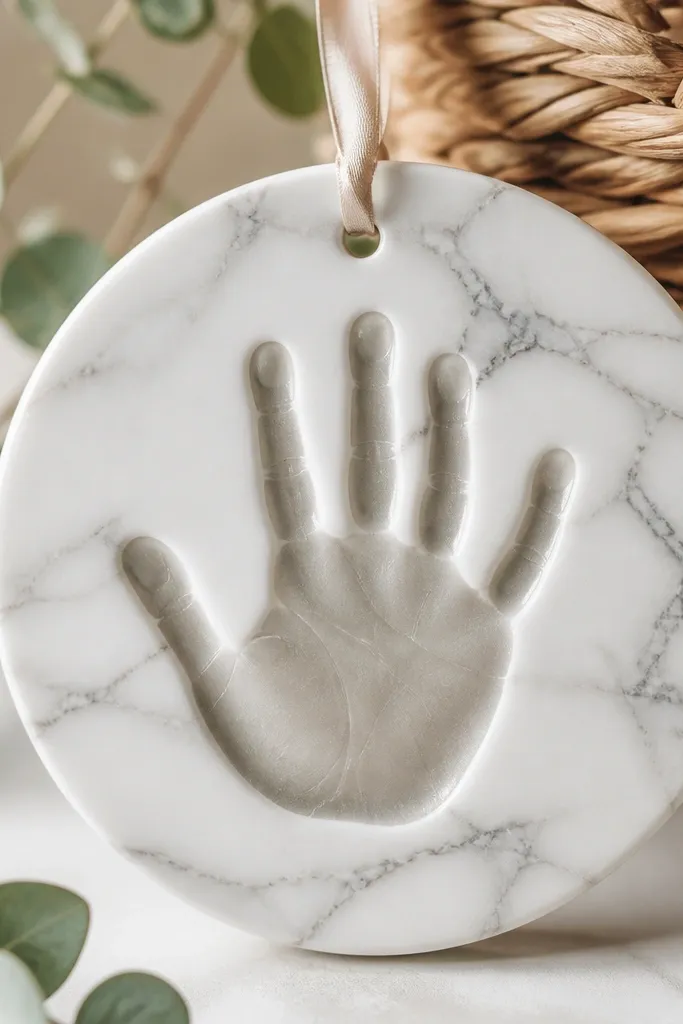
Marble look sounds fancy, but it’s doable and it reads high-end because it has natural-looking variation. The white base stays bright, while gray veining adds movement. I keep the handprint slightly darker gray so it looks like carved plaster. This flatters both light and medium skin tone prints because the gray blends smoothly. It also looks great on a black or navy tree skirt because the white pops.
Pro tipUse cotton swabs to soften veining — marble looks expensive when edges are blurry.
Roll dough to 9-10 mm and cut a 4 inch rounded square. Stamp the handprint, then dry fully. Sand gently with 220 grit. Paint the whole thing white, then add gray veining with a small fan brush and watered-down gray paint. Feather the lines so they look natural, not painted stripes. For the handprint, glaze a thin layer of light gray over the raised ridges so it reads sculptural. Seal with satin clear coat and add a white ribbon through the hole.
AvoidAvoid strong black marbling — it turns into imitation tile.
11. Navy Night Sky + Star Dust Mica

Navy + star dust looks expensive because it has depth and sparkle in only a few places. The handprint ridges get silver mica highlights, so it looks like frost on glass. I add tiny star specks across the background, but I keep them sparse so it doesn’t look like craft glitter. This style flatters cool-toned palettes and looks great with silver ornaments. It also makes small handprints look more detailed because stars frame the silhouette.
Roll dough to 9 mm and cut a 3.75 inch circle. Stamp handprint, let dry, then sand. Paint the background deep navy acrylic. Mix silver mica with a dab of clear medium and apply it lightly to the raised handprint edges only. Then flick a toothbrush dipped in watered-down white paint for tiny stars. Add a few larger stars with a dotting tool, then seal with satin clear coat and thread navy satin ribbon through the hole.
For star specks, test flicking on scrap first — you want dots, not streaks.
Don’t cover the whole background with mica — it turns flat and grainy.
12. Hunter Green + Antique Gold Rope Border
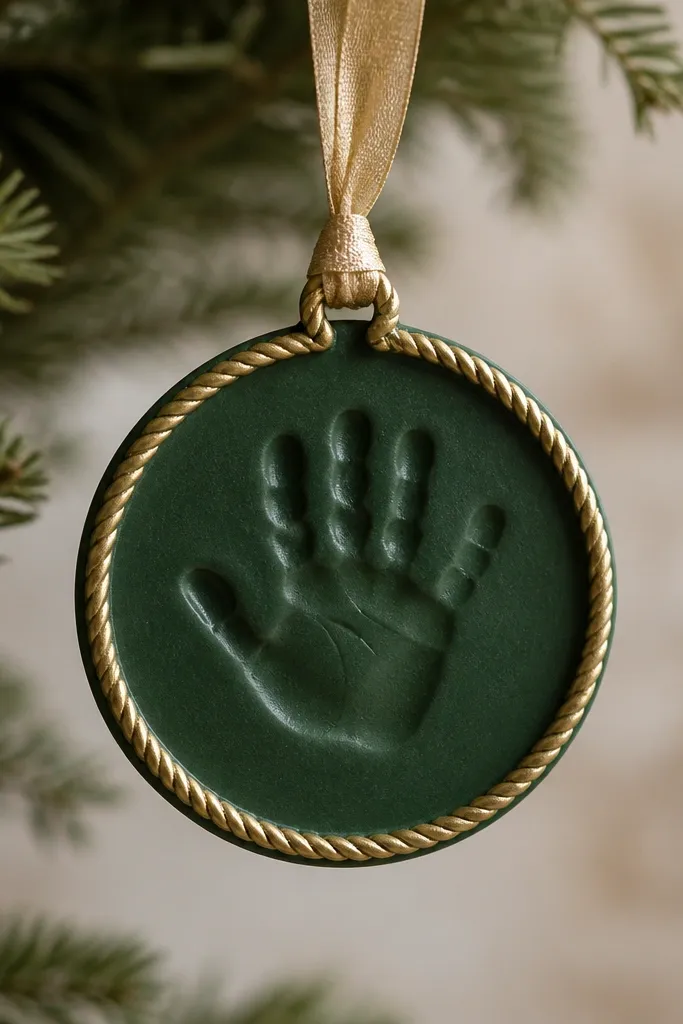
A rope border makes salt dough look like it belongs on a nautical-themed mantle or a holiday gift box. Hunter green is deep enough to hide brush marks, and antique gold keeps it warm. I keep the handprint itself calm — no heavy metallic — so the rope detail reads like design, not decoration overload. This style flatters people who like traditional holiday colors but want something handmade that photographs like decor. It’s also great for larger handprints because the border frames them.
Roll dough to 10 mm and cut a 4 inch circle. Stamp the handprint and dry fully, then sand. Paint the base hunter green. For the rope border, use a fine paint line tool or a toothpick to draw a twisted rope pattern around the edge using antique gold paint. Keep the handprint area mostly green, then add a tiny gold wash on the fingertips only. Seal with satin clear coat and thread a gold ribbon through the hole.
Draw the rope pattern with a steady hand by resting your wrist on the table edge.
Avoid thick rope lines — they make the ornament look cartoonish.
13. Blush Pink + Matte Gold "Dust" Palm

This is for that soft, modern aesthetic where the metallic looks like it was rubbed on, not sprayed. Blush pink is flattering because it reads warm and gentle, and matte gold looks expensive against it. I apply gold dust only where the handprint naturally catches light — palm ridges and fingertip bumps. The result is subtle sparkle that doesn’t overwhelm the handprint. It’s gorgeous for baby gifts and looks clean on pastel trees.
Roll dough to 8-9 mm and cut an oval. Stamp the handprint, dry fully, then sand smooth. Paint the entire piece blush pink and let cure. Mix matte gold mica with a tiny bit of clear medium and tap it onto the palm ridges and fingertips. Avoid the flat background so the metallic stays dimensional. Seal with satin clear coat, then add a blush ribbon through the hole.
Use a soft dry brush to remove extra gold dust from flat areas.
Don’t use metallic craft spray — it pools and looks uneven.
14. Sapphire Blue + White Porcelain Dry Brush
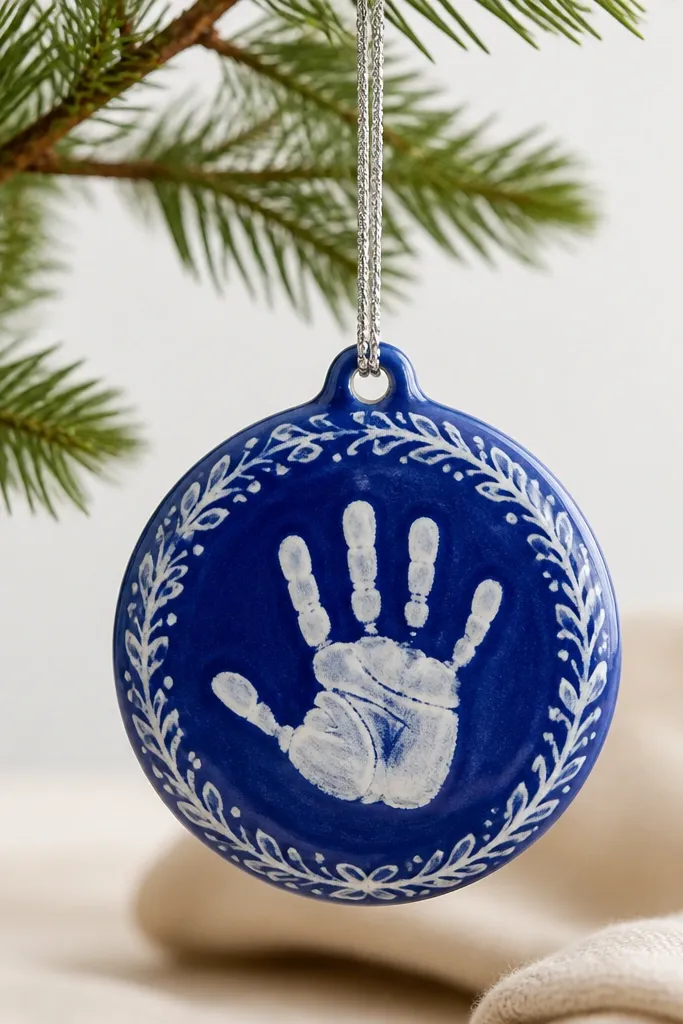
Sapphire blue reads luxe because it’s saturated and deep, and white dry-brushing mimics porcelain highlights. I keep the white concentrated on the raised handprint and outer rim so the ornament looks sculpted. This style flatters medium to deep skin tone prints because the contrast is clean. It also looks sharp on silver trees and in winter photo lighting. Chain loops make it feel like jewelry, not craft.
Pro tipDry-brush with a nearly dry brush — you should see the blue through the white.
Roll dough to 9-10 mm and cut a circle or tag shape. Stamp the handprint, then dry and sand. Paint everything sapphire blue. Dry-brush white paint mixed with a little water onto the outer rim and on the raised fingertips — focus on edges. Add a few micro specks with a toothbrush for extra porcelain texture. Seal with satin clear coat and attach a thin silver chain through the hole.
AvoidAvoid heavy white coverage — it turns into chalky patches.
15. Sandstone Beige + Burnished Copper Edges
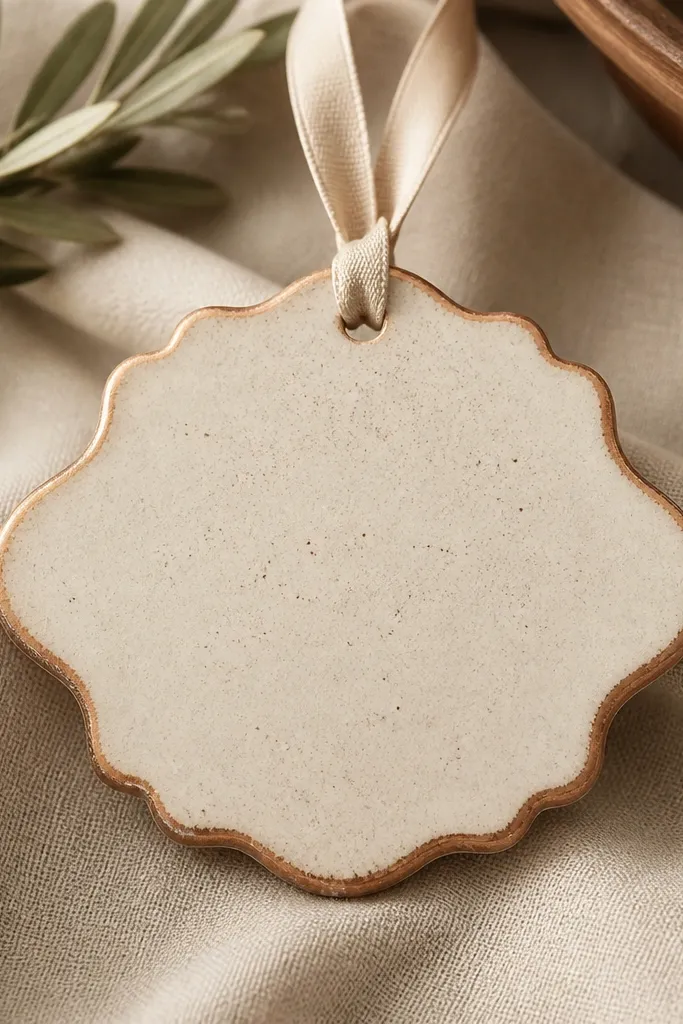
Burnished copper edges make the whole ornament feel finished because you get a frame effect. Sandstone beige is a neutral that looks expensive because it has tiny variation, not flat color. I add subtle speckling to the background so it doesn’t look like painted plastic. Copper is only on the border and the handprint ridges, so the shine is controlled. This style flatters warm palettes and looks great with wooden ornaments and natural fiber garlands.
Roll dough to 9 mm and cut a 4 inch circle with a slight texture border using a stamp or fork. Stamp the handprint and let dry. Sand edges and paint sandstone beige. While paint is still slightly tacky, tap a stiff brush with darker beige or umber to create tiny speckles. After drying, apply copper mica or metallic paint only along the outer rim and the handprint ridges. Wipe excess so it stays edge-focused. Seal with satin clear coat and tie a beige ribbon through the hole.
Use a foam makeup applicator for copper so it buffs into texture instead of streaking.
Don’t put copper on the entire face — it kills the sandstone look.
16. Glacier White + Silver Leaf Speckle
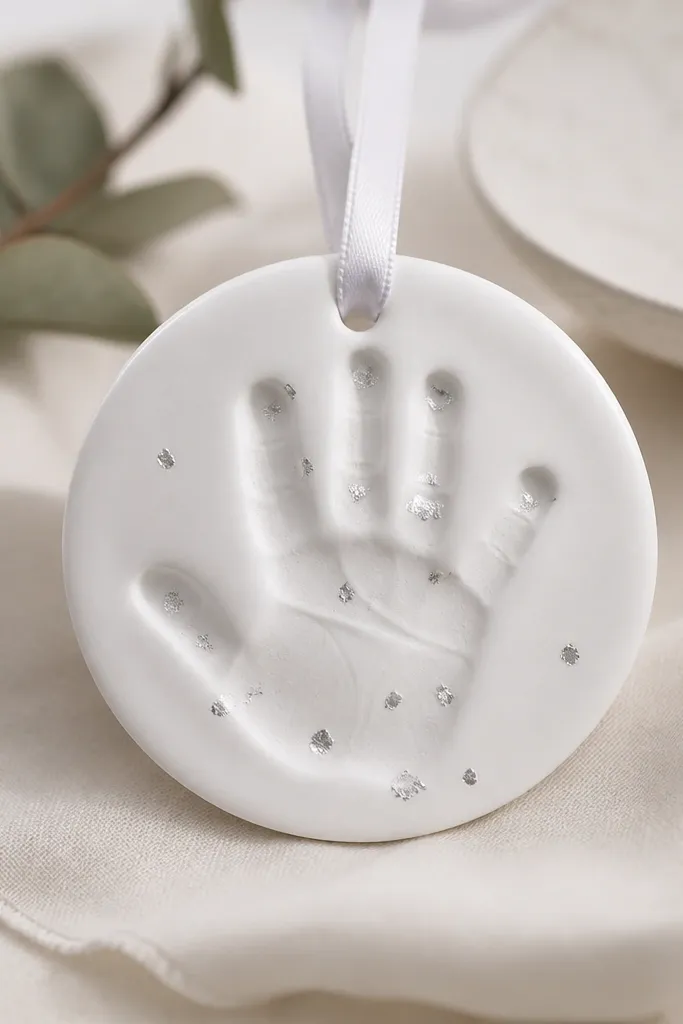
If you want “expensive” without dark colors, glacier white with silver leaf flecks is the move. The base stays clean, and the handprint catches tiny reflective moments. I use silver leaf in micro pieces so it looks like frost trapped in paint. This style flatters light decor and looks crisp under direct light. It also makes smaller handprints look more detailed because the leaf flecks sit on raised lines.
Pro tipTear leaf with your fingers for irregular bits — uniform flakes look fake.
Roll dough to 9 mm and cut a 3.75 inch circle. Stamp the handprint and dry fully. Sand lightly. Paint with glacier white acrylic and add a faint gray wash in creases around the handprint. Apply silver leaf adhesive only to the raised handprint ridges, then press tiny silver leaf fragments on top. Seal with satin clear coat — go thin so leaf stays bright. Thread white ribbon through the hole.
AvoidAvoid sealing too thick — it can dull silver leaf and make it look gray.
17. Sage + White Lace Border Texture
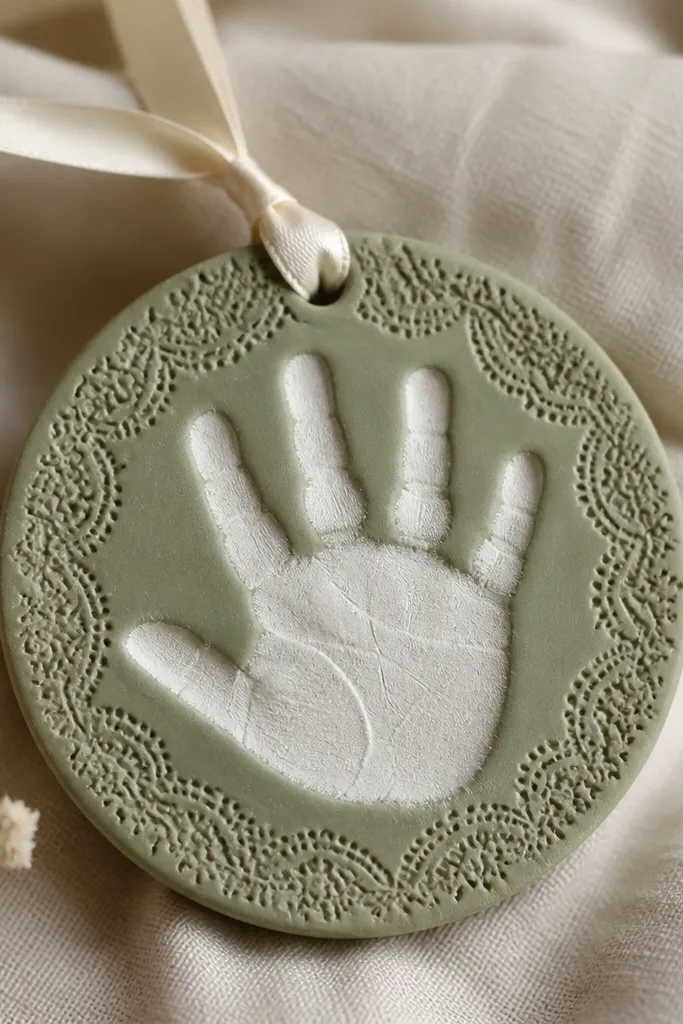
Embossed lace border makes salt dough feel like it came from a craft wedding boutique. The lace texture reads crisp when you keep the center smooth and light. I paint the handprint area white while the border stays sage so the texture pops. This style flatters anyone who likes vintage tones and works well for baby and bridal keepsakes. It also hides minor handprint inconsistencies because the border draws attention.
Roll dough to 8-9 mm. Cut a circle and stamp the handprint. Press a lace ribbon or textured fabric lightly around the outer 1/4 inch to emboss the border, then remove it carefully. Dry fully and sand only the face — keep the emboss crisp. Paint the background sage green, then paint over the handprint area with white, leaving the lace border in sage. Seal with satin clear coat and thread a cream ribbon through the hole.
Press lace with a firm, flat hand for 10-15 seconds so the emboss doesn’t blur.
Avoid painting over the lace border with white — it erases the texture.
18. Rose Gold Mica Over Warm Tan
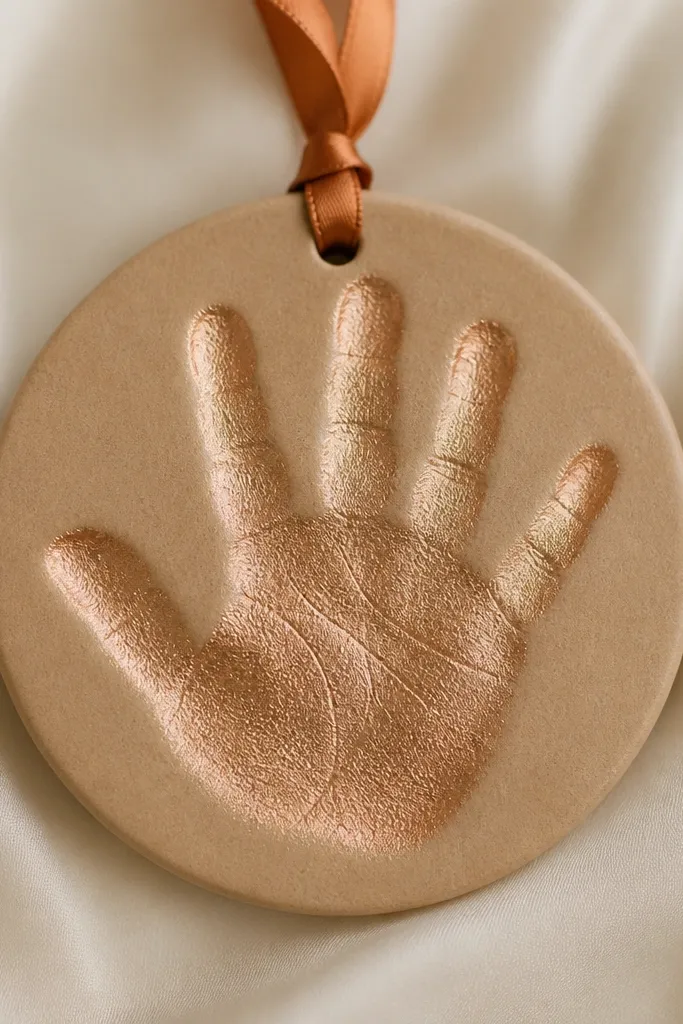
Rose gold mica reads expensive because it’s warm and soft instead of loud. Warm tan gives the rose gold something to glow against, and the handprint ridges become the highlight. I apply mica like you’re polishing — light taps, then stop. This style flatters both warm and neutral palettes and looks gorgeous on trees with copper accents. It also looks great as an ornament on a gift box because it reflects light in tiny flashes.
Roll dough to 9 mm and cut a 4 inch circle. Stamp handprint and dry fully. Sand and paint warm tan acrylic. Let dry, then mix rose gold mica with a tiny amount of clear medium. Dab the mixture only on the raised handprint ridges using a small sponge. Leave the background tan and clean. Seal with satin clear coat and use a copper ribbon through the hole.
If your mica looks patchy, add one more thin layer instead of pressing harder.
Avoid thick mica paste — it cracks and looks like glitter glue.
19. Antique Ivory + Gold Stamped Border
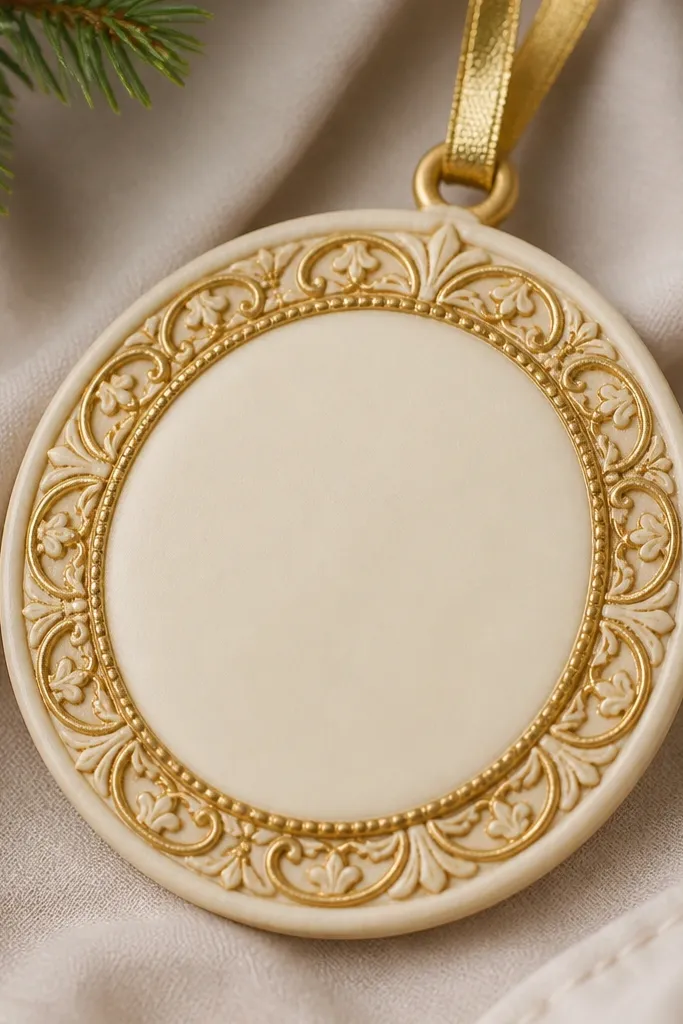
A stamped border pattern makes these feel designed, not decorated. Antique ivory helps because it reads like ceramic, and gold stamping adds the “expensive” cue without covering the whole ornament. I keep the handprint center mostly ivory, then add a faint gold wash to the ridges for dimension. This style flatters minimal holiday aesthetics and looks classy on white trees. It’s also easy to match to gift wrap because gold works with almost everything.
Pro tipPractice the stamp pressure on scrap dough so the border looks crisp, not smudged.
Roll dough to 9-10 mm and cut a 4 inch ornament. Stamp the handprint, then dry fully. Sand and paint antique ivory. For the border, use a small rubber stamp or texture stamp lightly pressed around the edge. Apply gold acrylic with a sponge on the stamp surface before pressing so the pattern transfers. Once gold dries, add a thin gold wash to the raised handprint ridges only. Seal with satin clear coat and thread a gold ribbon through the hole.
AvoidAvoid heavy gold paint in the border — thick paint lifts and looks messy.
20. Slate Gray + White "Chalk" Handprint
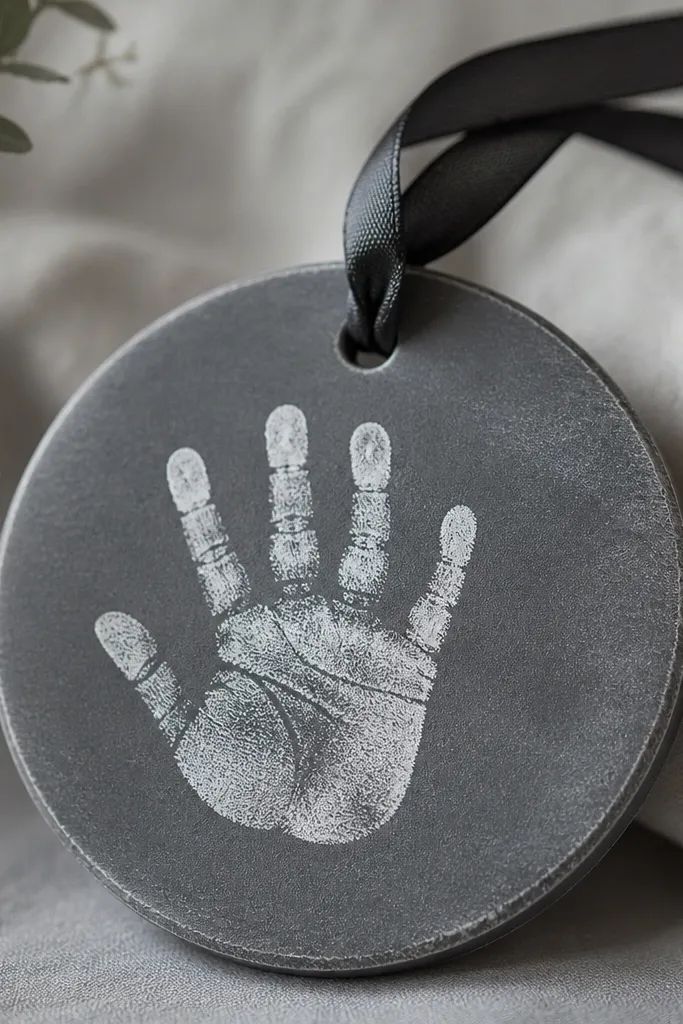
Chalky finishes can look premium if you control them. Slate gray gives depth, and chalky white on the handprint ridges looks like plaster and snow. I dust the chalky paint with a soft brush so it doesn’t feel wet or glossy. This style is great for farmhouse-modern decor and looks good with black, white, and gray ornaments. It also flatters families because it reads clean even when handprints have tiny gaps.
Pro tipUse a soft bristle brush for chalk effect — stiff brushes leave streaks.
Roll dough to 8-9 mm and cut a circle with a slightly wider rim. Stamp the handprint and dry. Sand with 220 grit. Paint the background slate gray. After dry, dry-brush chalky white acrylic onto the raised handprint ridges and fingertips, leaving the background untouched. If you want extra chalk texture, add a tiny bit of baking soda to the paint and brush lightly. Seal with matte or satin clear coat and tie black ribbon through the hole.
AvoidAvoid glossy top coat — it kills the chalk look.
21. Emerald Green + Antique Gold Leaf Outline
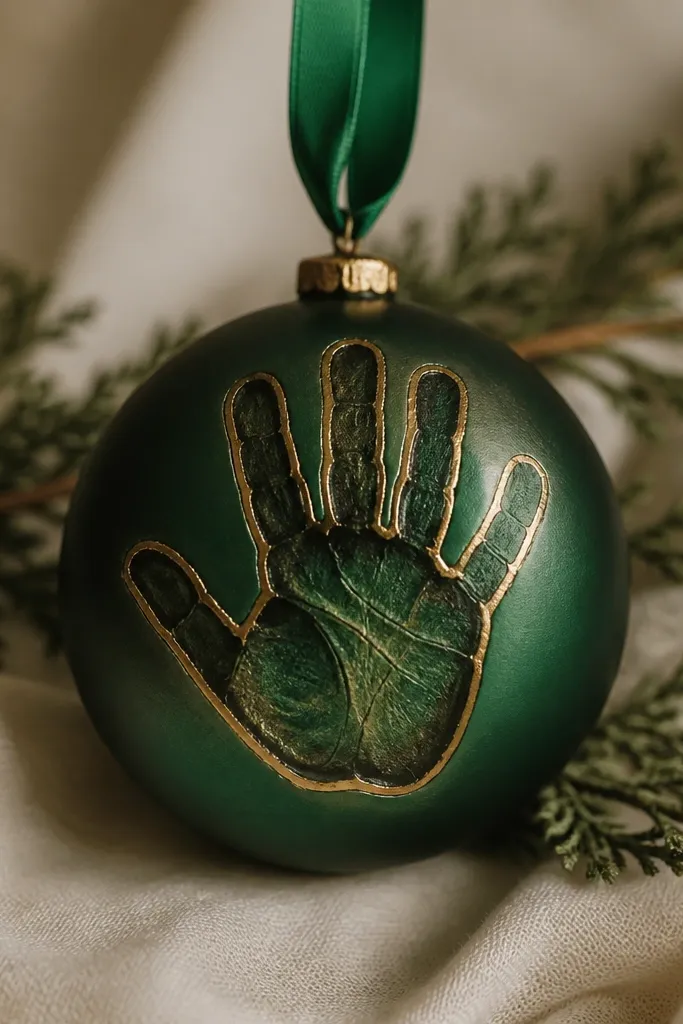
Emerald green has that “holiday heirloom” feel right away, and the gold leaf outline is what makes it look expensive. I use leaf just on the handprint edges, not inside, so it frames the hand like a pendant. The darker shading in creases adds depth so the handprint looks carved. This style flatters deep skin tones and also looks striking for darker hair color families because the contrast is strong. It’s dramatic without being loud.
Roll dough to 10 mm and cut a 4 inch circle or scallop. Stamp the handprint and dry fully. Sand edges and paint emerald green. Once dry, brush a thin shadow wash of dark brown into the handprint creases and wipe excess on raised ridges. Apply gold leaf adhesive only along the outline of fingertips and palm edges, then press antique gold leaf onto those lines. Seal with satin clear coat. Thread a matching emerald ribbon through the hole.
Use a small craft brush to keep adhesive only on the outline — messy adhesive makes leaf look patchy.
Avoid covering the whole hand with leaf — it turns into a glittery mess.
22. Honey Gold Base + White Vein Handprint
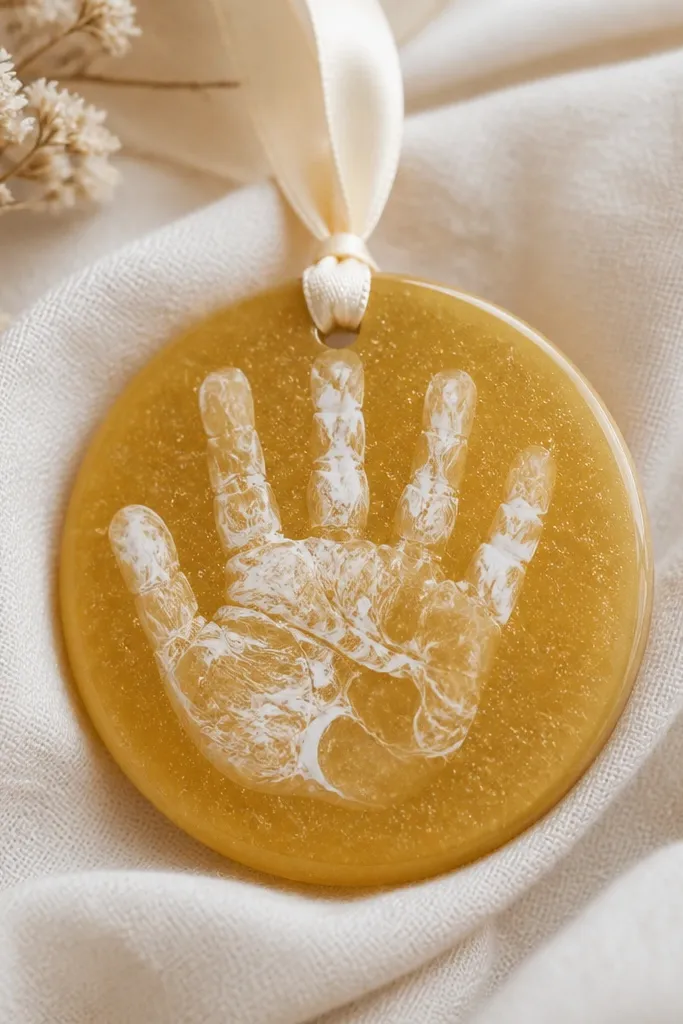
Honey gold with white veining looks like polished stone and it photographs like a designer piece. The gold base is warm and flattering, and the white veining adds movement without cluttering the handprint. I keep the veining mostly on the handprint ridges, so the fingers look sculpted. This style flatters warm skin tones and looks amazing on trees with cream lights. It also works well for adult handprint keepsakes since it’s bold but classy.
Pro tipThin your white paint a lot — veining looks expensive when it’s translucent.
Roll dough to 9 mm and cut an oval. Stamp the handprint and dry fully. Sand smooth. Paint the background honey gold and add a few tiny darker-gold specks by tapping a dry brush. Mix watered-down white paint and lightly glaze it over the raised handprint ridges in thin lines like veins. Use a fine liner brush to pull a few lines from palm to finger tips. Seal with satin clear coat and tie a cream ribbon through the hole.
AvoidAvoid thick white paint — it looks like frosting.
23. Matte White + Gold Dot Constellation
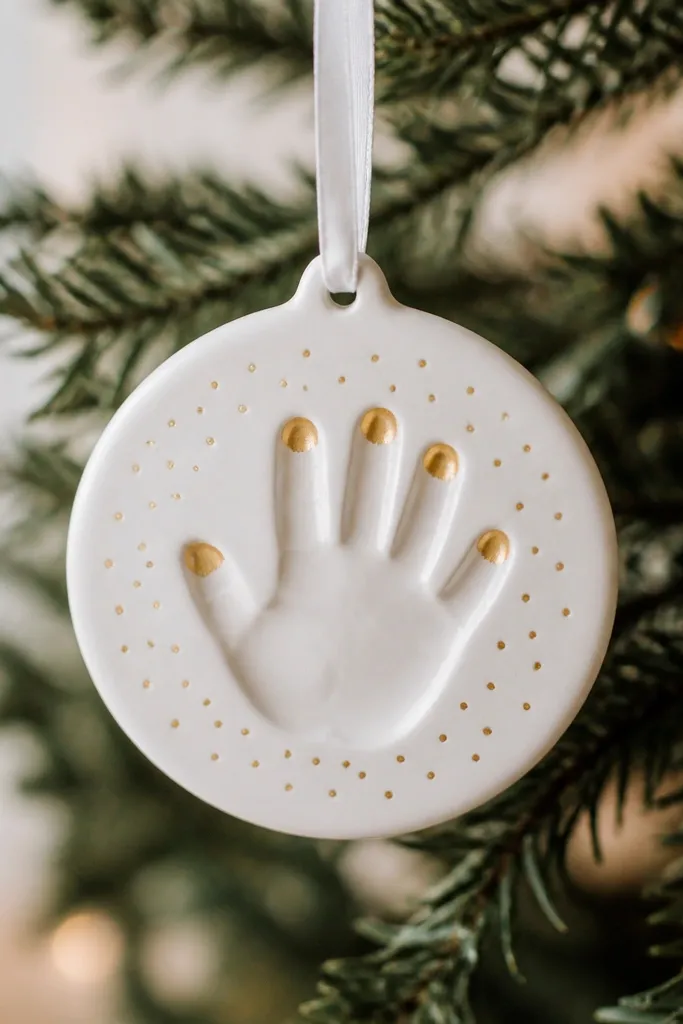
Gold dot constellations make the handprint feel like part of a bigger design. Matte white keeps it clean, and gold dots add controlled sparkle without messy coverage. I place dots in a ring around the handprint and then add a few on the fingertips. This looks expensive because the sparkle is intentional and spaced. It flatters almost any skin tone because the dots sit on the background, not on top of the handprint details. It also feels modern for anyone who doesn’t like traditional holiday motifs.
Pro tipUse a toothpick for dots — it makes consistent size points.
Roll dough to 8-9 mm and cut a circle. Stamp the handprint and dry fully. Sand and paint matte white. Mix gold mica with clear medium until it’s like thin paint. Use a fine brush or dotting tool to place a ring of gold dots around the handprint, not covering the hand entirely. Add a few gold dots on the raised fingertips and then seal with satin clear coat. Thread a white ribbon through the hole.
AvoidAvoid random glitter dots — they look chaotic and cheap.
24. Warm Cream + Brass "Frame" Border
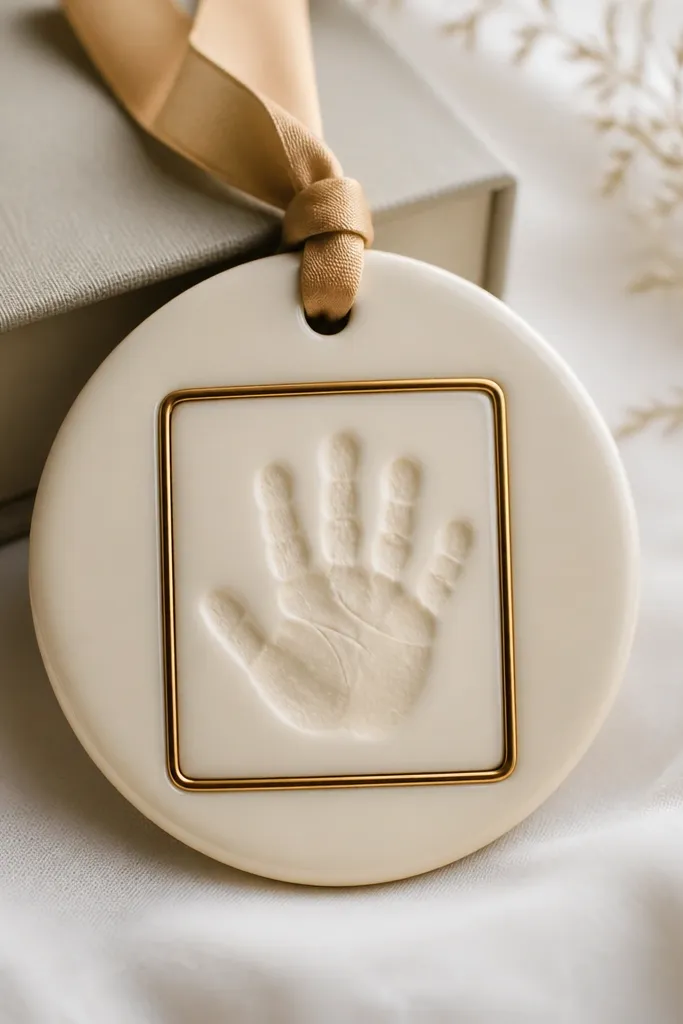
A brass frame border is a simple trick that instantly makes the ornament look like a piece of art. The handprint sits inside a clean “window,” so the composition looks intentional. Warm cream is the perfect background because it makes brass look richer and it photographs well. I keep the handprint lightly shaded so the frame does the heavy lifting. This style flatters kids' handprints because it hides uneven edges around the stamp. It also works for adult keepsakes because it looks formal.
Roll dough to 9-10 mm and cut a slightly wider rectangle or circle. Stamp the handprint and dry fully. Sand smooth and paint warm cream. For the brass frame, use a ruler and pencil lightly to map a border, then paint two parallel brass lines on each side. Add small corner ticks so the frame looks like a picture frame. After it dries, glaze a thin warm gray wash on the handprint ridges only. Seal with satin clear coat and thread tan ribbon through the hole.
Use painters tape to keep frame lines straight — peel it before paint fully dries.
Avoid freehand frames — crooked lines make it look like a kid made it.
25. Powder Blue + White Pearl Mica Crest
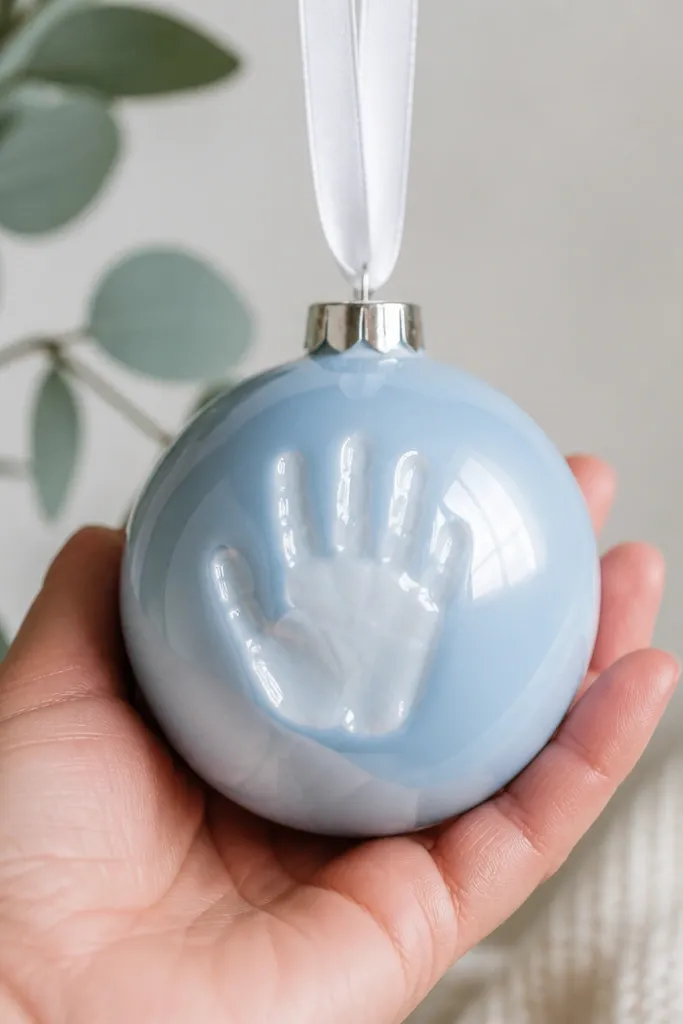
Powder blue is a soft color that reads expensive when you pair it with pearly, not glittery, highlights. I build a “crest” effect by applying pearl mica in a curved band across the palm and upper fingers. It gives the handprint a sculpted, ceramic shine. This style flatters cool-toned palettes and looks sweet for baby keepsakes and winter birthdays. It’s also easy to style with white lights and silver decor.
Roll dough to 8-9 mm and cut a circle. Stamp the handprint and dry fully. Sand and paint powder blue. Let cure, then mix pearl mica with clear medium. Apply the pearly mixture in a curved band over the palm and upper fingers, leaving lower fingers mostly blue. Add a tiny pearl dot at the fingertips for sparkle. Seal with satin clear coat and thread white ribbon through the hole.
Use a damp makeup sponge for pearly mica so it blends into texture.
Avoid coating every finger evenly — crest placement makes it look designed.
26. Charcoal + Silver Chain Tag Look
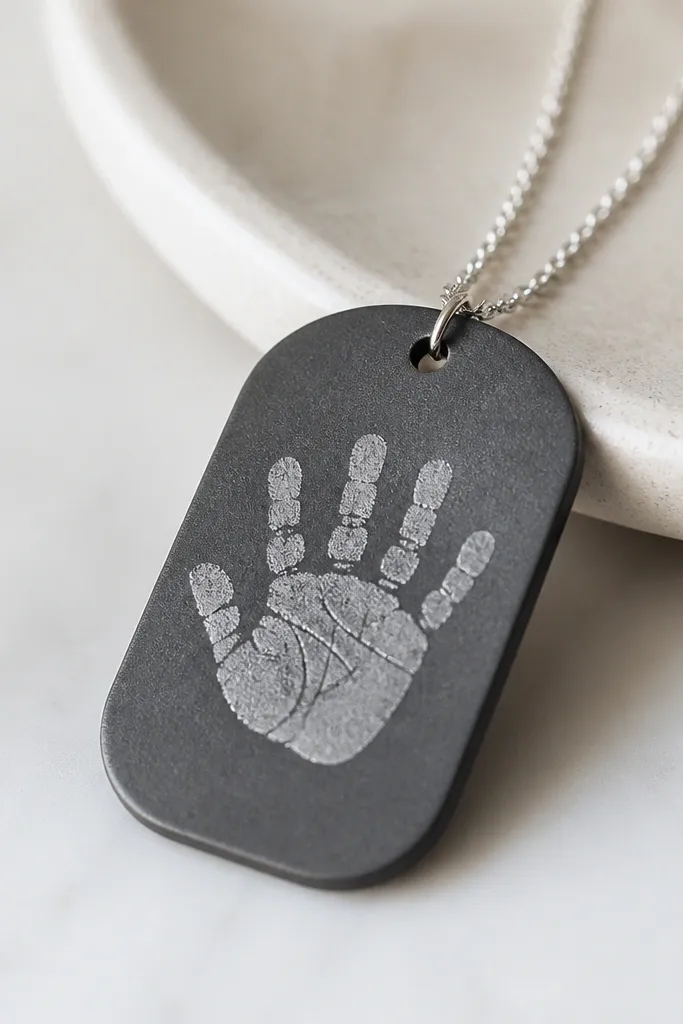
A tag shape plus chain hardware makes salt dough look like a premium gift tag. Charcoal gray hides tiny imperfections, and silver accents on the handprint ridges keep it sleek. I keep the handprint mostly charcoal with thin silver highlights so it doesn’t look like a metallic sticker. This style flatters minimalist holiday decor and looks great in monochrome trees. It’s also a strong choice for adult keepsakes since it reads more “design” than “kid craft.”
Roll dough to 10 mm and cut a tag shape about 3.5 x 2.5 inches. Stamp the handprint, then dry fully and sand. Paint charcoal gray in two coats. Mix silver mica with clear medium and brush it only on raised fingertips and palm ridges. Keep the background charcoal clean. Seal with satin clear coat and attach a small silver chain through two holes — one near top and one near bottom — so it hangs straight.
Hang test it before sealing — chain weight can rotate the ornament if the holes aren’t aligned.
Avoid single big hole with heavy ribbon — it can tilt and look sloppy.
27. Classic Red + Antique Gold Frame Handprint
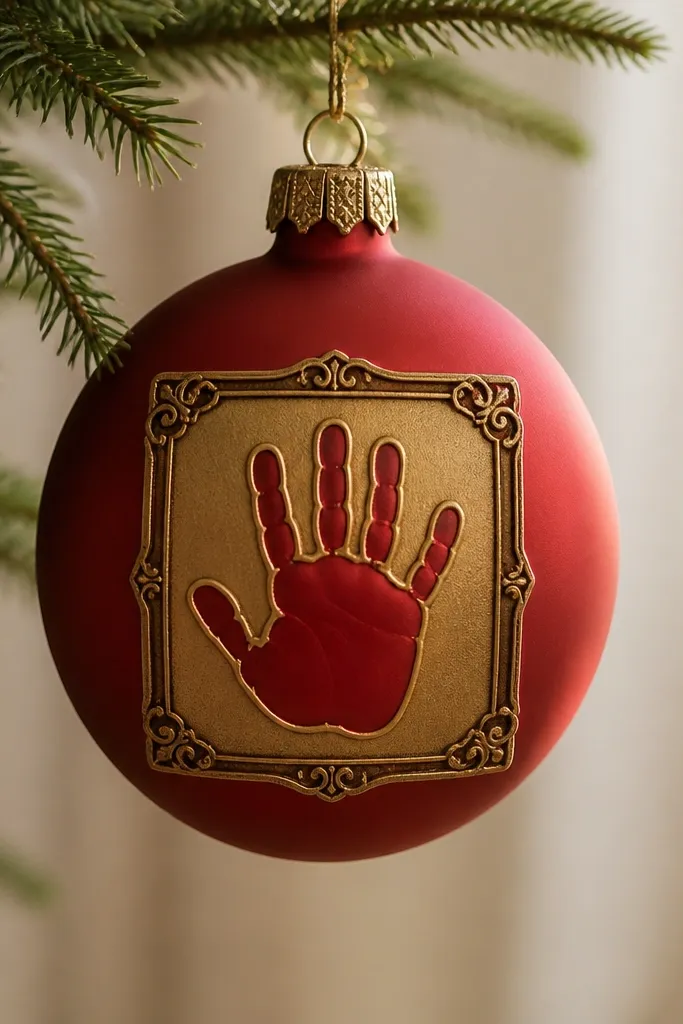
Classic red is bold, and when you add an antique gold frame, it turns into something that looks like a vintage holiday label. The antique gold edge shading on the handprint keeps the detail visible without turning it into glitter. This style flatters warm skin tones and also looks strong with evergreen trees. I like it for Christmas gifts because it matches wrapping paper and ornaments instantly. It also stands out in photos because red has high contrast.
Roll dough to 9-10 mm and cut a 4 inch circle or oval. Stamp handprint and dry fully. Sand and paint classic red acrylic. Outline a smaller inner rectangle frame around the handprint using antique gold paint. Then lightly shade the handprint ridges with antique gold — just the raised areas. Seal with satin clear coat and thread a red or gold ribbon through the hole.
Use a thin liner brush for frame corners — sharp corners look more expensive than rounded ones.
Avoid bright red plus bright gold — it turns into costume Christmas instead of classic.
28. Forest Green + Pine Needle Texture Border
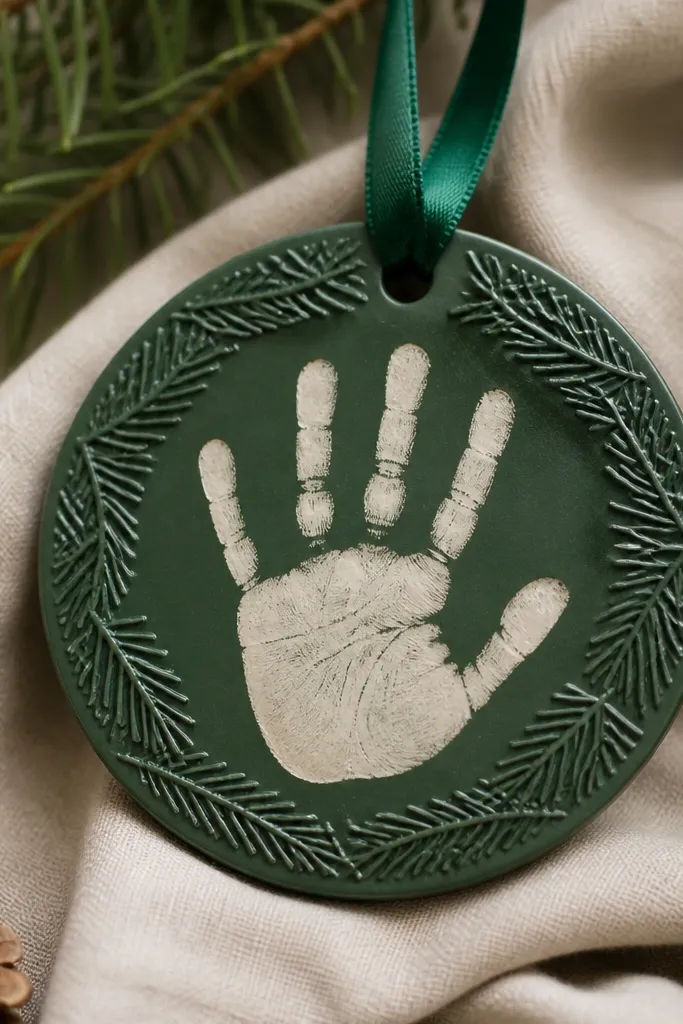
Textured borders make salt dough feel handmade in a good way because the detail is tactile. Forest green is deep and hides paint streaks, and a cream handprint center keeps it clean and upscale. I create a pine needle border using a real twig impression or a textured stamp, then paint the border darker for contrast. The handprint stays cream so the raised needles frame it like a wreath segment. This style flatters winter decor lovers and looks great with rustic-but-clean trees.
Roll dough to 9-10 mm and cut a circle. Stamp the handprint and press a pine needle texture around the outer rim. Dry fully and sand only the face, not the border texture. Paint the background forest green, then paint the handprint area cream, leaving the pine texture in green. Add a tiny gold mica line on the pine ridges for a subtle shine. Seal with satin clear coat and tie a green ribbon through the hole.
Paint the textured border before you paint the center so you don’t smear into the handprint.
Avoid painting over texture with one thick coat — it fills the details and looks flat.
29. White + Gold Mica Handprint Only (No Background Metallic)
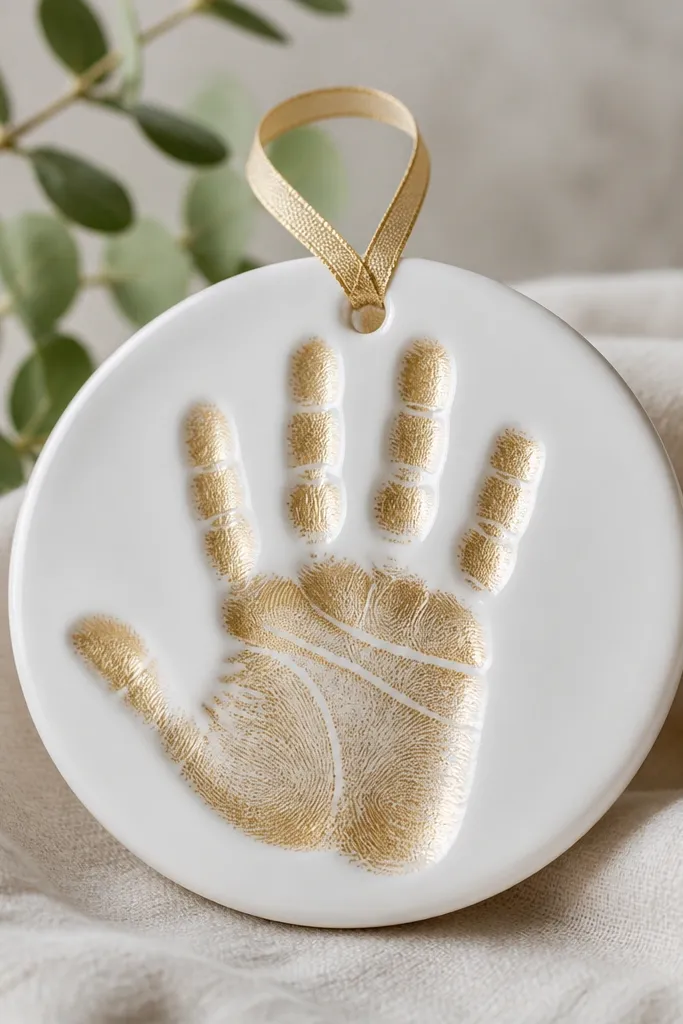
This is the cleanest “expensive” look because metallic is restricted to one focal area. A white base reads fresh and modern, and gold mica only on ridges makes the handprint look like it’s been gilded by hand. I also love this because it hides small cracks better than dark backgrounds. It flatters almost every skin tone print and looks expensive even when the handprint isn’t super deep. The key is restraint — no metallic on the background.
Pro tipUse a cotton swab to correct spots — metallic on the background is what makes it look messy.
Roll dough to 8-9 mm and cut a 4 inch circle. Stamp the handprint and dry fully. Sand smooth and paint with white acrylic in two thin coats. After it dries, mix gold mica with clear medium into a thin paste. Dab it only on the raised handprint ridges and fingertips, then wipe any metallic that lands on the flat background. Seal with satin clear coat and thread a thin gold ribbon through the hole.
AvoidAvoid brushing gold mica too aggressively — it spreads and blurs the handprint.
30. Sand + Terracotta Ombre Rim
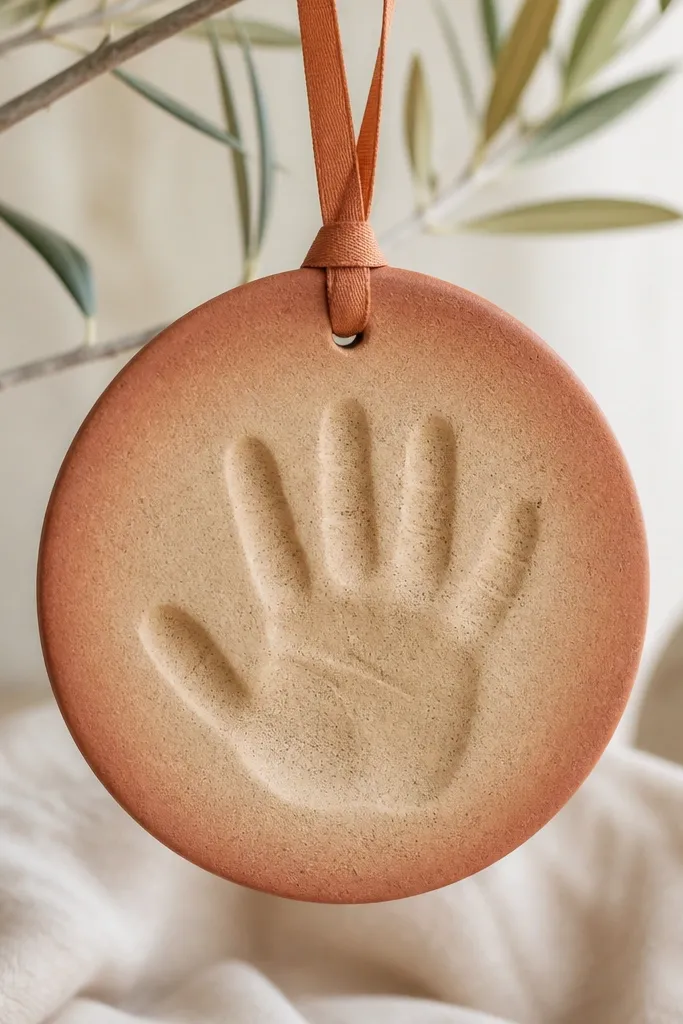
Ombre rims look designer because they create a gradient that mimics pottery glazing. Sand is neutral and expensive-looking, while terracotta adds warmth without overpowering the handprint. I keep the handprint itself sand so the rim does the color work and the hand stays readable. This style flatters neutral decor and looks great on trees with warm whites and terracotta accents. It also works well for families because it’s calm and cohesive.
Pro tipBlend the ombre while paint is still slightly wet for a smoother fade.
Roll dough to 9 mm and cut an oval or circle. Stamp the handprint and dry fully. Sand and paint the entire ornament sand. Let it dry, then use a sponge to apply terracotta paint to the outer 1/4 inch, fading inward with lighter dabs. Keep the center untouched so the handprint looks clean. Add a thin gold mica touch on the very edge of the rim if you want extra polish. Seal with satin clear coat and thread terracotta ribbon through the hole.
AvoidAvoid hard lines in the gradient — they read like a stencil.