1. Cocoa-Glazed Gingerbread with Antique Gold Buttons

This one looks expensive because the brown isn’t flat. I mix cocoa-brown paint with a touch of burnt umber, then add a glaze layer so the surface catches light where it curves. The raised “buttons” read like metal because you outline each dot with a darker brown before filling with antique gold. It flatters warm skin tones and cozy interiors because the colors sit in the same family as wood, cinnamon, and brass.
Start by rolling dough to about 6-7 mm thick, then cut a gingerbread silhouette and press a small stamp for subtle frosting swirls. Bake until fully dry and cool completely. Paint the whole piece cocoa brown, then dry-brush the edges with a slightly darker umber for depth. Finally, paint the button dots antique gold and seal with satin clear varnish; attach gold cord after the varnish dries.
Use a damp makeup sponge for the glaze layer so it pools lightly in the grooves instead of streaking.
Don’t paint the whole surface with shiny gold — it looks like cheap foil under tree lights.
2. Cream Piped Gingerbread with Champagne Outline

This design reads luxe because the contrast is clean. Cream paint gives you that “bakery icing” vibe, and the champagne outline makes the shape pop without looking loud. I like raised piping because it creates tiny shadows that look real when the ornament swings. It suits people who prefer neutral decor and it looks especially good against dark green trees.
Pro tipBefore sealing, wipe the raised piping with a barely-damp cloth so the paint sits in the grooves.
Roll dough to 6 mm and cut the gingerbread shape. Press a silicone texture mat lightly so the surface has faint grain like baked dough, then add piping lines using a toothpick to draw shallow channels. Paint the base matte cream, then outline the silhouette with champagne using a fine brush. Seal with matte varnish so the cream stays soft-looking, then tie pale ivory ribbon through the top hole.
AvoidSkip thick paint on the piping — it fills the grooves and looks lumpy.
3. Forest Green Gingerbread with Rusted Metal Speckles
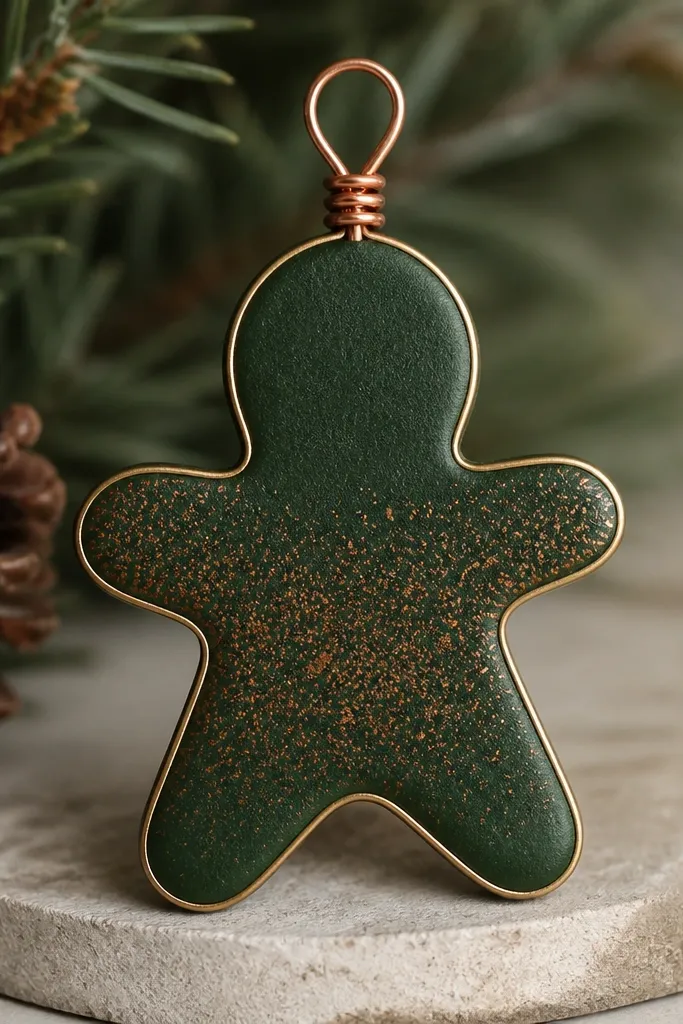
This one feels high-end because it looks aged, like a vintage shop display. The forest green is a deep, steady color, and the rust speckles mimic the way metal oxidizes. I place speckles only on the center areas so the edges stay crisp; that’s what keeps it from looking messy. It flatters cool-toned rooms and looks stunning with warm copper lights.
Pro tipPractice speckling on scrap dough first so your dot size matches the ornament scale.
Roll dough to 6-7 mm and cut your gingerbread. Bake and cool fully, then paint the entire piece forest green. Mix a rust-brown paint with a little water and dab it with a stiff brush to create controlled speckles, focusing on the belly and around raised details. Add a thin warm gold outline, then seal with satin varnish; for the hanger, push a short copper wire through the hole and twist it tight.
AvoidDon’t spray anything aerosol-style; overspray makes salt dough look speckled in the wrong way.
4. Velvet Red Gingerbread with Black Licorice Lines

Velvet red is where the luxe look happens because it feels like fabric when it’s finished right. I paint in thin layers, then seal with semi-matte so it doesn’t look glossy like candy. Black licorice lines make the raised details read clearly, especially when the ornament moves. This color combo looks best in traditional decor and makes warm lighting look richer.
Pro tipIf your red looks streaky, add a tiny drop of white to lighten and keep brush marks invisible.
Roll dough to 6 mm thick, cut the gingerbread, then press a small border texture around the edges. Bake until dry, then paint red in two thin coats. Use a fine brush to paint the raised lines black and add a darker red shadow along the outer edge. Seal with semi-matte varnish, let it cure fully, then thread black twine through the top and knot tightly.
AvoidDon’t use flat red paint straight from the bottle — it dries chalky.
5. Champagne Starburst Gingerbread with Star Cutout
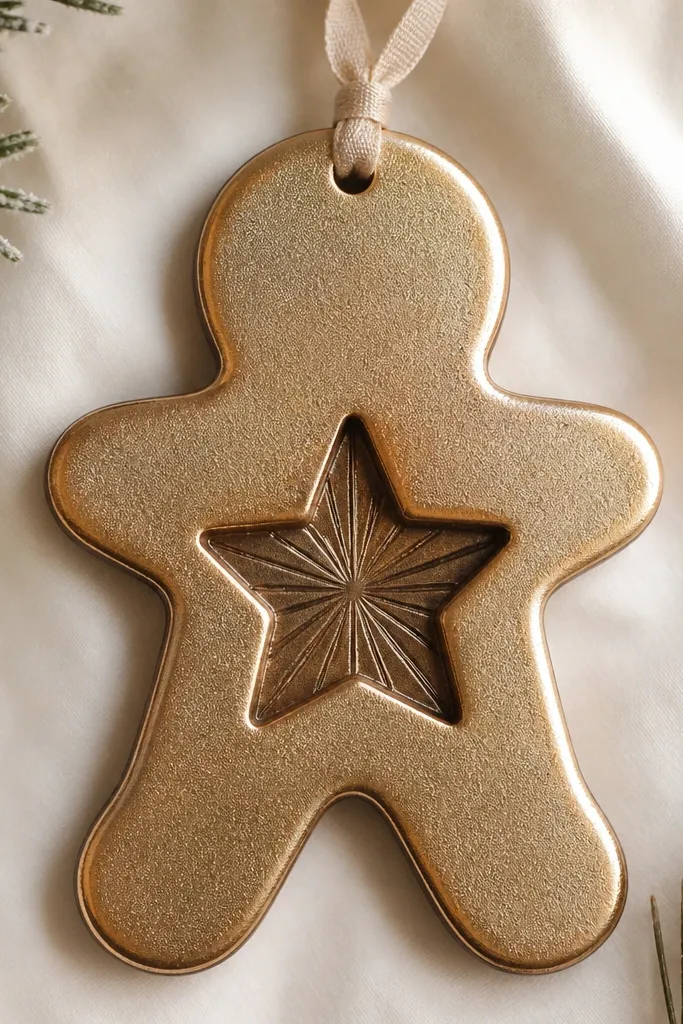
This is luxe because it has negative space. The star cutout creates a second layer of light — you see the darker interior behind it, which makes the metallic feel deeper. I paint the base champagne, then paint the cutout edges bronze so the star rim looks like a frame. It’s a great choice for minimal trees because it still has detail without being busy.
Pro tipUse a craft knife with a fresh blade for the cutout so the edges stay sharp after baking.
Roll dough to 7 mm and cut your gingerbread shape. Press a star outline into the belly area and cut it out carefully with a craft knife. Bake and cool, then paint the entire front champagne metallic. Paint the inside rim and the star edges bronze, and add a faint bronze dry-brush around the outer silhouette. Seal with satin varnish and attach a champagne ribbon.
AvoidDon’t skip sealing the cutout edges — that’s where you’ll see dusting first.
6. Lace-Pressed Gingerbread with Pearl Highlights
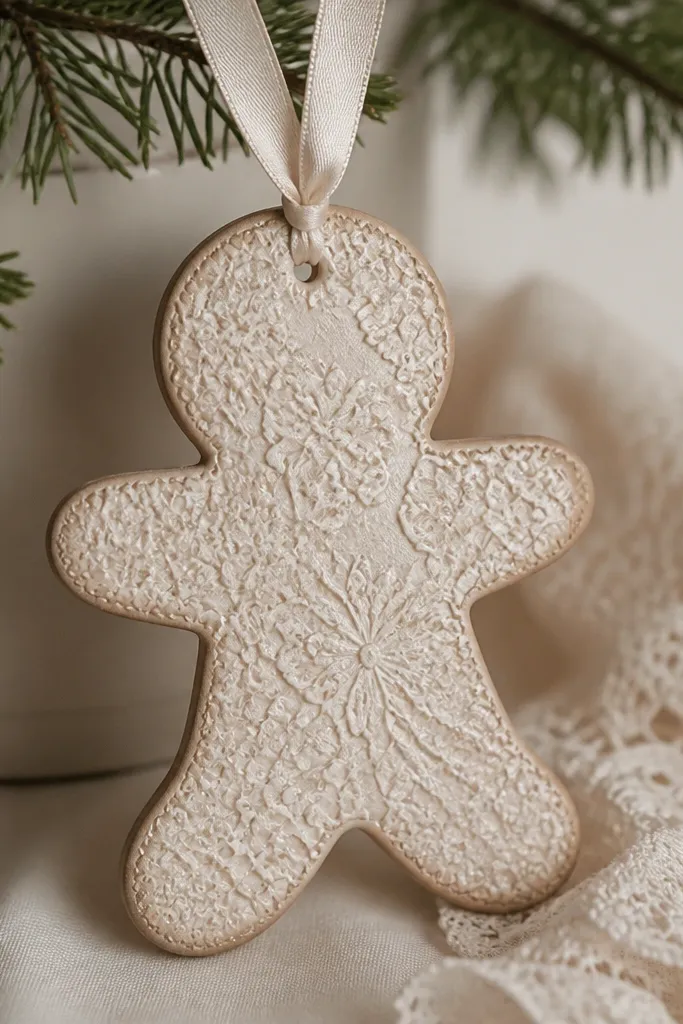
Pressed lace looks expensive because it creates fine shadows that mimic embroidered fabric. I press lace gently so the pattern transfers without tearing — then I paint the base cream so the texture reads like icing. Pearl highlights go on the highest ridges only, so the ornament looks dimensional instead of uniformly shiny. This is gorgeous on white trees or pale garlands.
Roll dough to 5-6 mm and cut the gingerbread. Lay lace fabric (cotton lace, not stretchy) on the dough and press with your palm for even transfer, then peel it off slowly. Bake until dry, then paint the base matte cream. Dry-brush pearl white over the lace ridges and shade the outer edge with a light taupe. Seal with matte varnish, then attach pale satin ribbon through the pre-punched top hole.
If the lace sticks, dust it lightly with cornstarch before pressing.
Don’t use lace that sheds — you’ll get stray fibers baked into the dough.
7. Rose Gold Bow Gingerbread with Blush Wash
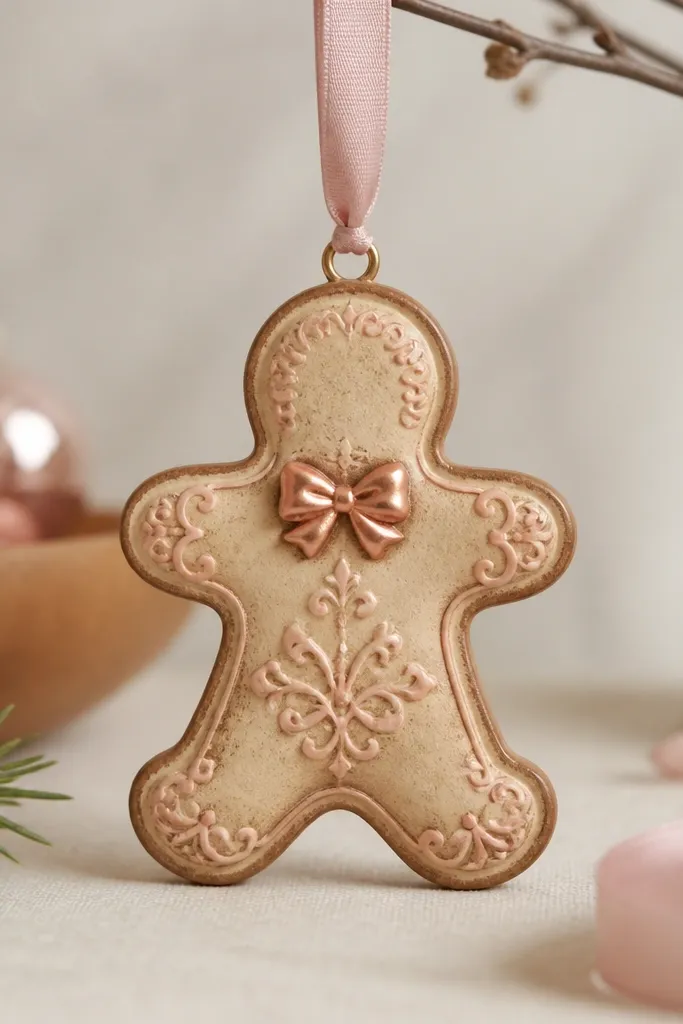
This design looks luxe because the “bow” is sculpted and then finished like metal. The blush wash is what makes it feel soft instead of flat — it settles into recesses and gives the ornament a warm, rosy glow. Rose gold on the bow adds that modern jewelry feel without turning the whole piece into a glitter bomb. It looks great with blush, taupe, and warm white decor.
Pro tipPaint the bow first, then do the base — it prevents rose gold smears on the beige.
Roll dough to 6-7 mm and cut the gingerbread. Roll a small rope of dough for the bow, pinch the loops, then attach it on top of the belly with a little water. Bake and cool. Paint the base warm beige, then add a blush-pink wash in the recesses using a damp brush. Paint the bow rose gold and outline the silhouette with darker brown. Seal with satin varnish, then match a blush ribbon to the bow color and tie it neatly.
AvoidDon’t overdo blush — too much pink turns it into a candy color.
8. Mini Scallop Frame Gingerbread with Gold Rim
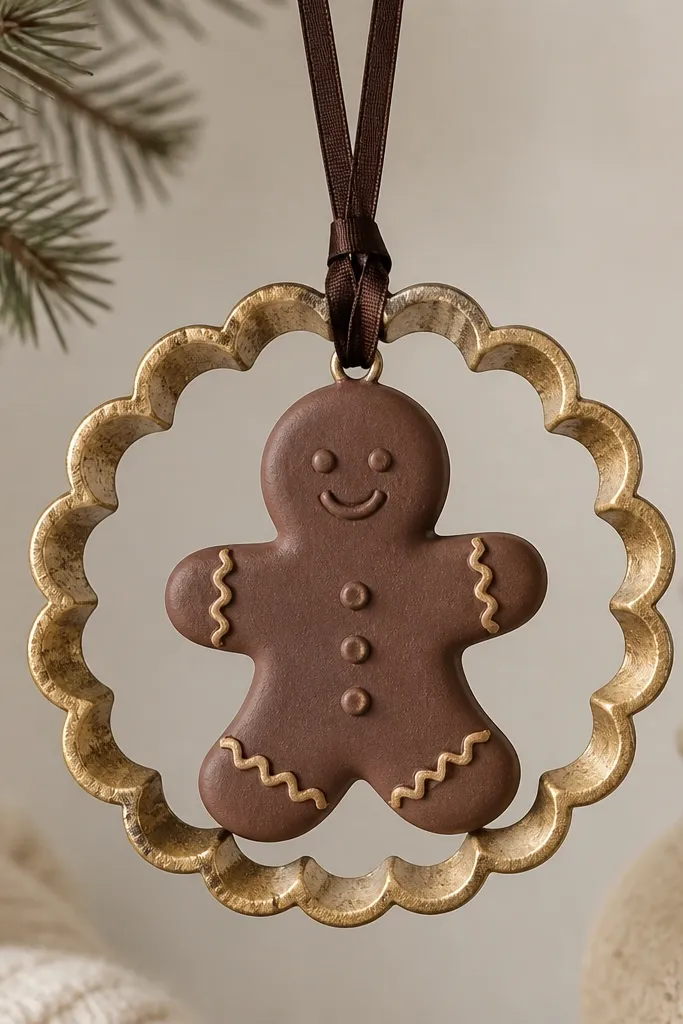
Frames make salt dough ornaments look like heirloom pieces because they add a second design boundary. The scallops create a repeating shape that catches light, and the gold rim makes the whole thing read like a pendant. I keep the gingerbread itself matte so the frame does the shining. This style looks great when you hang multiple ornaments together because the frames align visually.
Pro tipDry-fit the gingerbread on the frame before baking if you want the bow or arms to stay centered.
Roll dough to about 7 mm and cut your gingerbread. Cut a separate scalloped circle frame (use a scalloped cutter) and bake both pieces, or bake together if your thickness is even. After baking, paint the gingerbread matte cocoa and outline the frame scallops with darker brown. Paint the frame metallic gold, then lightly dry-brush brown into the scallop valleys. Seal everything with satin varnish, glue the gingerbread to the frame using a tiny dot of wood glue, and hang with a deep brown ribbon.
AvoidDon’t glue and then varnish the whole piece — glue edges can bubble under varnish.
9. Antique White Gingerbread with Walnut Edge Dry-Brush

This one reads luxe because it looks worn-in without looking dirty. Antique white keeps it warm, and the walnut dry-brush gives edges that “baked and handled” look. I add a tiny amount of cinnamon-like speckle only on the belly so it feels baked, not splattered. Jute twine at the top makes it feel farmhouse-chic, but the finish keeps it from looking rustic-cheap.
Roll dough to 6 mm thick and cut the gingerbread. Bake until fully dry. Paint the whole ornament antique white, then dry-brush walnut brown only along edges, arms, and raised piping. Add faint speckles by tapping a brush loaded with watered brown paint over the belly. Seal with matte varnish, then thread cream jute twine through the hole and knot tight.
Use a nearly-dry brush for dry-brushing — it should barely deposit color.
Don’t use pure white — it can look sterile and flat next to warm decor.
10. Black Cocoa Gingerbread with Clear Glitter Varnish

Black cocoa looks expensive because it absorbs light and makes metallic highlights feel sharper. Instead of loose glitter (which sheds), I use clear glitter varnish so the sparkle stays locked in place. The silver line on raised details acts like thin icing highlights. It looks amazing on trees with white lights because the ornament catches and throws tiny reflections.
Pro tipLet each coat dry fully before adding glitter varnish so it doesn’t sink into wet paint.
Roll dough to 6 mm and cut gingerbread. Bake and cool. Paint the entire piece black cocoa in two thin coats for an even finish. Paint raised details with a fine silver line, then dab clear glitter varnish on the belly and arms with a sponge brush. Seal again with a compatible top coat if your varnish system requires it, then string with silver thread through the hole.
AvoidDon’t sprinkle loose glitter on wet paint — it turns uneven and messy fast.
11. Marbled Gingerbread with Copper Vein Paint
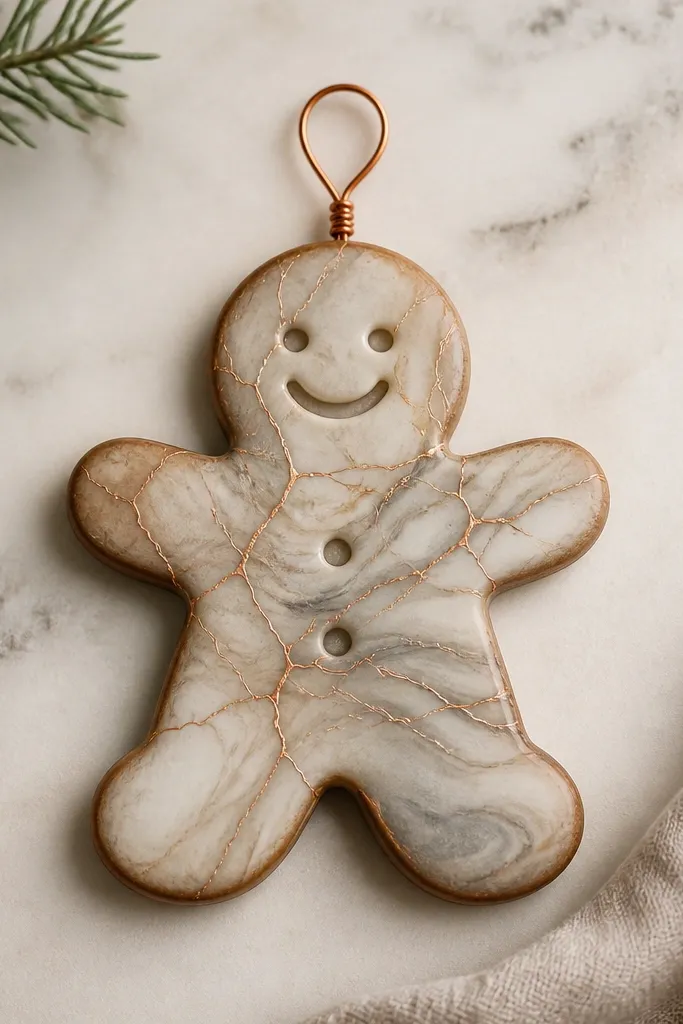
Marbling looks luxe because it imitates stone. The key is controlling the “veins” — too thick and it looks like craft paint, too thin and it disappears. I keep the base in cream and warm gray so the copper veins read as jewelry. This style looks especially good on neutral or modern trees where you want one standout piece.
Roll dough to 6-7 mm, cut gingerbread, and bake. Paint a base coat of warm gray, then add cream patches while the paint is still slightly damp. Use a clean brush to drag through the colors to create soft marbling. Mix copper paint with a little medium for a smooth vein consistency, then paint thin lines across the belly and arms. Add a light brown outline and seal with satin varnish; twist copper wire through the hole for the hanger.
Keep a damp rag nearby and wipe your brush often — marbling looks best when you remove pigment, not add it.
Don’t overwork the marbling — repeated strokes muddy the stone effect.
12. Embossed Script "Joy" Gingerbread with Deep Teal

This design is luxe because it uses relief text, not printed letters. Raised script creates shadow under warm light, and the slight highlight on the embossing makes it look like it’s been gilded. Deep teal is bold but still elegant, and antique gold accents keep it from feeling like kids' crafts. It looks sharp with white lights and pairs well with gold or brass decor.
Roll dough to about 7 mm and cut the gingerbread. Use a letter stamp or carve script into the belly area with a craft knife, then press lightly to create embossing. Bake and cool. Paint the whole ornament deep teal, then dry-brush a lighter teal only on the raised letters. Outline the script with antique gold using a fine brush. Seal with satin varnish and hang with deep green ribbon tied in a small bow.
If your stamp fills in, lightly sand after baking with 220 grit to restore the raised edges before painting.
Don’t try to paint tiny letters without embossing — it looks shaky and cheap.
13. Pearl-White Snowflake Gingerbread with Silver Edge

Snowflake cutouts look high-end because they add light-through detail. The pearl-white base keeps it soft and wintery, and the silver edge frames the negative space like a tiny window. I like putting the snowflake on the belly because it balances the human shape and makes the ornament feel intentional. This is an easy fit for white trees, silver garlands, and anyone who hates loud colors.
Pro tipUse a thin paint brush for the cutout rim; it should look like a clean frame, not a blob.
Roll dough to 6 mm and cut gingerbread. Cut a snowflake shape into the belly area using a small snowflake cutter or a stencil and craft knife. Bake fully and cool. Paint the front pearl white, then paint the snowflake cutout rim and outer edge with silver. Add a tiny amount of silver dry-brush around raised details. Seal with matte varnish so the pearl finish stays creamy, then thread white organza ribbon through the hole.
AvoidDon’t leave the cutout rim unsealed — it will shed dust when handled.
14. Toasted Cinnamon Gingerbread with Rolled Oat Texture

This ornament looks luxe because the texture is real, not painted-on. I press rolled oats into a lightly tacky surface and then seal so the “grain” reads like baked crust. The toasted cinnamon color gives warmth, and darker speckles sit in the oat texture so it looks dimensional. It’s a great pick when you want a cozy, edible-looking ornament that still photographs well.
Pro tipCrush oats with your fingers instead of a blender so you keep a mix of tiny and medium pieces.
Roll dough to 6-7 mm and cut gingerbread. Bake and cool completely. Paint the base toasted cinnamon brown, then dab a thin layer of glue-water mix (just enough to make the oats stick) on the front. Press finely crushed oats into the tacky spots, then let it dry. Paint over lightly with cinnamon-brown to unify color, add darker brown to raised lines, and seal with satin varnish; hang with braided twine.
AvoidDon’t use whole oats — they create big bumps that crack in the oven.
15. Gold Foil Look Gingerbread with Clear Resin Gloss Spots

This is the closest I’ve gotten to “store window” shine without using actual foil. The trick is mixing matte paint with glossy resin spots so you get thick icing highlights in the exact places your eye expects. The gold foil look comes from metallic paint rubbed into raised lines so it stays in crevices, not as a flat layer. It looks amazing on dark trees because the cream base holds the light, and the gloss spots catch it.
Pro tipIf you use resin, warm it slightly in your hands first so it levels and doesn’t form bubbles.
Roll dough to 6 mm, cut gingerbread, and bake. Paint the base matte warm cream. Use a fine brush to paint raised outlines metallic gold, then lightly wipe with a damp cloth to remove gold from flat areas. Mix and apply clear resin or clear glossy medium in small dots on the belly and arm tips, keeping each spot about the size of a pea. Let it cure fully, then attach gold chain through the hole.
AvoidDon’t flood resin over the whole surface — it turns plastic-looking fast.