1. Classic Button-Belly Snowman with Burnt Sienna Noses
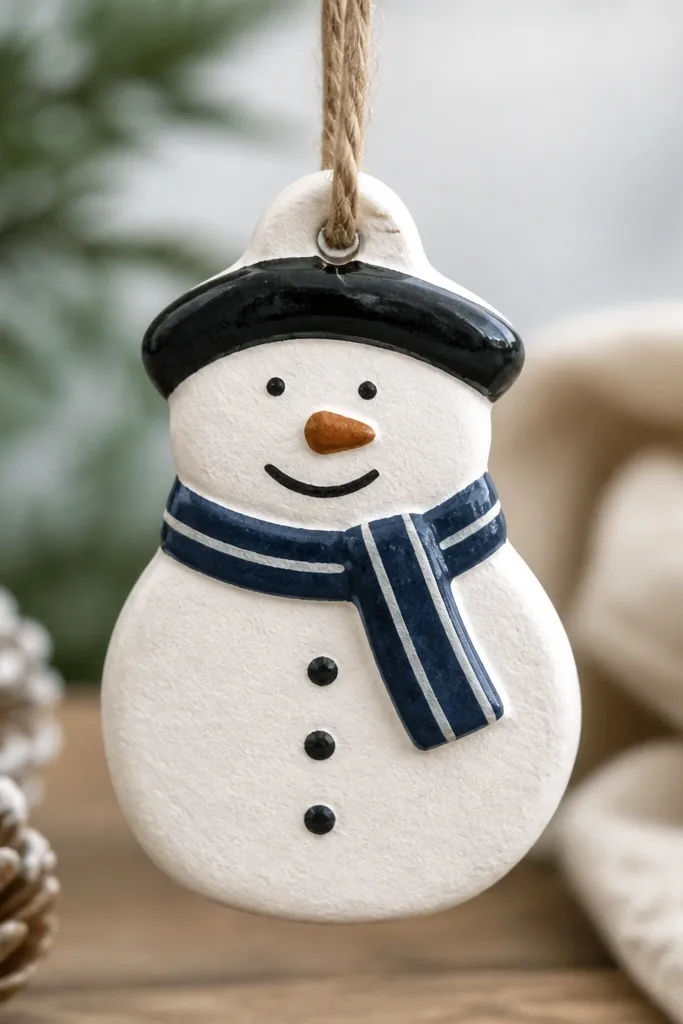
This one looks like the snowmen you see on old Christmas cards, and it’s my go-to when I want “cozy” without clutter. I paint the face with a charcoal-gray (not pure black) so the smile looks soft, not harsh. The nose uses burnt sienna mixed with a tiny bit of orange-brown so it reads as carrot even from a few feet away. It flatters most color palettes because the scarf is navy and the body stays clean white, which makes skin-tone color in photos look warmer.
Start by rolling your dough to 1/4 inch (6 mm) and cutting a rounded snowman shape with a small circle cookie cutter for the head. Score the scarf line with a dull butter knife so paint doesn’t flood the seam. After baking and cooling, brush on a thin clear matte sealer, then let it dry 20 minutes. Paint the belly buttons with a dotting tool using a warm gray, add the smile with a fine liner brush, and finish the nose with a small angled brush. For the scarf, paint navy first, then add one thin white stripe across the middle and let it dry before sealing again.
Pro tipUse a dotting tool made from the end of a clean pencil eraser for even buttons — your snowman will look “printed,” not shaky.
AvoidAvoid painting straight onto raw dough; it soaks in and makes the face look dull and patchy.
2. Chunky Mittens Snowman with Speckled "Frost" Paint
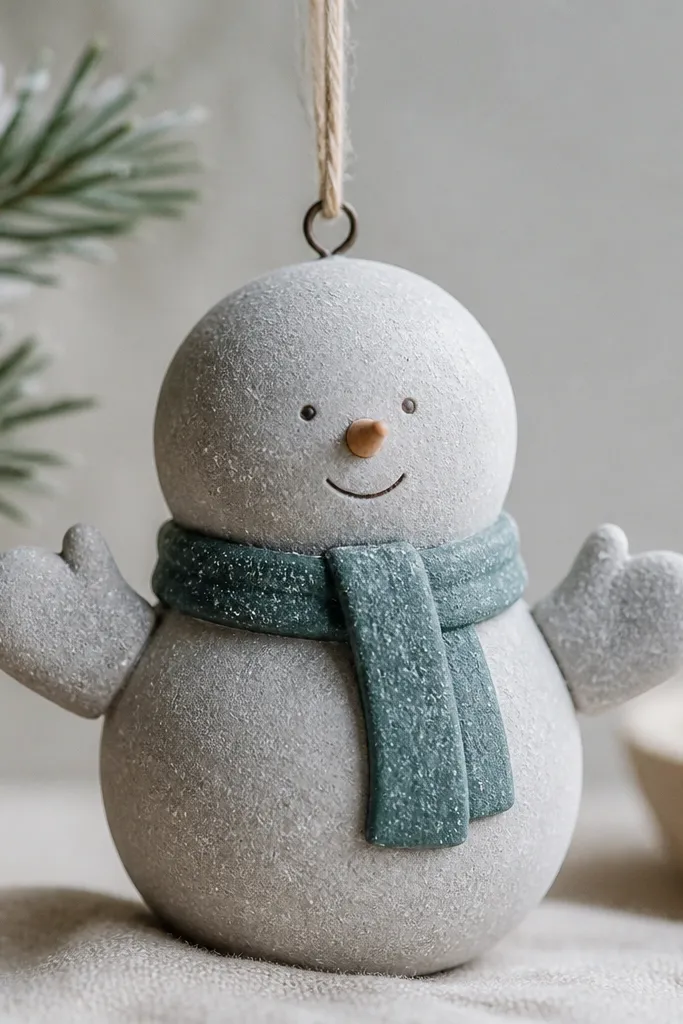
This snowman reads extra cozy because the mittens add weight and movement. I like pale gray mittens because they don’t compete with the face, and the speckled frost hides minor surface dents that happen during baking. Dusty teal scarf keeps it modern without looking neon. This style looks great on light wood shelves and on white trees because the speckles catch light softly instead of reflecting like glossy paint.
Roll dough to 1/4 inch and shape the arms as separate flattened ovals, then score and slip them onto the body. Bake low and long, then cool on a rack. Seal with clear matte, then paint the body pale gray using a flat brush. For the frost, load a toothbrush with white acrylic, then flick over the wet paint from about 6 inches away. Finally, paint the scarf teal and add a simple hat band in charcoal.
If speckles land too heavy, wipe the surface lightly with a damp cloth before it fully dries.
Avoid rushing the speckle step while paint is still wet enough to smear — you’ll get muddy blobs.
3. Sugar-Glaze Snowman with Glossy Highlight Nose
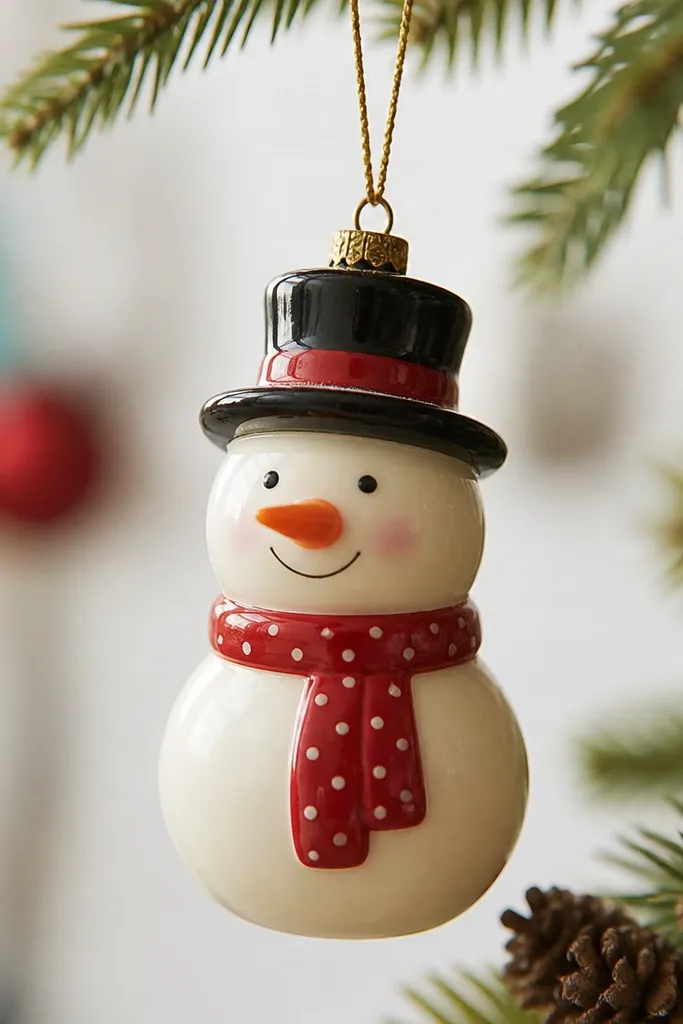
This style looks like sugared cookies, and the trick is the finish. I paint the body cream, then seal with a satin clear coat so it reflects gently. The nose gets the most attention: I paint it orange-brown, then add a tiny white highlight line on one side. Red scarf with white dots gives that holiday candy feel without needing glitter. This one looks best for evening lights because the satin finish shows highlights instead of soaking them up.
Bake your 1/4 inch snowman until fully dry, then cool completely. Apply a thin satin clear coat first, then paint the body cream and the cheeks with watered-down pink. Add the scarf red, then dot white circles with a sponge tip or the end of a round brush. For the glossy nose, paint the nose base and let it dry, then add a small curved white highlight. Seal one more time with satin clear coat, and hang it only after the second coat stops feeling tacky.
Mix a drop of gloss medium into your clear coat if you want the nose highlight to look extra “wet.”
Avoid thick clear coat layers; they can pool around button lines and look uneven.
4. Plaid Scarf Snowman with Cutout Fringe
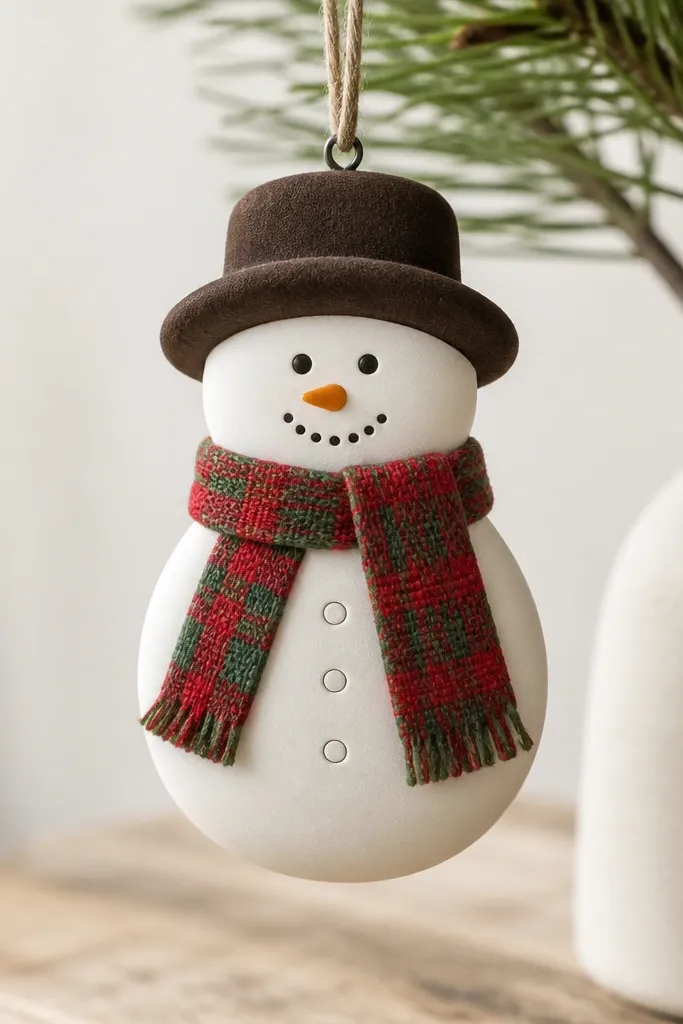
This is the snowman that makes people reach closer. The scarf fringe adds texture you can feel in photos, and plaid gives it structure. I keep the plaid lines thin so they look like yarn, not marker. The green is muted forest green so it pairs with the red without screaming. It flatters warm-toned decor because plaid brings in traditional colors that sit well next to wood, cream textiles, and antique brass.
Roll dough to 1/4 inch and cut your snowman. For the scarf, cut a simple rectangle shape and attach it with slip (dough paste made from flour and water) so the edges bond. Use a craft knife to cut three to five small slits on each end for fringe, then lightly press the fringe tips outward. Bake, cool, and seal matte. Paint scarf plaid with a red base, then add green lines and a thin cream cross line. Outline the buttons in gray so they pop.
Pro tipDraw the plaid layout in pencil lightly first, then paint over it so your lines stay straight.
AvoidAvoid thick scarf edges; heavy fringe can snap off after baking.
5. Snowman with Pinecone Hat and Tiny Leaf Buttons
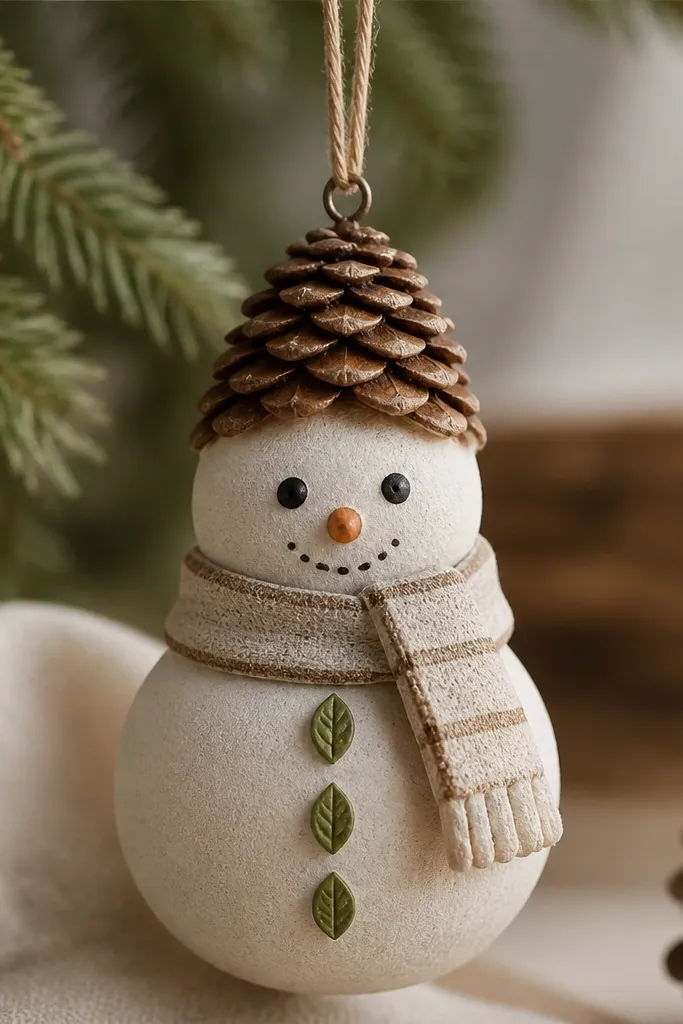
This one looks like it came from a craft store in the best way — natural and a little rustic. The pinecone hat adds ridges so the light hits texture even if you keep paint simple. Leaf buttons are small but they change the whole vibe from “cartoon” to “nature winter.” The scarf stays neutral so the hat doesn’t overwhelm the face. If your decor leans farmhouse or woodsy, this snowman belongs on the tree or hung on a hook by a window.
Shape the hat as a small cone and add shallow ridges using a toothpick pressed in a vertical pattern. Bake with the hat attached using slip. After cooling, seal with matte so the ridges don’t absorb paint unevenly. Paint the pinecone hat with warm brown, then dry-brush a lighter tan on the ridges. For leaf buttons, cut tiny leaf shapes from a thin rolled scrap, bake them attached, then paint them green and outline lightly with dark brown. Finish with a neutral beige scarf and one thin brown stripe.
Dry-brush in one direction only on the hat ridges so the texture reads clean, not smudged.
Avoid painting over unsealed texture; it soaks into ridges and kills the shape.
6. Snowman on a Scalloped Snowdrift Base
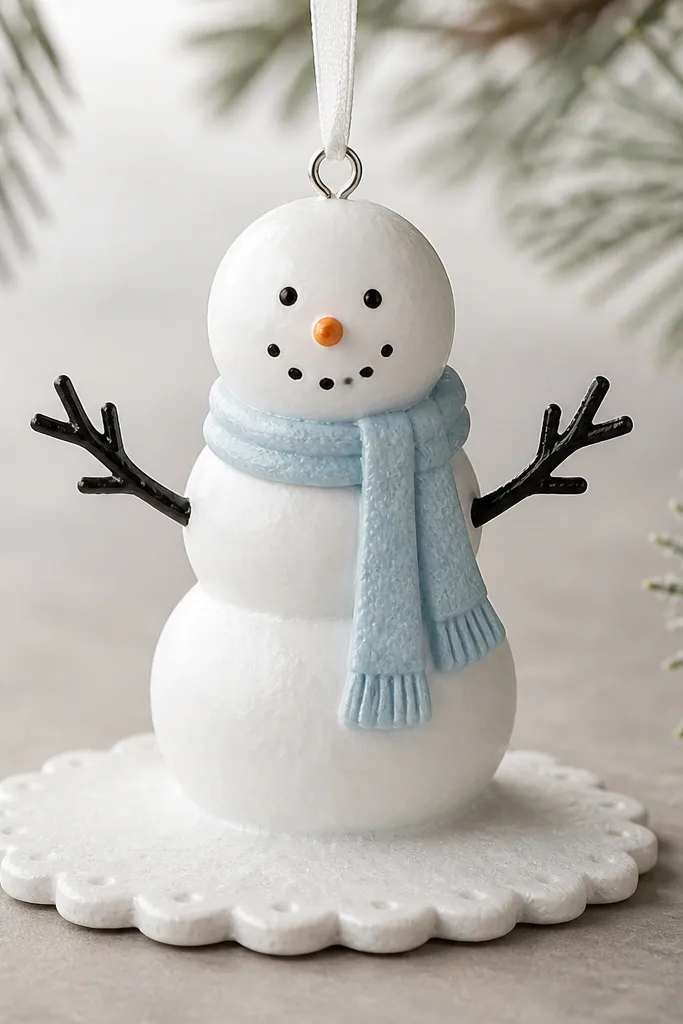
Adding a snowdrift base makes the snowman look grounded, like it’s standing in real snow. The scalloped edge gives a decorative border without adding extra characters. I use light blue scarf to create contrast against white — it reads crisp in photos and on a tree. This style suits small spaces because it’s still one ornament, but it has depth. It also flatters people’s kitchens because blue-and-white looks clean and calm.
Roll dough and cut a snowman body shape. Separately cut a scalloped oval base using a scalloped cutter, then score both surfaces and attach with slip. Make stick arms from thin rolled dough snakes, press them into place before baking, and smooth the joints. Bake, cool, then seal matte. Paint the snowdrift with white and add a thin gray wash at the underside of the scallops. Paint the snowman scarf light blue and add a simple black smile and dot eyes.
Pro tipUse a sponge to apply the gray wash; it gives a soft “shadow” instead of a hard line.
AvoidAvoid attaching arms after baking; the joint will crack when you handle it.
7. Gingerbread-Style Snowman with Brown Sugar Speckles
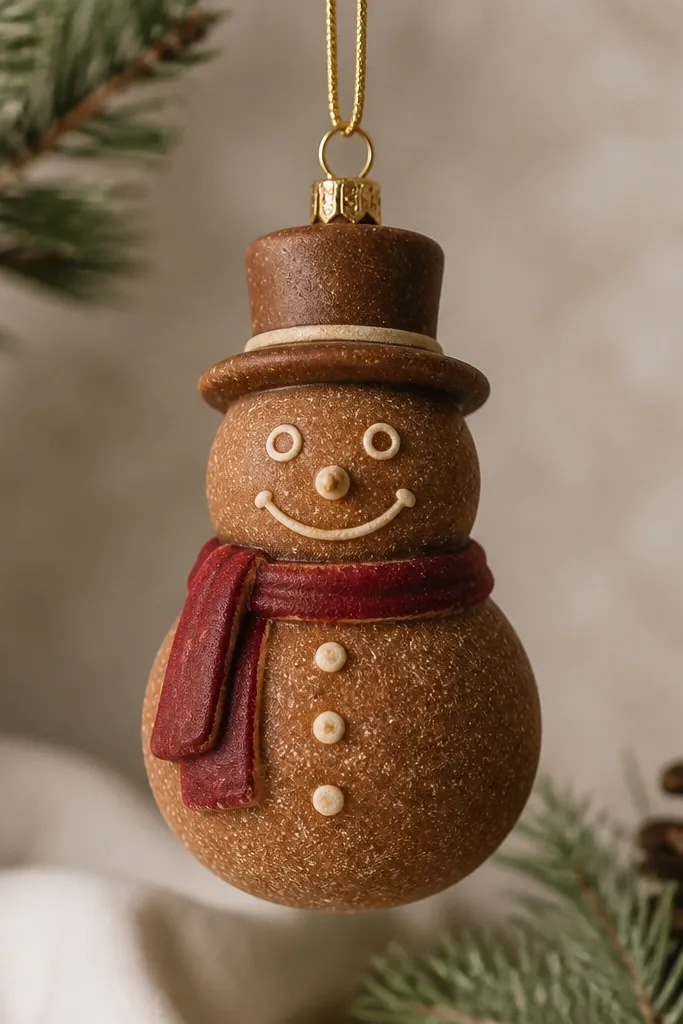
This is the snowman for people who love warm bakery colors. The brown sugar speckles hide tiny cracks and small dents, so your ornament still looks intentional even if the edges aren’t perfect. Cream outlines around the face give a sweet, retro feel. A dark red scarf keeps it traditional. It looks great on holiday wreaths and on a mantle with wood frames because the warm tones feel like baked goods.
Roll dough to 1/4 inch and shape a classic snowman. Bake and cool fully, then seal matte. Paint the body warm brown, then add cream speckles using a toothbrush flick technique but in a controlled way — tap the brush against your finger to control the amount. Outline eyes and mouth with a thin cream line so the face reads clearly. Paint buttons cream dots and add a dark red scarf. Finish with a second thin matte seal so the speckles don’t rub off.
Keep a scrap piece of dough to test speckle density before you paint the real ornament.
Avoid using bright white speckles on brown; it looks like paint splatter instead of sugar.
8. Minimal Chalkboard Snowman with White Paint Drips
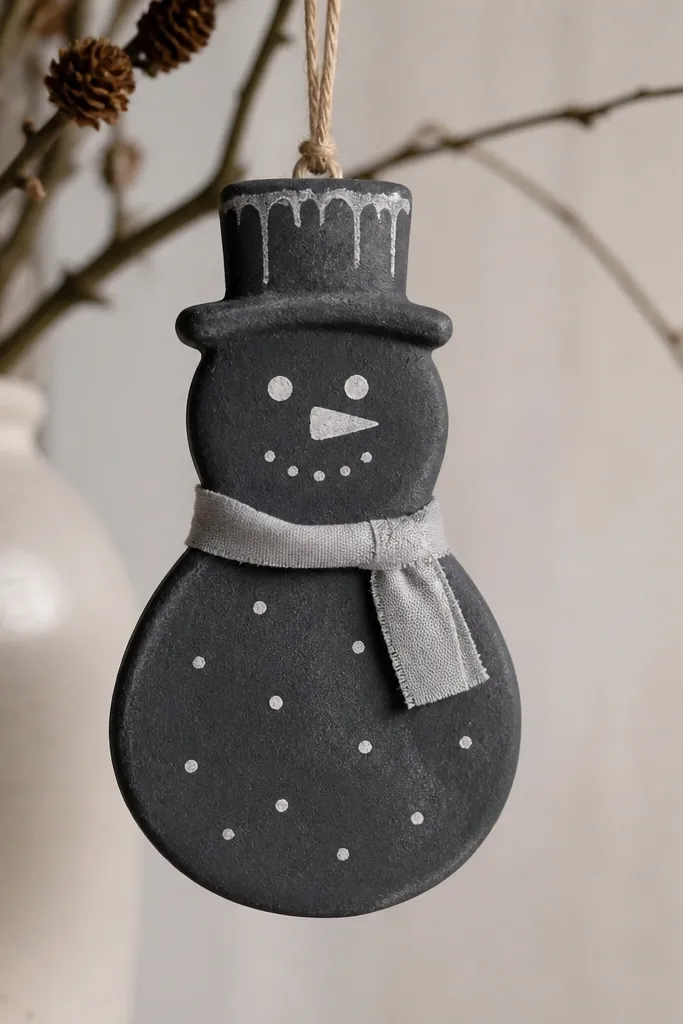
This one looks modern and graphic, and it’s the fastest to make look expensive. The trick is using a dark base and keeping the lines slightly imperfect, like real chalk. I paint the face with white acrylic thinned a touch with water so it looks like chalk, not nail polish. The small drips add personality without turning into messy splatter. It works best if your decor has black, gray, or neutral tones.
Bake and cool your 1/4 inch snowman, then seal matte. Paint the entire body charcoal, two thin coats. After the paint dries, draw eyes and a smile with a fine liner brush using thinned white paint. Add belly buttons as small dots. For drips, load a brush with extra-thin white paint and touch the hat brim area — lift away quickly so gravity makes the drip. Seal with matte again so it looks like a chalk drawing under clear protection.
Pro tipThin your white paint just enough that it drags slightly on the brush. That drag makes the chalk effect.
AvoidAvoid glossy sealer on this design; it makes the chalk effect look plastic.
9. Pastel Bunny-Eared Snowman (Yes, It's Cute)
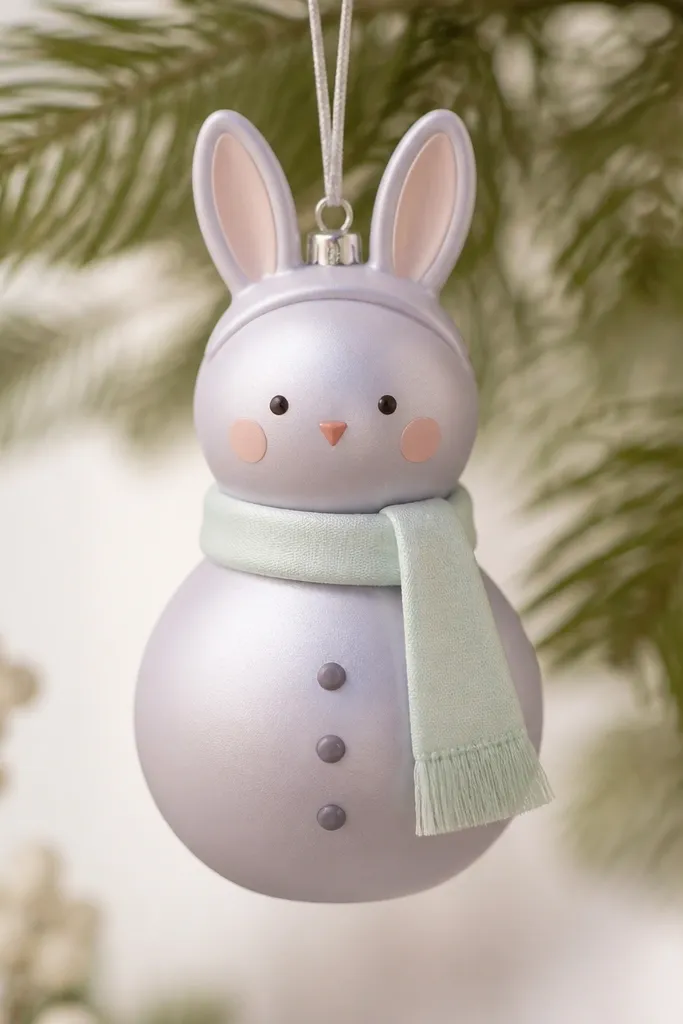
This is my “cozy but playful” ornament when I’m decorating a kids' room or a pastel holiday corner. Bunny ears turn the snowman into something softer without losing the winter look. I keep the colors muted — pale lavender-gray body, mint scarf, peach cheeks — so it feels calm, not candy-bright. Satin finish helps pastel tones look smooth and warm. It flatters fair skin tones in photos because the peach cheeks add a natural blush effect.
Roll dough to 1/4 inch and form the body. Add bunny ears as two small teardrops attached near the top, then smooth seams with a damp finger. Bake and cool, then apply clear satin sealer. Paint body pale lavender-gray, then add peach cheeks and a tiny pastel nose. Paint mint scarf around the middle, and outline the eyes with a soft gray liner so they don’t look too sharp. Seal once more with satin, and let it cure fully before hanging near soft fabrics.
Pro tipUse a damp makeup sponge to tap on blush cheeks so they stay round and even.
AvoidAvoid tiny ears thinner than 1/8 inch; they snap when you pick the ornament up.
10. Snowman with Knitted Scarf Look Using Dry Brush
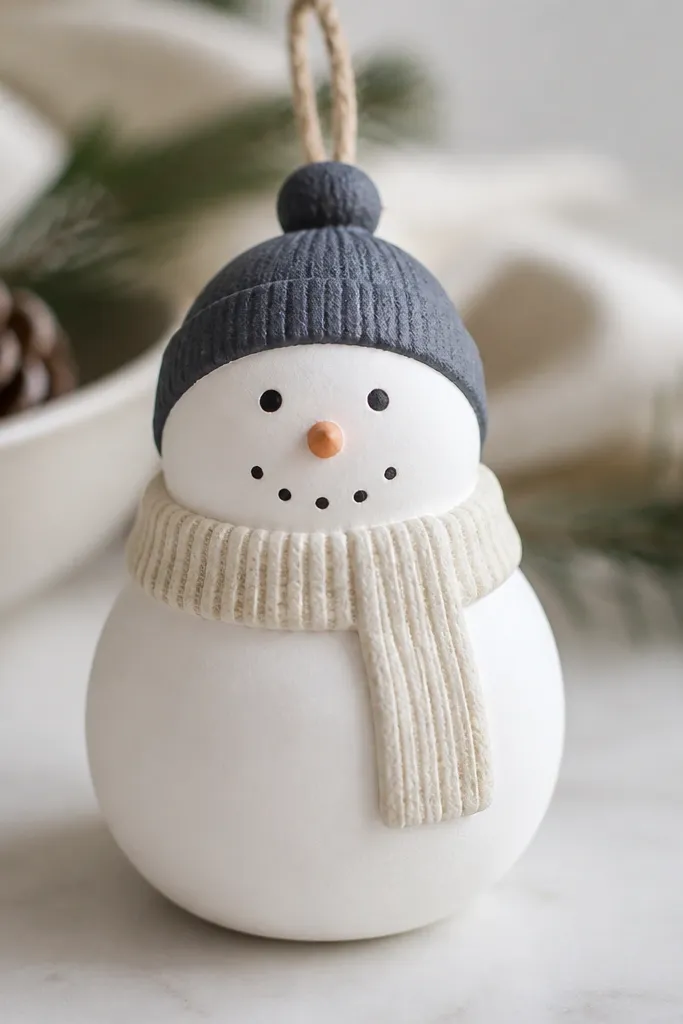
A knitted scarf look is one of those details that makes people assume you bought it. You don’t need fabric — dry brush does it. I paint a cream base scarf and then drag a slightly lighter or darker gray across it in short strokes, matching the direction of knit ribs. The effect reads as texture from across the room. This one looks best on white trees and against darker walls because the scarf texture catches light without looking shiny.
Bake and cool your snowman, then seal matte. Paint the body bright white. For the scarf, paint a cream band around the middle and let it dry. Mix light gray paint and use a nearly dry brush to drag short vertical strokes across the scarf, then add two or three horizontal “wrap” lines near the bottom. Paint a charcoal hat and add a pom-pom dot at the top. Seal again with matte so the knit lines don’t get smeared by handling.
Practice the dry brush motion on a scrap dough piece; the right amount of paint makes the ribs look like yarn.
Avoid wet-brush stripes on the scarf; they fill in and erase the knit illusion.
11. Snowman Ornament with Gold Outline and Red Buttons
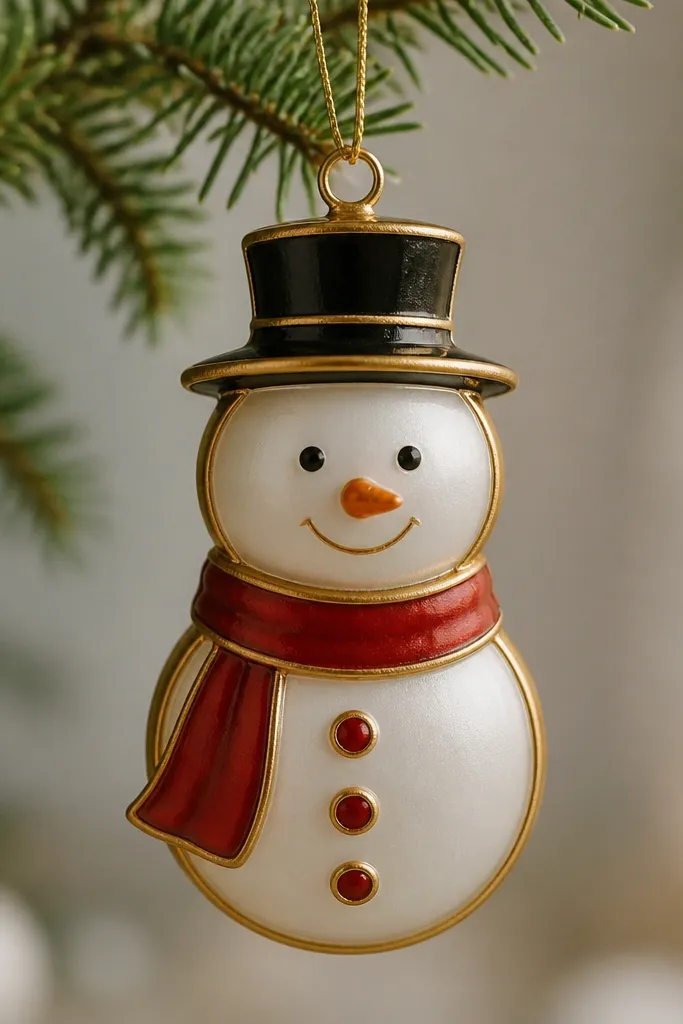
Gold outlines make a salt dough snowman look framed, like a little holiday sign. Red buttons add contrast and keep the belly from looking blank. I use gold paint sparingly — only around key edges — so it doesn’t turn into a costume. Satin clear coat makes gold look warm instead of metallic-cold. This style looks best when you’re hanging ornaments in a cluster, because each outline catches a different angle of light.
After baking and cooling, apply a thin satin clear coat. Paint the snowman body white and the scarf red. Add red buttons using a dot tool. Outline the scarf edges, hat rim, and face border with a fine brush using gold paint. Add a black hat and a gold band across it. Seal once more with satin, and let it cure fully so the gold doesn’t scratch when you hang it.
If your gold line wobbles, wipe the edge with a barely damp cotton swab before it dries.
Avoid painting gold over glossy paint; it can look streaky and uneven.
12. Snowman with Real Twine Bow and Painted Buttons
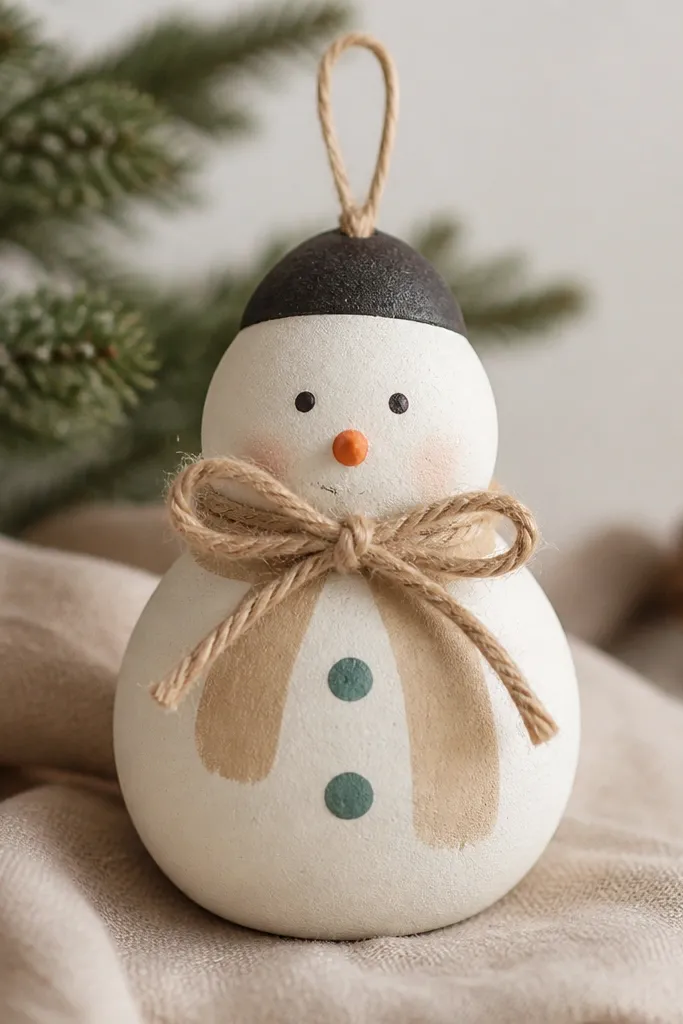
This is the only snowman here that uses real texture from materials you can touch. The twine bow makes the ornament look handmade without adding more paint. I like muted teal buttons because they echo the twine’s natural fiber vibe. Keep the scarf beige or taupe so the bow doesn’t fight color. This style looks great on neutral trees and in rustic entries where you already have burlap or linen.
Roll dough to 1/4 inch and bake your snowman. Seal matte, then paint body white and scarf beige. Paint buttons muted teal and add a simple dark smile. While the scarf paint dries, tie a small bow from twine and trim the ends to about 1/2 inch. After the paint is dry, glue the bow onto the scarf area using a tiny dot of white craft glue or hot glue. Let it set 10 minutes, then spray a very light matte seal over the ornament so twine stays protected without soaking.
Pro tipUse a glue dot smaller than a pea. Too much glue shows through and makes a shiny spot.
AvoidAvoid soaking twine with sealant; it turns dark and stiff.
13. Snowman with Striped Candy Cane Scarf

Diagonal stripes feel instantly festive because your eye reads them as motion. A candy cane scarf also lets you avoid complicated patterns — just two colors and a clean angle. I paint the scarf stripes with a steady hand and thin lines so they look like candy, not tape. The red hat matches the scarf and keeps the ornament balanced. This one looks great on white trees because the red pops without needing glitter.
Roll and cut your snowman to 1/4 inch thickness. Bake and cool, then seal matte. Paint the body white and the hat red, leaving the face clean. For the scarf, paint a red diagonal band first, then add white stripes over it. Use painter’s tape as a guide if your stripes tend to wobble — place it lightly, paint, then remove while paint is still slightly wet. Paint the eyes and smile in black and add the carrot nose in orange-brown. Seal again once everything is dry.
Pro tipIf you use tape, press it down only at the edges and remove it at an angle so paint doesn’t peel.
AvoidAvoid thick paint for stripes; it blurs when the ornament curves.
14. Snowman with Raised Buttons Using Extra Dough Dots
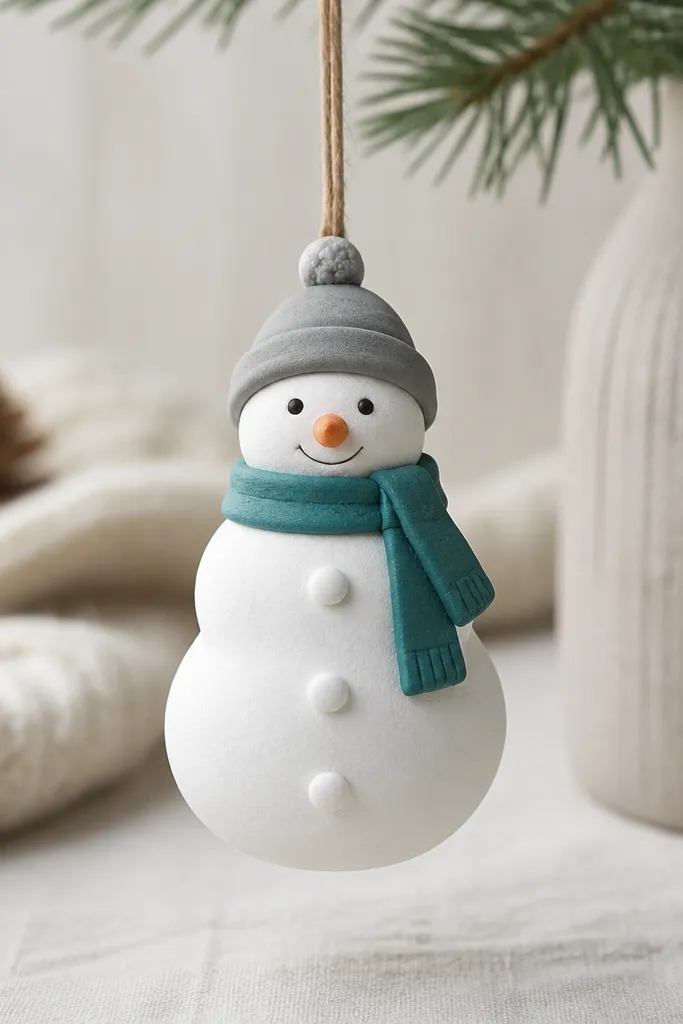
Raised buttons add shadow, and shadow makes the ornament look more realistic. You don’t need glitter when the texture already does the work. I keep the body white and add a light gray wash under the buttons so the depth reads clearly. Teal scarf is a nice contrast that still feels wintery. This one looks best on trees with medium lighting because the raised dots catch light and create a soft 3D effect.
Roll dough to 1/4 inch and form your snowman body. Attach raised buttons by rolling tiny dough balls, pressing them on, and blending the edges with a damp finger. Score lightly around the button area first so the dots fuse during baking. Bake and cool fully. Seal matte, then paint the body white. Add a thin gray wash under the buttons and around the lower belly, then paint scarf teal and hat gray with a pom-pom dot.
Pro tipIf buttons crack at the edges, sand them very lightly with a fine nail file after baking.
AvoidAvoid flattening the button dots too much; if they’re too low, you lose the 3D shadow effect.
15. Snowman Ornament with Starry Sky Background Behind His Head
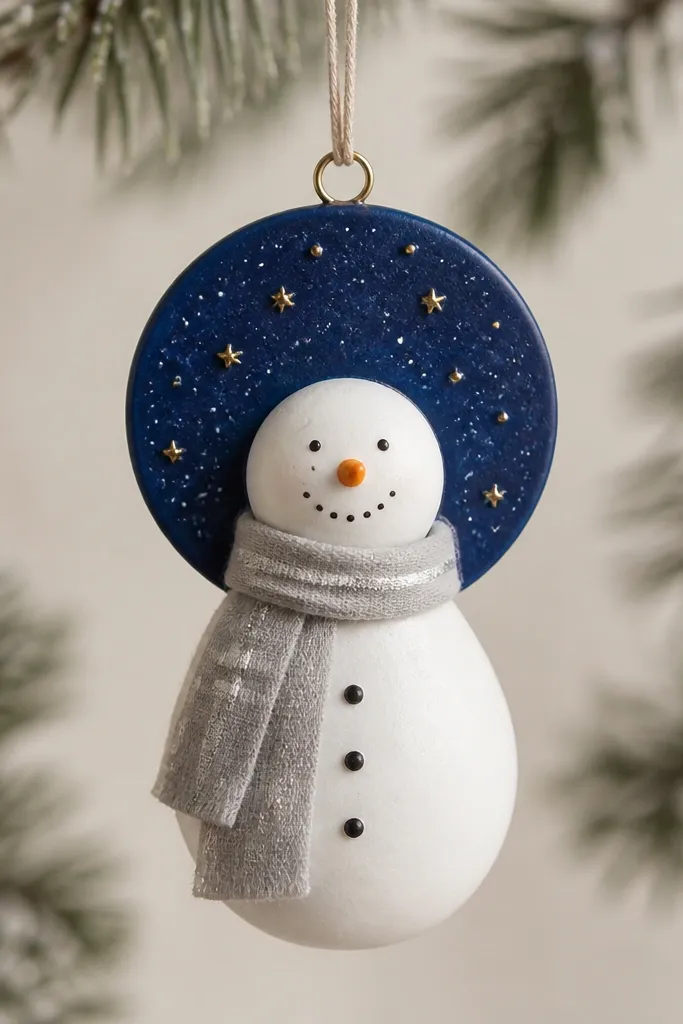
This one looks like a little holiday scene. The navy disk behind the head makes the snowman stand out without extra props, and gold stars make it feel special even with minimal face details. I use tiny star dots instead of big ones because big stars look like confetti. Light gray scarf with a silver stripe keeps it cool-toned and modern. It flatters anyone who likes winter blues and silver ornaments more than red-and-green.
Roll dough and cut a small circular background disk, then cut and shape your snowman. Attach the snowman head area so it sits slightly in front of the disk, then bake. Seal matte for the navy paint base. Paint the disk deep navy, then add gold stars with a fine brush or stencil dotting. Add tiny white specks by flicking a toothbrush. Paint the scarf light gray and add one thin silver stripe, then finish with a matte clear coat so the navy stays deep.
Pro tipUse a coffee stir stick to flick specks — its thickness controls spray better than a toothbrush handle.
AvoidAvoid painting stars after the final seal; they’ll smear if your coat isn’t fully cured.