1. The Mustache Pumpkin with Tiny Bow Tie
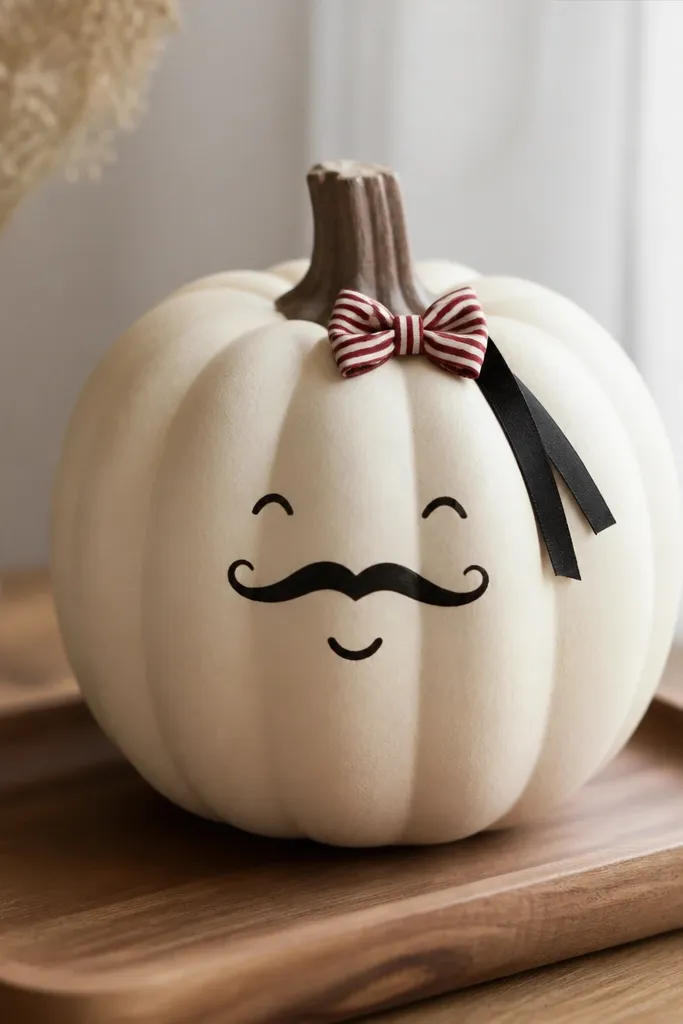
This one looks funny up close but still clean from across the room because the face is simple and the bow tie adds a “grown-up costume” vibe. I use a cream or off-white base so the black mustache reads sharply and doesn’t look muddy. For the bow tie, I like grosgrain ribbon in red with white stripes — it catches light and looks crisp even in indoor lamp glow. This style flatters most spaces because it’s not too spooky; it reads playful and slightly classy. It also works on lighter skin tones in photos because the warm cream and red don’t clash with people’s outfits the way bright orange can.
Start by painting your pumpkin cream (if you’re using foam, use matte craft paint; if you’re using real pumpkins, seal with a clear matte sealer first). Let it dry fully, then draw the mustache with a pencil and paint it with a fine brush or a paint marker. Add a small smile using the same black and keep it tiny — about the width of a dime. Tie a mini bow from 3/8-inch ribbon, then hot glue it just below the stem. Finish by gluing a short ribbon tail so it falls toward the tray edge.
Pro tipMake the mustache slightly uneven on purpose. Real faces have character, and the asymmetry keeps it from looking like a sticker.
AvoidDon’t make the mustache too thick — it turns from funny to heavy fast.
2. Spooky Librarian Pumpkin with Eyeglasses and Bookmark Hat
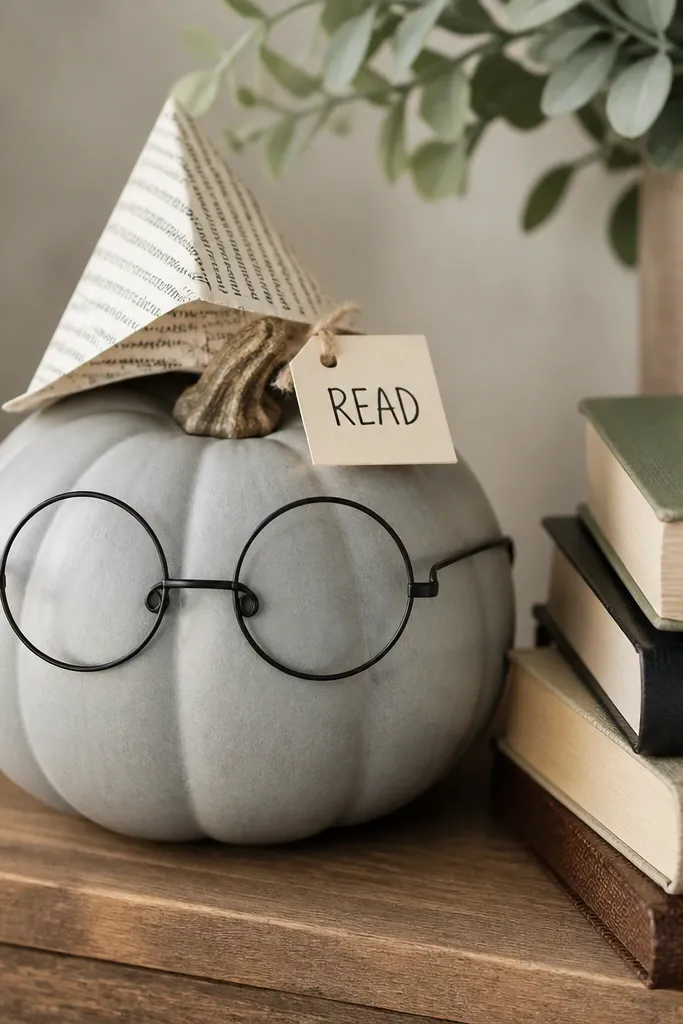
This is my go-to for year round pumpkin decorating ideas because it’s Halloween-adjacent without leaning into gore or skeletons. The gray base makes the eyeglasses look like a real prop, and it photographs well under porch lights. I use wire glasses because they hold their shape and look believable from the side. The bookmark hat gives you that school/library vibe, which works in fall and also in non-Halloween months. It flatters a cozy, reading-corner look — especially if you already have books in neutral tones.
Paint the pumpkin a soft gray, then let it cure. Bend two small wire loops for the eyeglass frame and glue them so the “bridge” sits centered. Add thin arms angled slightly outward, then reinforce with a small dab of glue where the wire meets the pumpkin. For the hat, fold a bookmark into a point and glue it to the top just around the stem area. Place a tiny faux book or two next to the pumpkin so the glasses and hat feel intentional.
Pro tipUse a matte clear spray on the gray paint so the surface doesn’t reflect too much porch glare.
AvoidAvoid using chunky plastic frames — they look like toy glasses and cheapen the whole face.
3. Witchy Cat Pumpkin with Felt Ears and Green Button Eyes
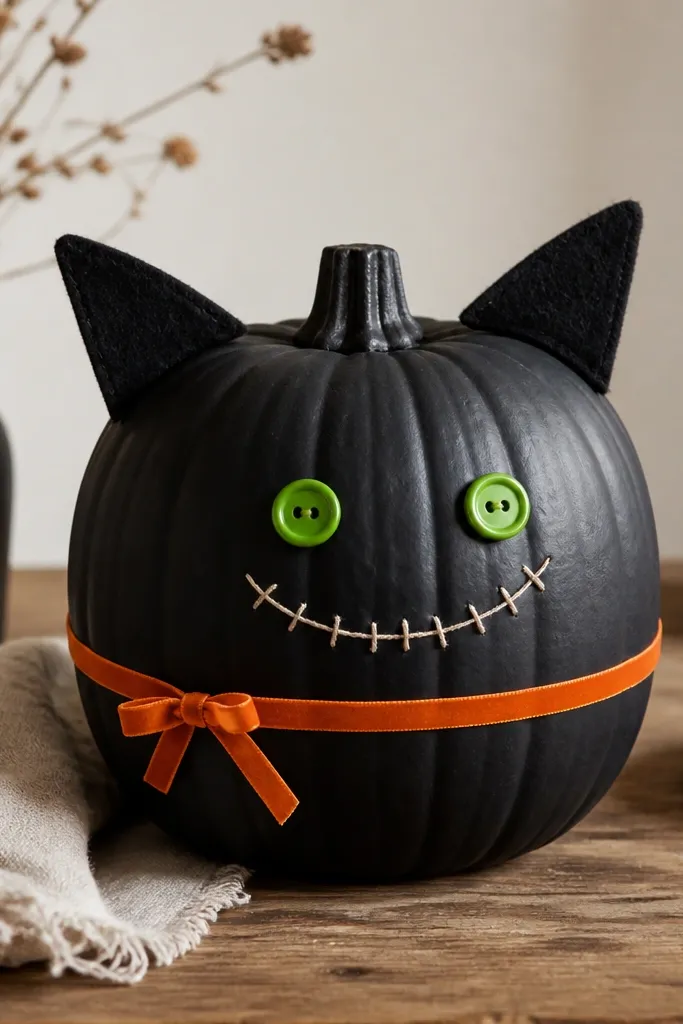
This one reads cute instead of creepy because the eyes are buttons and the smile is stitched-looking. I use black pumpkins because felt and green buttons pop hard, and the contrast looks intentional. Felt ears give you that soft, fuzzy texture that looks warm even in cool fall light. The orange ribbon collar adds a playful accent that still feels “fall” after Halloween. It works especially well if your decor palette is black, cream, and a single bright accent color.
Glue felt ear shapes onto the top of the pumpkin — I cut triangles with rounded tips so they don’t look like costume horns. Center the ears so there’s a slight gap between them. Glue green buttons as eyes, then add a stitched smile using a black fabric marker or paint pen. Wrap a thin orange ribbon around the middle and tie a knot at the front. Add a small black ribbon tail at the side if you want a bit of movement in photos.
Pro tipStitch the smile with embroidery thread using a few quick stitches. It holds up better than paint and looks more handmade.
AvoidDon’t place the eyes too high — it makes the cat face look off and top-heavy.
4. Pumpkin "Couch Potato" with Mini Blanket Drape
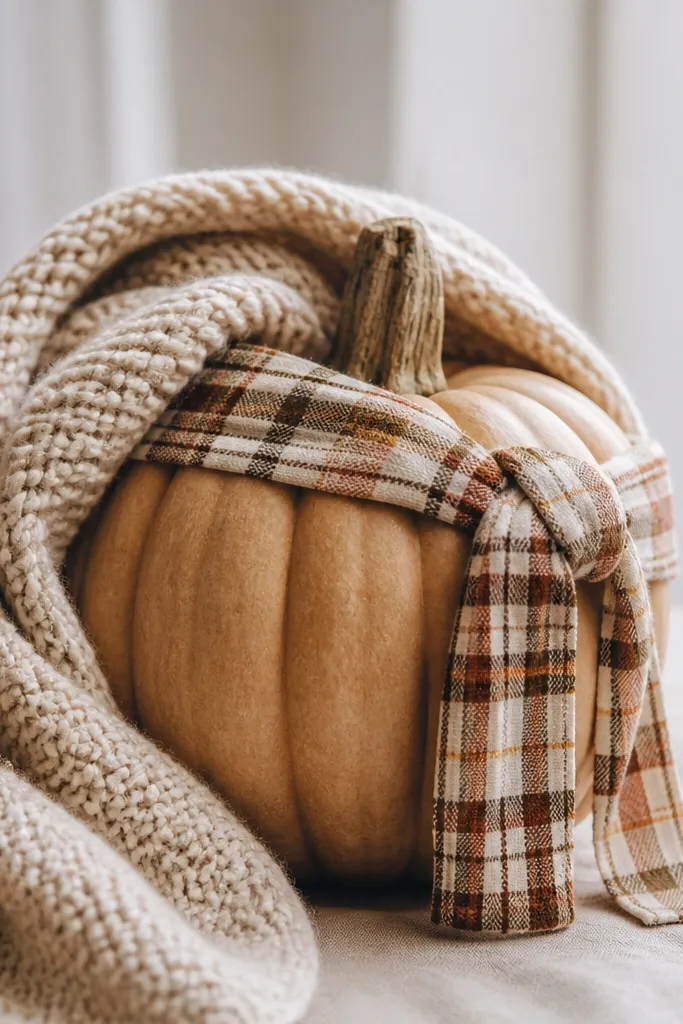
This is funny in a wholesome way. The blanket drape makes the pumpkin look like it’s relaxed, and that visual joke stays friendly even after October. I like using a knitted or fleece blanket because the texture reads cozy instead of costume-y. A tan pumpkin gives you a neutral base that works year round with any seasonal table setting. This style flatters farmhouse and modern spaces because it’s soft, not sharp.
Start with a tan pumpkin and wrap a small rectangle of fleece or knit fabric around the front so it creates a fold at the center. Use hot glue at the back seam points only, so the front still looks naturally draped. Add a plaid ribbon across the middle like a scarf — tie it with a knot that sits slightly off-center. If you want extra realism, tug the fabric edges so they flare out a bit instead of lying flat. Place it on a tray with a small candle or a ceramic bowl so the blanket theme feels intentional.
Use a fabric glue stick on the drape edges if you want easier repositioning than hot glue.
Avoid slick satin fabric — it slides and makes the pumpkin look like it’s wearing a costume sheet.
5. Hot Sauce Label Pumpkin with Mini Bottle Cap Top
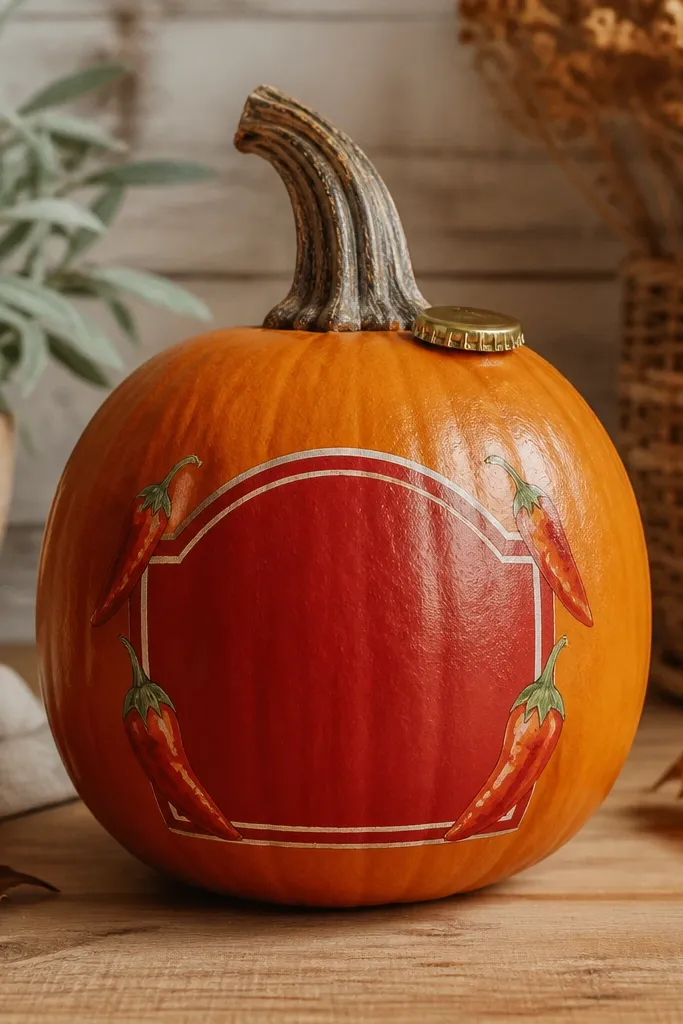
This one is pure humor and it looks great on a kitchen counter because it’s themed around food. I use an orange pumpkin or an orange-painted foam pumpkin so the label looks like it belongs. The bottle cap detail makes it feel like a prop you’d find in a novelty store. For labels, I like red vinyl or printed sticker paper with white text, since it reads clean under warm indoor lighting. It flatters kitchens with wood tones because the orange-red combo looks like autumn pantry colors.
Paint or choose an orange pumpkin and let it dry. Create a label: cut a rectangle of sticker paper or print on label sheets, then add a border strip using a thin black marker. Glue the label to the front, keeping it centered. Glue a small bottle cap near the stem as the “lid.” Add tiny faux chili accents around the label corners using craft foam or small red felt dots.
Seal the label with a thin layer of clear matte spray so it doesn’t peel when you dust the pumpkin.
Don’t wrap the label around the curve — it warps the text and looks messy.
6. Snowman-Style Pumpkin with Carrot Nose and Button Buttons
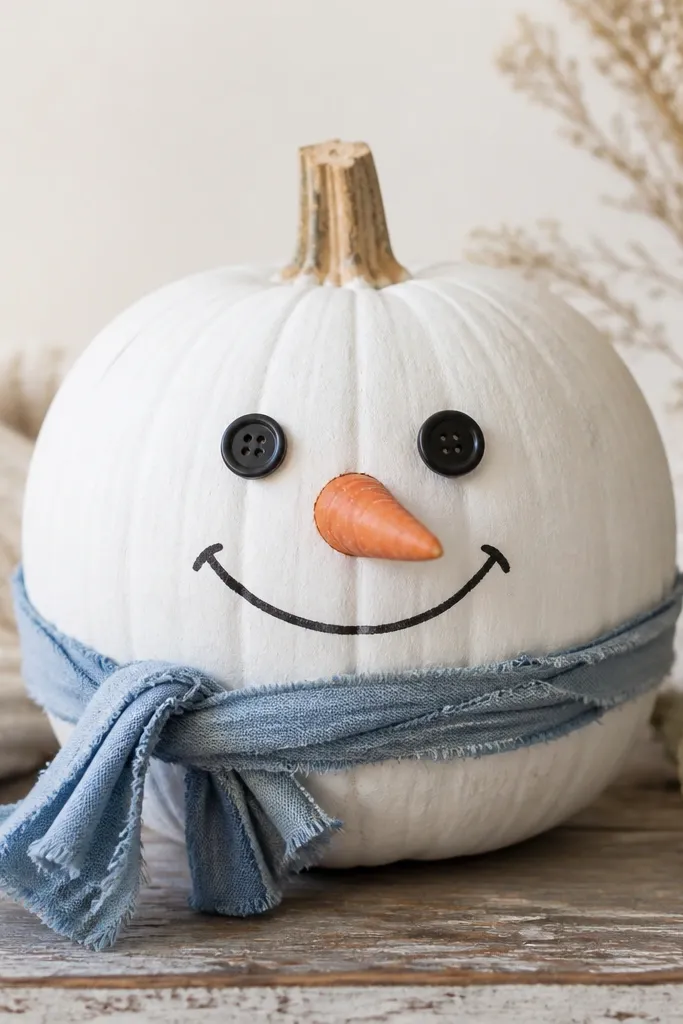
This is the “winter pumpkin” version of Halloween decor, which is why it belongs in year round pumpkin decorating ideas. The white base and black buttons mimic a classic snowman, and the scarf makes it feel seasonal without screaming October. I like a fabric scarf because it looks soft and real, unlike plastic ribbon. The carrot nose adds a bright focal point that photographs well against neutral winter coats. It flatters people’s outfits in photos because the blue and orange sit nicely with denim and cream sweaters.
Paint the pumpkin white with matte craft paint and let it cure overnight. Cut a small carrot nose from orange foam and glue it centered. Add button eyes and a smile using small black buttons or paint markers. Wrap a short strip of blue fabric around the top third like a scarf and tie a knot at the front. Add two tiny “button” dots under the smile if you want the snowman feel to land stronger.
Pro tipUse a micro dab of glue at the scarf knot so it stays tied but you can remove it for storage.
AvoidAvoid glossy paint — it makes the snowman look like it’s made of plastic.
7. Thanksgiving Turkey Pumpkin with Feathery Ribbon Tail
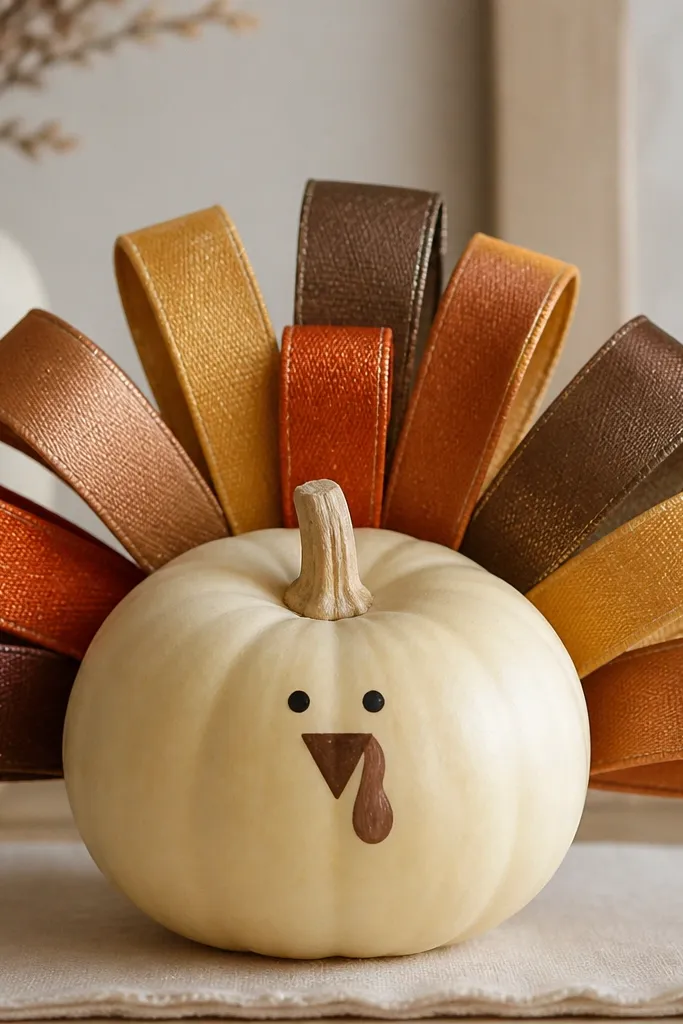
This transforms a pumpkin into a Thanksgiving character without using actual feathers. Ribbon tails look full and readable from a distance, and they store flat better than real feathers. I like cream pumpkins because the turkey colors look like warm spices. The face drawing stays simple: a small beak and dot eyes, nothing too fussy. This works well for dining tables because it’s a centerpiece vibe that doesn’t block plates.
Paint the pumpkin cream and draw a small turkey face with brown paint — keep the beak short and curved. Cut ribbon into strips about 10 inches long and 1 inch wide, then create a fan by gluing the strip bases in a circle at the back. Leave the ribbon ends free so they curl slightly from your fingers. Glue the fan behind the stem area so it looks like a tail. Add a small bow in rust ribbon at the top front if you want a polished finish.
Pro tipUse wired ribbon if you want the tail to hold its shape even after storage.
AvoidDon’t make the tail too wide for your table. If it blocks sightlines, it stops being cute.
8. Glow-in-the-Dark Ghost Pumpkin with Velcro Strap
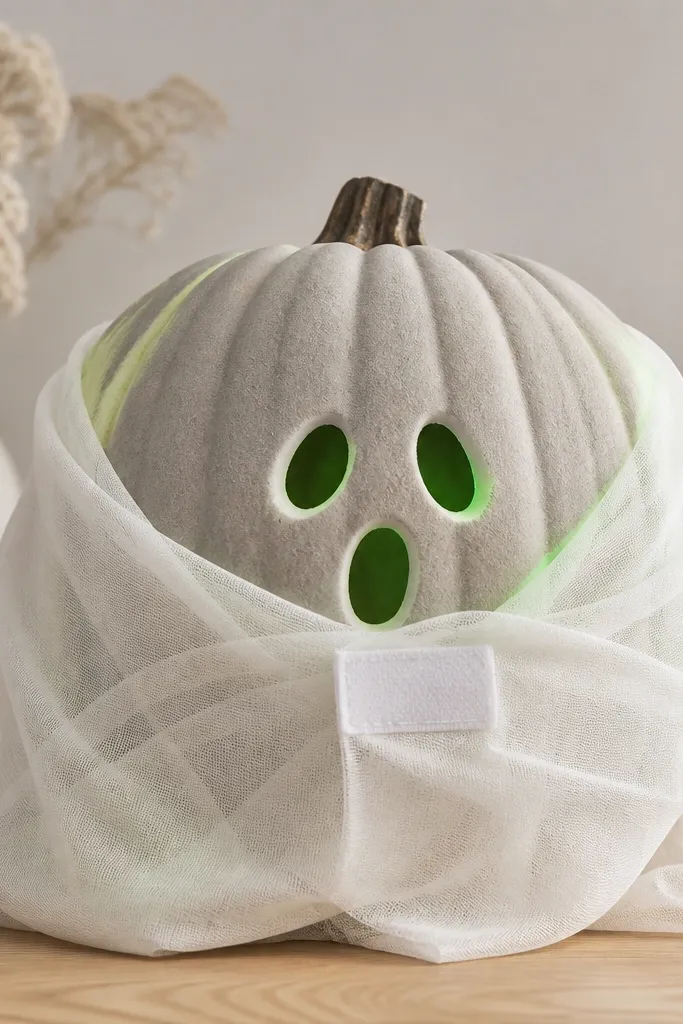
This is a Halloween look that you can keep up in the off-season because the ghost is subtle until the lights go down. The gray base keeps it neutral, and the translucent ghost fabric gives you that floating effect without looking like a cheap sheet. I use glow-in-the-dark paint just on the ghost outline — it looks magical at night, but day looks clean. Using Velcro means you can remove the ghost layer and keep the pumpkin as a plain decor piece. It flatters patios and entries where you want something that reads “fun” after dark.
Paint the pumpkin light gray. Add a ghost face with a white paint pen or black marker. Mix glow paint and outline the ghost shape lightly — just around the edges, not the whole face. Cut a ghost shape from translucent white fabric and attach small Velcro dots on the back. Stick the ghost to the front layer so it wraps around the pumpkin and sits centered.
Charge the glow paint under a bright porch light for 10 minutes before your evening party.
Avoid covering the entire pumpkin in glow paint — it turns into a nightclub look in daylight.
9. Comic-Strip Pumpkin with Speech Bubble and Doodle Text
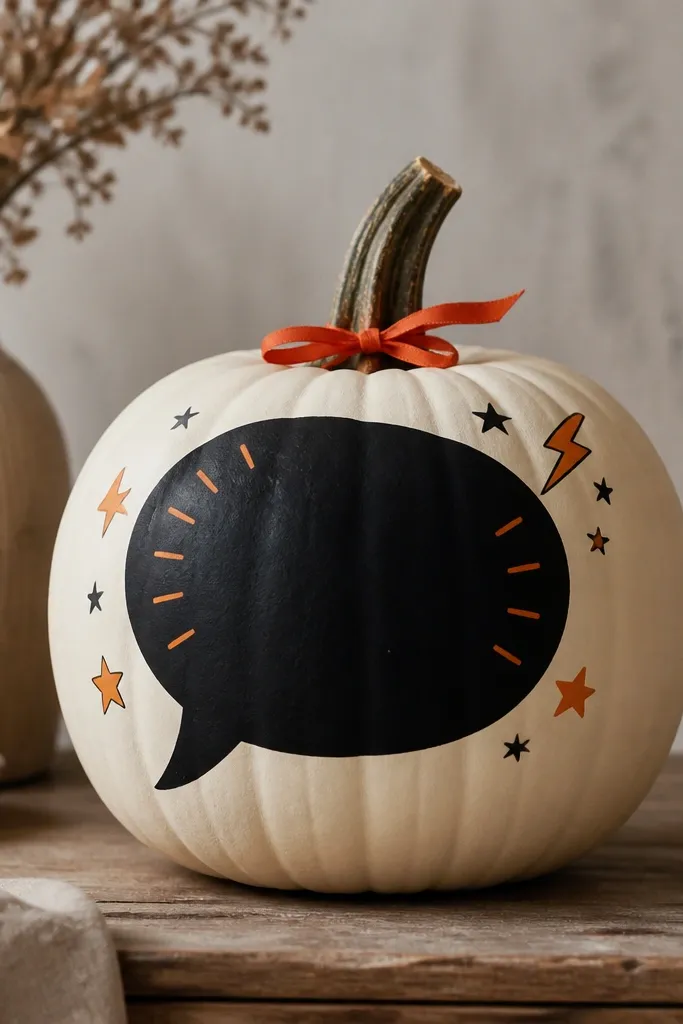
This style is funny because it looks like the pumpkin is talking. I use a cream base so the comic lines look crisp, and I stick to one or two accent colors for a clean layout. Speech bubbles are easy to swap year round since the bubble outline stays the same but the text changes. If you’re doing family photos, the bold black lines read well even with busy backgrounds. It works great for kids' parties and still looks graphic enough for non-Halloween fall setups.
Paint the pumpkin cream or buy one already in that color. Draw a speech bubble in black using a thick paint marker or vinyl cutout. Add doodles like small stars and lightning bolts around the bubble using orange and yellow paint pens. Tie a small red ribbon around the stem so the top looks finished. If you want it reusable, write the “joke” text on removable label paper and place it inside the bubble.
Pro tipUse permanent marker on label paper, then seal it with matte spray so it stays readable.
AvoidAvoid using thin, gray outlines. The comic look dies when the lines don’t pop.
10. Pumpkin Bowling Set with Mini Pin Faces
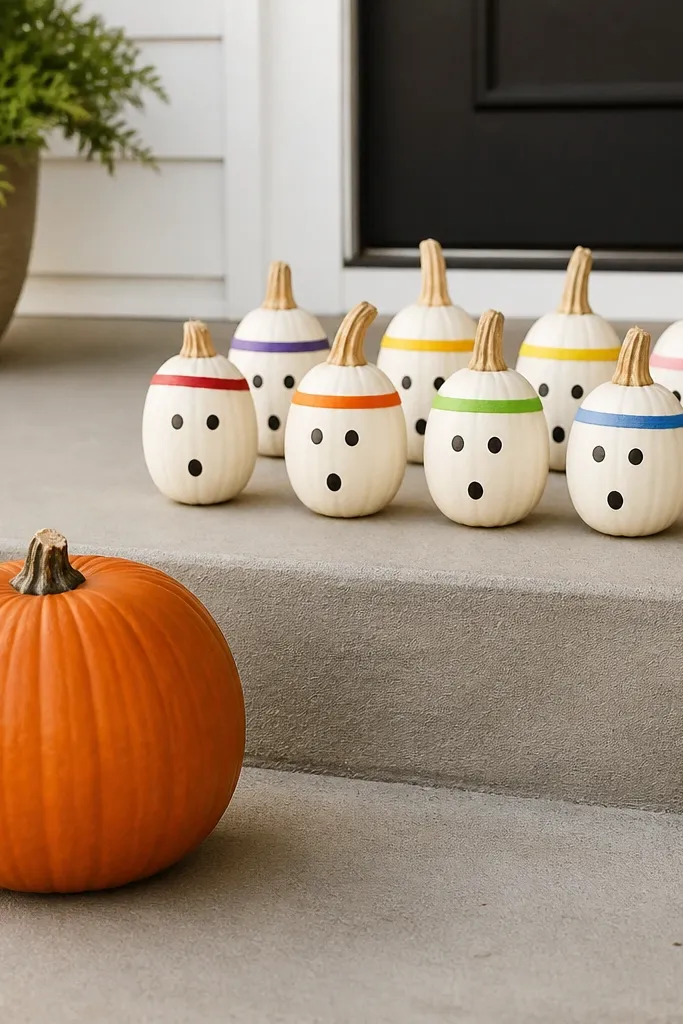
This one is funny because it turns your pumpkins into a game. You get a clear “story” from across the yard, and it works for year round pumpkin decorating ideas because the bowling theme is playful, not scary. I use small white pumpkins for the pins because they act like blank canvases for faces. Colored bands near the top mimic bowling pin color rings. This style is great for porches with steps or a narrow entry area because the grouping creates a neat line.
Choose 6-8 small pumpkins and paint them white. Paint dot eyes and simple smiles in black, then add a colored ring band about 1.5 inches from the top using craft paint. Arrange them in a bowling triangle — four in front, then three, then two, then one. Place a larger pumpkin slightly forward as the “ball” base. Add a small ribbon or jute bow at the triangle corner so it looks like a finished prop, not random pumpkins.
Pro tipUse painter’s tape bands for the colored rings so they stay straight.
AvoidDon’t leave gaps between pins. The triangle needs tight spacing or it looks messy.
11. Terracotta Pumpkin Planter with Fake Succulent Hair
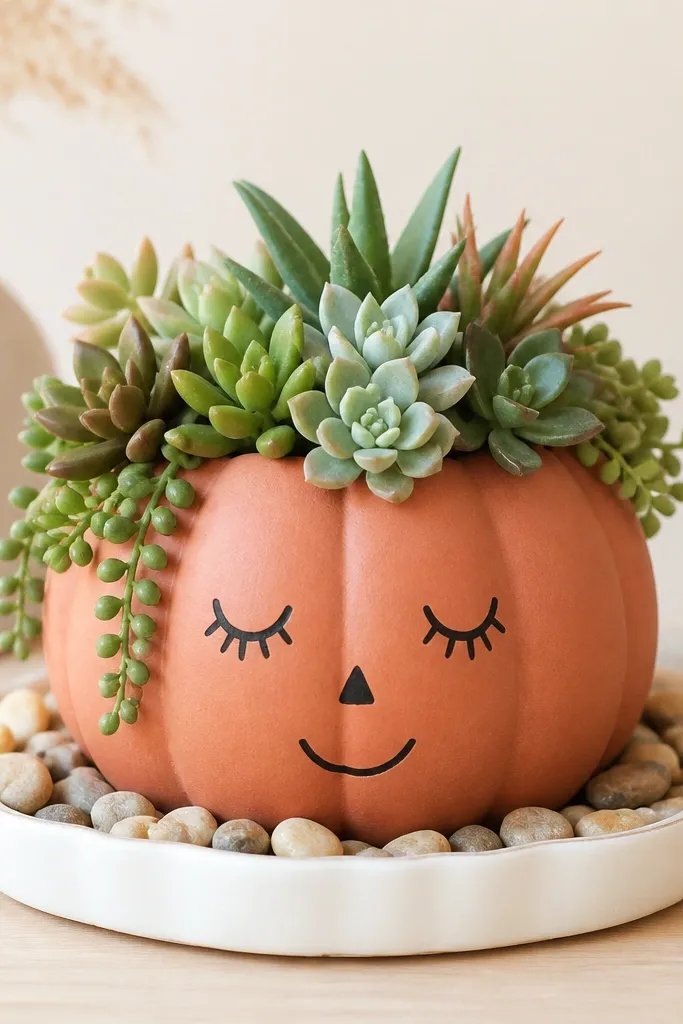
If you want year round pumpkin decorating ideas that don’t scream Halloween, turn the pumpkin into a tiny plant character. The terracotta base looks earthy and stays warm months after October. Faux succulents give you a “hair” tuft that makes the pumpkin look whimsical without needing real watering. I like a simple face and let the succulents do the talking. This works well for people who want a decor piece that lives on a kitchen shelf or windowsill long after trick-or-treat ends.
Paint or choose a terracotta pumpkin and add a minimal face with a dark brown paint pen. Cut a small foam insert or use a faux moss plug at the top so the succulent tuft has something to sit on. Glue faux succulents into the plug so they fan out like hair. Place the pumpkin on a white tray and add a thin layer of pebbles around the base for a clean edge. Keep the colors tight — terracotta, deep brown, and one green tone.
Mist the succulents with a tiny bit of matte finish spray so they look less plastic in daylight.
Avoid overloading the top with too many succulents — it turns into a bush instead of a hairstyle.
12. Black Cat Pumpkin with Tail Curl and Collar Bell
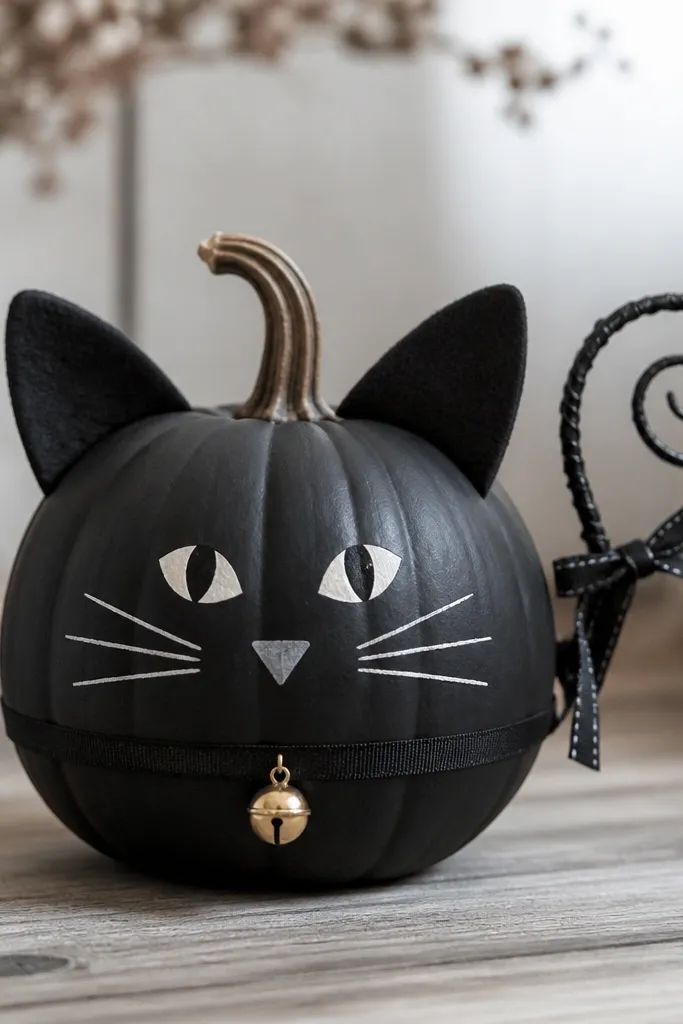
This is a Halloween cat that still works in non-Halloween months because the design is clean and graphic. Black pumpkins look sleek, and the white whiskers give you a high-contrast look that pops on light-colored porches. A curled tail adds motion, and the bell makes it feel playful. I like a gold bell because it reads warm under both daylight and warm bulbs. This style flatters modern spaces because it looks like a character prop rather than a pile of themed items.
Paint your pumpkin black and let it dry flat. Paint a simple cat face: two small eyes, a tiny nose, and a short mouth. For whiskers, use a white paint pen and draw 3 lines per side. Make a tail by curling thin wire, wrapping it with black ribbon, and gluing it to the side near the middle. Add a collar using a strip of ribbon around the pumpkin and glue a small bell at the front.
Attach the bell with a brad or a loop of wire so it doesn’t rotate weirdly when you move the pumpkin.
Avoid thick paint whiskers. Thin lines look like whiskers; thick lines look like marker scribbles.
13. Orange Zebra Pumpkin with Stripe Decals
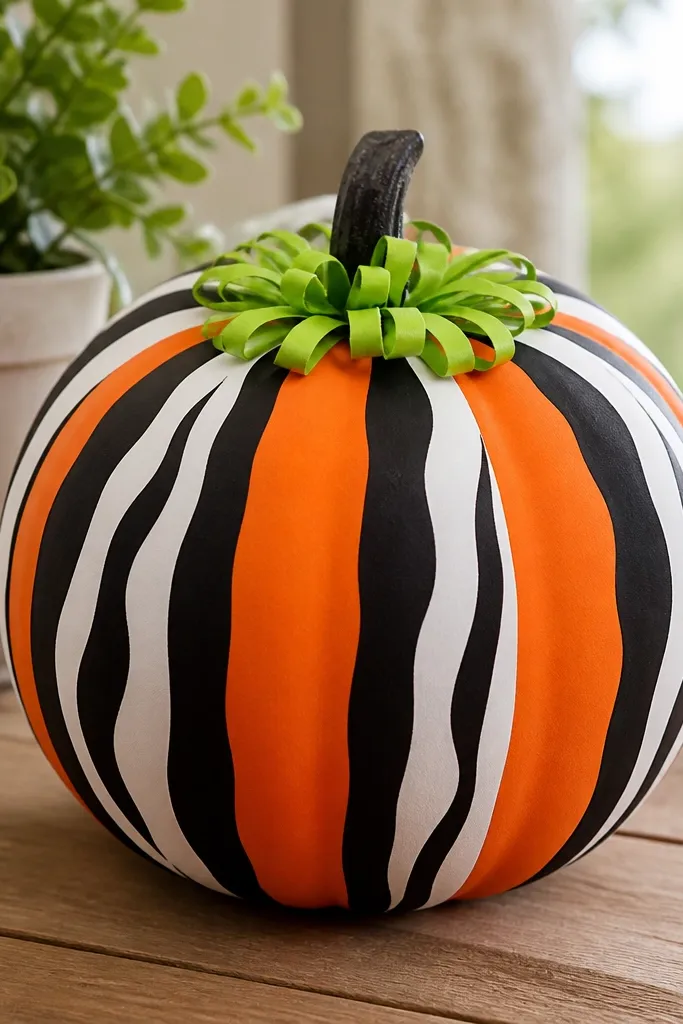
This is funny because it’s unexpected. It turns a pumpkin into a pattern statement, so it fits year round pumpkin decorating ideas even when you’re not in Halloween mode. I use zebra stripes because they read as playful fashion, not spooky. The orange base keeps it autumn, while the black-and-white pattern makes it feel graphic and modern. This style looks great next to neutral planters and works especially well if your decor has black metal accents. It also photographs well because the stripes create strong lines even in low light.
Paint the pumpkin orange and let it dry. Use painter’s tape to map stripe widths — I keep them about 1/2 inch wide for a standard medium pumpkin. Paint alternating stripes black and white, then remove tape once each color is set enough to not smear. Add a tiny green ribbon “mane” at the stem by hot-gluing a short piece and fraying the ends with scissors. Finish by stepping back and checking stripe symmetry around the front.
Pro tipPress tape firmly where it meets the curve so you get crisp edges instead of fuzzy stripes.
AvoidAvoid uneven stripe widths. Zebra stripes look intentional when they’re consistent.
14. Pumpkin Pie Slice with Felt Crust and Cherry Top
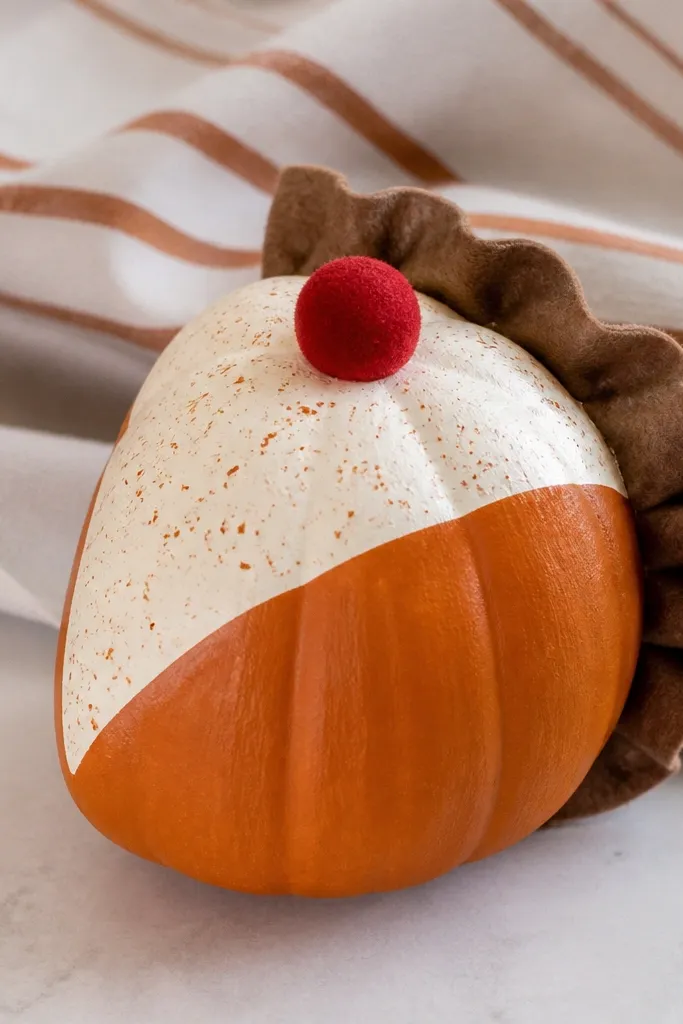
This one makes your pumpkins feel like dessert decor, which is why it works after Halloween too. The felt crust gives you soft texture, and the cherry top makes it instantly recognizable. I use warm browns and cream so the piece matches table linens, cutting boards, and fall dishes. It’s funny because it’s obviously “a slice,” not a pumpkin face, so it reads like a craft joke. This style flatters warm-toned interiors and looks great with wood, gingham, and off-white ceramics.
Paint the pumpkin so the front resembles pie filling: cream base with tiny orange speckles using a dry brush. Cut a felt crust strip in a warm brown and glue it along the lower edge of the pumpkin. Add a small felt cherry with a tiny green felt leaf at the top point. If you want a more slice-like look, glue a thin felt triangle on the front to mimic the pie’s cut edge. Place the pumpkin on a small plate or tray with a striped cloth underneath so it looks like a served dessert.
Dry-brush the speckles lightly — too many makes it look like confetti instead of filling.
Don’t use thick felt all over — keep the crust as the texture accent and the rest smooth.
15. Roasted Marshmallow Pumpkin with Faux Char Spots
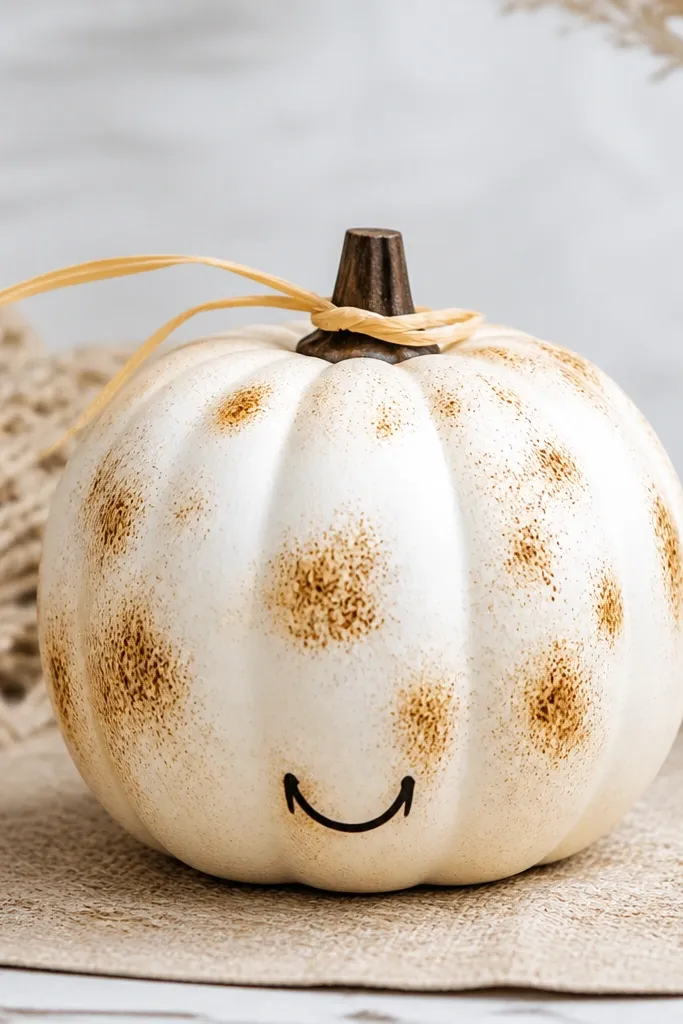
This is a funny Halloween snack that stays cute in winter because it’s basically a campfire character. The white base looks clean in daylight, and the brown char spots add realism. I like using a “stick” detail because it makes the pumpkin feel like it’s roasting, not just dressed up. It’s also easy to keep neutral: no bright orange needed, no spooky palette required. This style flatters anyone who wants decor that fits a cozy living room or a holiday mantle without turning it into a haunted house.
Paint the pumpkin white with matte paint and let it dry. Dab brown paint spots using a sponge — keep them irregular and smaller near the top. Add subtle darker edges on a few spots with a tiny brush so it looks toasted. Wrap a thin tan ribbon around the pumpkin near the stem like a stick tie, then glue it in place. Draw a tiny smile low on the front and keep it simple so it reads like a roasted marshmallow face.
Pro tipUse a foam makeup sponge for the char spots. It gives you that pitted, toasted texture.
AvoidAvoid perfect circles for the spots. Toasted marshmallows never look uniform.