
1. Square-Neck Ribbed Bralette with Thin Straps
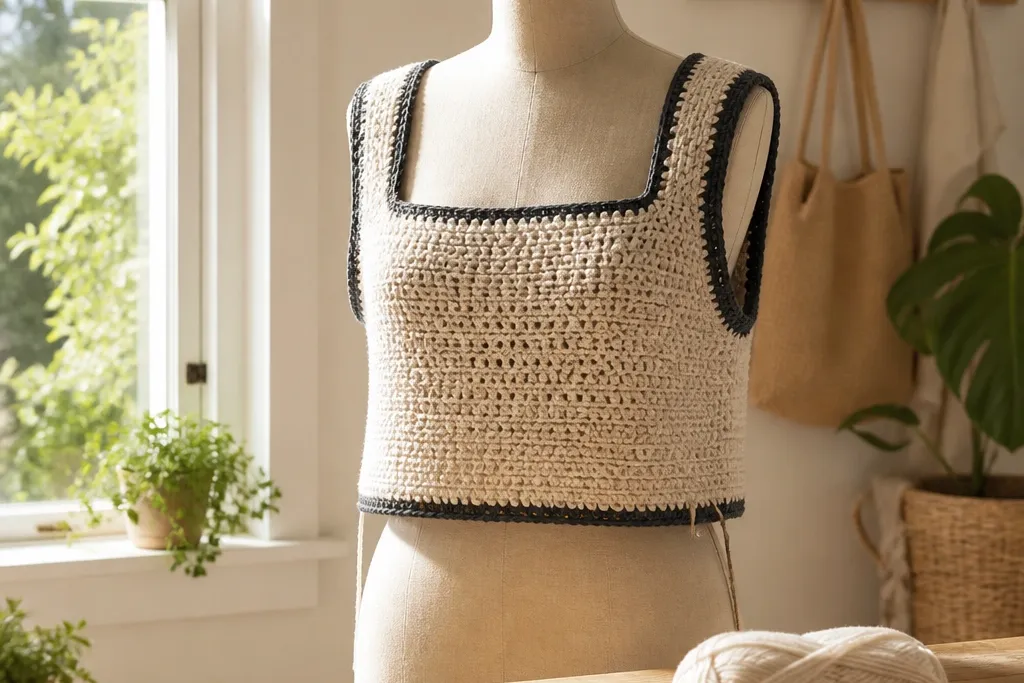
This is the “clean and modern” crochet top that reads like a ready-to-wear piece. The square neckline frames the collarbone, while the ribbed fabric creates a subtle vertical texture that hides minor row-to-row variation. Thin straps keep it delicate, but the ribbing keeps the cups from looking flat or stretched. It’s a great first modern top because the construction is simple and the look depends on edge finishing more than complex shaping.
Pro tipUse a smaller hook than your yarn label suggests for the ribbed fabric so it holds its shape after washing.
Start by crocheting two identical cup panels using a ribbed stitch in DK weight yarn, aiming for firm fabric (check your gauge). Build a square neckline by working straight rows for the center and decreasing at the corners in a controlled pattern so the top stays flat. Then seam the cups to a front band and add thin straps at the side corners, finishing all edges with a tight slip-stitch border. Finally, block it to square the neckline and even the rib texture before you wear it.
AvoidDon’t skip blocking — the square neckline looks sloppy when the fabric stays wavy.
2. Crochet Tank with Color-Block Front Panel
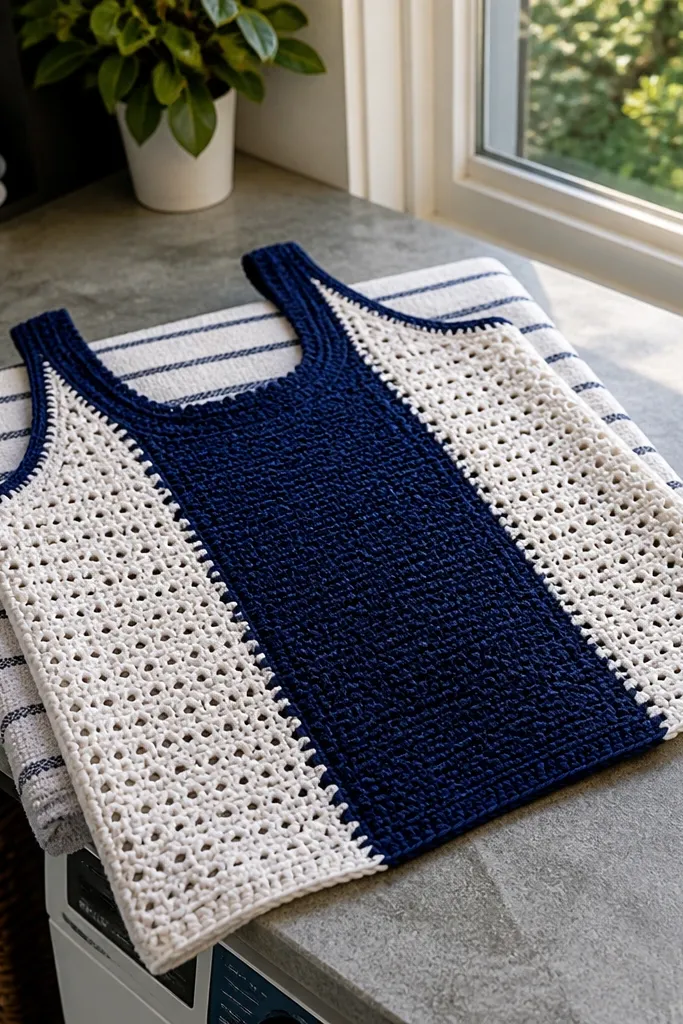
Color-blocking makes crochet look intentional even if you’re using a simple stitch. The trick is placing the contrasting panel where the body naturally draws the eye: center front. Use a solid-stitch panel for the main structure and a lighter, more open stitch on the sides so the whole top looks slimmer and more modern. This design is also forgiving for beginners because the seams and borders do most of the visual work.
Make three panels: a solid front center panel and two side panels in a lighter or contrasting yarn. For the front, use a denser stitch like single crochet or half double crochet worked tightly, and keep the width consistent so the color line stays straight. For the sides, switch to a slightly more open stitch for breathability while keeping the same stitch height. Sew panels to a back panel or create a continuous back piece, then add a ribbed neckline and armhole band using a stretchy crochet rib or crab stitch edge.
Keep the front panel slightly wider than your expected finished bust so blocking doesn’t leave gaps at the armholes.
Don’t use the same open stitch for the front panel or you’ll lose the crisp color-block line.
3. V-Neck Yoke Top with Puff Stitch Texture
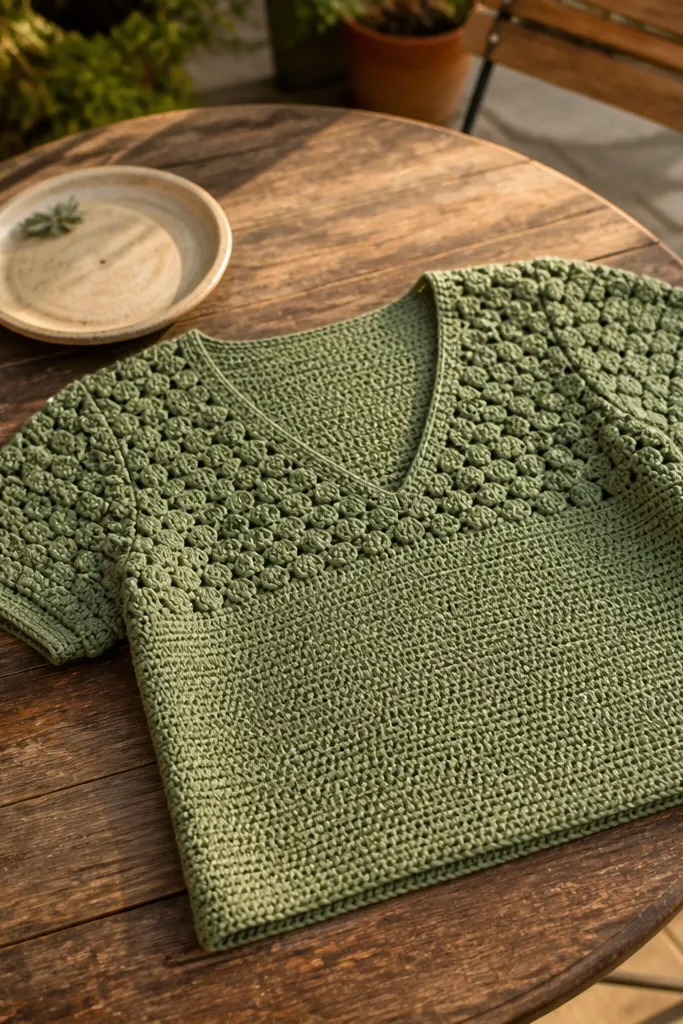
A yoke makes crochet tops look fitted without complicated full-body shaping. Puff stitches on the yoke create a raised texture that photographs beautifully and disguises minor gauge differences. The smooth body below keeps the silhouette clean and prevents the top from looking like a thick winter sweater. This is a great option if you want a statement neckline but don’t want to work decreases across the entire garment.
Pro tipMake a swatch for the puff stitch and measure how much it compresses after blocking — it changes the final neckline width.
Start with a V-neck yoke worked in rows, using a puff stitch pattern for the yoke area only. Increase at the yoke edges to widen the shoulders, then transition to a smoother stitch like half double crochet for the body. Join the front and back at the shoulders, then crochet side seams or add a simple underarm seam. Finish the V with a firm border band so it lays flat, then add a slightly wider hem band to prevent curling.
AvoidDon’t place puff stitches all the way down the body or the top will look heavy and bulkier than the photos suggest.
4. Off-Shoulder Scallop-Edge Summer Top
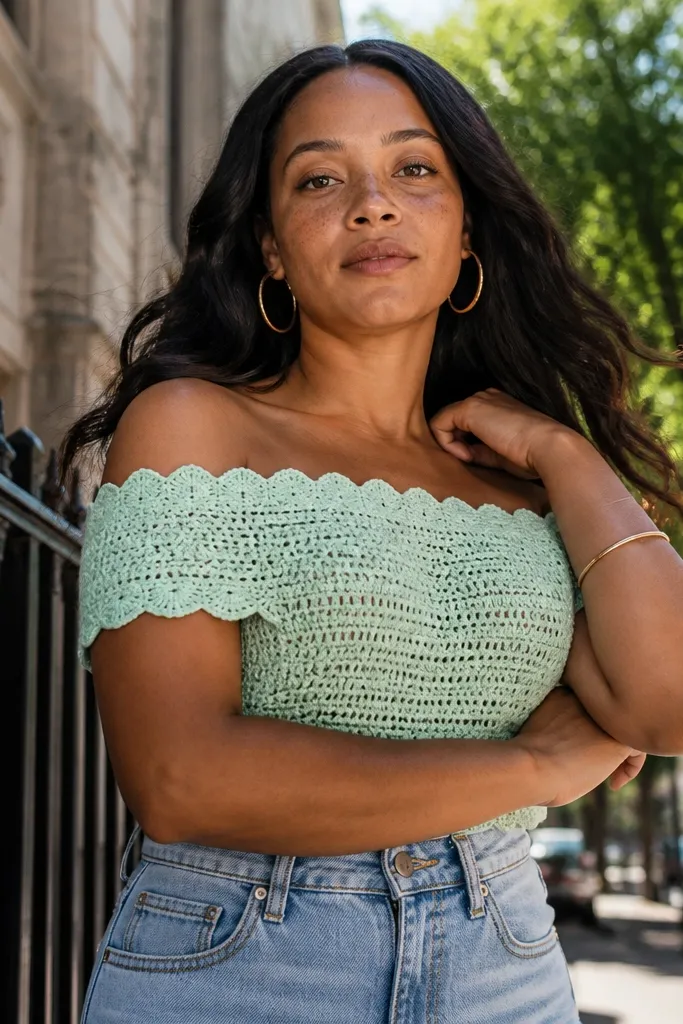
Off-shoulder crochet looks modern when the neckline edge is crisp. Scallops do that job — they create a defined curve and a soft, feminine highlight in photos. Keep the body in a simpler stitch so the scallop trim remains the star. This top works best with cotton or cotton-viscose blends because they drape nicely and don’t stretch out as fast as pure acrylic.
Pro tipUse a stitch marker every scallop so your curve stays even — uneven scallops show up instantly in photos.
Work the body as a rectangle front and rectangle back, then join at the shoulders. Create the off-shoulder neckline by crocheting scallop edging along the top edge and adding short drawstring ties if you want adjustable placement. For a secure fit, crochet a slightly tighter band under the scallops using a smaller hook and a dense stitch. Finish the sleeves/arm edges the same way with scallops, then block to set the curve.
AvoidDon’t use a floppy yarn with scallops unless you add a firm band under the edge.
5. Cropped Polo-Inspired Crochet Top with Button Placket
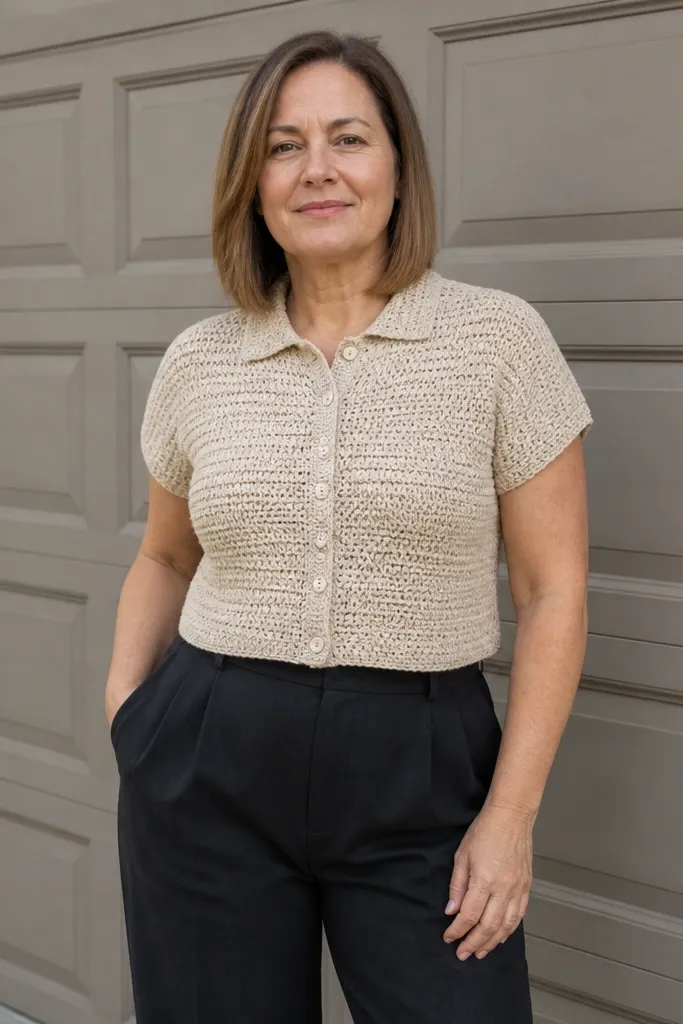
Polo shapes look instantly current, and crochet can nail it with a simple collar + placket. This design uses a denser stitch for the front panels so the button placket stays flat, while the collar adds structure and a clean photo line. A cropped length makes it feel modern instead of vintage, especially in neutral colors. It’s also a practical top because the neckline is adjustable and you can style it open or closed.
Make a front and back panel with a dense stitch like half double crochet, keeping the rows straight for crisp edges. Add a front placket by crocheting a narrow strip along one side, then repeat on the other side for the buttonholes. Crochet a ribbed collar by picking up stitches around the neckline and working a tight rib stitch for 2-3 rows. Sew or crochet on buttons, then add a hem band to keep the crop from curling upward.
Plan buttonholes before you start the placket band so you don’t end up with uneven spacing.
Don’t make the placket in a lace stitch — it will buckle when you button it.
6. Mandala-Inspired Yoke with Simple Side Panels
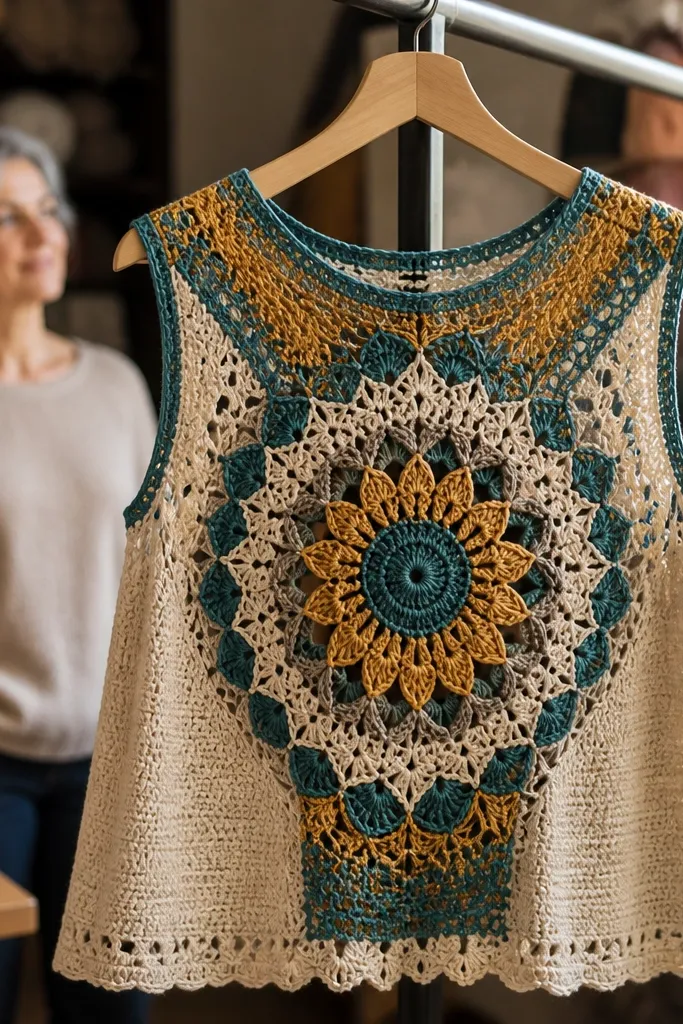
This is one of the fastest ways to get a “wow” top without making the whole thing complicated. A mandala-style yoke brings color and pattern to the top center, and solid side panels keep the silhouette modern and wearable. The best look comes from choosing one dominant color in the yoke and using a neutral for the body so the pattern doesn’t fight with itself. It also photographs well because the eye lands on the neckline and shoulder line first.
Pro tipIf the yoke edge waves, block it flat before sewing side panels — it keeps your join line straight.
Create a round or slightly square yoke using a mandala motif pattern, but stop once you reach the shoulder width. Attach side panels in a solid stitch like single crochet, matching the yoke edge width by evenly increasing or decreasing stitch counts. Join front and back at the shoulders, then add a neckline border by picking up stitches around the yoke edge. Finish the hem with a straight band in the neutral color so the top looks intentional rather than unfinished.
AvoidDon’t use a busy stitch for the side panels or the yoke loses its focus.
7. Halter Top with Twisted Rope-Style Straps
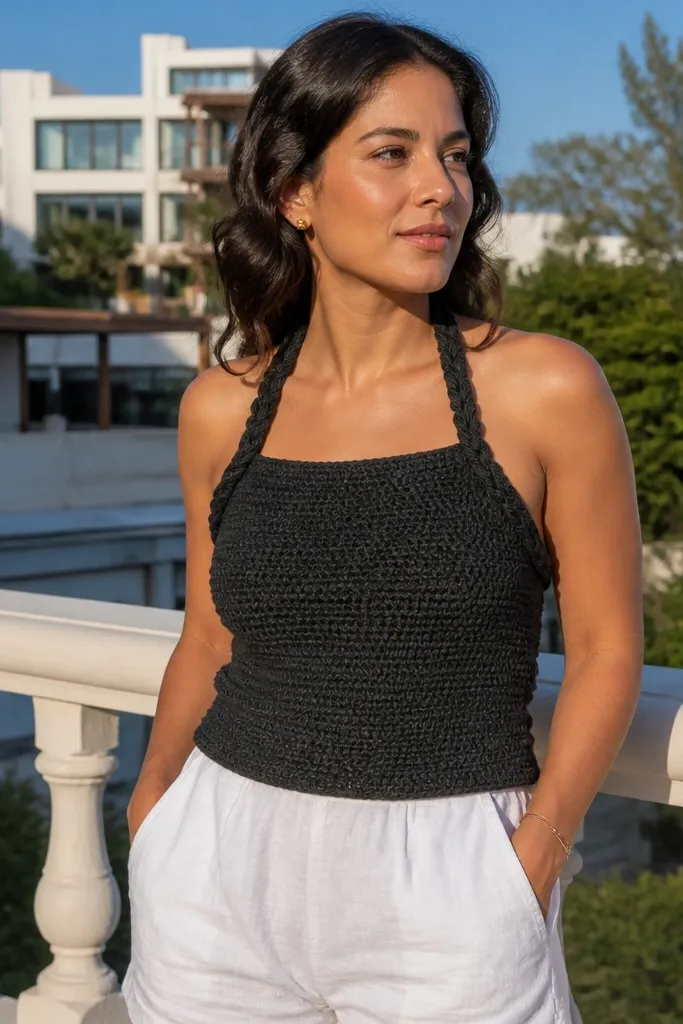
Thick halter straps read modern because they look architectural, not delicate. A rope-style strap adds shine in photos because the twist creates highlights and shadows. Keep the body stitch simple and tight so it doesn’t compete with the strap texture. This top is a solid choice for summer because it shows shoulders and keeps the neckline clean.
Work the body as a front and back panel that match your desired bust coverage, using a dense stitch in DK weight yarn. For straps, crochet a chain foundation and then work a twisted rope-like cord by crocheting around the chain with a method that creates a spiral twist (use the same yarn and tighten consistently). Attach strap ends to the corners of the upper panel, then reinforce the join with a few stitches so it doesn’t rip out. Add a neckline edge band to keep it from stretching.
Use the same yarn for straps as the body and keep tension firm; loose straps look limp fast.
Don’t attach straps directly to a lacy edge — sew or crochet a band first.
8. Square-Grid Mesh Top with Lined Neckband
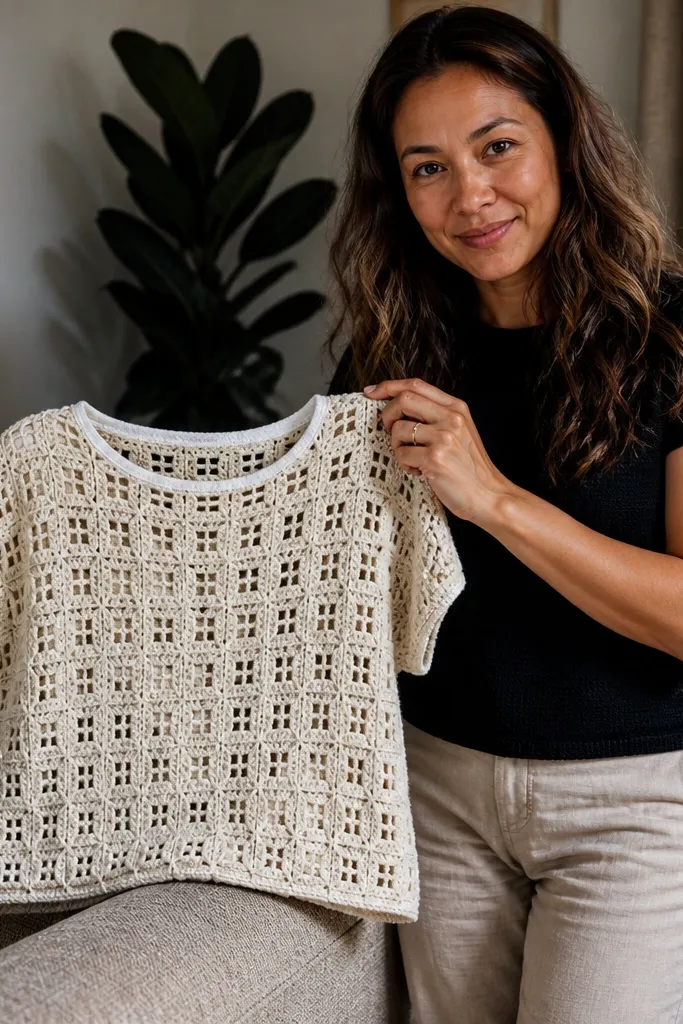
Mesh looks modern when it’s controlled. A square-grid mesh stitch gives a graphic, almost knit-like look, and a lined neckband keeps the neckline from stretching or curling. This design is photogenic because the grid pattern creates a consistent texture across the garment. It’s also a smart “wearable crochet” project if you plan to line the inside with thin jersey or lightweight fabric for comfort.
Crochet a front and back using a square-grid mesh stitch with a consistent gauge, then join at the shoulders. Crochet neckband and armhole bands in a denser stitch like single crochet so the edges stay firm. If you line, cut a matching jersey lining for the front and back, then tack it inside the neckband and armhole bands so it doesn’t move. Finish with a hem band to stop the mesh from rippling.
Pick a darker color for the mesh and a matching lining shade — the neckline reads cleaner in photos.
Don’t leave mesh edges raw; curling makes the whole top look unfinished.
9. Sleeveless Crochet Polo with Contrast Stripes
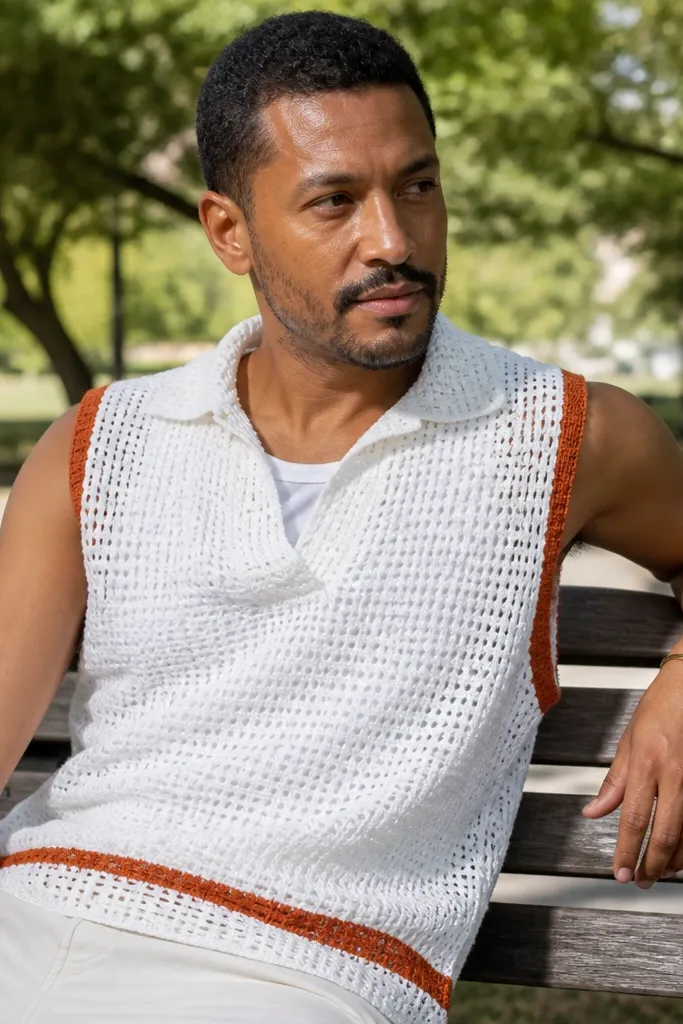
This one looks like a sporty knit because of the stripe placement and collar shape. Use stripes at the hem and around the armholes so the color framing makes the garment read as a single piece, not separate panels. A short collar adds structure and makes the neckline look deliberate. It’s stylish for everyday outfits because it pairs with denim, skirts, and even tailored trousers.
Make a sleeveless front and back panel with a dense stitch, then add a stripe band by crocheting a row in contrast color at your planned hem height. Create armhole edging with the same contrast color so the lines match. For the collar, pick up stitches around the neckline and work short rows to shape the center front, then finish with a ribbed edge. Sew sides, then block to keep stripe lines straight.
Use a stitch marker for stripe transitions — shifting by even a few stitches is obvious on collars and hems.
Don’t change stitch type mid-collar unless you want the collar to look bulky.
10. Longline Crochet Cardigan-Top Hybrid
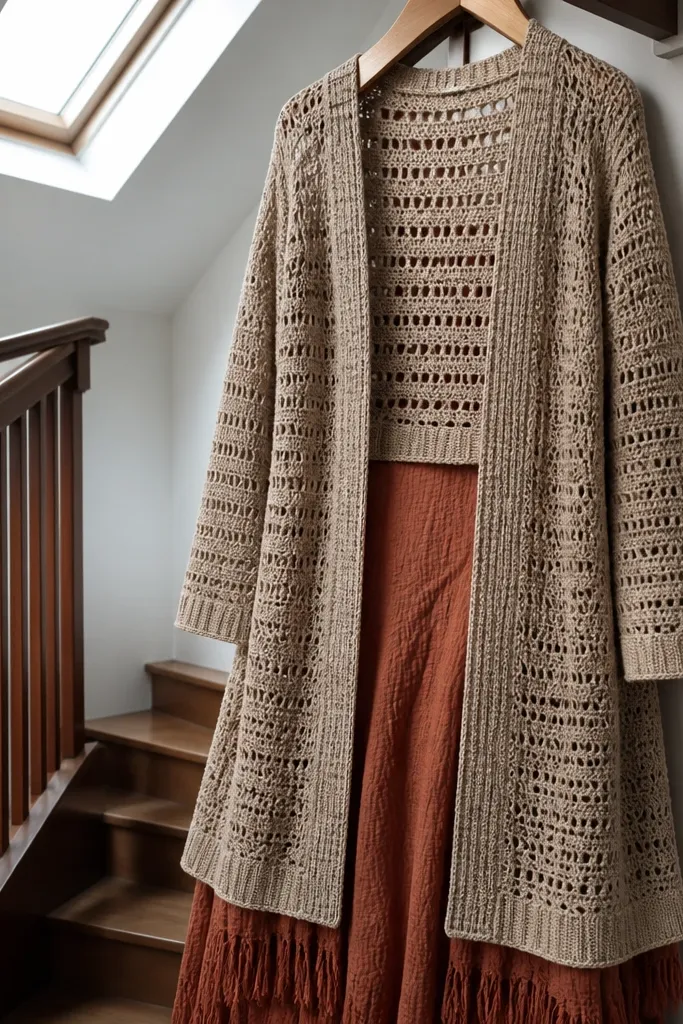
A longline open-front crochet top reads modern because it creates vertical lines and layers well. The look is all about edge discipline: ribbed or dense bands along the front opening and hem make it look like a designed garment, not a shawl. Choose a lightweight yarn so it drapes and doesn’t feel stiff. This is a great option for transitional weather or for styling over a tank.
Work a front and back as long rectangles with a slightly tapered opening if you want a more flattering silhouette. Use a stitch that has good drape but doesn’t stretch, like half double crochet in a firm gauge. Add front bands by crocheting dense rows along both edges, including buttonholes if you want closure. Finish with a ribbed hem band and add side ties or buttons for a cleaner front line.
Block the bands separately before attaching them; it keeps the opening straight and the hem flatter.
Don’t use a wide, floppy border on the opening or the front will gape.
11. Babydoll Crochet Top with Slight Empire Waist
Babydoll shapes look sweet but can turn shapeless fast. The modern version uses an empire waist seam and a controlled flare so the skirt part moves without losing shape. Use a denser bodice for support and a lighter stitch for the skirt for a flattering photo silhouette. This top works well in soft pastels because the flare shows texture and light.
Pro tipIncrease evenly using stitch markers at quarter points so the flare stays balanced.
Start with a fitted bodice rectangle or shaped panel up to the empire seam using a dense stitch. At the seam, increase stitch count gradually over 2-3 rows to create a smooth flare rather than a sudden jump. Crochet the skirt portion with a lighter stitch like airy shells or lace repeats, stopping at your desired length. Add a neckline band and finish the hem with a narrow, dense border to stop curling.
AvoidDon’t make the whole top airy — the bodice needs structure or it collapses.
12. Ribbed Square-Crop with Cutout Shoulder Panels
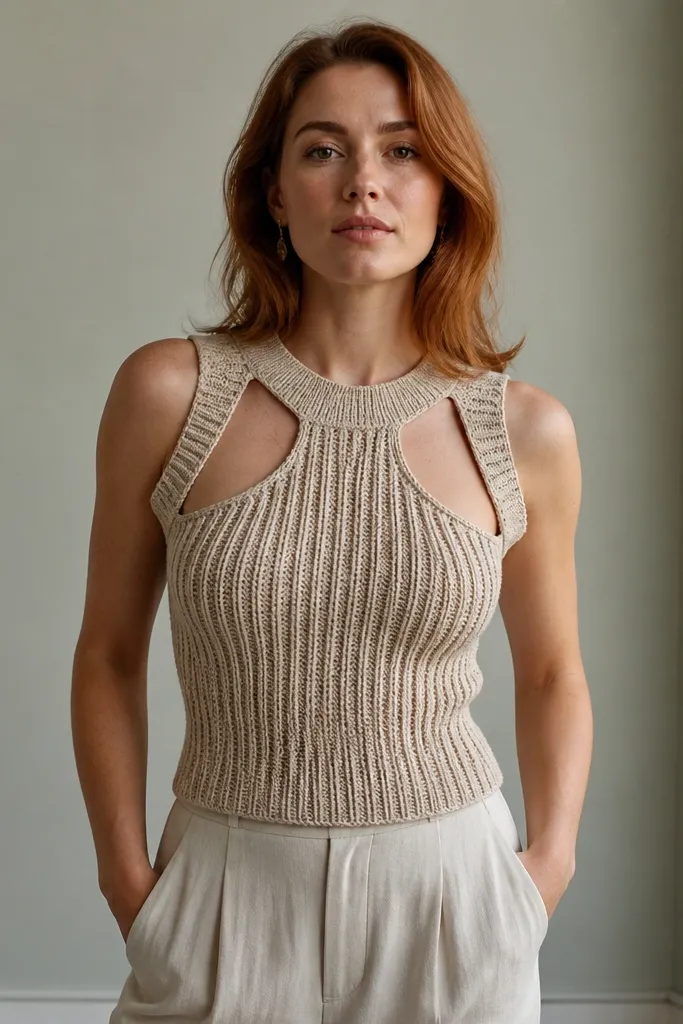
Cutouts make crochet feel fashion-forward, but they only look good when the surrounding fabric is firm. A ribbed square-crop gives structure and keeps the cutout edges defined. The shoulder cutouts add a modern graphic line and show skin without turning into a messy openwork hole. This design is especially photogenic in dark colors because the rib texture catches light along the edges.
Pro tipUse a contrasting stitch marker color when placing cutout skips so both sides match perfectly.
Work a square-crop body in rib stitch for strong fabric, keeping front and back panels the same width. Mark the shoulder cutout zones and work those sections by skipping stitches and closing with short rows so the cutout edges are clean. Add shoulder straps or small bridge sections to connect the cutout to the neckline. Finish neck and arm edges with ribbing or a tight border, then block to flatten the cutout curves.
AvoidDon’t leave cutout edges in loose openwork; it frays visually.
13. Sunburst Stitch Top with Center Star Motif
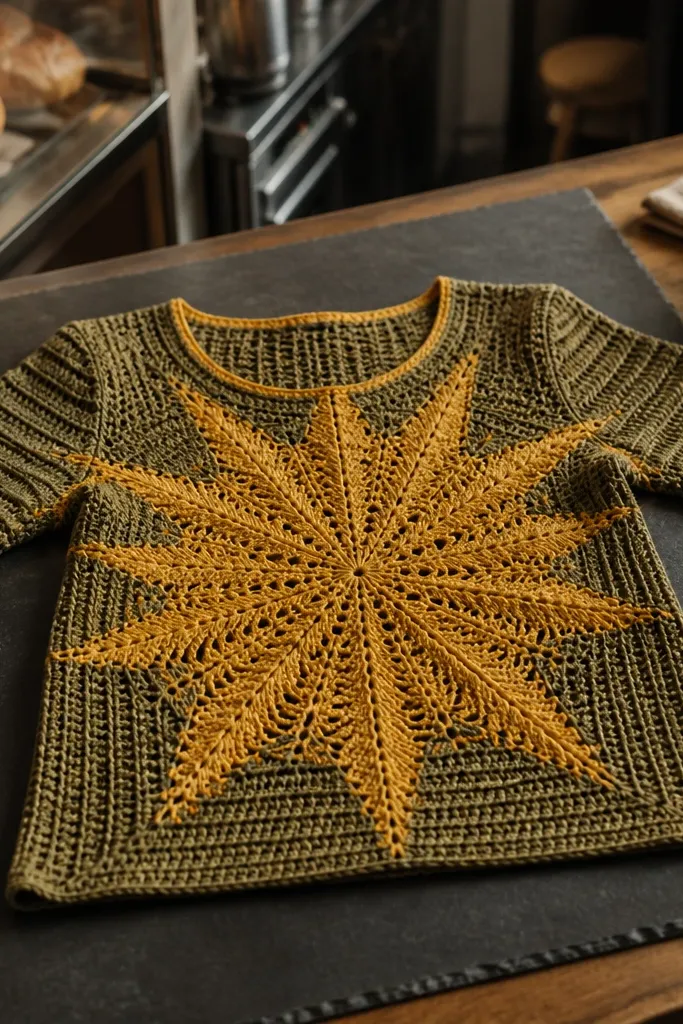
Sunburst stitch patterns look like modern wallpaper when the center motif is clean and the rest stays structured. This top uses a center star or burst as the focal point, then works outward into a controlled radiating pattern. Keep the sides simpler so the shape stays wearable and the burst doesn’t warp the neckline. It’s a statement piece that still reads as a top because the neckline and hem are finished firmly.
Start with a center star or burst motif in a solid color, then expand into a sunburst pattern while keeping the stitch repeat consistent. Once you reach your shoulder width, stop increasing and transition to a straight panel stitch for the side areas. Join front and back at the shoulders, then add a tight neckline band. Finish the hem with a dense border row so the sunburst doesn’t ripple downward.
Count increases carefully: the burst looks best when it lands symmetrically over the bust center.
Don’t use a too-thin yarn for the burst or the pattern loses definition.
14. Strapless Sweetheart Top with Crochet Boning Channels
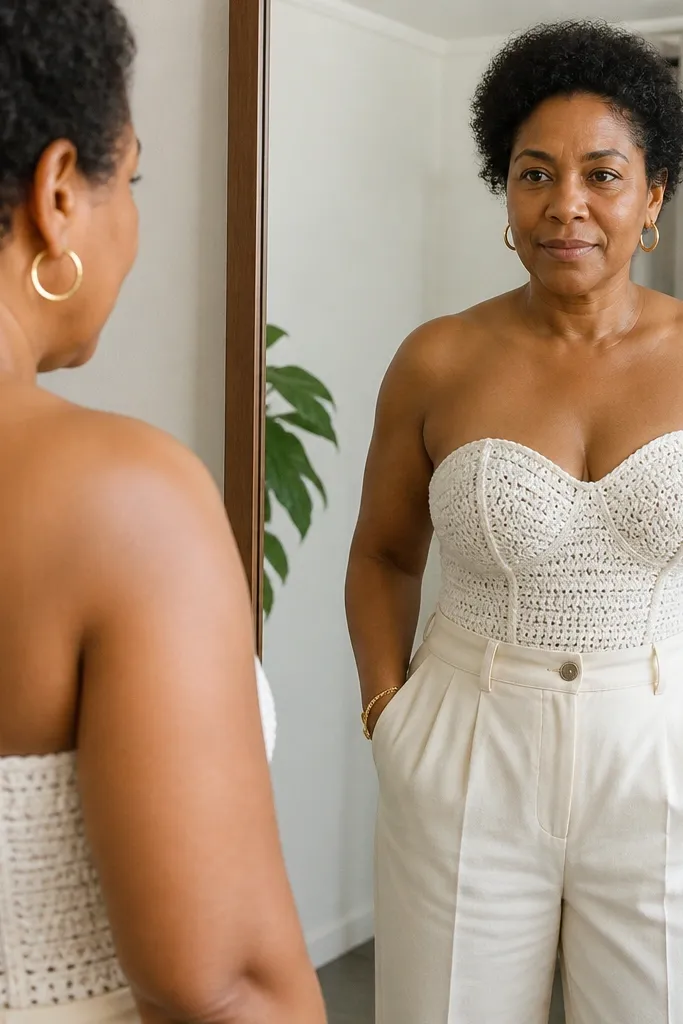
If you want a strapless crochet top to look high-end, you need structure. A sweetheart neckline looks romantic, and crochet boning channels make the top hold its curve instead of collapsing. This is one of the more technical options, but it’s still doable if you follow the construction steps carefully. The result looks sleek in photos because the neckline stays sharp and the hem sits flat.
Pro tipMeasure your bust circumference and choose boning length slightly shorter than the edge so it doesn’t poke.
Work the front and back in a dense stitch to create a sturdy foundation, shaping the sweetheart by decreasing toward the center and widening toward the sides. Crochet channels along the inner edge where you’ll insert flexible plastic boning, leaving enough space for movement. Add a wide ribbed hem band and a tight top edge band to anchor the strapless shape. Finish by sewing the channels shut and adding a light lining if you want comfort and smoother fit.
AvoidDon’t use a stretchy stitch for the foundation; it will defeat the boning.
15. Mesh Crop with Chain-Link Shoulder Detail
This design is all about the shoulder detail. A mesh crop keeps it light and modern, but the chain-link shoulder accents give it a structured, fashion look. The neckline band is the key — it keeps the mesh from curling and makes the whole top read as designed. Choose a crisp yarn and keep tension even so the chain links look clean rather than airy and messy.
Pro tipUse stitch markers every anchoring point for the chain links so both shoulders line up.
Crochet a front and back crop in a mesh stitch, stopping at your desired hem length. Work a dense neckline band by picking up stitches along the top edge and crocheting tight rows or a rib-like edge. Create chain-link shoulder details by crocheting short chain sections and anchoring them at set intervals on the top corners, then cover the join with a small border row. Sew shoulders, then add armhole edges with a tight border to keep everything flat.
AvoidDon’t make the neckline band in the same mesh stitch or the collar will roll.
16. Asymmetrical Hem Crochet Top with Scalloped Side Drop
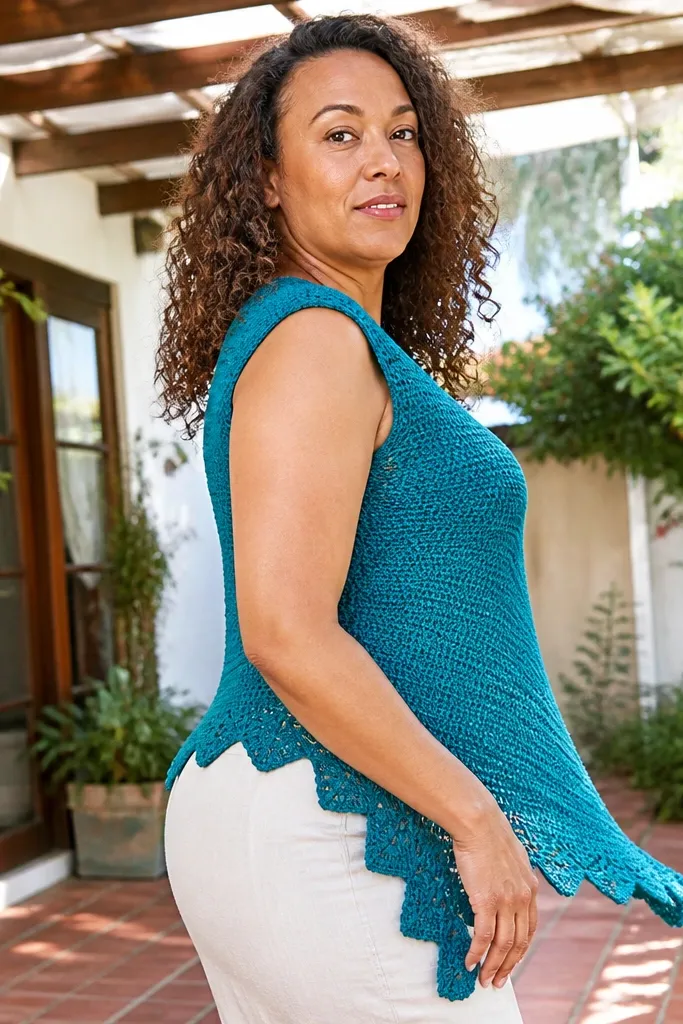
Asymmetry makes crochet look editorial. This top uses a simple stitch body, then adds a scalloped side drop that creates movement in photos. The asymmetrical hem also helps hide minor differences in row tension because the eye follows the scallop line. It’s a great pick if you like modern styling and want a piece that looks good even when it’s slightly imperfect.
Start with a front and back panel in a solid stitch, then determine your asymmetrical hem by setting one side longer than the other. Crochet a straight hem on the shorter side and build the longer side using gradual increases or extra rows. Add scallops along the longer hem edge by switching to a scallop repeat and finishing with a dense border row. Join shoulders and add a neckline band that’s firm enough to keep the top from rolling at the edge.
Block flat and measure the hem lengths before you finish the scallops so the curve matches your intended asymmetry.
Don’t use a stretchy yarn for the body or the asymmetry will relax out of shape.
17. Crochet Babydoll Dress-Top with Lace Sleeve Caps
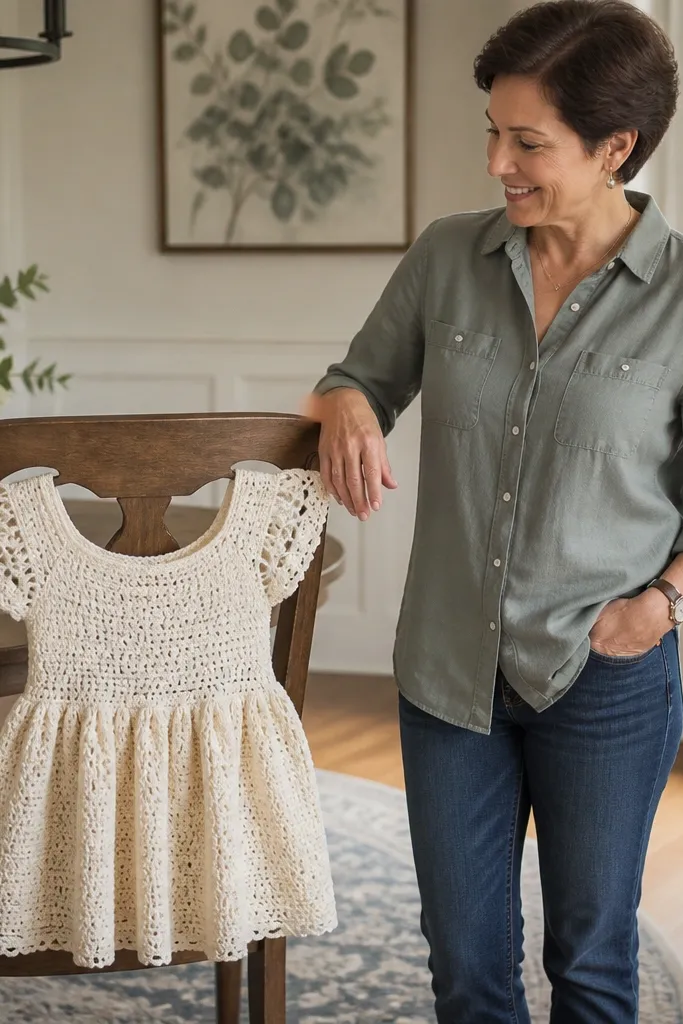
Lace sleeve caps add a delicate, modern touch without making the whole top openwork. This design keeps the body softly gathered and adds a structured neckline so it looks like a coordinated garment. The sleeve caps create a “romantic but clean” look that photographs well because the texture sits at the shoulder. Pick a yarn with good drape so the cap looks airy and not crunchy.
Crochet a bodice in a dense stitch with a slight gather at the neckline by working small increases toward the center and flattening with a band. For the sleeve caps, make two separate pieces using a lace repeat and attach them to the arm opening with evenly spaced stitches. Add a neckline band that’s firm and slightly wider than you think to keep the gather controlled. Finish the hem with a narrow border and block to even the sleeve cap edges.
Attach sleeve caps with a slip-stitch join, then reinforce the seam with a second pass for a neat edge.
Don’t attach lace sleeve caps to a loose armhole; you need a firm arm edge first.
18. Retro Square Motif Top with Modern Solid Border
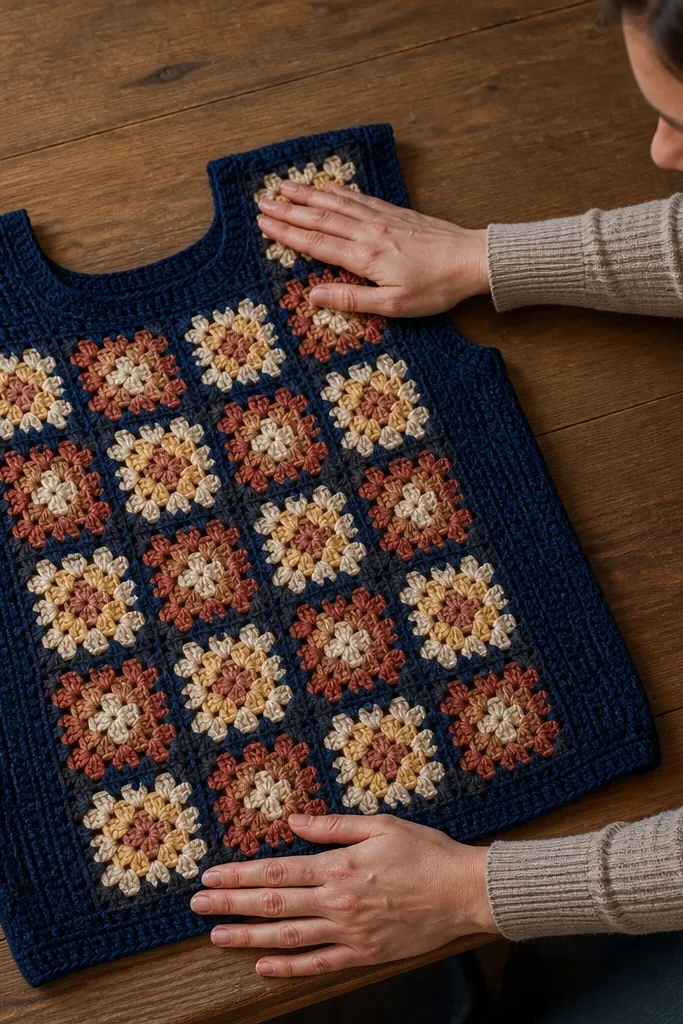
Square motifs look retro, but the modern version is all about the border. Use small granny-style squares or geometric squares in a limited palette, then frame the whole top with a solid border stitch so it looks like one garment. The border keeps the edges crisp and prevents the top from looking like a patchwork blanket. This is a strong choice for readers who want visual interest without complex shaping.
Plan a motif grid for the front and back: for example, 6-8 squares across depending on your size, keeping the same square count per row. Join squares as you go, then crochet a solid border around the entire neckline and armholes. Add shoulder seams and a hem border in one neutral color. Finish by tightening the neckline with a dense band so the squares don’t spread out.
Choose one border color and stick to it for both neckline and hem — it makes the top look finished in photos.
Don’t skip the border — without it, square motifs look like separate coasters.
19. One-Skein Crochet Tank with Continuous Spiral Body
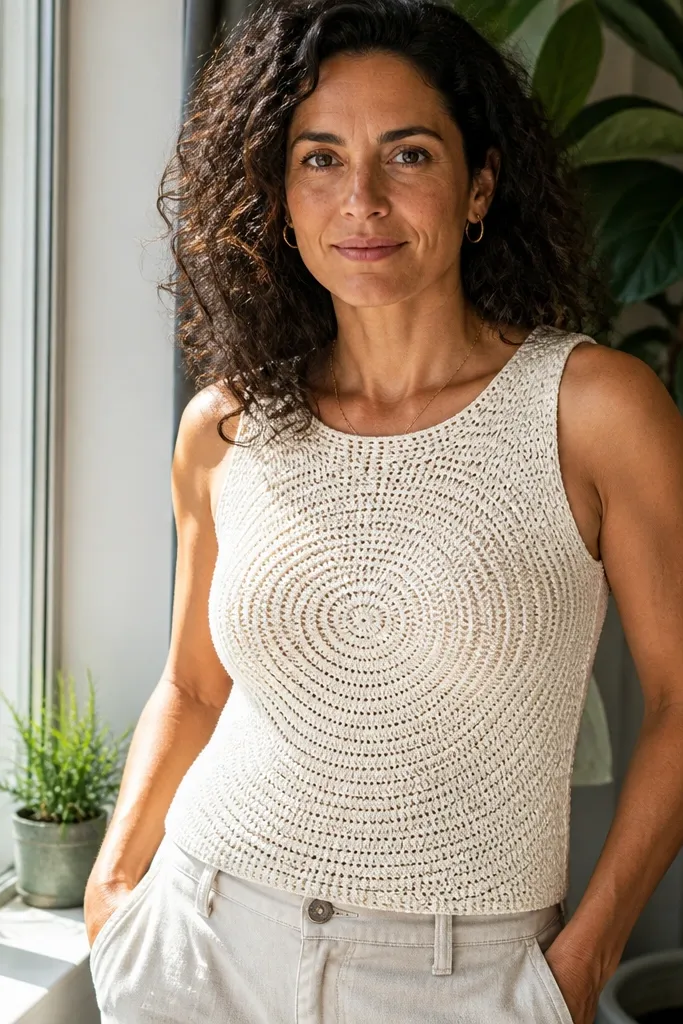
A continuous spiral texture reads modern because it looks smooth and uniform across the body. This tank style is photogenic in light colors since the stitch texture catches light evenly. The clean look comes from avoiding heavy seams — fewer joins means fewer visible lines. It’s a practical project if you want something fast that still looks designed, not random.
Use one long foundation and work a continuous spiral body with a stitch pattern that stays flat, keeping stitch count consistent. Create armholes by leaving stitch gaps at planned intervals rather than cutting and rejoining. Crochet a firm neckline band and armhole bands in a denser stitch for structure. Finish with a straight hem band and block to set the spiral texture.
Count your rounds/rows with markers so your spiral stays even; uneven spacing ruins the smooth look.
Don’t add big openwork holes near the neckline; it makes the tank look unfinished.
20. Cowl-Neck Crochet Top with Wrap Tie Sides
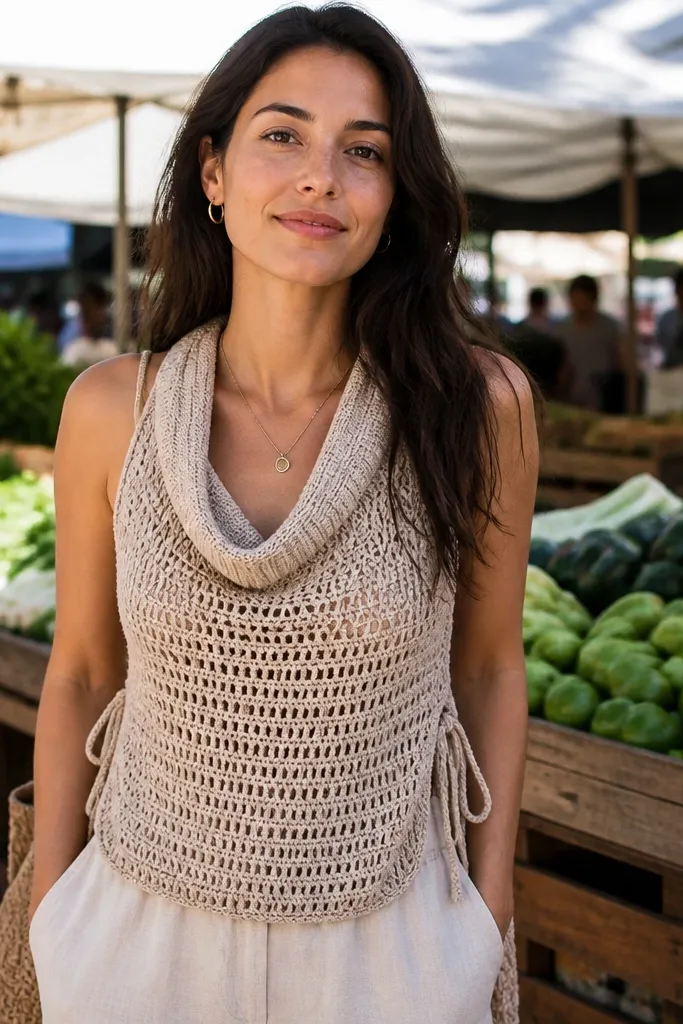
A cowl neck makes crochet look instantly stylish because it adds drape and depth without complicated stitchwork. Wrap tie sides let you adjust the fit so the photo silhouette looks intentional. The modern look depends on a ribbed or dense edge around the opening so the cowl doesn’t flop. This top works especially well in medium-weight yarns that drape, not thin yarns that collapse.
Pro tipTie cord lengths matter — measure from your natural waist to your preferred wrap point before you crochet the cords.
Make a front and back panel that fit your bust, then add the cowl by working extra length at the neckline area in a soft, drapey stitch. Crochet ribbed edges around the neckline opening to keep the cowl shape. Add tie strips at the side seams by crocheting narrow cords and sewing them into the garment so you can wrap and adjust. Sew the sides, then finish with a hem band and block to shape the cowl fall.
AvoidDon’t use a loose edge around the cowl or it will look like an unstructured scarf.



