
1. Strawberry Jam Market Tote with Front Bobble Panel
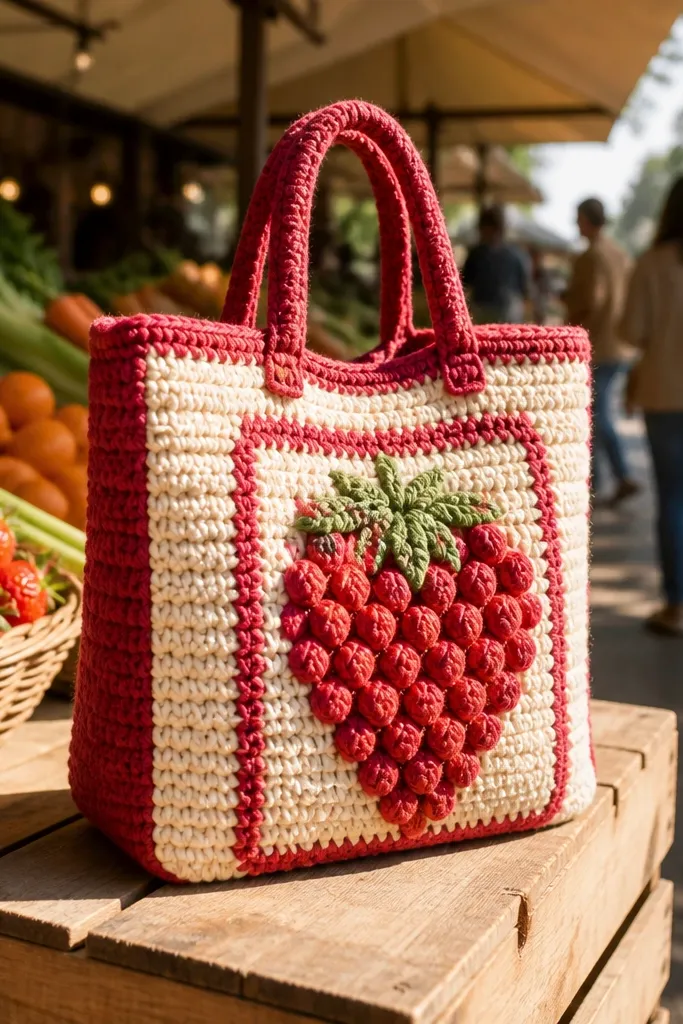
Start by crocheting a rectangle base panel in tight single crochet, then build the sides up to about 12-14 inches tall. Make a separate front panel strip in cream, then stitch the red bobble/puff “strawberries” onto it before attaching the strip to the tote. Add a dense edging round (single crochet or half double crochet) around the top opening, then crochet two straps in the same tight stitch at about 1 inch wide each. Finish by weaving in ends, then sew a simple cotton lining to the inside top for stiffness and cleaner edges.
This tote looks like a summer fruit stand, but it works year-round because the body is built with a dense stitch and a structured base so it doesn’t slump. The front uses a raised bobble or puff-style panel that catches light and makes the design pop in photos. Choose a red and cream palette and keep the edging crisp so the texture reads clean instead of messy. It’s a good project if you like color blocking and want something that looks “designed,” not just assembled. Skill level is beginner-to-intermediate because the stitches are straightforward, but you’ll pay attention to tension on the front panel.
AvoidAvoid loose tension on the tote body — bobbles look great, but a floppy frame ruins the look.
Pro tipUse a stitch marker to keep the bobble rows aligned; crooked texture shows up fast in close photos.
2. Mocha Cable Clutch with Magnetic Snap Flap
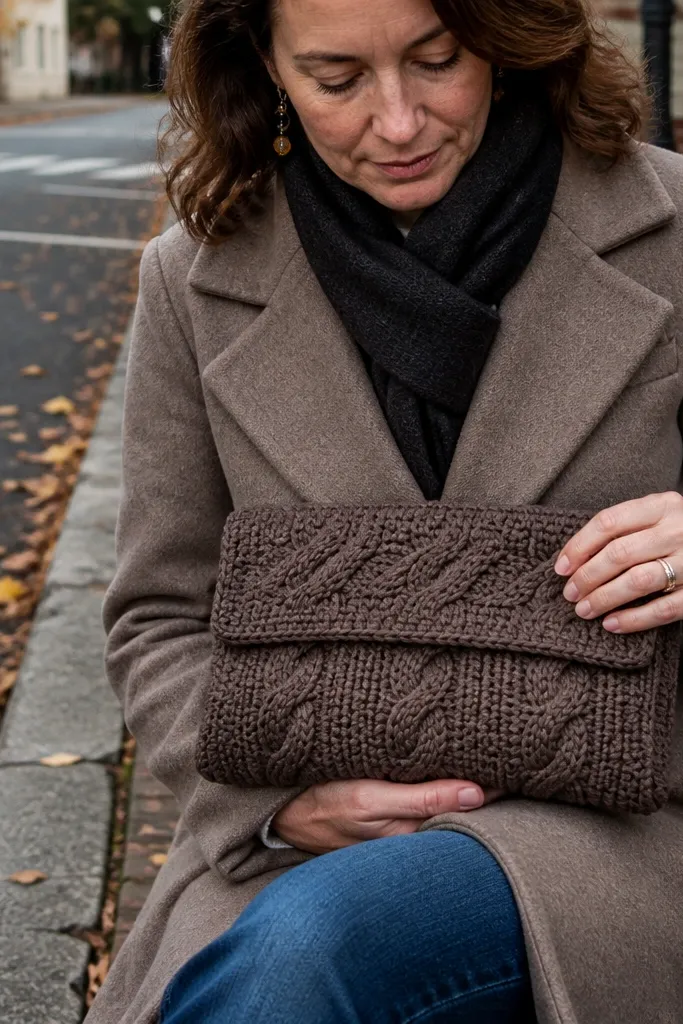
Crochet the main body as a rectangle with a tighter stitch gauge, then fold and seam it to form a pouch about 9-10 inches tall. Build a flap that covers the front opening by making a second rectangle, then add a cable-like pattern using front-post/back-post stitches across the flap rows. Attach the flap to the top edge only after blocking so the flap lays flat. Sew in a magnetic snap at the flap and front edge, then crochet a simple edging around the opening to hide raw seams.
A cable-texture clutch reads expensive because the surface looks dimensional even when it’s plain in color. This one is built with a flap and a magnetic snap so the top stays neat and the bag sits flat on your lap. Choose mocha or dark taupe yarn so the “braid” contrast shows without loud colors. It’s great for fall dinners and winter errands because the compact shape doesn’t fight with bulky coats. This project is intermediate: cable-style stitches take concentration, but the final look is worth it because it photographs like a knit bag.
AvoidDon’t skip edging — raw crochet edges around a snap look uneven and cheap in photos.
Pro tipBlock the flap flat before attaching the snap so it doesn’t pop up at the corners.
3. Sea Glass Hexagon Tote with No-Sag Stiff Base
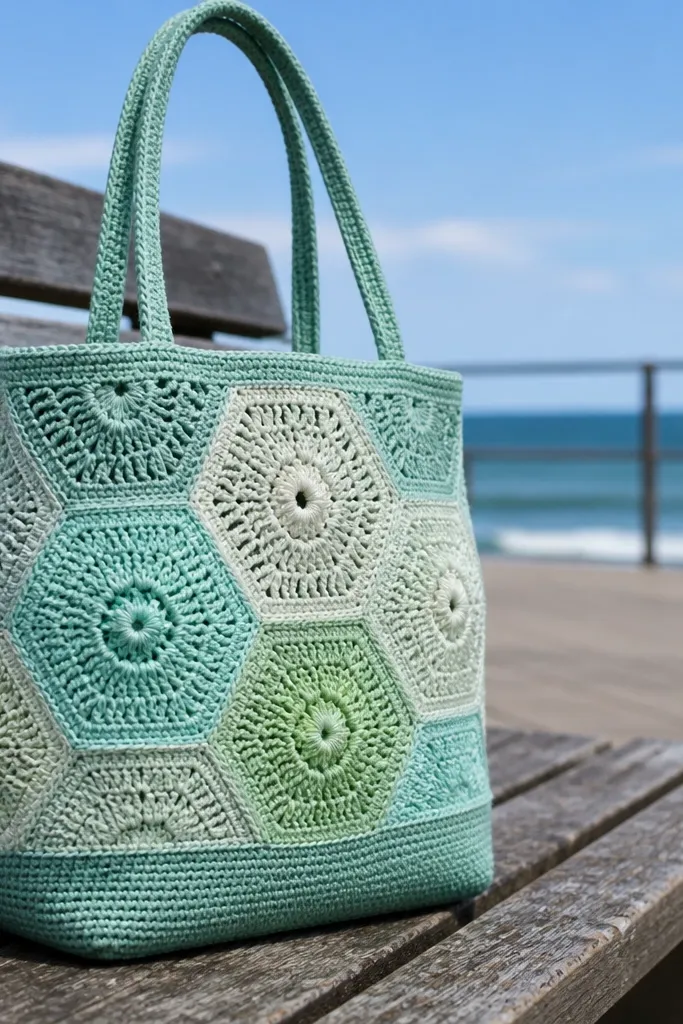
Hexagons look airy and modern, but they can sag if you join them loosely. This tote solves that by combining hexagon panels with a firm base and clean side seams, so the shape stays crisp from spring to winter. The sea-glass color palette (mint, seafoam, pale teal) makes the whole bag look like it belongs in a magazine. It’s photogenic because each hexagon edge creates a grid of highlights in natural light. Skill level is intermediate because hexagon joining needs patience, but the pattern is repeatable and satisfying.
Make two side panels from hexagon motifs, then join them into a bag shape with a single crochet seam so the edges stay straight. Create a base insert from a stiff fabric or craft foam covered with a tight crochet cover; aim for about 10 x 4 inches. Sew the base insert to the bottom of the hex panels, then crochet a top rim and add straps using the same motif color family. Line the inside with cotton and stitch the lining to the top rim so it doesn’t shift.
Plan your color order so the mint tones sit at the top corners; it makes the bag look balanced in pictures.
Avoid joining hexagons with a stretchy chain join — you want structure, not gaps.
4. Black Cherry Oval Crossbody with Leather-Style Strap
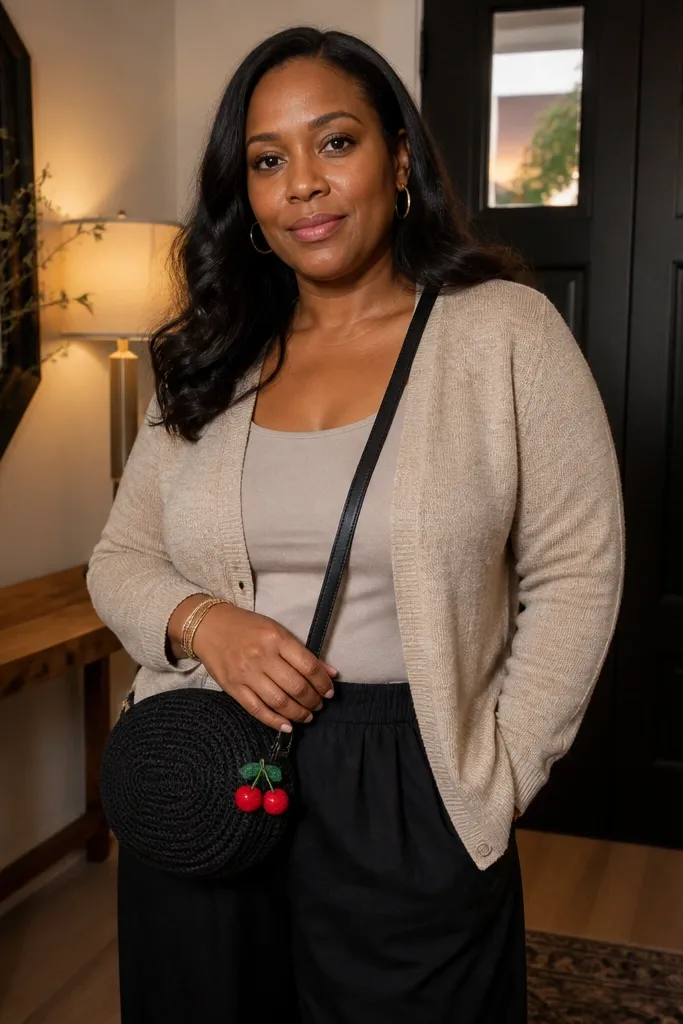
Start with an oval base by crocheting in rounds, increasing evenly for the first few rounds, then decreasing slightly to shape the sides. Work straight for a few inches, then add a slightly narrower top by decreasing in the last rounds. Create a flap edge or a top closure tab, then attach a strap made from a leather-style webbing or crocheted cord for strength. Finish by adding a hidden snap or zipper pouch closure, then line the inside with fabric cut to the oval shape.
Oval crossbodies photograph clean because the shape is controlled and the front surface is smooth. The crochet stitches here are tight and compact, and the oval gives you that “designer bag” silhouette without a complicated pattern. The black strap contrast is the main aesthetic move, and it keeps the bag from looking too casual. This works year-round because it stays sleek under coats and doesn’t look bulky. It’s beginner-friendly if you can follow a stitch count, but the shape requires careful increases and decreases.
AvoidDon’t use a thin strap — it twists and makes the oval bag look lopsided.
Pro tipUse a strap length that hits your hip bone, around 48-52 inches total for most body types, so it sits right in photos.
5. Rainbow Granny Square Tote with Flat Top Border
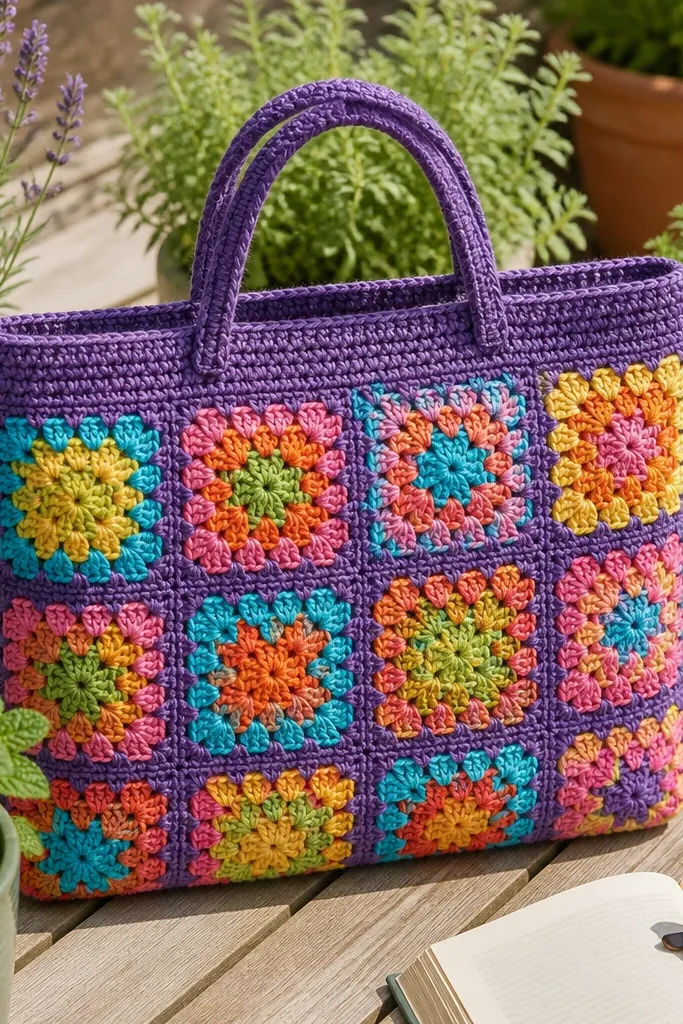
Crochet 20-28 granny squares in a tight pattern, then block them lightly so they’re the same size. Lay them out in a grid and join with single crochet through both loops to keep edges flat. Build a firm top border by working several rounds of single crochet around the opening, then add straps crocheted in wide rows or braid them with sturdy yarn. Line the inside and stitch the lining to the top border to stop the squares from spreading.
Granny squares are classic, but this tote looks good because the top border is flat and structured. Instead of letting the squares “ruffle,” you join them and then crochet a firm border round that forces everything to sit straight. The rainbow layout reads fun, while the flat top makes it look polished instead of beachy. It’s a great year-round bag because you can pair it with neutral outfits and let the color do the work. Skill level is beginner-to-intermediate: the granny squares are easy, but consistent joining matters.
AvoidAvoid loose joining chains — they create gaps and a wavy top edge.
Pro tipKeep your square size consistent within 1/8 inch so the border doesn’t warp.
6. Cream Puff Stitch Cloche Bag with Drawstring Cord
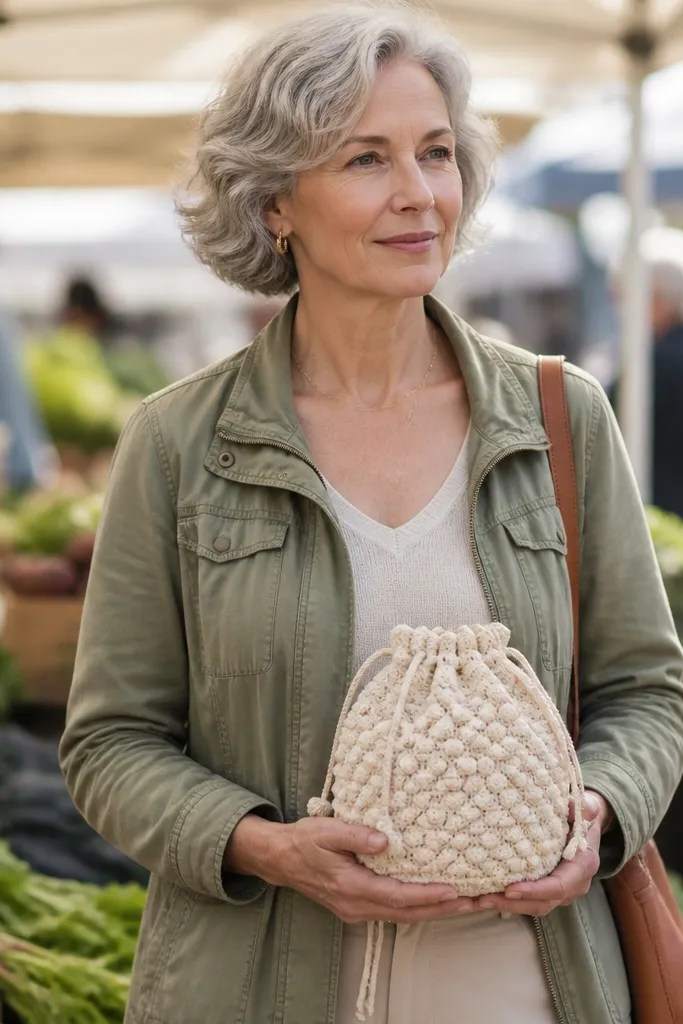
Work a rounded base in tight stitches, then build up using puff stitches on the main body while keeping the puff rows consistent. Create a drawstring channel by switching to a row of chain spaces or a worked seam that forms a tube-like opening near the top. Thread cotton cord or braided rope through the channel, then finish the top with a smooth edging round. Line the inside with fabric, then tie off the ends securely so the cord doesn’t twist.
A puff-stitch texture makes the bag look soft and sculptural, and the cloche shape makes it feel intentional. The drawstring closure is practical in every season because it keeps small items from spilling, and it looks photogenic when the cord is threaded through a clean channel. Use cream or ivory so the texture reads like fabric, not like random lumps. This bag is great for spring outings and winter nights because it’s small, neat, and not too heavy. It’s intermediate due to puff stitch density and the drawstring channel.
AvoidDon’t leave the channel too loose — a sloppy channel makes the drawstring sit uneven.
Pro tipChoose a cord color that matches your yarn undertone, not bright white if your yarn is creamy — it looks more natural in photos.
7. Forest Green Openwork Tote with Taut Lining
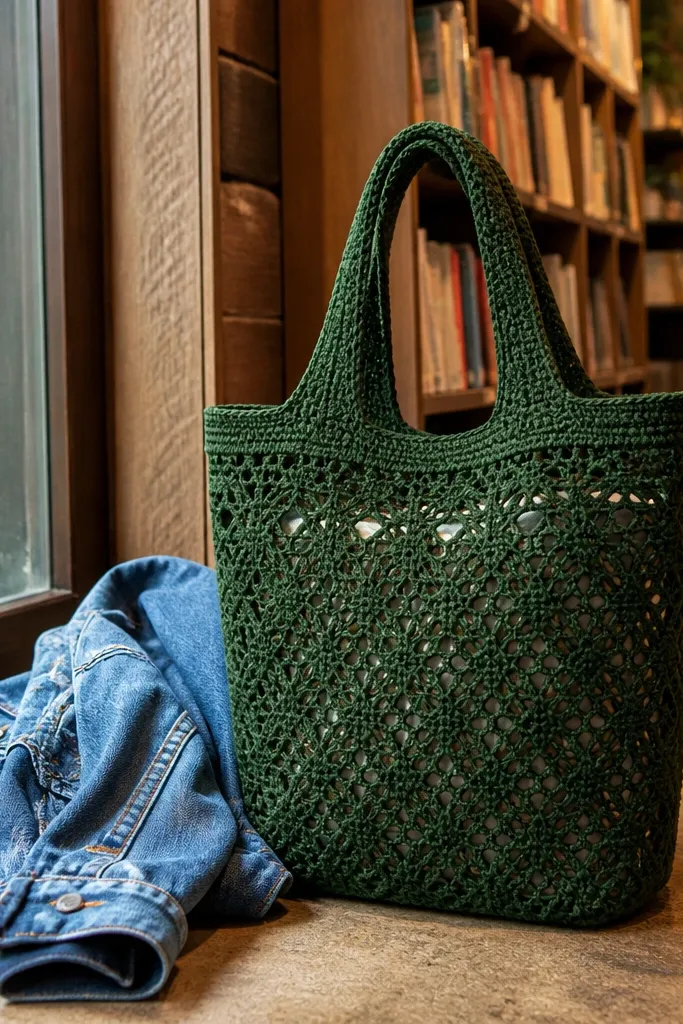
Crochet the tote body in rows with an openwork pattern, but keep the stitch gauge tight and the edges reinforced with single crochet borders. Sew a lining from medium-weight cotton or canvas cut to the exact bag shape, then attach it to the top rim only so it stays smooth. Add sturdy straps in a dense stitch or strap width around 1.25 inches, then stitch strap ends onto reinforced side panels. Finish the top with a firm edging round to stop the openwork from curling.
Openwork stitches look airy and expensive when the bag stays structured underneath. This tote uses an open stitch pattern on the outside, but it includes a taut lining that holds the shape and keeps the bag from bagging out. Forest green is a strong choice because it photographs with depth and works with denim, black boots, and winter coats. The result is light-looking but functional, and it’s perfect for year-round errands. Intermediate skill: you need steady tension so the openwork doesn’t stretch.
AvoidAvoid skipping edge reinforcement — openwork curl makes the whole bag look unfinished.
Pro tipMeasure the lining against the bag before sewing; if the lining is even 1/2 inch wider, it will ripple in photos.
8. Terracotta Boho Clutch with Fringe Edge
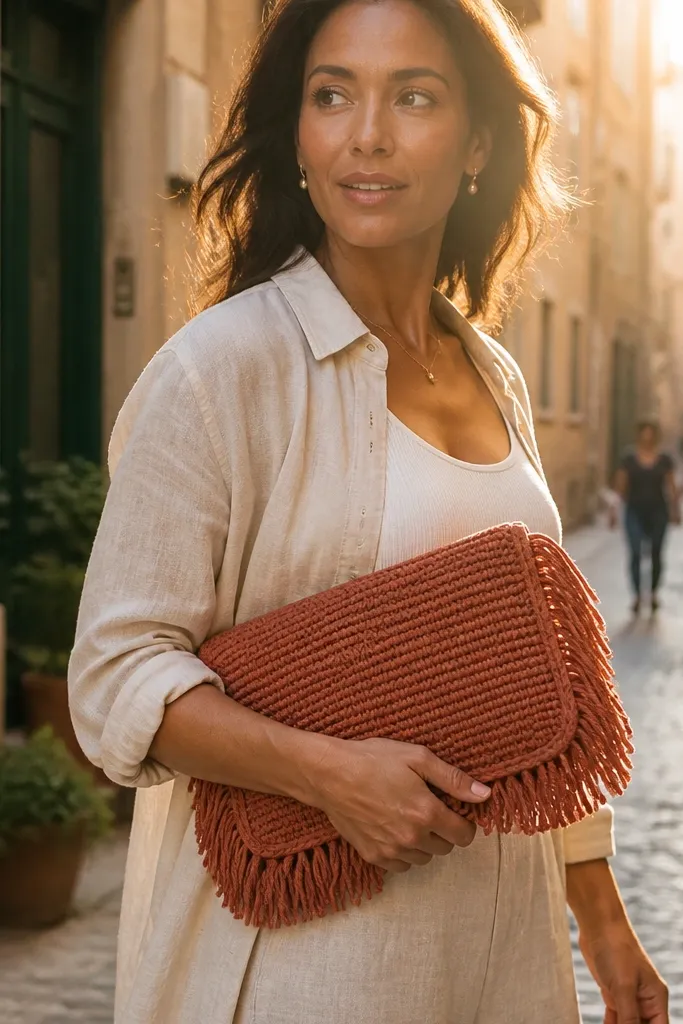
Crochet a rectangular clutch body in a dense stitch, then seam the sides and work a flap or snap tab at the top. Add a fringe edge by cutting yarn strands to about 8-10 inches, then attaching them evenly along the bottom row. Trim the fringe to a consistent length after it’s attached so it hangs straight. Sew a lining and add a closure like a magnetic snap or a button-and-loop so the top stays shut.
Fringe is the easiest way to make a crochet bag look styled, not handmade-only. This clutch uses a warm terracotta base and a fringe edge that swings nicely in photos when you walk. Keep the body simple and the fringe clean, so the look reads modern boho instead of costume. It’s great for fall festivals, winter dinners, and spring weddings because terracotta pairs with brown, cream, and olive. Skill level is beginner-to-intermediate: fringe assembly is quick, but the finishing needs neat trimming.
AvoidDon’t attach fringe to a stretchy edge; reinforce the bottom row with extra single crochet rows first.
Pro tipMake a small fringe template from cardboard so every strand is the same length before you attach them.
9. Denim Blue Mini Tote with Cross-Stitch Look
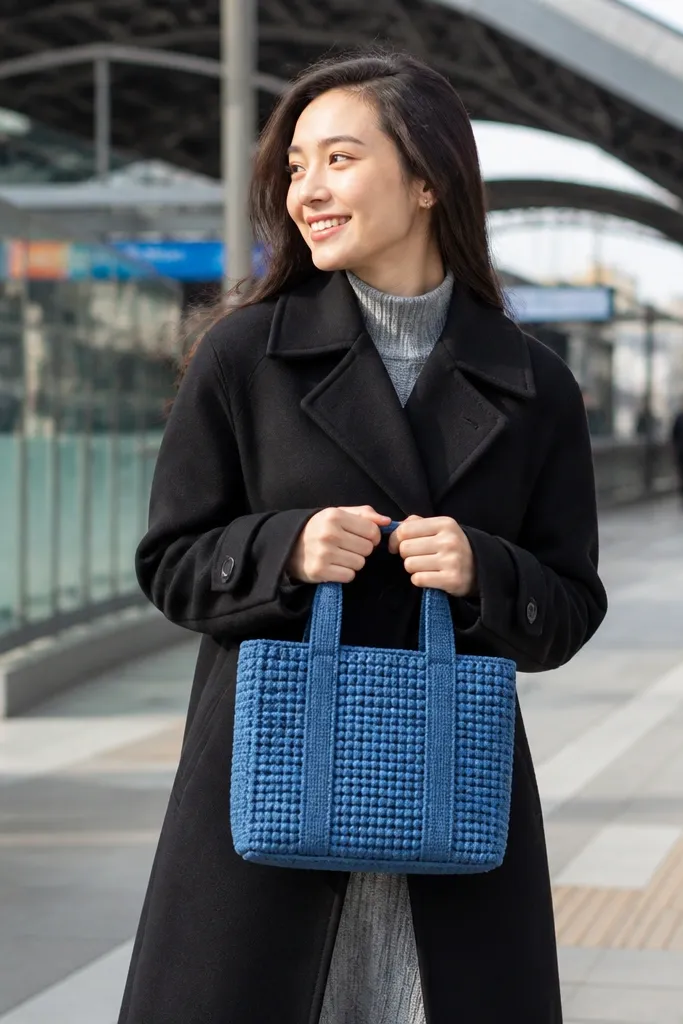
Start with a rectangle base in tight single crochet, then build the sides with a grid-like stitch pattern using front-back post alternation or simple color changes if you want a two-tone look. Keep the bag width around 10-11 inches so it stays “mini” and photogenic. Crochet straps separately in a dense stitch width of about 1 inch, then attach them symmetrically with reinforced corner stitches. Line with cotton and stitch the lining to the top rim so the grid surface stays flat.
This mini tote looks like cross-stitch embroidery because the crochet pattern creates a grid surface. The color is denim blue, so it goes with everything and still looks interesting up close. It’s compact, holds its shape with a firm base, and has straps that sit flat for clean photos. Year-round use comes from the sturdy construction — it doesn’t fold into itself when you carry it. Skill level is intermediate because the pattern uses stitch placement discipline, but it’s still manageable without advanced techniques.
AvoidAvoid bulky yarn for this design — it makes the “grid” look clumpy instead of crisp.
Pro tipUse stitch markers every 5 rows on the grid pattern; it prevents drift that ruins the cross-stitch look.
10. Sunflower Burst Tote with Raised Petal Motifs
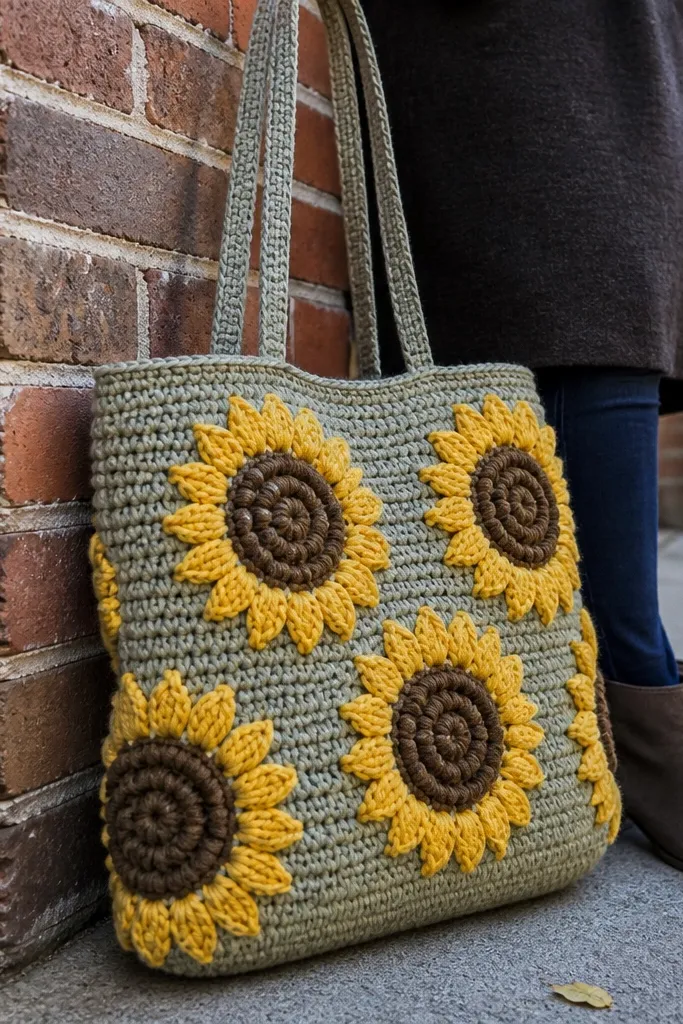
Crochet a dense tote base and sides in a neutral base color like cream or off-white. Create sunflower motifs separately using yellow for petals and green for leaves, then sew them onto the front panel using a yarn needle with matching thread. Add a firm top edging round and attach straps with reinforced side blocks. Line the inside so the background stays smooth and the raised petals don’t warp the tote shape.
A raised sunflower motif makes the bag instantly recognizable in photos, and it’s still wearable in colder months when you pair it with dark outerwear. The trick is to use a tight stitch background and attach petal motifs firmly so they don’t flop. The sunflower center can be done with bobbles or a ring of puff stitches for a bright highlight. This tote is a standout without needing loud stripes everywhere. Skill level is intermediate because motif placement and attachment matter for the final look.
AvoidDon’t attach motifs too close to the sides — it makes the bag look crowded and uneven when carried.
Pro tipSew motifs with a tight mattress stitch around the edges so they sit flat and don’t curl.
11. Black and Oatmeal Stripe Sling Bag with Buckle Strap
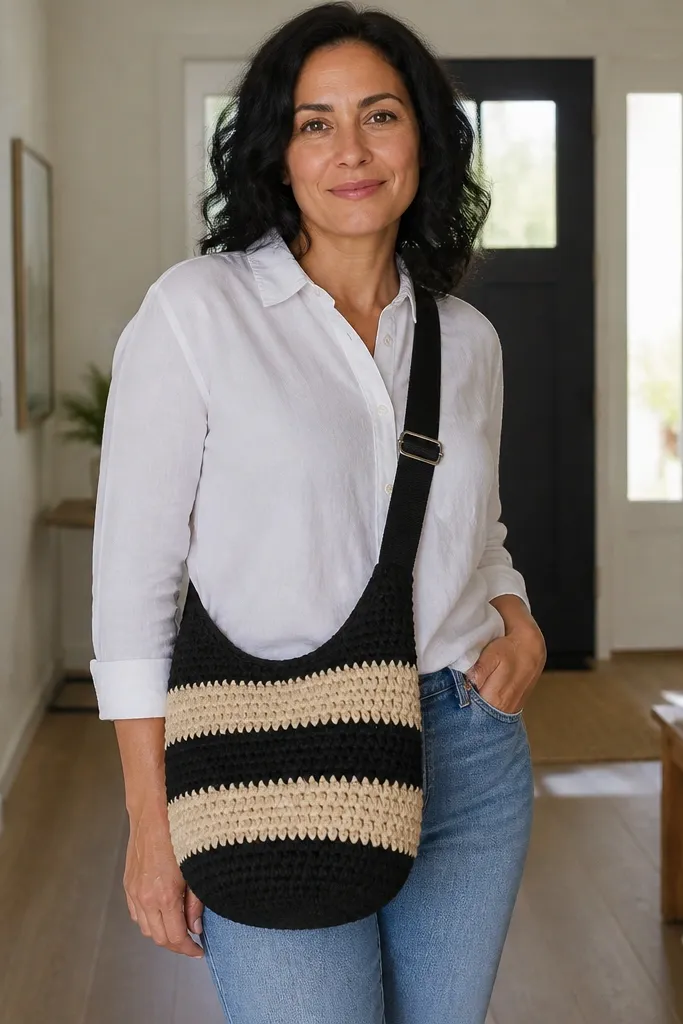
Sling bags look great because you get a clean front panel and hands-free carry. This design uses black and oatmeal stripes, which makes it look like a store-bought accessory. The buckle strap is the secret to the aesthetic — it keeps the strap flat and adjustable, so the bag sits properly at your torso. The crochet body uses tight rows so stripes don’t ripple. It’s beginner-friendly if you can keep stripe counts consistent, and the construction is simple.
Crochet a rectangular body in alternating black and oatmeal stripes, keeping the stitch height consistent across colors. Seam the sides to form a pouch, then crochet a flat front edging for a tidy look. Add a back panel if you want extra structure, then attach a buckle strap using end rings or sewn-on strap tabs. Line the inside and add a simple zipper pouch or snap closure at the top opening.
Match stripe colors with the strap hardware color; black hardware with black yarn makes the whole bag look intentional.
Avoid uneven stripe tension — one loose stripe line makes the whole bag look off in photos.
12. Burgundy Velvet-Look Crochet Bag with Waistcoat Stitch
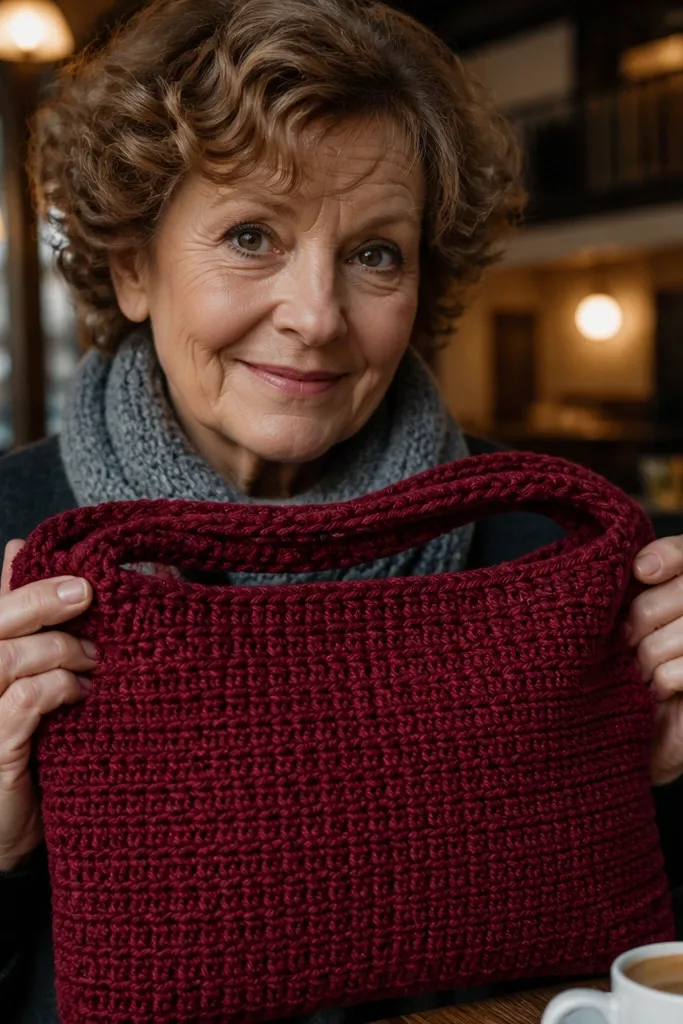
Make a base rectangle in waistcoat stitch using tight gauge so the surface stays dense. Build the sides up to a medium height, then seam into a pouch shape with a neat bottom seam. Add a flap or zipper top with a contrasting lining, then crochet around the opening in waistcoat stitch for a clean edge. Install a zipper or add a fabric-lined snap closure so the textured surface doesn’t gap.
The waistcoat stitch creates a “knit” surface that looks plush without using actual velvet. Choose deep burgundy yarn and you get a bag that looks rich in any lighting, plus it hides small imperfections better than shiny yarn. This design stays photogenic year-round because the texture gives depth in winter and dimension in summer. It’s a good pick if you want a monochrome bag that still looks like a statement. Skill level is intermediate because waistcoat stitch has a specific technique, but it’s repetitive once you get going.
AvoidDon’t use very slippery yarn — waistcoat stitch can look uneven and stretched.
Pro tipUse a yarn with good stitch definition (not too fuzzy) so the raised texture stays crisp.
13. Pastel Ombre Bucket Bag with Stitched Rim
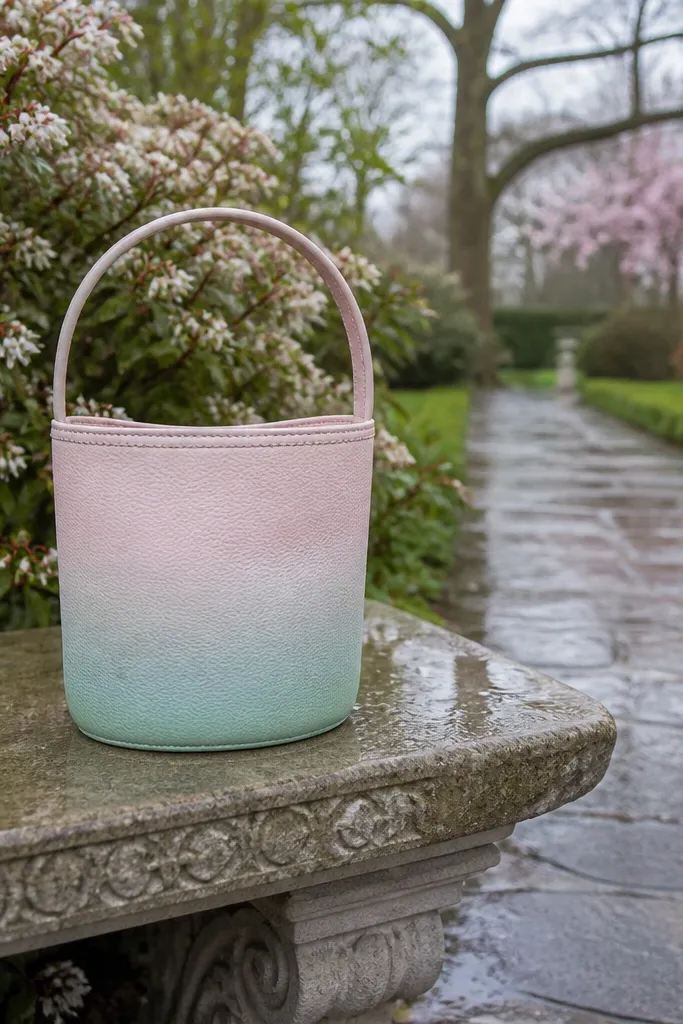
Crochet the body in continuous rounds or joined rounds, starting with the darkest pastel and moving lighter as you go. Add increases until you get the bucket’s width, then reduce slightly to shape the dome. Build a firm rim by crocheting a thick border in dense single crochet around the top edge and reinforcing with a thin plastic ring or a fabric band. Add a drawstring channel or a buttoned flap, then line the inside with a smooth cotton fabric.
Bucket bags are flattering because the opening stays rounded and the bag sits in a soft dome. Ombre yarn makes it look store-bought, but you need a stitched rim so the top doesn’t collapse. This bucket bag is year-round because the bucket shape fits both casual outfits and dressier looks. The rim also makes the bag feel more “finished,” which is where compliments come from. Skill level is intermediate because you’ll manage round construction and a stable rim.
AvoidAvoid skipping reinforcement on the rim — ombre looks pretty, but a collapsed top looks unfinished.
Pro tipKeep your ombre color transitions even by switching colors only at the end of a round, not mid-round.
14. Lime Basil Crochet Keyhole Bag with Button Eyelet
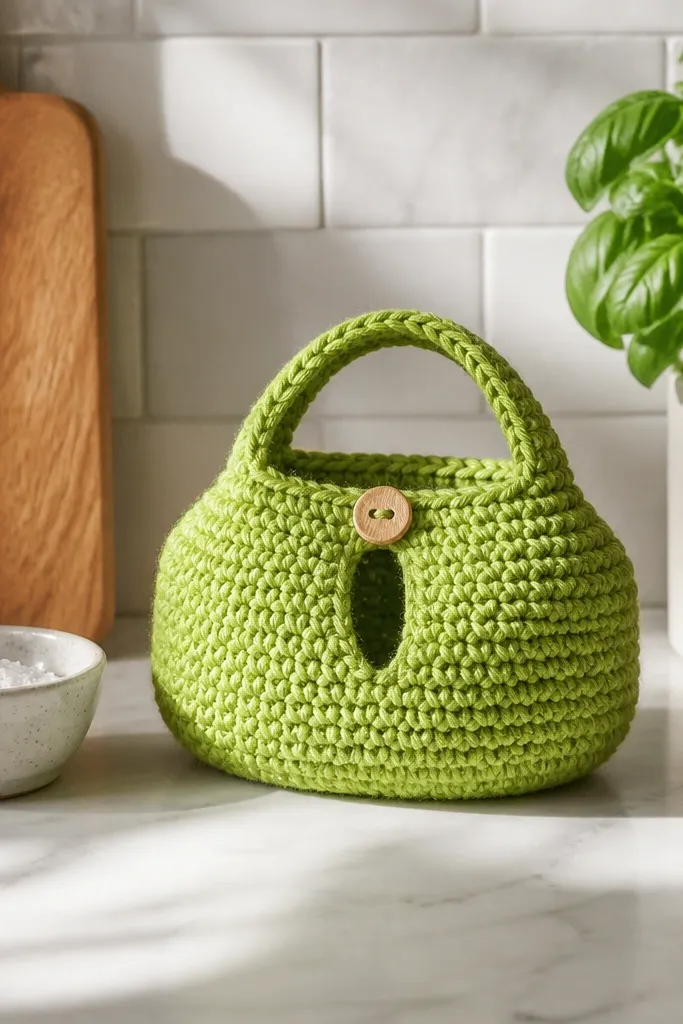
Crochet a compact rectangle-to-oval body with tight stitches for structure, then seam the sides. Create the keyhole opening by leaving a controlled gap in the front panel and crocheting a channel around it for the eyelet. Work a sturdy button loop separately and sew it in place so it aligns perfectly with the keyhole opening. Line the bag and add a short strap or crossbody strap using reinforced tabs.
A keyhole opening is a small detail that reads clever in photos, and it makes a simple bag look designed. The bag is lime basil green, which pops against neutral coats and denim. The closure is a button eyelet, so it stays secure without bulky hardware. This is a great year-round mini bag for holding lip balm, a phone, and keys. Skill level is beginner-to-intermediate because the shape is simple, but the opening needs careful placement.
AvoidDon’t make the keyhole too large — it turns the bag into a loose pouch instead of a sleek closure.
Pro tipMark the center of the front panel before you cut the opening gap; alignment makes the design look intentional.
15. Oatmeal Cable Tote with Matching Pouch Insert
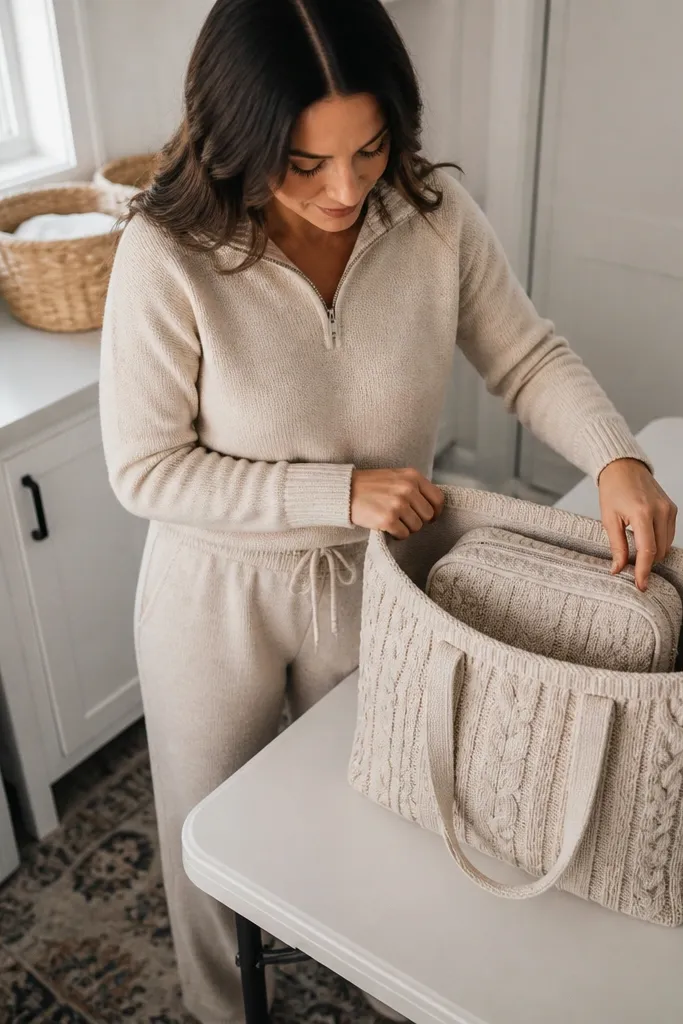
Crochet the tote body in a dense stitch base, then add a cable-texture panel on the front by using front-post/back-post rows. Build a firm bottom by crocheting an extra-thick base panel and sewing it in, then line the tote. Create the pouch insert as a smaller rectangle folded and seamed, add a zipper or snap top, and attach it with a removable stitch or simple hook-and-loop tabs. Finish with matching edging so the set looks cohesive.
This tote wins compliments because it gives you two coordinated pieces: a textured tote and a matching pouch that makes the whole set look styled. The cable texture on the tote front reads high-end, while the pouch adds function and keeps small items from floating. Year-round use is built in because the tote has straps and a firm base, and the pouch is quick to grab. Skill level is intermediate because cables plus sewing a pouch takes focus, but the build is straightforward.
AvoidAvoid mixing stitch gauges between tote and pouch — it makes the set look mismatched.
Pro tipUse the same yarn lot for both tote and pouch; slight dye differences show up in pictures side-by-side.
16. Silver Gray Puff Stitch Shoulder Bag with Button Tab
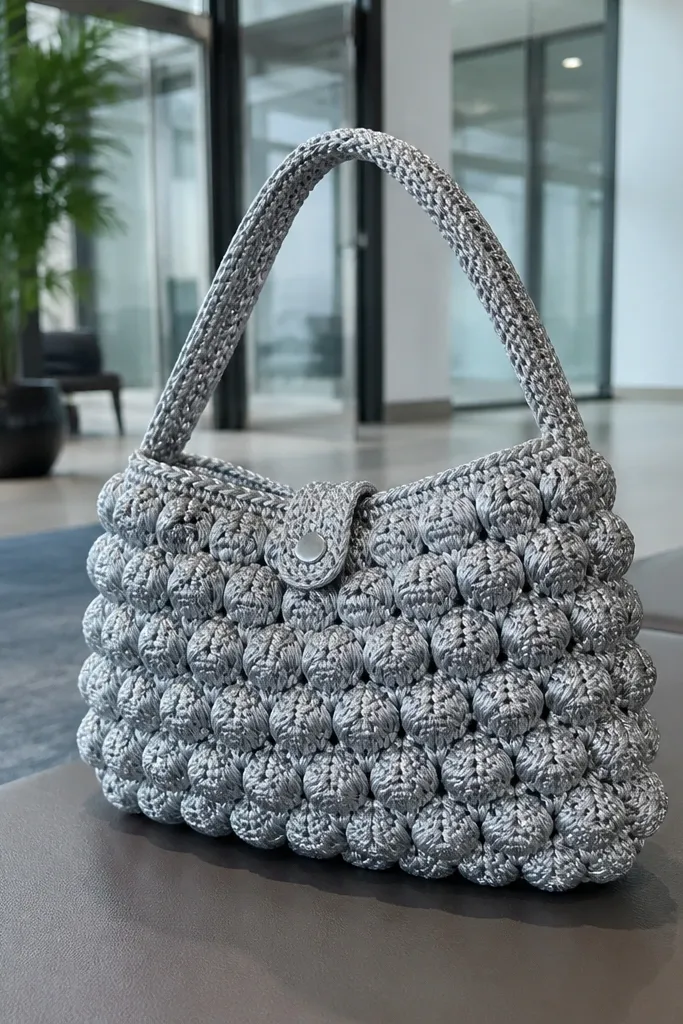
Puff stitches give this bag a cloud-like surface that still looks structured when you keep the base tight. Silver gray is the aesthetic move because it photographs softly and pairs with both warm and cool outfits. The button tab closure keeps the top neat and makes the bag look tidy even when it’s not completely filled. This is a year-round shoulder bag that works in spring and winter because it’s medium size and doesn’t flop. Beginner-to-intermediate: puff stitches are repetitive, but you need consistent tension.
Work a rectangular base in tight stitches, then build upward using puff stitch rows on the main body. Create a button tab by crocheting a small flap that folds over the opening, then sew a button on the opposite side. Add a dense edging round around the top so the opening stays square. Line the bag for a clean interior and to help the puff texture hold its shape.
When you do puff stitches, keep the same number of yarn wraps each time; variations make the texture look uneven.
Don’t skip edging on the top — puff stitch edges curl and look messy.
17. Rose Pink Clamshell Bag with Top Zip
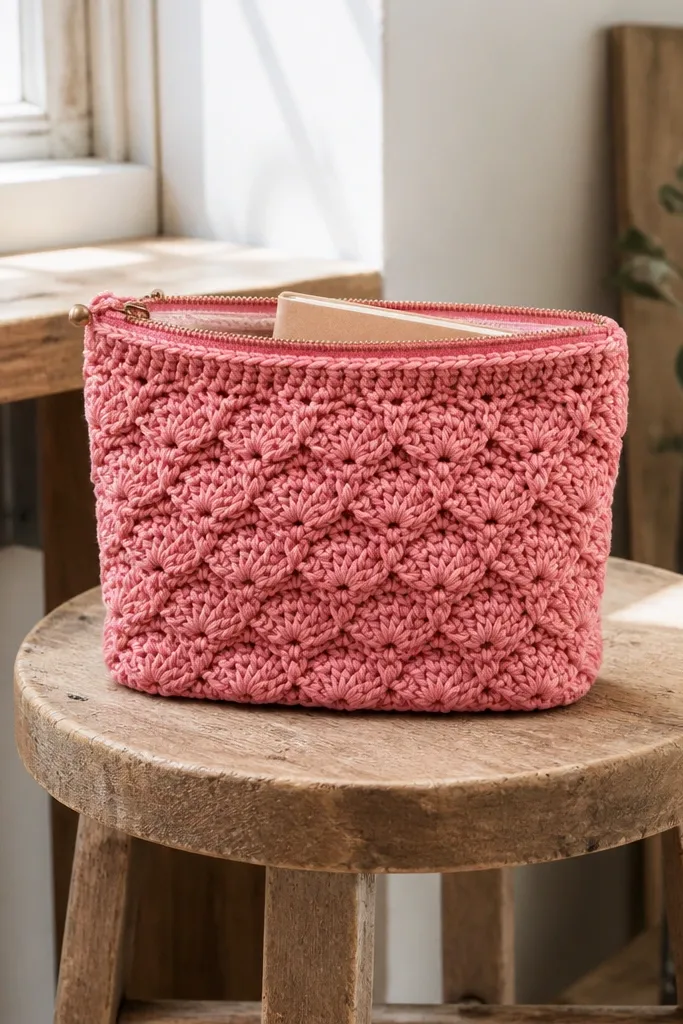
Crochet a flat rectangle base with a dense back layer or double-thickness panel so the clamshell texture doesn’t stretch. Work clamshell stitch across the front and back panels, then seam the sides to form a pouch. Sew in a zipper sized to the bag width, and line the inside with cotton so zipper edges don’t show. Add a top zipper pull tab or fabric tab in matching yarn, then finish the bottom with a firm edging round.
Clamshell stitch looks like scalloped seashells, and it reads “special” without loud color changes. A top zipper makes it practical year-round and keeps the bag looking crisp even when you’re stuffing it. Rose pink is flattering and photogenic, especially in daylight, and the clamshell texture gives consistent highlights. This is a great choice if you want a bag that looks feminine but still structured. Intermediate skill because clamshell stitch needs careful row counts and the zipper install takes patience.
AvoidAvoid skipping a lining — clamshell edges around a zipper look rough.
Pro tipPin the zipper in place before sewing — zipper alignment is what separates a clean look from a wavy one.
18. Teal Wave Tote with Woven Strap Ends
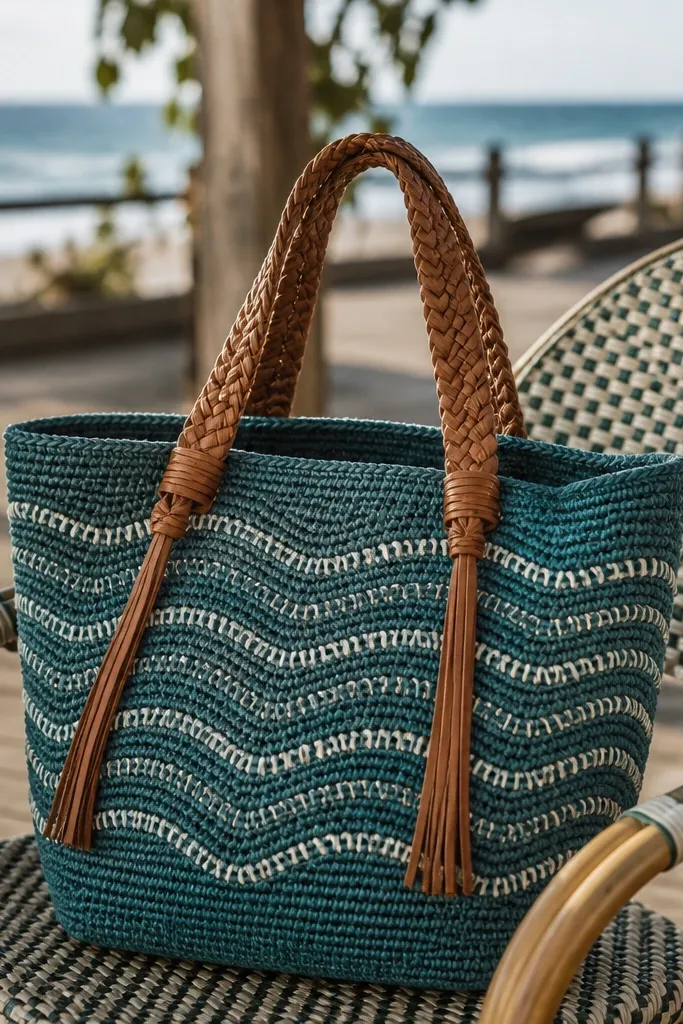
Crochet the tote body using a wave-pattern stitch across rows, but keep the edges reinforced with single crochet borders. Build a firm base panel and sew it to the bottom so the waves don’t stretch. Crochet wide straps, then braid or weave the strap ends using contrasting yarn for a clean “woven” look at the attachment points. Line the tote and stitch the lining to the top rim for a smooth interior finish.
Wave stitch gives this tote motion on the surface, and teal makes it feel fresh without being childish. The reason it gets compliments is the strap finishing: woven or braided strap ends make the tote look like it has hardware and design details. The tote body stays year-round friendly because it’s built with a firm base and a tight stitch count. This tote also looks good with jeans and cardigans because the wave texture adds interest without needing extra color. Intermediate skill due to wave stitch repeat and strap finishing.
AvoidAvoid thin straps — the woven ends look best when the strap body is sturdy.
Pro tipKeep wave rows even by counting every peak and valley; one skipped stitch makes the wave look jagged.
19. Cream Crochet Handbag with Buttoned Front Pocket
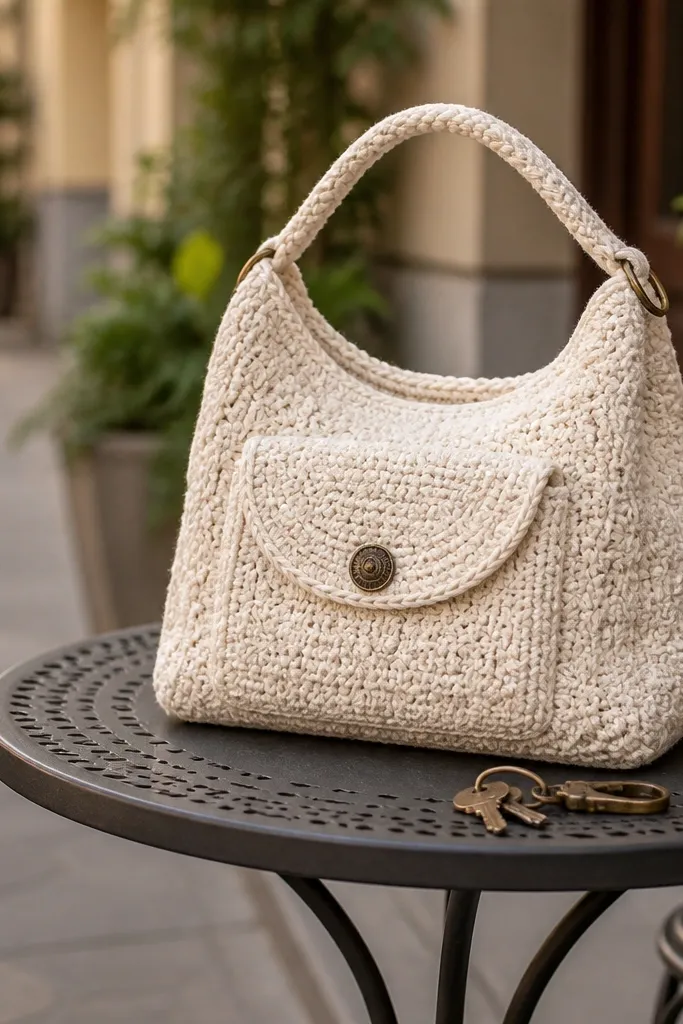
Crochet the handbag body as a rectangle folded and seamed, then reinforce the bottom with extra dense rows. Add the front pocket by crocheting a separate rectangle panel, then fold and attach a flap with a button loop. Sew the pocket onto the front panel before adding straps, and make sure the flap closes flat. Line the bag and attach the lining to the top rim so the pocket edges don’t pull the fabric out of shape.
Front pockets on crochet bags make them look functional and styled at the same time. This cream handbag uses a buttoned pocket flap so the front has a focal point and stays tidy even when you carry small essentials. The bag works year-round because the color is neutral and the structure comes from a tight stitch body plus a lined interior. It’s also great for photos because the pocket flap creates a sharp shape against the roundness of the bag. Beginner-to-intermediate: pocket construction is simple, but you need clean edges.
AvoidDon’t make pocket flaps too narrow — narrow flaps buckle and look crooked.
Pro tipUse a contrasting thread color for sewing the pocket flap — it’s hidden inside but helps you keep alignment straight.
20. Sunset Colorblock Tote with Contrast Crochet Edges
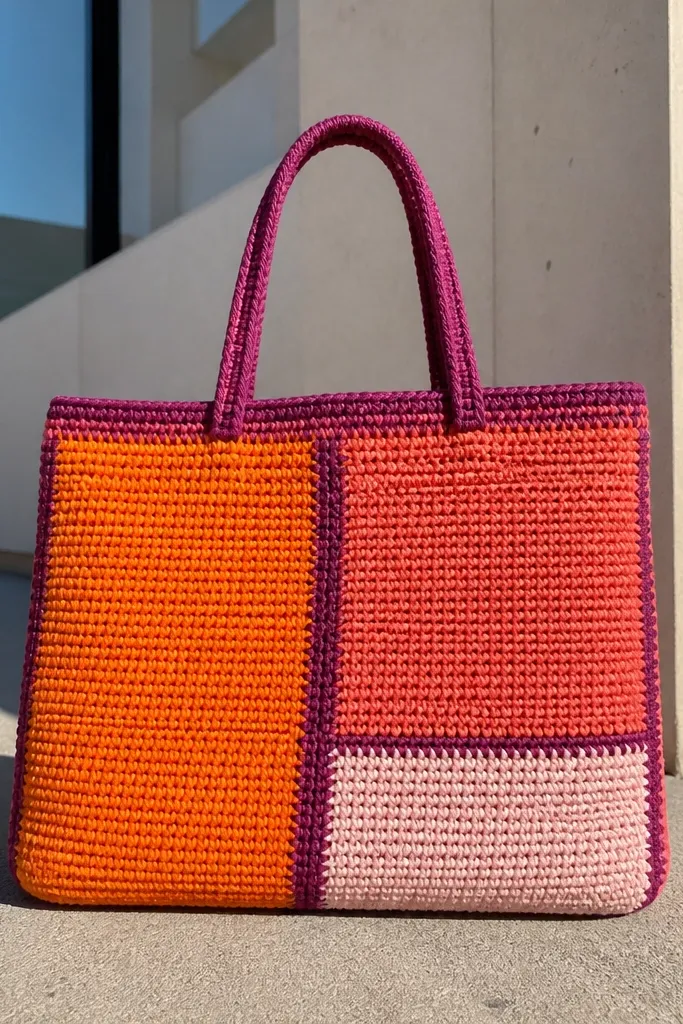
Crochet the tote sides in sections: start with one color band and work to your desired height, then switch colors at the end of rows. Add contrast edging by crocheting a single crochet border around each band transition, then continue building the full tote. Create a thick top rim and straps using dense stitches, then line the bag for stiffness. Finish with a simple top closure like a button flap or zipper pouch depending on how structured you want it.
Colorblocking looks best when the borders are crisp. This tote uses sunset tones like orange, coral, and soft pink, then frames each section with a contrasting edge color so the bag looks graphic and modern. The firm straps and reinforced top keep it from collapsing, which is where many colorblock totes lose their appeal. Year-round use is built in because the palette works with denim, black boots, and winter layers. Skill level is beginner-to-intermediate because the construction is simple rectangles stitched together.
AvoidAvoid fuzzy yarn for colorblocking — it blurs the contrast edges that make the design look intentional.
Pro tipKeep your color-change points at the same height on both sides so the stripes line up in photos.
21. Charcoal Wave Clutch with Chain Strap
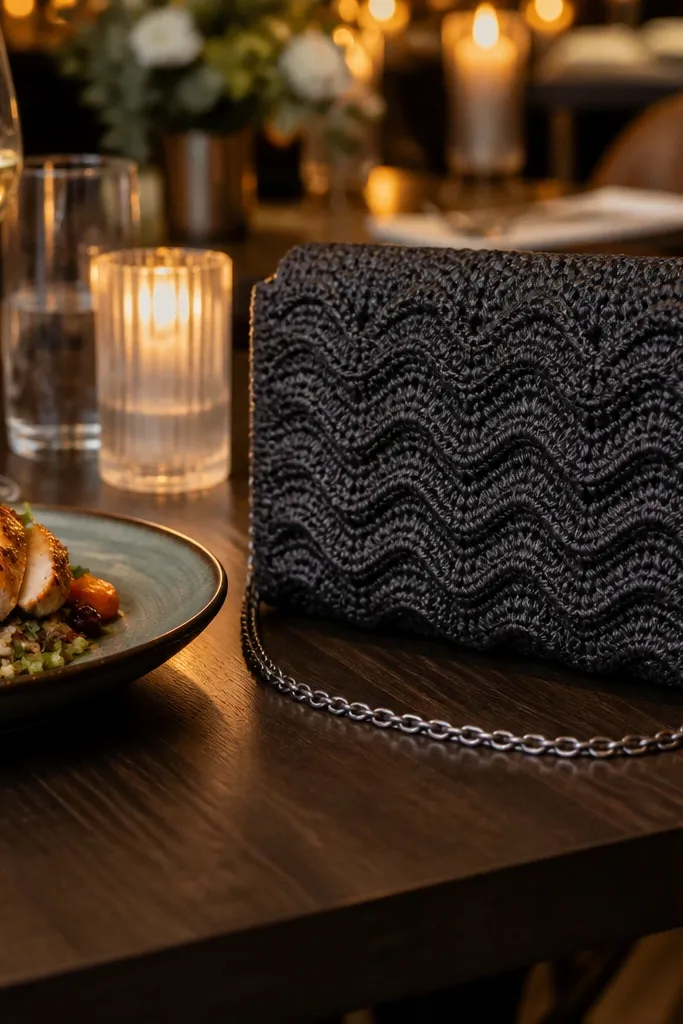
A charcoal clutch with a short chain strap looks sharp because the hardware adds polish, and the wave texture keeps it from looking plain. The bag is small but structured, so it sits nicely in a hand or on a shoulder. Year-round use works because charcoal is neutral and the wave pattern adds depth without color dependence. This design is perfect for nights out, but the construction also makes it practical for daytime errands. Skill level is intermediate: you’ll manage wave stitch shaping and securely attach the chain strap.
Crochet a dense rectangle clutch body, then add wave stitch patterning on the front and back panels. Seam the sides, then crochet a firm edging around the top opening. Attach a chain strap using metal rings or sturdy sewn-on strap tabs so the chain doesn’t pull on the crochet. Line the inside and add a snap or zipper closure for a clean, closed top.
If your chain is heavy, reinforce strap tabs with extra stitching and a small backing fabric patch inside the lining.
Don’t attach chain directly to thin yarn edges — it will stretch and sag.
22. Ivory Lace-Look Tote with Crochet Lace Border
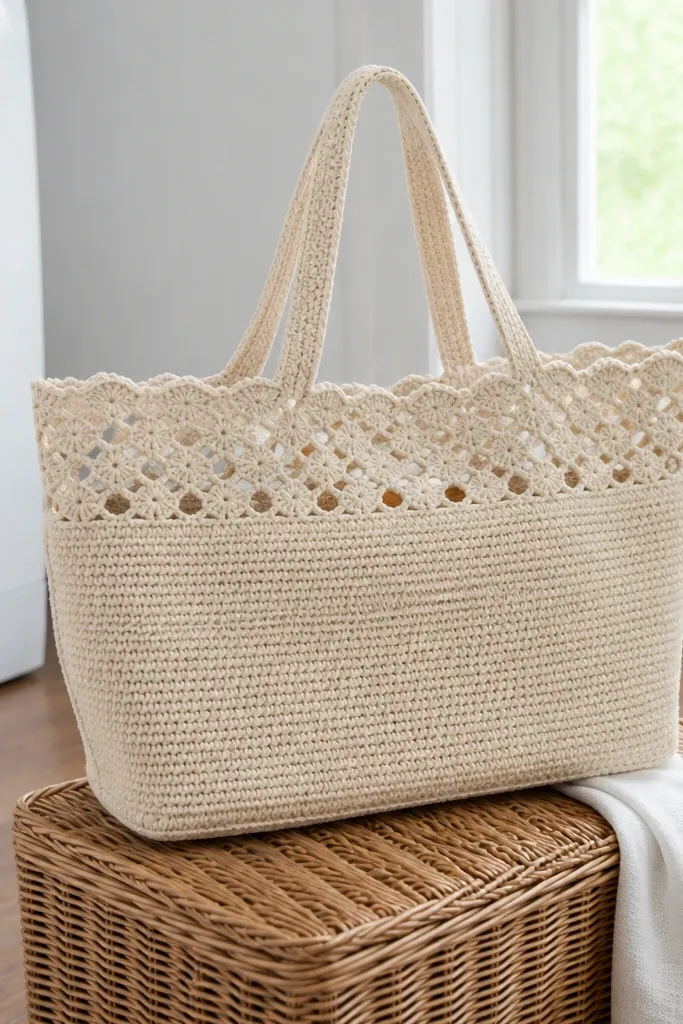
This tote is “lace-look” without going fragile. The body uses a stable stitch, while the border uses lace-like openwork that makes the bag look delicate in photos. Ivory keeps it light and bright, and the sturdy straps make it usable all year. It’s a great choice if you love feminine details but still want a bag that doesn’t collapse. Skill level is intermediate because lace border stitches need careful counting and consistent tension.
Crochet the tote body in stable stitches like half double crochet with reinforced edges, then build a lace border panel as a separate strip. Attach the lace border to the top and/or sides, then crochet a firm top rim to keep it from curling. Make straps in dense stitch and sew them onto reinforced corners. Line with cotton and stitch the lining to the top rim so the tote holds shape.
Block the lace border before attaching it so the pattern sits flat and crisp.
Avoid skipping a stable body — lace-only construction looks pretty but collapses fast.
23. Olive Utility Tote with Zippered Side Pocket
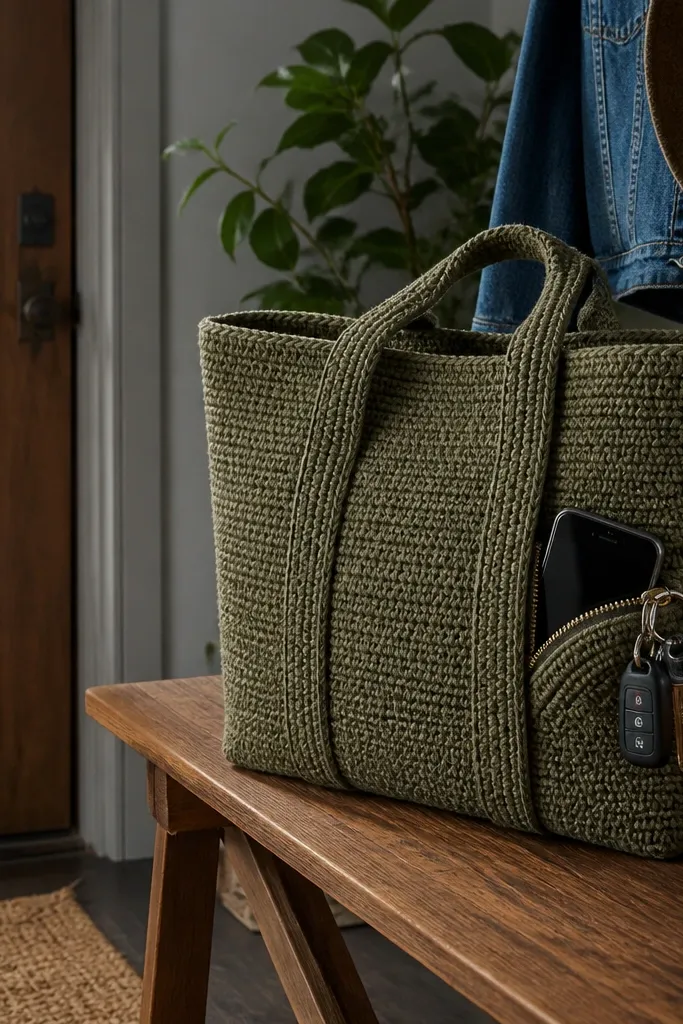
Crochet the tote body in dense stitches and build a firm base panel, then decide where the side pocket sits. Make a pocket rectangle with a zipper opening, then sew in a zipper that matches the pocket width. Attach the pocket to the tote side after lining, so the pocket lining hides seams. Add a top rim and straps, then line the whole bag and stitch the lining to the top rim.
Utility details make crochet bags feel grown-up, and the zipper side pocket is the photo-friendly feature. Olive green reads calm and stylish, and it works with both warm and cool outfits across seasons. The tote construction is built for structure: dense body stitches, reinforced straps, and a lined interior. This one gets compliments because it looks like it has thought in it, not because it’s covered in random motifs. Skill level is intermediate because zipper pockets require careful measurement.
AvoidAvoid attaching the pocket before making sure the tote sides are fully aligned — zipper pockets show misalignment immediately.
Pro tipMeasure your zipper length and choose a pocket width that gives you 1 inch overlap on each side of the zipper opening.
24. Oxblood Granny Stripe Bag with Leather Strap Tabs
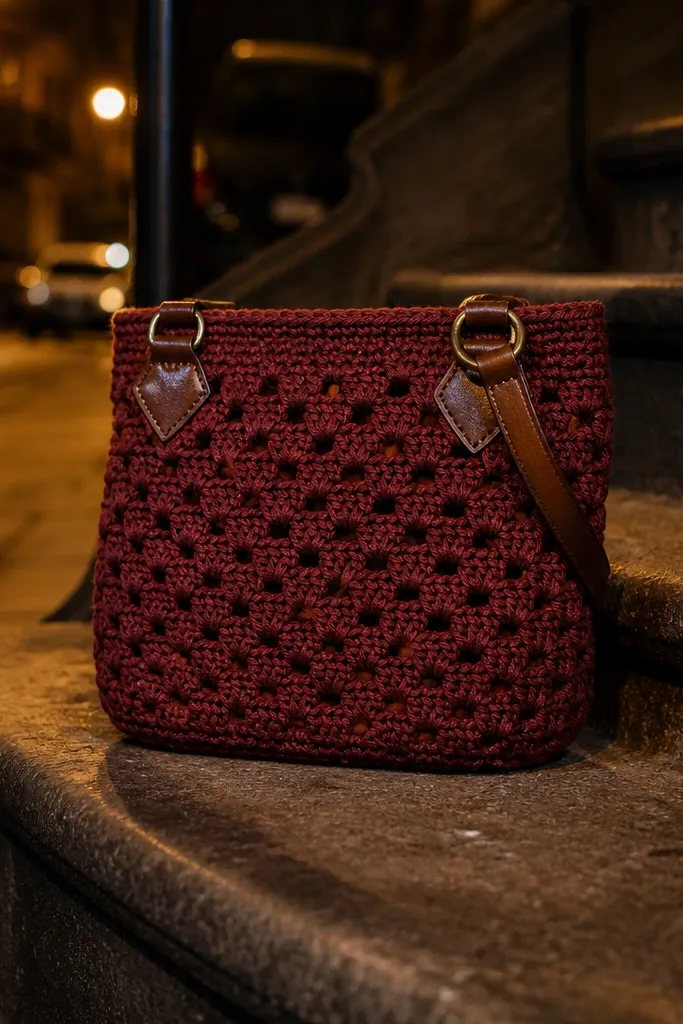
Granny stripe looks playful, but this version looks polished because the color is oxblood and the strap attachments use leather-style tabs. The deep red tone photographs beautifully in low light, and the strap tabs make the hardware area look intentional. The bag holds its shape with a dense base and a top rim, so it stays crisp even when you carry it full. It’s year-round because the color works in every season and the silhouette stays simple. Skill level is beginner-to-intermediate: granny stripe is easy, but keep consistent widths for a clean grid.
Crochet granny stripe panels using alternating rows in a tight stitch pattern, then join into a bag shape. Build a firm base by adding extra dense rows or a fabric base insert, then crochet a top rim round. Make strap tabs from faux leather or sturdy fabric, then stitch them inside the lining at the strap attachment points. Add straps in dense crochet or attach pre-made straps to the tabs, then line the bag for a clean interior finish.
If your faux leather tabs fray, seal the cut edge with fabric glue before sewing.
Don’t skip a top rim — granny stripes curl at the opening and ruin the structured look.
25. Teal and Cream Beaded Look Tote without Loose Beads
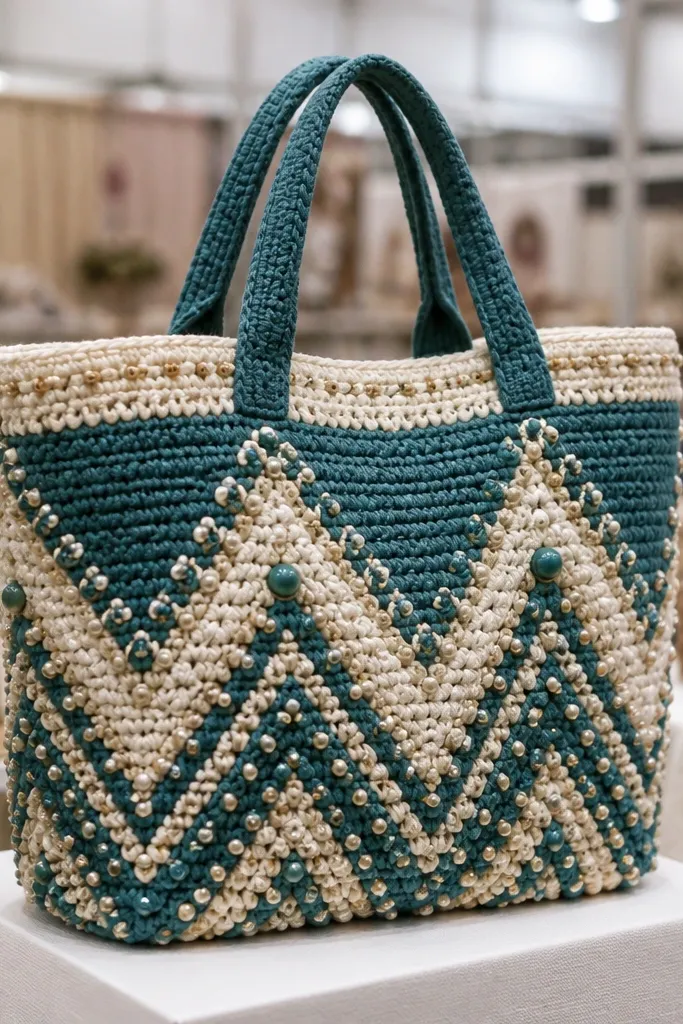
Crochet a tote body in tight stitches, then mark a repeating row where you’ll place beads (every 2-3 stitches). Pre-thread beads onto yarn or fishing line, then attach beads by crocheting them into the stitch as you work the marked row. Build a firm base and add straps with reinforced attachment points. Line the tote and secure loose ends inside so beads don’t migrate.
Beaded look bags get compliments because they sparkle in small highlights, but loose beads can snag and look messy. This tote gives you the look by using planned bead placement and a stable stitch foundation so nothing shifts. Teal and cream keep it bright and year-round, and the sparkle reads more “jewelry” than “craft beads.” It’s intermediate because you’ll thread beads at specific stitch points, but the technique is repeatable and the result is worth the attention. It also works for photos because bead placement creates consistent glints.
AvoidAvoid adding beads to openwork — beads catch on fabric and distort the pattern.
Pro tipUse smaller beads (seed beads) and keep bead spacing consistent; wide spacing looks uneven in photos.
26. Black and White Checker Clutch with Button Closure
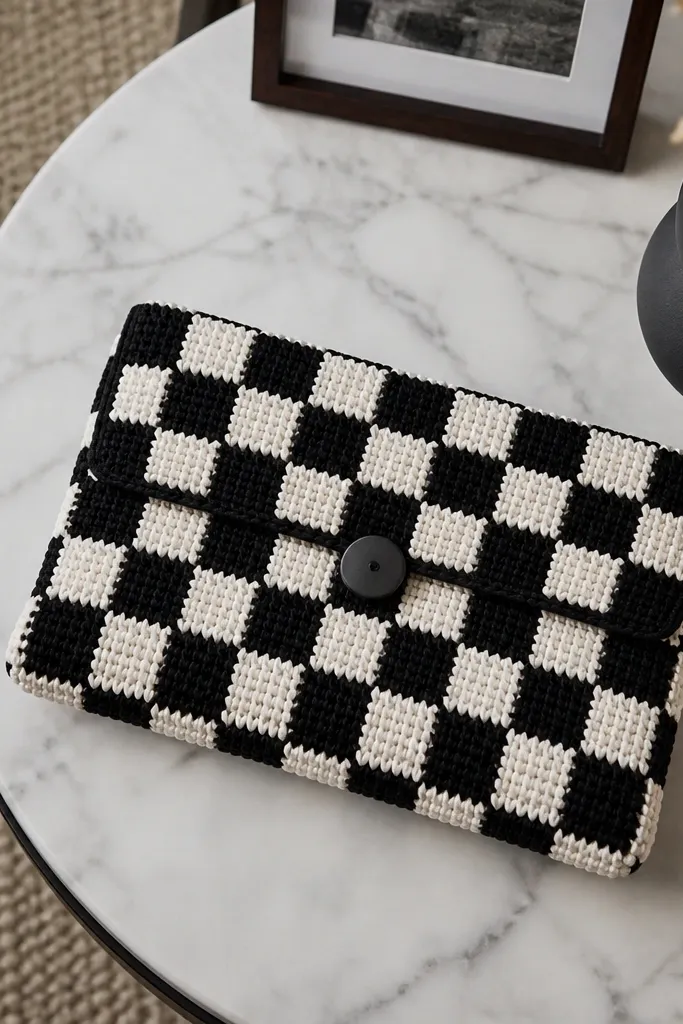
Crochet a checker panel using alternating colors with tight stitches, keeping your row and stitch counts exact. Seam into a clutch body and add a flap or front panel section for the button. Crochet a reinforced edge around the opening, then attach a button loop and button alignment. Line the inside and add a bottom stiffener if you want it to stand up on a table.
Checker patterns are graphic and look amazing in photos because the contrast is instant. This clutch stays year-round friendly because it’s compact, structured, and uses a button closure that sits flat. Black and white also makes outfit pairing easy — denim, leather, and winter knits all work. The surface is crisp thanks to tight stitch work and a lined interior. Skill level is intermediate: you need consistent color-change placement and neat edges.
AvoidAvoid letting the fabric twist while you work — twisted panels make checkers look crooked.
Pro tipChange colors at the same stitch each row to keep the checker squares perfectly aligned.
27. Coral Crochet Shoulder Bag with Rolled Handle Edges
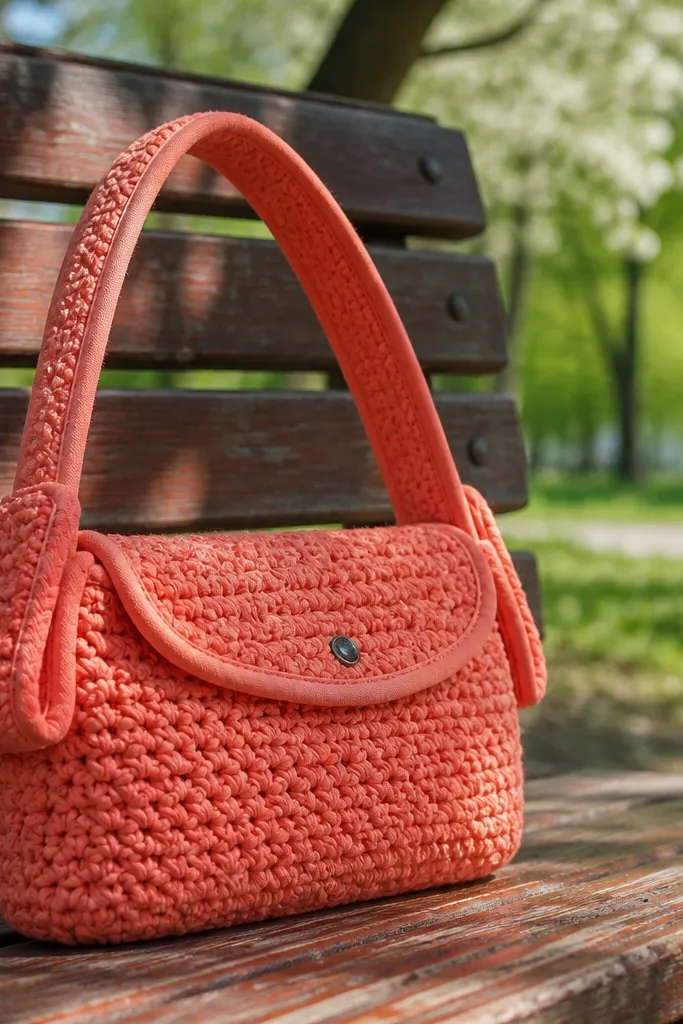
Rolled handle edges make a crochet bag look soft but finished, like it has a fabric lining even when it’s all crochet. Coral is a flattering year-round color that pops against both dark winter coats and light spring outfits. The bag itself is a simple shoulder shape with a flap or snap top, so it stays practical. This project is photogenic because the rolled edges create a clean highlight line where the bag meets the handle. Skill level is beginner-to-intermediate: you’ll focus on consistent handle construction.
Crochet the main bag body in tight stitches and add a firm base insert or dense bottom panel. Create straps in a wider stitch band, then fold and crochet around the strap edges to form a rolled edge finish. Attach straps to the bag with reinforced stitching and symmetrical placement. Add a flap or snap closure, line the bag, and sew the lining to the top rim so the rolled edges don’t stretch the opening.
Roll the handle edges before attaching to the bag; it lets you keep the roll even on both sides.
Don’t attach straps at different heights — rolled edges will make the mismatch obvious.
28. Pistachio Mini Tote with Crochet Buttoned Top
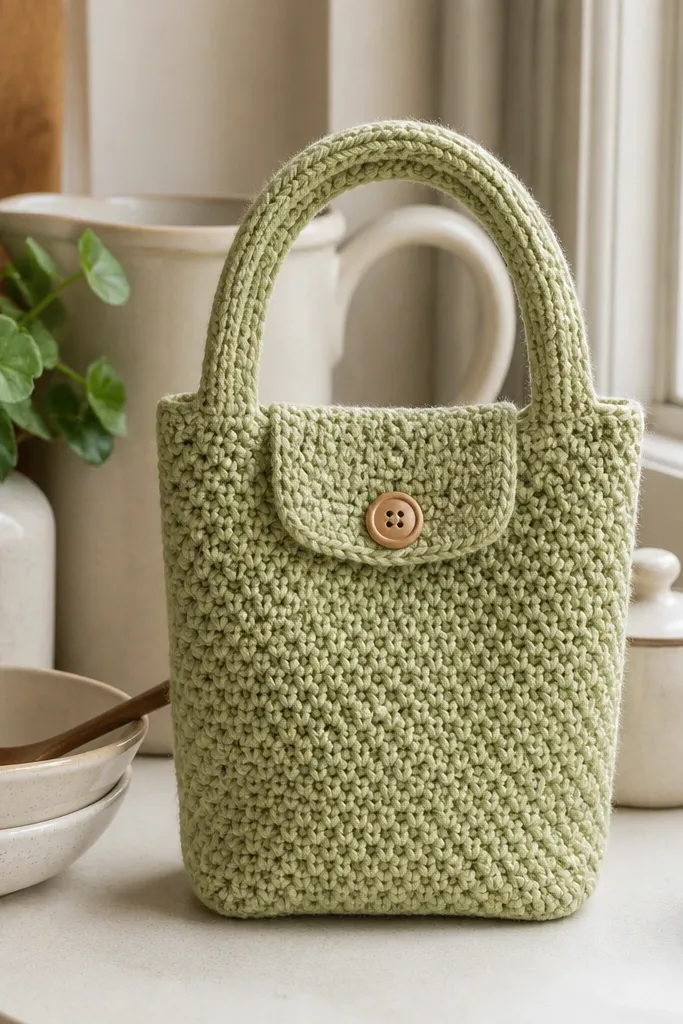
Crochet a rectangular tote body with dense stitches, then seam the sides and reinforce the base. Add a top flap by crocheting a rectangle panel and attaching it to the front opening edge. Sew a button and loop so the flap closes flat, then crochet an edging round around the opening for a tidy look. Line the inside and stitch the lining to the top rim so it stays smooth and doesn’t slide.
Mini totes get compliments because they look styled and intentional, not because they’re huge. Pistachio green is fresh and neutral enough for year-round wear, and the buttoned top keeps the shape neat. The top flap also hides how the lining is attached, which makes the finish look cleaner. This bag is perfect for holding small essentials and looks great in photos when you carry it at waist height. Skill level is beginner-to-intermediate: the shape is simple, and the main work is consistent edging.
AvoidAvoid thin, stretchy yarn for a mini tote; it collapses and loses the structured silhouette.
Pro tipUse a button that matches the undertone of your yarn (yellow-green vs gray-green) so it doesn’t look off in daylight.
29. Butter Yellow Granny Circle Bag with Hidden Snap
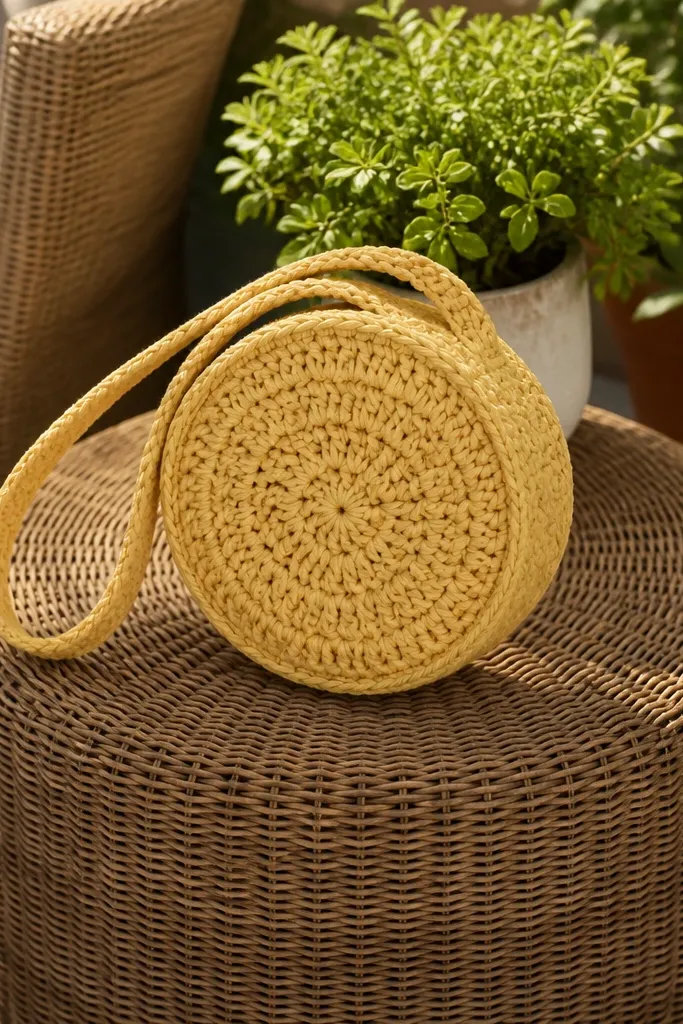
A granny circle bag looks playful, but it gets compliments when you keep the circle structure tight and add a hidden snap. Butter yellow is bright without being neon, and it photographs like warm light even in shade. This bag is year-round because the silhouette is compact and the snap closure keeps the top neat. Skill level is intermediate because circle construction needs careful increases and joining, but the look is distinctive and clean.
Crochet granny circle panels using a consistent round increase method until you reach the bag’s width. Join panels into a pouch shape with single crochet seams, then add a dense base panel so it doesn’t sag. Create a hidden snap closure by sewing one half inside the top edge and the other half on the flap or front overlap section. Line the bag and stitch the lining to the top rim for a finished interior.
Keep the circle diameter consistent by measuring across the widest round before you join panels.
Avoid uneven joining tension — circle seams can pucker and ruin the smooth top opening.
30. Charcoal and Silver Ombre Tote with Chain-Trim Handles
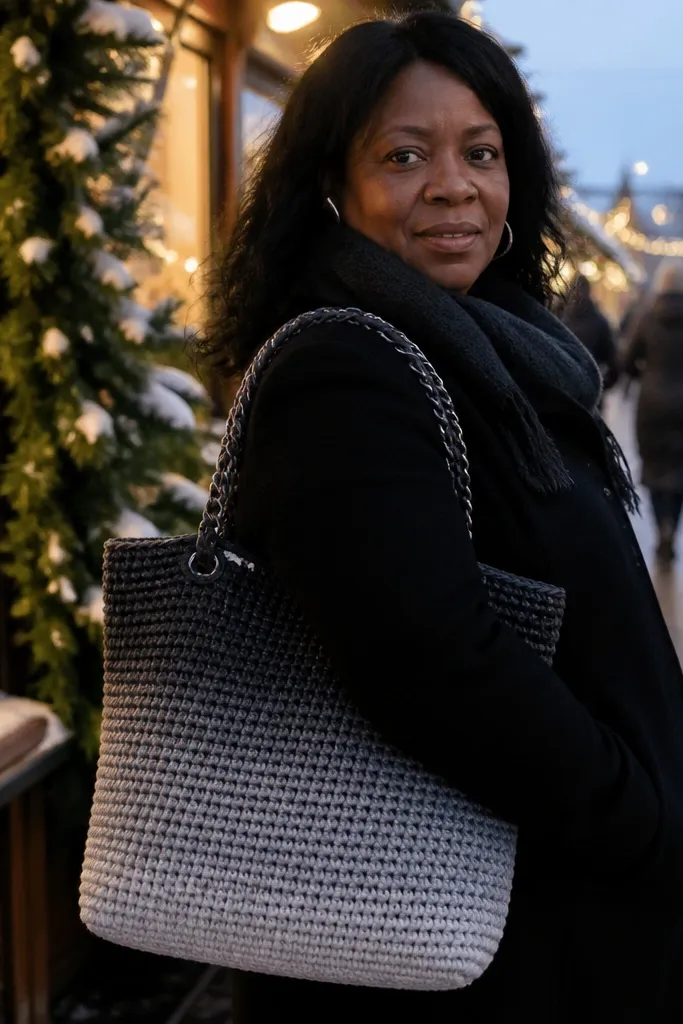
Ombre totes look expensive when the transition is smooth and the handles look intentional. This charcoal-to-silver palette reads sleek and works in every season, especially with winter layering. Chain-trim handles add a subtle shine that catches light without turning the bag into a costume. The crochet body is built with a firm base so it stays upright and doesn’t fold. Skill level is intermediate because you’ll manage ombre transitions and securely attach chain trim.
Crochet the tote body in dense stitches, switching yarn shades gradually every few rows for a smooth ombre. Add a stitched base panel and reinforce the bottom with a fabric insert. Crochet straps in dense rows, then attach small chain trim along the outer handle edge using metal rings or sewn loops. Line the tote and stitch the lining to the top rim so the chain doesn’t pull the crochet out of shape.
Attach chain trim only to the strap body, not to the tote sides; it prevents twisting when you carry the bag.
Don’t use too much chain — heavy trim stretches straps and makes the tote look sloppy.



