
1. Wrist Double-Band with Three Finger Fans
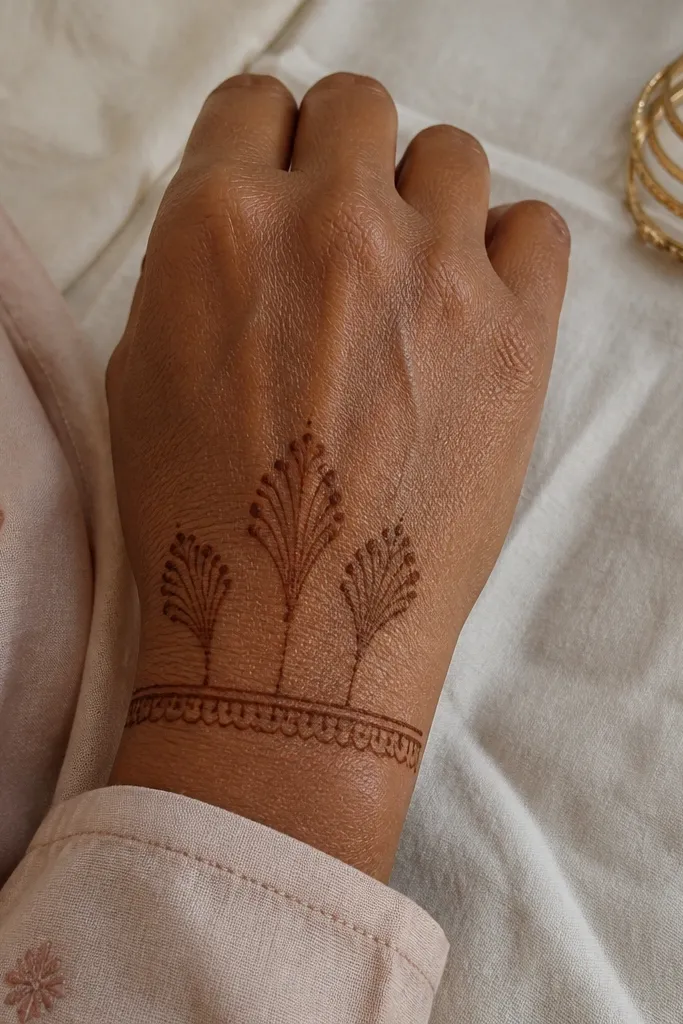
This layout gives you that “done by someone who plans” look without covering the whole hand. The double band at the wrist creates a frame, and the three finger fans read like jewelry when the back of the hand is visible. You keep the rest of the hand mostly linework, which prevents the common beginner problem of heavy, dark smudges. Work the fans with short curved strokes so they look light and airy instead of chunky. It suits everyday festive wear, tea-time functions, and quick applications where you still want the pattern to photograph clean.
Start by drawing a thin wrist band around the widest part of your wrist, then add a second band right above it with a small gap. Next, outline the base of three finger fans across the index, middle, and ring finger tops, leaving the pinky mostly bare. Fill each fan with 6-8 light curved lines that get slightly thicker at the base, then finish each fan tip with 2-3 tiny dots. Finally, add one small leaf stroke at the center of the hand to connect the design visually.
Pro tipUse a ruler or the edge of a phone for the wrist band curve so both sides match.
AvoidAvoid filling the entire fan — leave the inner space open so it stays crisp.
2. Central Oval Mehndi with Side Vine Dots
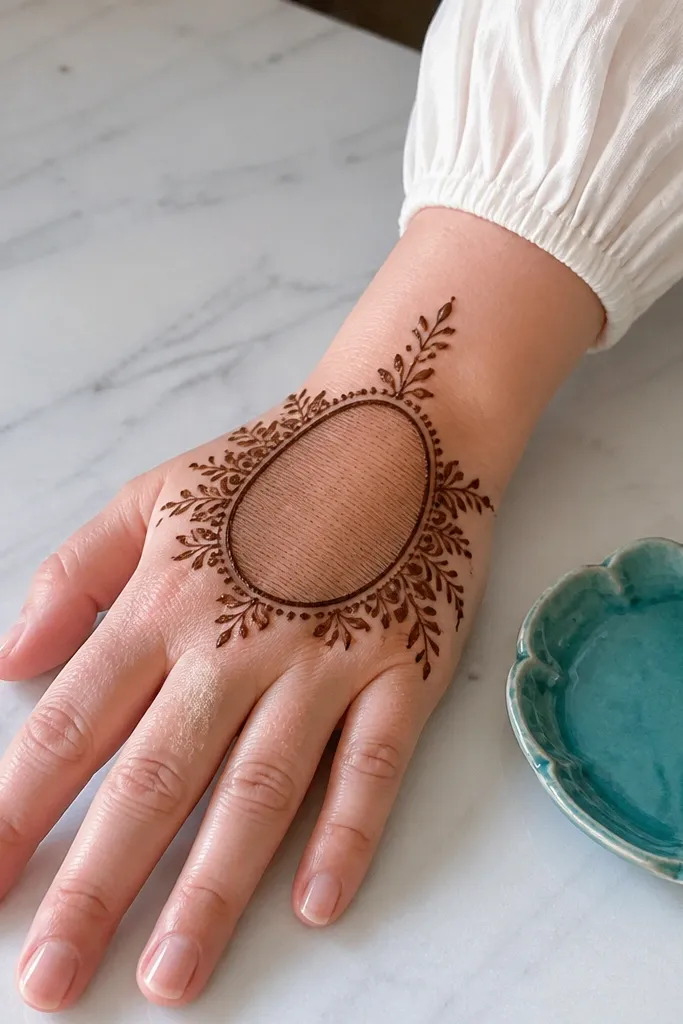
A central oval is the fastest way to make simple mehndi look intentional. It gives you one clear focal point, and the side dotted vines add movement without requiring large filling. The oval outline makes the design look “structured,” which is what expensive-looking mehndi usually has. You’ll also get a smooth gradient of attention — the eye lands on the oval, then travels to the tiny dots. Great for parties, bridesmaids, and anyone who wants a clean look that doesn’t feel heavy.
Outline a vertical oval on the back of the hand, slightly above the center, keeping the top narrower than the bottom. Draw two short vine stems on either side of the oval, each stem ending near the wrist curve. Add tiny dot clusters along the vines — 3-5 dots per cluster — and connect dots with thin curved lines. Finish by adding a small scallop border at the oval edges using 1-2 mm repeated curves.
Pro tipKeep the oval lines light at first; go over them once after the shape is right.
AvoidDon’t make the oval too wide — if it fills the whole hand, it stops looking elegant.
3. Finger-Tip Rings with a Minimal Thumb Leaf
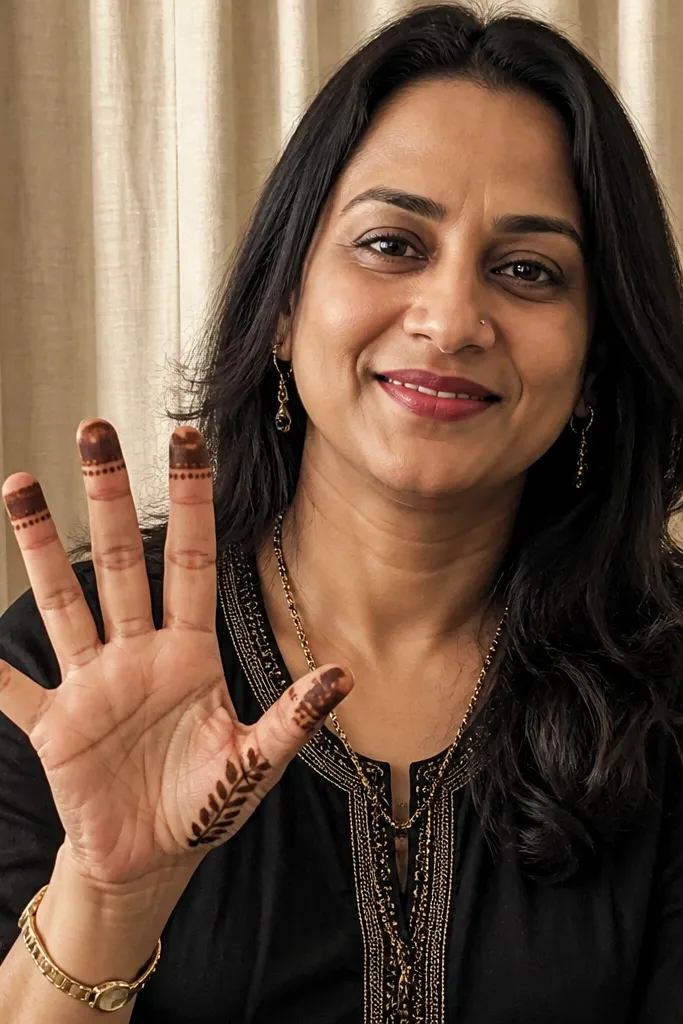
If you want simple mehndi that still looks styled, finger-tip rings are your friend. This design uses small bands at the tips to create a “stacked jewelry” effect. It’s minimal on purpose, so you get clean, photogenic lines instead of a dark block of paste. The thumb leaf gives a soft focal point that keeps the look from feeling empty. It’s perfect for short events, daily wear, and when you want your hands to look put-together without heavy coverage.
Start with a thin ring around each fingertip on the back of the hand, leaving the sides of the fingers bare. Then add a small leaf near the thumb base — just one leaf with a center line and two side strokes. Place one tiny dot at the tip of each ring band so the rings look intentional. Finish by drawing a short curved connector line from the thumb leaf to the nearest ring band.
Make ring bands slightly thicker at the outer edge of each finger for a jewelry-like look.
Avoid putting rings too low — keep them at the fingertip so they read as rings.
4. Wrist Net Lattice with One Flower Center
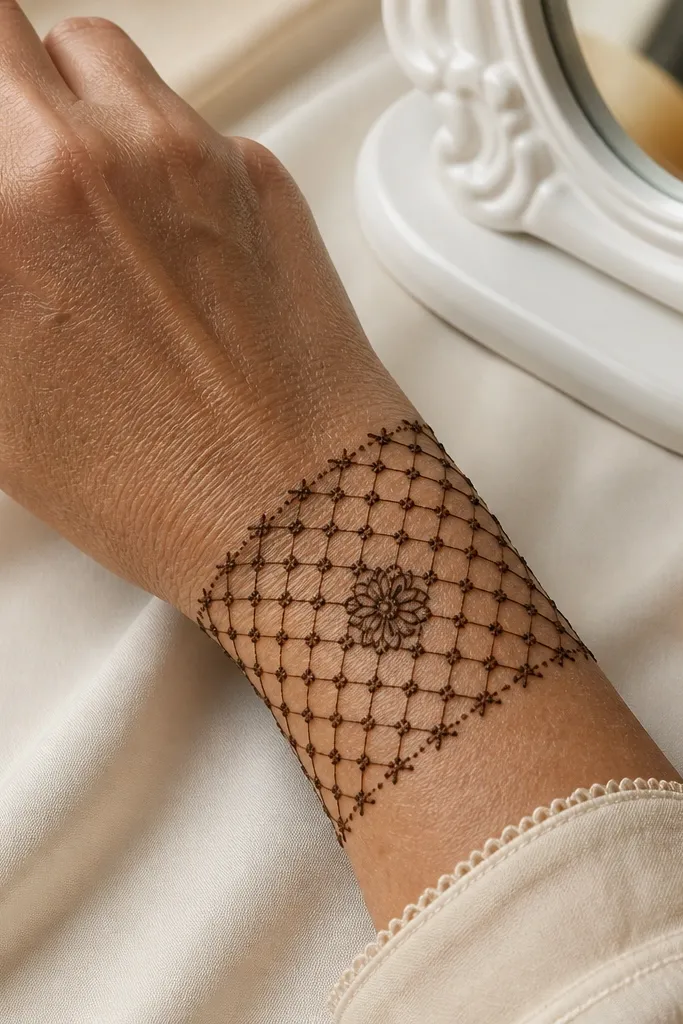
A net lattice looks delicate and high-end because it creates pattern texture without big fills. You’ll only need to cover the wrist area, so it’s easier to keep clean and even. Add one small flower center to stop the design from looking like a random grid. The combination of lattice + one focal flower keeps it balanced and photogenic. This works well for holiday dinners, festive brunches, and anyone who wants a classy wrist statement.
Draw a wrist band curve, then add vertical lines inside the band at 5-7 mm spacing. Cross those with horizontal lines to form a lattice, keeping intersections light. Leave one small open space in the center of the wrist band. In that open space, draw a 5-petal flower with a dot center, then add 2 tiny leaves on each side of the flower.
Pro tipMark your spacing with a dot guide first so the lattice stays even.
AvoidDon’t overfill the lattice intersections; heavy paste will blur into a dark patch.
5. Back-of-Hand Feathery Arches
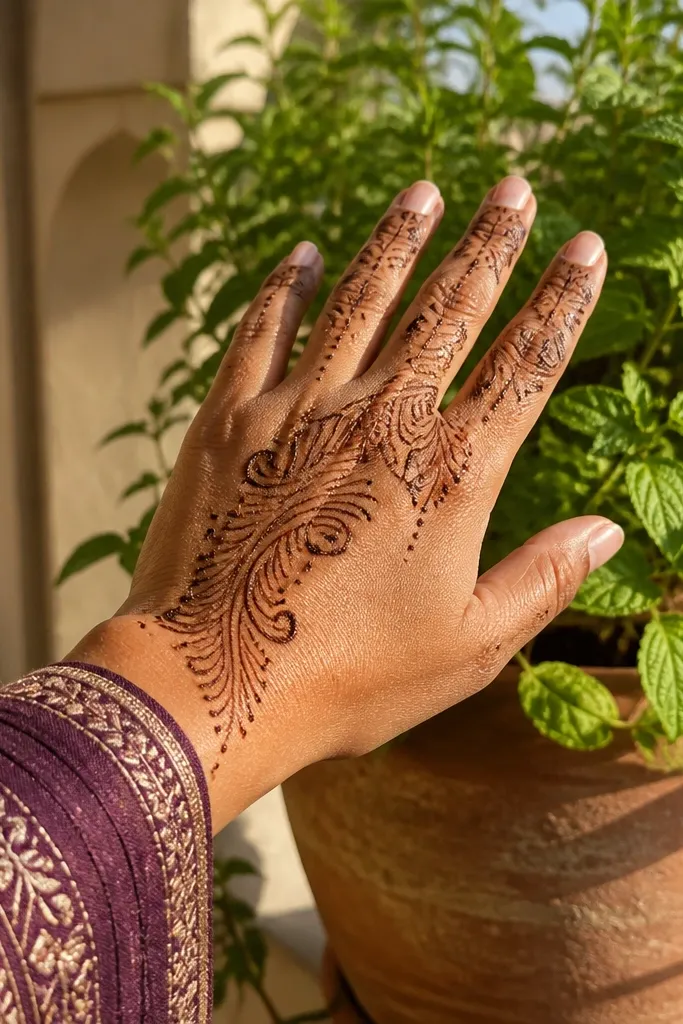
Feathery arches create movement and make the hand look longer. This is a linework design, so it stays light and doesn’t smear as easily as heavy filling. The arches also frame the natural shape of the back of the hand, which is why it photographs well. You add tiny dot highlights along the arches to mimic embroidery. Ideal for quick holiday looks and for people who get nervous about large floral fills.
Start with a thin long arch from near the wrist up toward the middle of the back of the hand, then draw two smaller arches parallel to it. Inside each arch, add short feather strokes that fan outward from the center line — 6-10 strokes per arch. Place a single dot at the base of each feather stroke group and another dot at the arch tip. Finish with a small curved line under the arches to connect to the wrist area.
Keep feather strokes 2-3 mm apart so they don’t merge into one dark line.
Skip thick outlines — thick lines make the arches look heavy instead of airy.
6. Three-Cluster Rosebuds on the Fingers
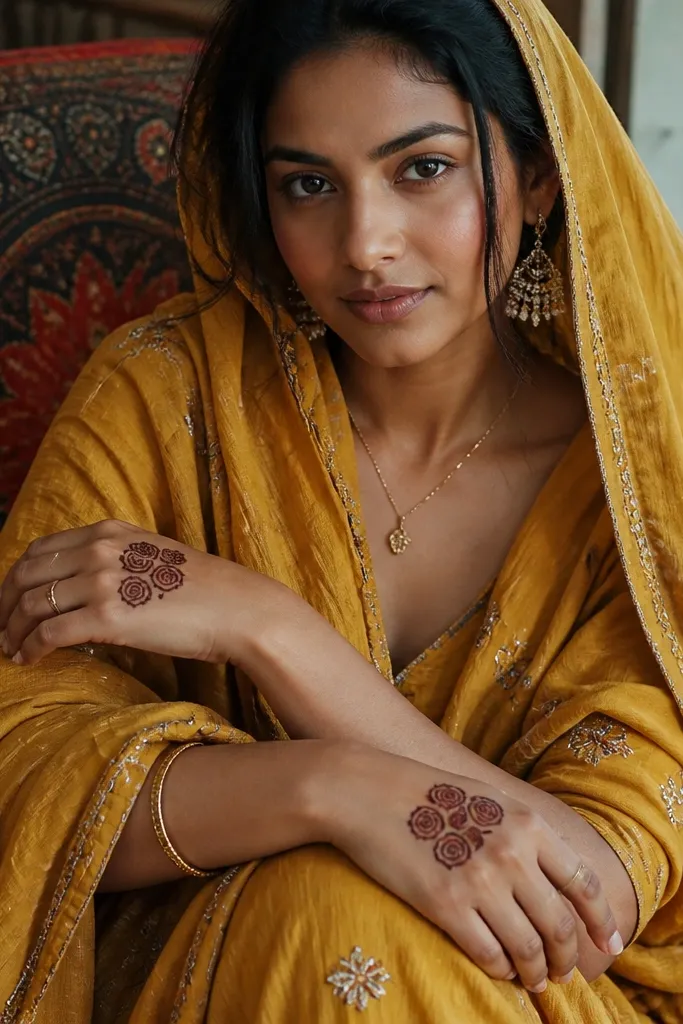
Rosebud clusters make simple mehndi look like you planned a bouquet. You only place motifs on the finger tops, so the hand stays breathable and neat. The clusters create depth through outline and tiny petal curls, not through heavy filling. It’s perfect for festive events where you want something pretty but not full coverage. This design also hides minor cone mistakes because the clusters look handcrafted.
Pick three fingers — usually index, middle, and ring — and place one rosebud cluster on each fingertip area. Outline a small teardrop bud, then add 4-6 tiny curved petals around it, keeping the center slightly open. Connect each cluster back toward the back of the hand with a thin line that stops before the knuckle. Add 2-3 micro dots around each bud for sparkle.
Use the same petal size across all three clusters so the look stays balanced.
Don’t fill the bud completely — keep the center open for a lighter, cleaner look.
7. Thumb Loop Band with Side Micro-Dots
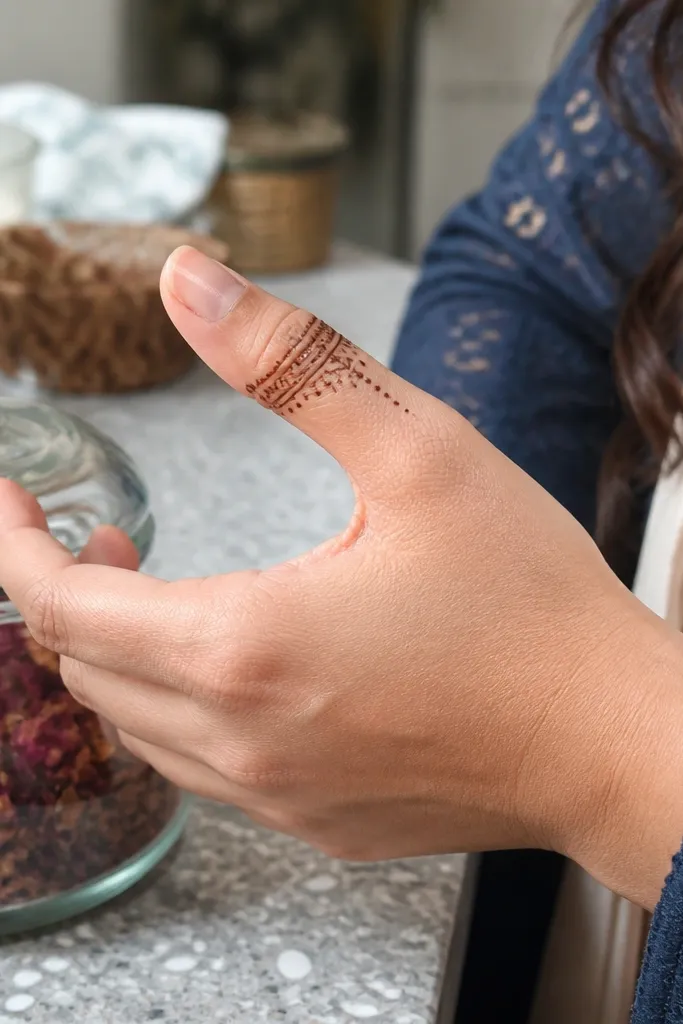
This one is small but very photogenic because it sits right where people notice hand gestures. The thumb loop band gives a neat “bracelet” effect, while micro-dots on the side add a subtle sparkle. It’s also forgiving for beginners because you’re working in a tight area. When you keep the rest of the hand blank, the thumb motif reads clean and intentional. Great for holiday selfies, party hosting, and quick applications.
Draw a thin loop band around the thumb base on the side closest to the palm, leaving space at the top of the loop. Add two short parallel lines inside the loop so it looks like a band. On the side edges, place three dot groups — each group has 3-4 dots — connected with a single curved line. Finish with one tiny leaf stroke pointing upward from the loop.
If your dots blob, squeeze less paste and use a lighter touch on dot placement.
Avoid placing the loop too close to the nail — it can smudge during wear.
8. Wrist Bracelet with Hanging Bead Drops
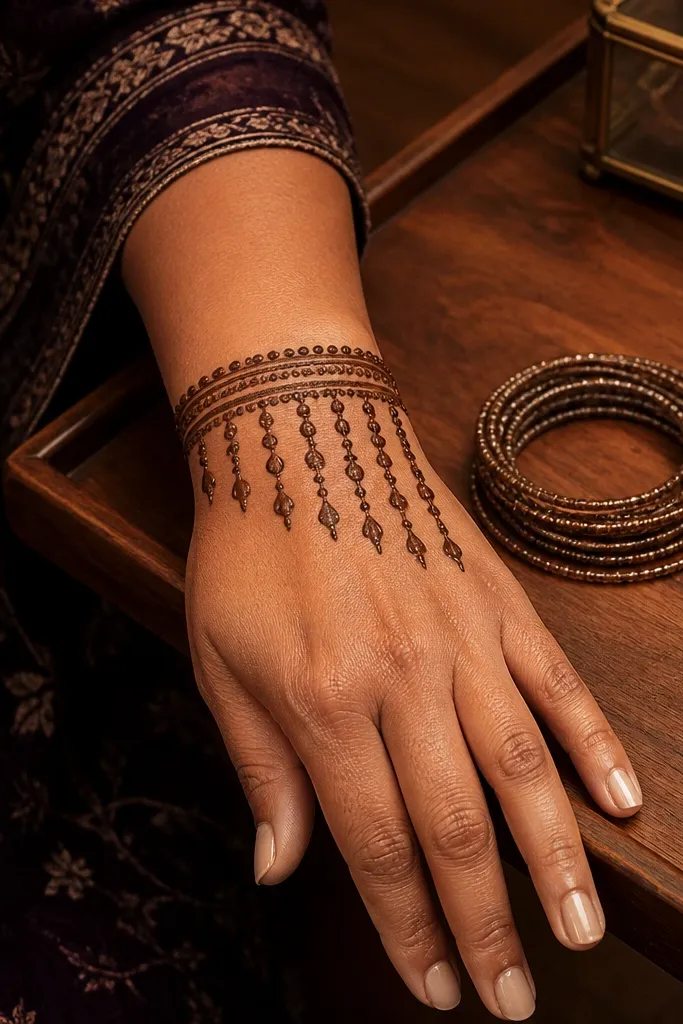
Bead drops make a simple wrist design feel like jewelry. You’ll get a strong vertical rhythm that looks good even when the paste isn’t super dark. The bracelet band gives structure, and the hanging drops add the holiday “sparkle” without needing big floral work. This is a smart option for people who want something pretty but don’t want to fill large areas. It works on both hands and looks great paired with bangles.
Start with a single bracelet band across the wrist, then add a second inner line to make it look like a double bracelet. From the bottom edge of the band, draw 6-9 hanging teardrop beads spaced evenly. Each bead should be outlined first, then lightly filled only in the teardrop center. Finish by adding a small dot between beads so the drops look separated and neat.
Pro tipSpace beads using the width of your cone tip as a quick measuring tool.
AvoidDon’t make beads too big — large drops turn into a muddy fringe.
9. Simple Leafy Vine Across the Back of the Hand
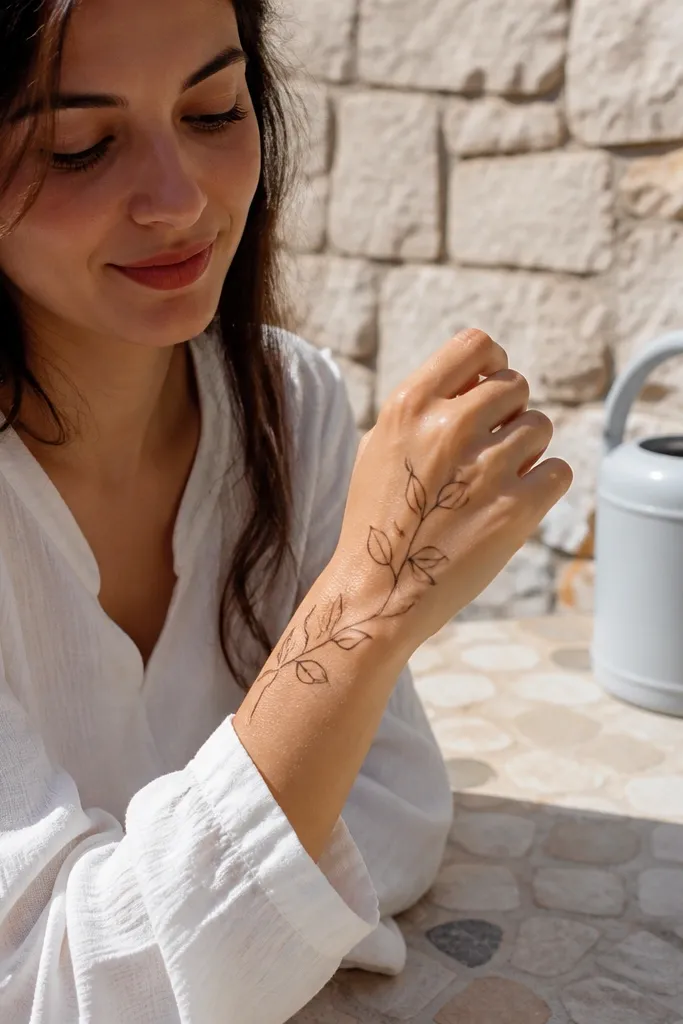
A single leafy vine is one of the cleanest ways to get an expensive look with minimal effort. The vine line gives you direction, and leaf pairs add texture without heavy filling. You can keep it light and still look styled because the negative space stays open. This design is also easy to scale — you can make it shorter for a smaller hand or longer for a full back-of-hand statement. It fits holiday wear when you want something refined rather than dramatic.
Draw a long diagonal vine line from near the wrist to the center of the back of the hand. Along both sides, add leaf pairs — each leaf is a teardrop with a center line. Place leaves alternately so they don’t collide, keeping 6-10 leaves total. Add 2-3 tiny dot clusters near the middle to break up the line and make it look decorative.
Pro tipKeep leaf tips pointing in the same direction for a consistent, polished look.
AvoidAvoid drawing the vine too thick — thick lines flatten the leaves.
10. Half-Moon Wrist Frame with Tiny Stars
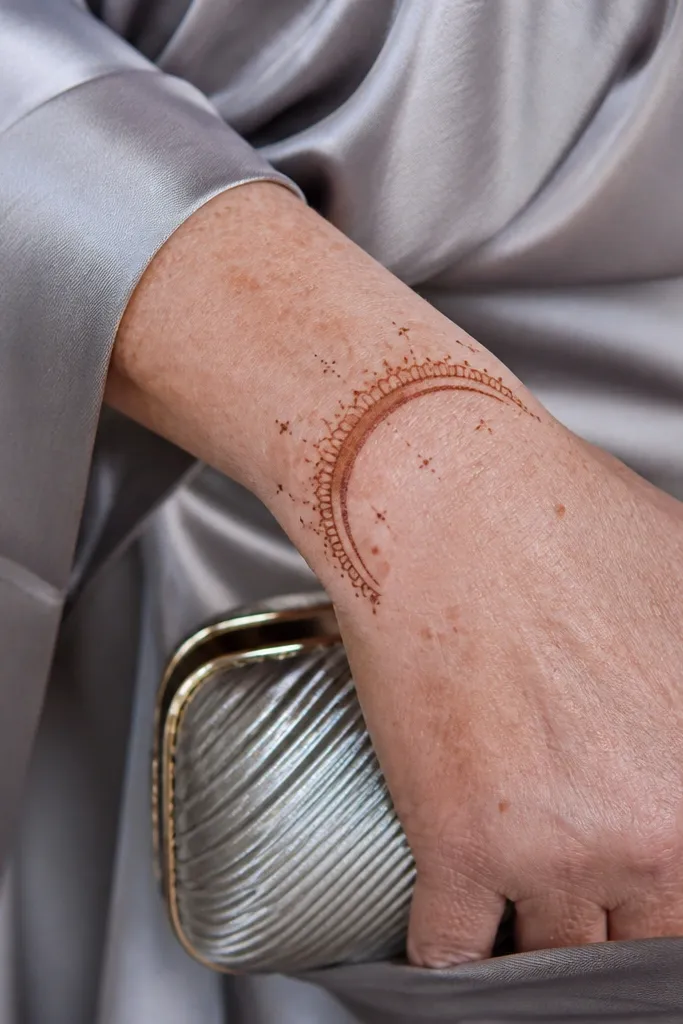
Half-moon frames look neat because they follow the wrist curve naturally. Add tiny star-like dots and you get a holiday vibe without filling the hand. This is a great design for beginners because the shape is simple and repeatable. It also photographs well because the frame creates a clear border. Perfect for festive dinners, small ceremonies, and quick mehndi before going out.
Outline a half-moon shape around the wrist — open side facing the back of the hand. Add a thin inner border inside the half-moon, leaving a small gap. Within the frame, place tiny star shapes made from 4 short lines and 1 dot center. Add 1-2 mini leaf strokes at the ends of the half-moon to complete the look.
Use a consistent dot size for stars so they look like part of one set, not random marks.
Don’t overcrowd the frame — leave space so the stars stand out.
11. Minimal Knuckle Dots with Center Dot Mandala
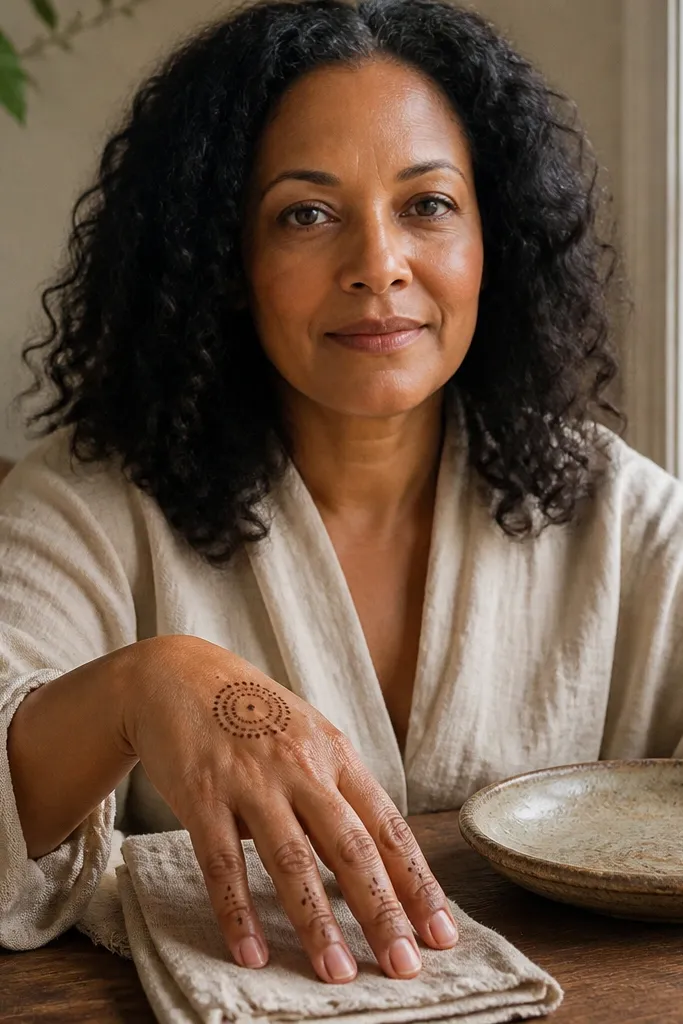
This design is for the “I want mehndi but I don’t want it everywhere” crowd. You place dot clusters near knuckles and a tiny mandala center on the back of the hand. That contrast — detailed center, open hand — is what makes it look expensive instead of sparse. It’s also a good solution if your paste application tends to get smudgy on finger sides. Works for holiday outings when you want neat, clean patterns that don’t overwhelm.
Draw a small circle mandala in the center of the back of the hand, about the size of a coin. Inside the circle, draw 5-6 petal outlines with dots at the petal tips. Then add dot clusters near the knuckles on two or three fingers — 6-8 dots per cluster. Connect the center mandala to one knuckle cluster with a thin curved line.
If your mandala petals blur, keep them as outlines only and rely on dots for definition.
Avoid adding long lines everywhere — keep connectors short so the pattern stays refined.
12. Palm-Friendly Triangle on the Back of the Hand

Triangles are underrated because they look architectural. This one is simple but looks high-end because the geometry stays clean and balanced. You outline a triangle on the back of the hand, then add micro-details at the corners. It’s a holiday-friendly design that looks great with rings and bangles. Beginners like it because it’s hard to mess up — you’re working with straight lines and controlled curves. It also dries neatly since it’s mostly linework.
Outline a triangle on the back of the hand with the point facing down toward the wrist. Keep the triangle lines thin and even. At each corner, add a small dot cluster of 3-5 dots. Inside the triangle, draw one curved line from the top side to the bottom point, then add 6-8 short tick marks along that curve. Finish by adding a tiny circle at the bottom point.
If your triangle lines wobble, draw the triangle lightly first, then go over with steady pressure.
Avoid thickening the triangle outline — it makes the geometry look heavy.
13. Finger Side V Lines with One Wrist Dot Band
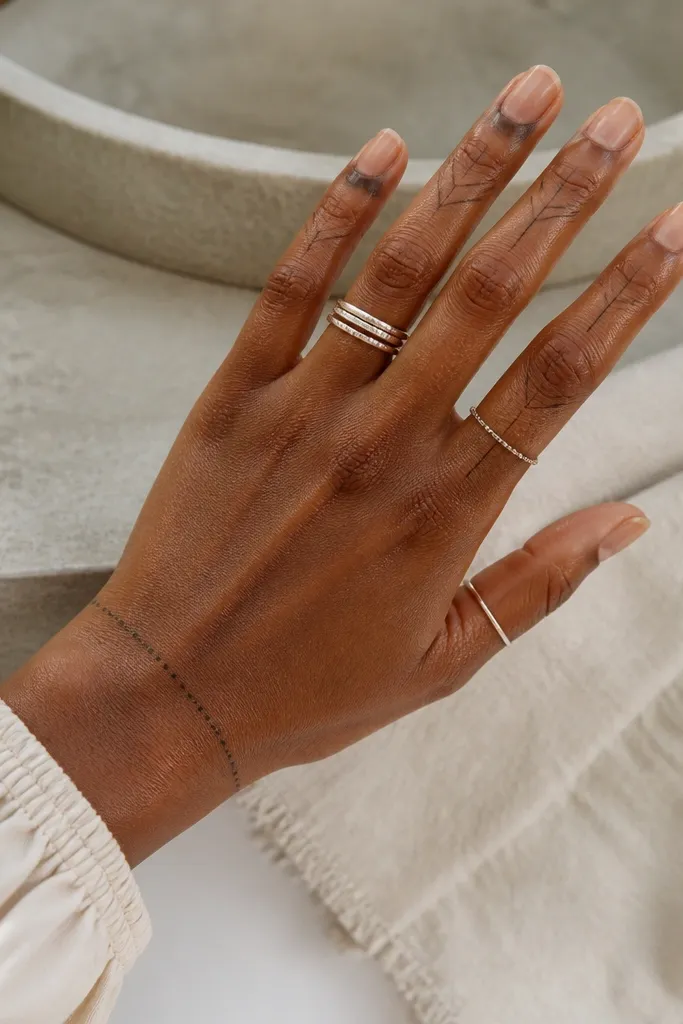
V lines make fingers look longer and slimmer, which is exactly why this design photographs so well. You keep the pattern on the finger sides, so the back of the hand stays mostly clean. A dotted wrist band ties everything together and gives a festive sparkle. This is a smart match for holiday styles where you want mehndi to complement a dress, not compete with it. It’s quick and repeatable, and it looks intentional even with minimal filling.
Start with a dotted band around the wrist using small dots spaced 3-4 mm apart. On the finger sides, draw V shapes starting near the knuckle and pointing toward the fingertip, 2-3 V shapes per finger. Outline each V, then add a dot at the V tip. Keep the back of the hand mostly empty except for one small connector line from the wrist band to the middle finger area.
Use consistent V length across fingers so the pattern looks like one set, not separate doodles.
Don’t draw V lines on all fingers — pick 3-4 fingers for a cleaner look.
14. Small Flower Sprigs on the Outer Hand Edge
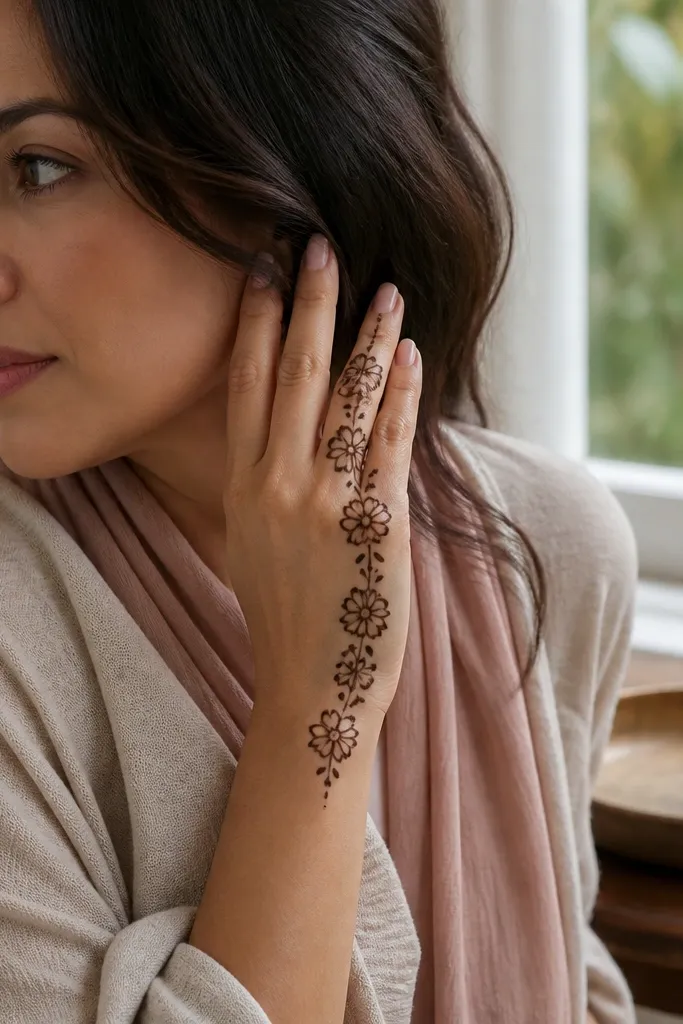
Placing flowers along the outer edge gives you an elegant “edge embroidery” look. You don’t cover the center, so your mehndi stays light and doesn’t blur. Each flower sprig has a clear structure — petals, a center dot, and tiny leaves — which keeps it photogenic. This design works especially well for people who want a minimal but pretty holiday look that still feels festive. It also hides uneven paste drying because the flowers create focal points.
Draw a thin curved guide line along the outer edge of the back of the hand, from wrist to near the pinky knuckle. Place three small flowers along that curve, spacing them evenly. For each flower, draw 5 petals around a center dot, then add two tiny leaf strokes beside it. Connect flowers with short curved lines so the sprigs look like they belong to one vine.
Keep petal outlines slightly taller than they are wide for a clean flower shape.
Avoid heavy filling in flower centers — outlines and dots look sharper.
15. Open Center Lotus with Side Petal Lines

A lotus motif looks expensive because it has symmetry, but you don’t need to fill it. This design keeps the lotus center open and uses side petal outlines to create structure. The open center is the key — it prevents the design from going dark and muddy. You still get that floral holiday vibe without spending hours. It’s a good choice for medium-time applications when you want something that looks ceremonial but still simple.
Outline a lotus in the center of the back of the hand with 6-8 outer petals drawn as teardrops. Keep the center open as a small circle. Add side petal lines by drawing 2-3 elongated teardrop strokes on each side of the lotus, pointing outward. Finish with a ring of tiny dots around the lotus base near the wrist.
Pro tipDraw the outer petals first, then add side strokes — it keeps symmetry cleaner.
AvoidDon’t add too many extra petals — more lines can make the lotus look crowded.
16. Wrist-to-Middle Hand Mini Chain Links

Chain links look like jewelry and they’re surprisingly easy to repeat. You’re drawing small loop shapes that connect in a line, so it’s simple but still looks “designed.” Keep it to a single diagonal chain so the hand doesn’t look cluttered. This is perfect for holiday season when you want something neat that pairs well with bracelets. The negative space around the chain is what makes it look polished.
Draw a diagonal guide line from the wrist toward the middle of the back of the hand. On the guide, draw small oval loops, each loop touching the next at one point. Outline each loop and add a tiny dot at the connection point for definition. Stop the chain at the mid-hand area and finish with a small leaf or dot cluster at the end.
Make each loop the same height by using the cone tip width as a consistent scale reference.
Avoid making loops too close — they merge into a dark blob when paste dries.
17. Two-Sided Finger Lace with One Central Bow
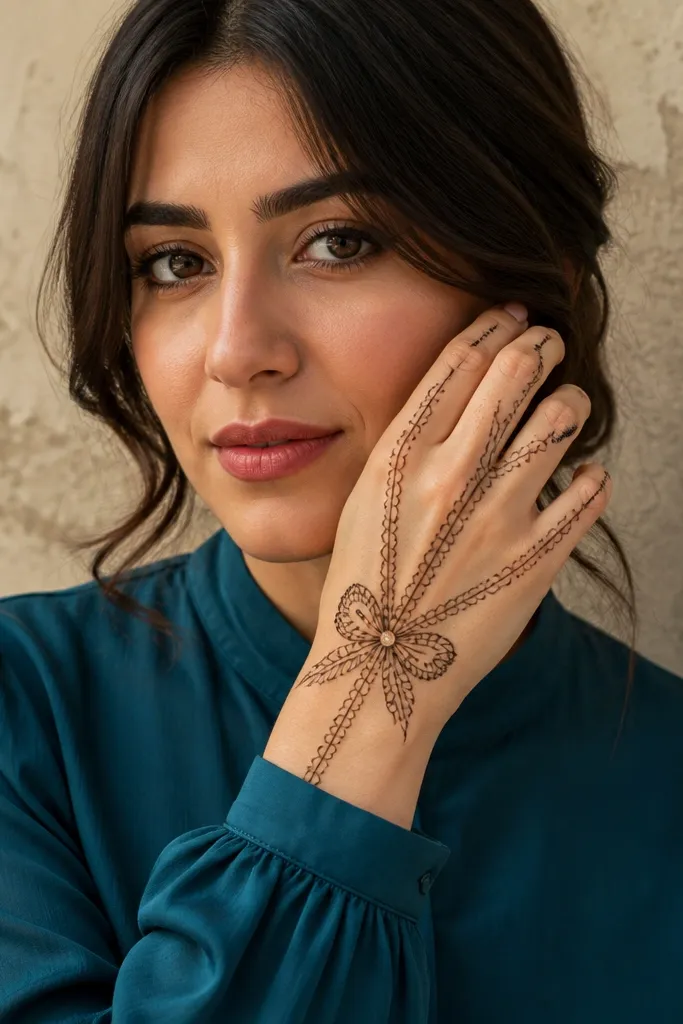
Lace-like finger sides look delicate and expensive because they mimic fabric texture. You keep it simple by using repeated side lines and a single central bow motif to anchor the design. The bow makes the pattern feel festive without needing a full floral fill. This is a great option for holiday parties when you want your hands to look styled for photos but you don’t want heavy coverage. It also looks balanced on both hands.
Draw thin vertical lines on the sides of 3 fingers, then connect them with short diagonal strokes so it forms a light lace rhythm. Keep spacing between strokes about 2-3 mm. In the center of the back of the hand, draw a small bow: two loops with a tiny knot in the middle. Add 4-6 tiny dots around the bow corners and one short curved line from bow to the closest lace finger edge.
Practice one finger lace section on paper first; the spacing is the whole trick.
Don’t fill the lace with extra lines — the emptier it stays, the cleaner it looks.
18. Back-Hand Oval Frame with Corner Scallops
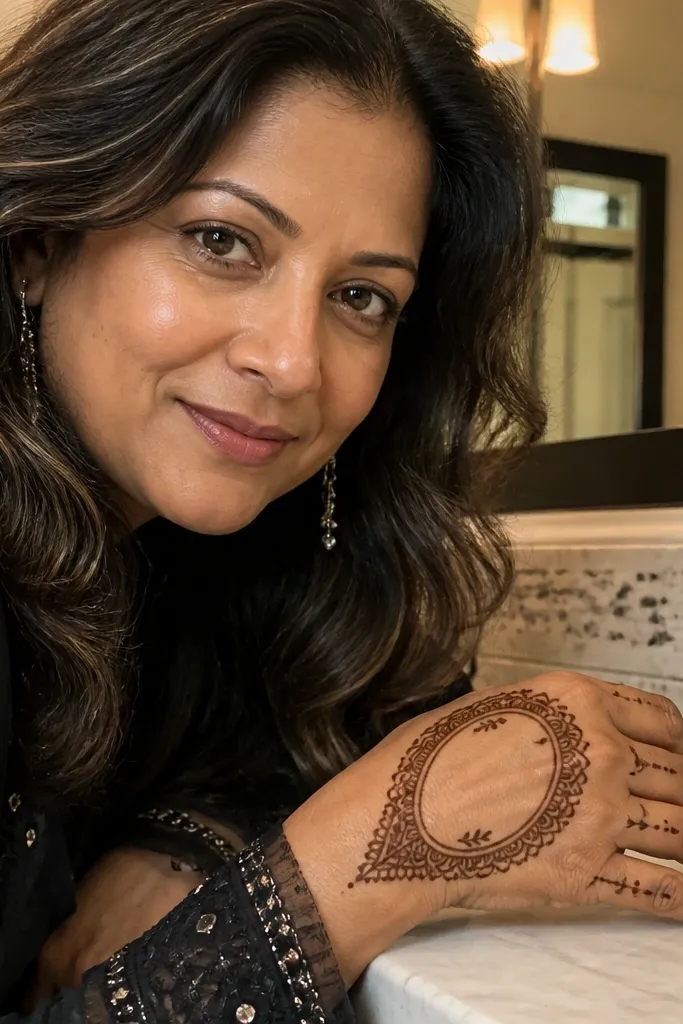
This design looks “expensive” because it’s structured like a frame. An oval frame with corner scallops gives you a polished border effect, and the inside stays mostly open. You add a few tiny dots and one small leaf so it doesn’t look empty. It’s also a good holiday design because the frame reads elegant under warm lighting. Beginners can pull it off since it’s mainly outlines and predictable shapes.
Outline an oval frame on the back of the hand with a gap inside, like a picture border. Leave a larger opening toward the center so it stays breathable. At the top-left and bottom-right corners, add scallops made from 4-6 repeated curves. Place a small dot cluster in the center gap and add one tiny leaf stroke under it. Finish by lightly outlining the oval edges again for a crisp border.
Keep the oval frame tilted slightly — flat ovals can look stiff in photos.
Avoid thick double lines everywhere; only thicken the outer frame for a neat look.
19. Minimal Mandala Quarter on the Wrist
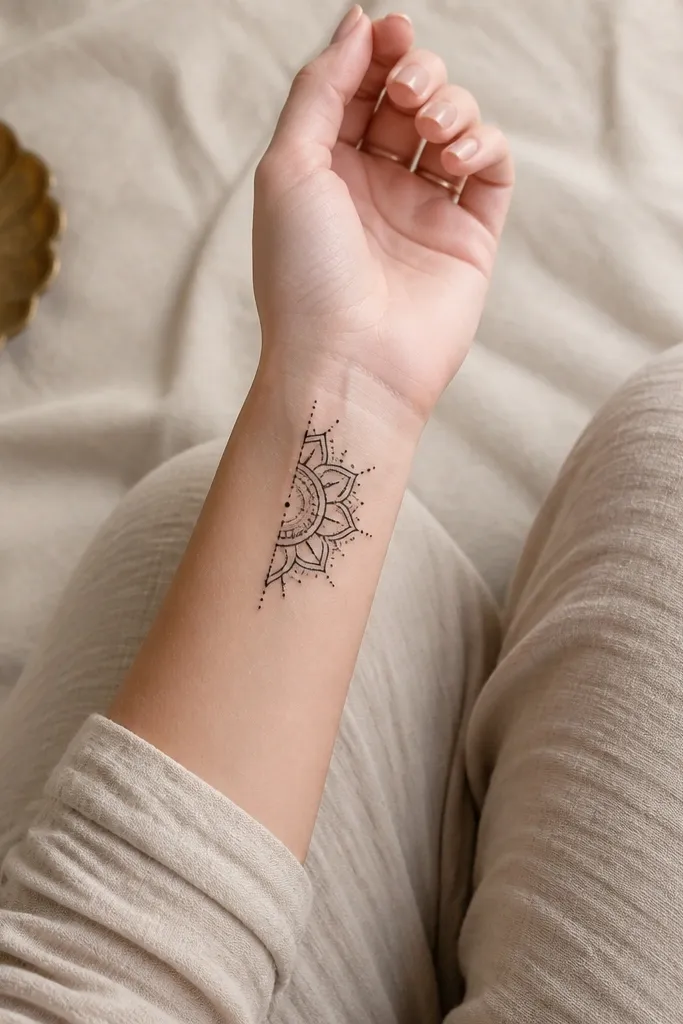
Quarter mandalas look special because they feel like you placed a decorative medallion in just the right spot. This one stays simple by using only one section of a circle on the wrist and leaving the rest blank. Dotted spokes add that holiday texture without heavy filling. It’s a clean, aesthetic choice for people who want mehndi that doesn’t cover the whole hand. The wrist placement also makes it easy to keep lines neat and symmetrical.
Draw a half band on the wrist, then add a quarter circle motif starting from the band’s center and extending upward. Inside the quarter, draw 6-8 dotted spokes radiating from a small circle center. Outline one small petal ring around the spokes using teardrop shapes. Add one corner leaf at the end of the quarter circle to finish the edge.
Pro tipUse dot spokes instead of line spokes when you want a lighter, more delicate look.
AvoidDon’t press hard on dotted spokes — thick dots turn into blobs.
20. Diagonal Starburst on the Back of the Hand
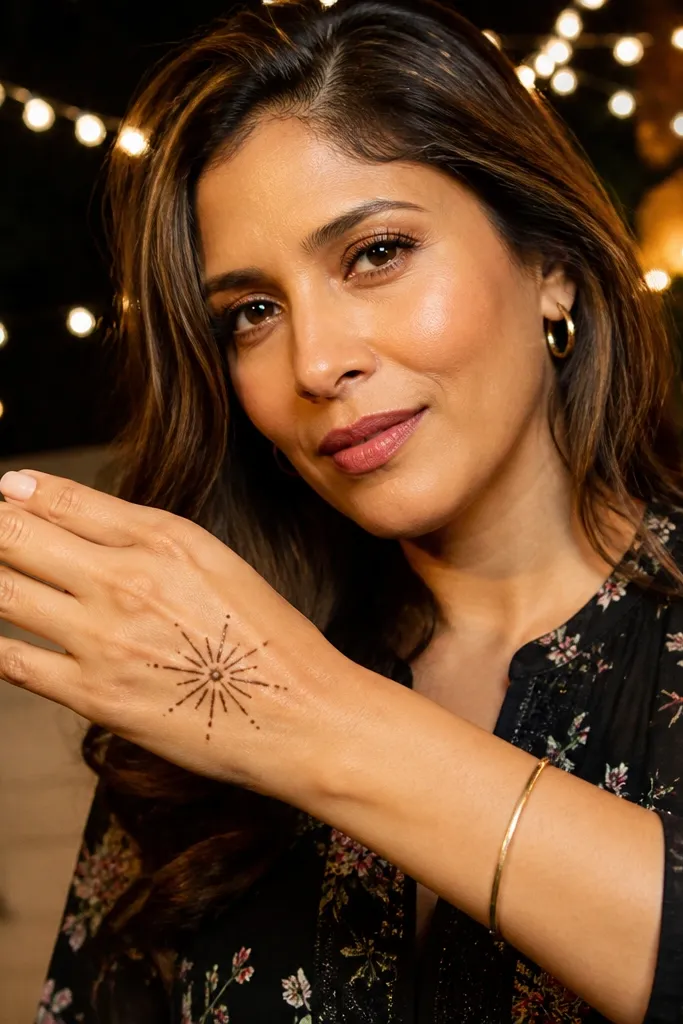
Starbursts feel festive without going overboard. This design puts a starburst diagonally so the hand looks dynamic, and it stays simple because you’re drawing short rays around a center. The dots between rays add sparkle and help the lines look intentional. It’s a great option when you want holiday mehndi that still feels clean and modern. Works well with short nails and bangles because the design sits in the visible back-hand zone.
Draw a small center circle on the back of the hand, about 1.5-2 cm wide. From the circle, draw 10-12 short diagonal rays outward, keeping them evenly spaced. Between rays, place tiny dot pairs to create a light “spark” effect. Add a thin curved connector line from the starburst toward the wrist and finish with two small leaf strokes near the connector end.
Pro tipKeep rays short and consistent; long rays make the starburst look messy fast.
AvoidAvoid filling the starburst center — an open center keeps it crisp.
21. Single Rose in a Side Frame on the Hand
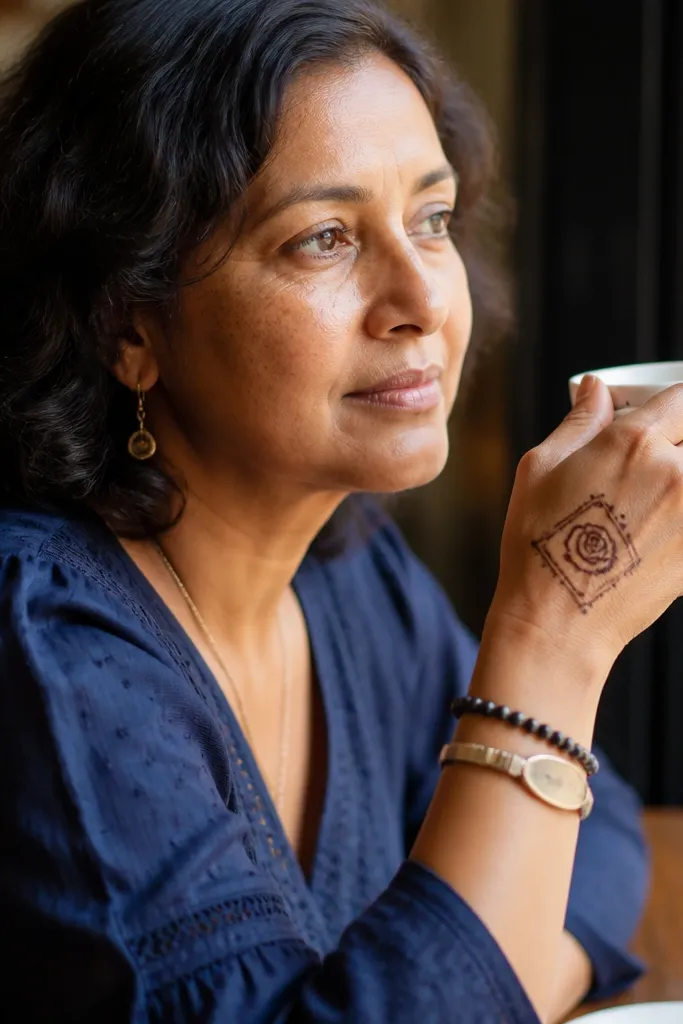
A single rose in a side frame looks high-end because it’s like a stamp on the hand. You only build one flower, then contain it with a simple border so it reads clean. This is a great “simple but expensive” plan for holiday season because roses photograph beautifully. The frame keeps the rose from floating, and the rest of the hand stays mostly blank. It’s a good pick for beginners who can handle outlining petals and adding a few dots.
Pick a side placement on the back of the hand (near the ring finger side works well). Draw a small vertical rectangle frame with rounded corners. Inside the frame, outline a rose using 8-10 petal teardrops around a center dot, keeping the center slightly open. Add two small leaves at the bottom corners of the frame. Finally, outline the frame border once more lightly to sharpen it.
Keep rose petals the same size and only vary the curve, not the thickness.
Don’t add extra flowers around it — one rose looks intentional, multiple roses look crowded.
22. Wrist Triangle Garland with Dot Spacing
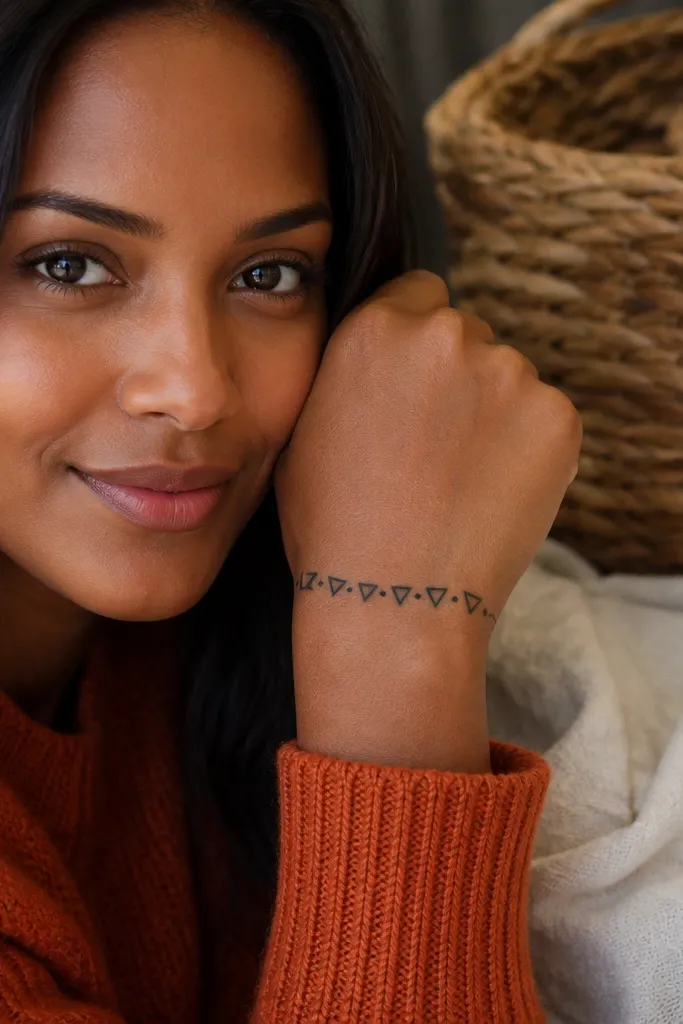
Triangle garlands look festive because they mimic holiday decor, but this version stays clean and simple. You draw a row of small triangles along the wrist curve, then add dots between them for definition. The result is a neat border that looks like jewelry and stays light on the skin. This design is perfect for quick applications because it’s repetitive and you can stop once the wrist row looks even. It also works for both hands in matching style.
Outline a curved wrist band lightly. Along the band, draw small triangles pointing up, each triangle touching the next at its base. Keep triangle height around 6-8 mm so they don’t overpower the wrist. Add a dot in the gap between each triangle, then finish both ends with a tiny leaf or single dot cluster. Let the band be linework — don’t fill every triangle completely.
If your triangles wobble, draw the first 3 triangles carefully, then repeat the same spacing.
Avoid filling every triangle — heavy fill makes the garland look like a dark strip.
23. Open Circle Halo with Micro Leaf Tips

An open circle halo looks elegant because it creates a soft boundary without covering the whole hand. You keep the middle space airy, then add micro leaf tips around the edge for detail. This gives you an “expensive” feel because the design looks like a deliberate motif placement, not random doodles. It’s also a great holiday choice since it reads decorative and modern. Works best on the back of the hand where the halo is visible when you wave.
Draw a large open circle on the back of the hand, leaving a small gap at the top. The circle should be about the size of a large coin. Outline 10-12 micro leaf tips along the circle edge, placing them at equal spacing. Add a single dot at the base of every other leaf to create rhythm. Finish by drawing two short curved lines connecting the circle gap to the wrist area.
Keep the halo gap consistent — it should look like the same break point every time you redraw.
Avoid making the circle too small; small halos get lost and look like a random ring.
24. Mini Geometric Grid on Fingers with One Dot Crown
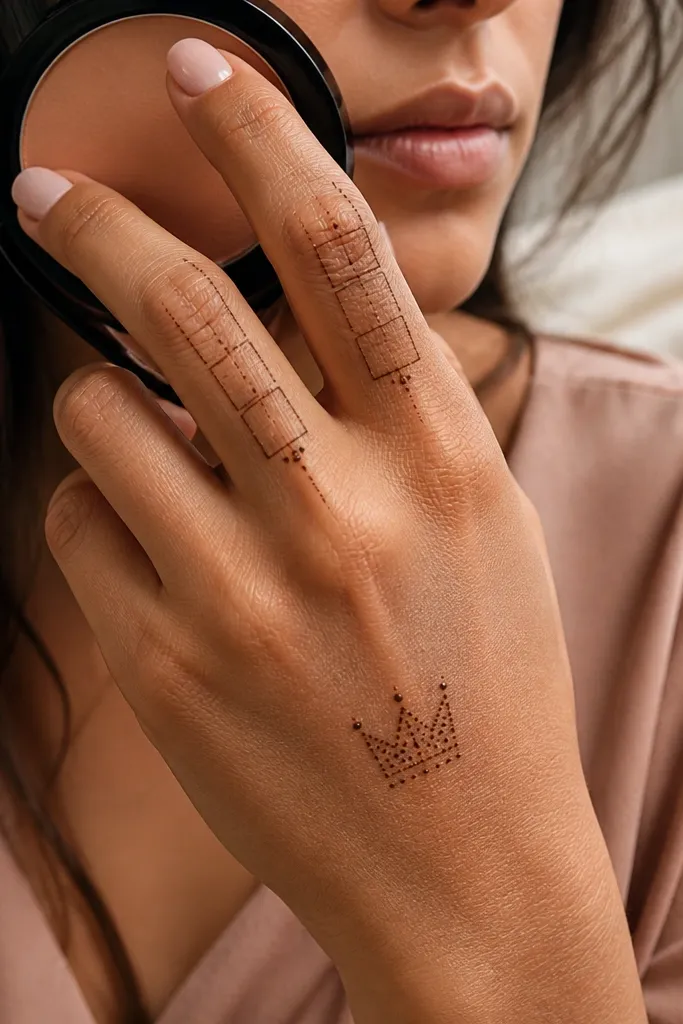
Geometric grids look expensive because they’re clean and structured. This design uses tiny grid sections on a couple fingers and then adds one dot crown on the back of the hand for a festive finish. You get a modern holiday look without heavy florals. It’s also a reliable choice when you want something photo-friendly but don’t want to commit to a full floral panel. Beginners can do it by repeating simple squares and lines.
Pick two fingers and draw a small grid panel on each finger side — 4-6 small squares per panel. Outline each square with thin lines and leave the inside open. On the back of the hand near the knuckles, draw a mini dot crown using 5-7 dots forming a curved crown shape. Connect the crown base to one grid panel with a short curved line. Finish by adding one tiny leaf near the crown left and right edges.
Keep grid squares uniform by counting your strokes — if you lose count, start the panel again.
Avoid covering the entire finger — grids look best as small panels.
25. Corner Flower Burst with Wrist Micro-Rings

This design is all about placement. A flower burst sits at one corner of the wrist area, and micro-rings around the wrist make the whole thing look like coordinated jewelry. It’s simple because the main work is one flower, then repeating tiny ring marks. The micro-rings also help your mehndi look complete even when you stop early. Great for holiday parties and for people who want a neat pattern that doesn’t spread over the whole hand.
Start by drawing 6-10 micro rings around the wrist, spaced 6-8 mm apart. Each ring is a simple oval outline, not filled. Then place one flower burst near the wrist corner closest to your thumb side. Outline 6 petals around a center dot, add two tiny leaves, and connect the flower to the nearest micro ring with one thin line. Add 2-3 dots around the flower to sharpen the burst effect.
Pro tipMake micro rings slightly thicker on the outer side so they read clearly on skin.
AvoidAvoid spacing rings unevenly — irregular spacing makes the design look accidental.



