
1. Three-Bangle Leaf Band with Tiny Dots
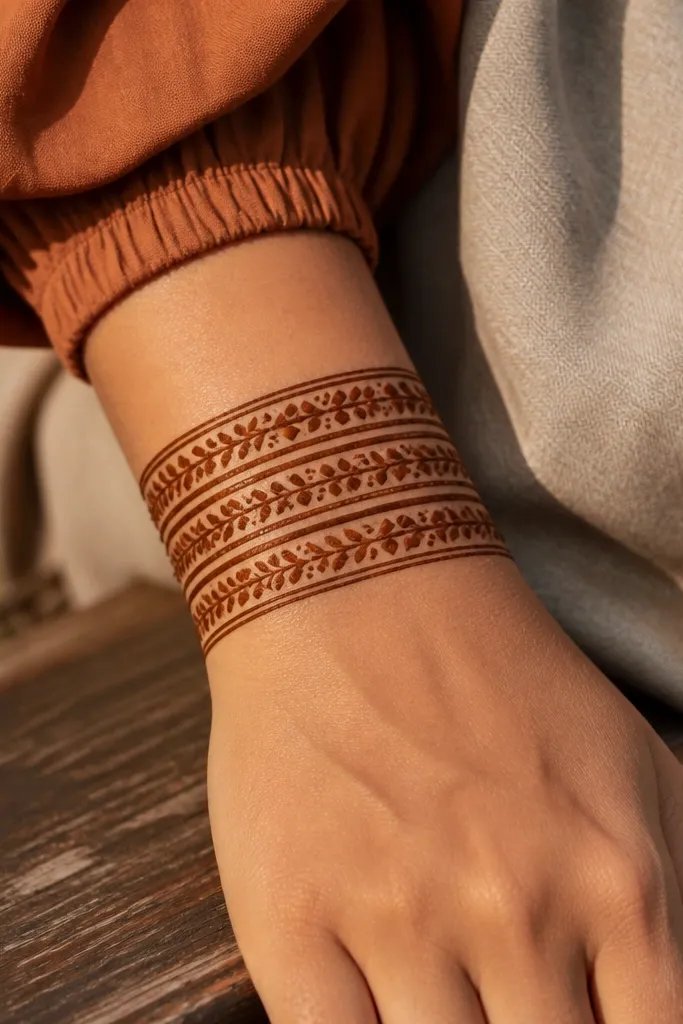
This design looks “done” because it builds a strong wrist frame using three bangle bands. Each band has a leaf rhythm, and the tiny dot clusters act like filler without turning messy. It’s budget-friendly because you’re not doing heavy palm filling — you’re repeating one simple motif and keeping spacing consistent. The leaf shapes also hold up well in photos since the outlines stay visible even if the stain is lighter. It suits holiday parties, especially when you want something neat with rings.
Pro tipIf your cone lines are shaky, practice one leaf outline on paper first and keep the leaf size consistent.
Step 1: Draw a curved bangle band at the wrist, then repeat a second and third band above it, leaving a small gap between each. Step 2: For each band, add leaf outlines pointing upward, then place 2-3 dots near the leaf tips. Step 3: On the finger tops, place one dot cluster at the base of each finger and connect it to the nearest band with a single thin line.
AvoidDon’t overfill the leaves — thick paste inside the leaf outline smears while drying.
2. Center Star Line with Side Vines
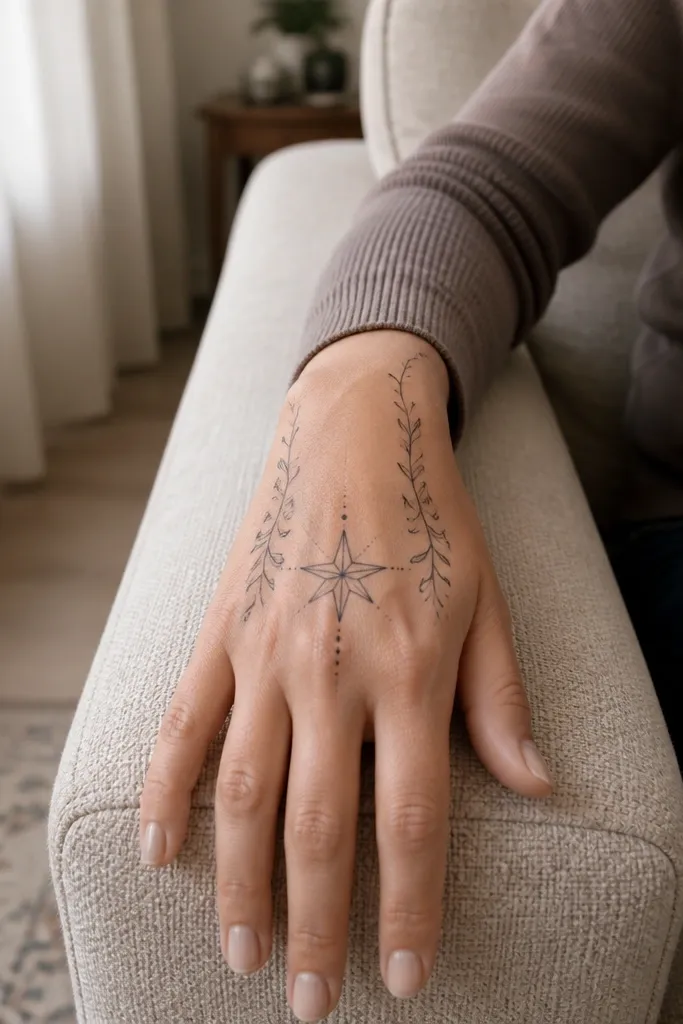
This is a clean, aesthetic design for people who hate crowded palms. The center star gives you a focal point, and the side vines create movement without requiring full coverage. It’s photogenic because the star reads clearly even with minimal filling, and the vines frame the hand instead of covering it. You’ll get a balanced look on both hand and wrist, which matters for holiday dinners where you’ll be holding plates and cups. It also works well if your cone is slightly dry — the linework stays the star.
Step 1: Draw a thin vertical center line from the wrist up to the middle finger area. Step 2: Add a small star at the center — five points with equal-length strokes — then mirror simple vine curves on both sides. Step 3: Finish by adding tiny cross dots along the vine turns and a short bangle band line at the wrist.
Keep the star smaller than you think; a small star makes the rest of the vines look intentional.
Skip thick outlines around the star — it makes the star look like a blob after it stains.
3. Peacock Feather Arc on Back of Hand
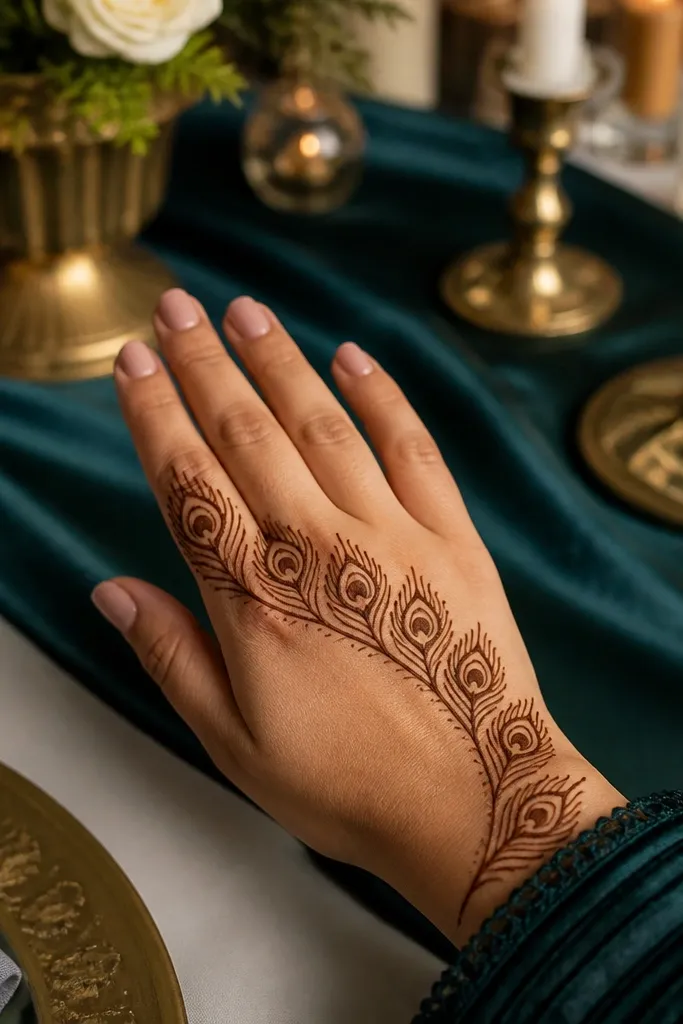
A peacock-feather arc is one of those patterns that looks fancy without being heavy. You’re essentially drawing a controlled fan of leaf shapes, and the arc naturally guides the eye. The feather outline is strong in photos because each leaf has a clear tip and you can keep the filling minimal. It’s great for festive events because it reads ceremonial and elegant even when you only do a portion of the hand. If you want a statement look but still budget-simple, this is the one.
Pro tipUse consistent leaf spacing: equal gaps make it look like a feather fan instead of random leaves.
Step 1: Start at the wrist and draw a smooth arc line toward the index and middle finger area. Step 2: Along that arc, add feather leaf shapes pointing outward, each with a small dot at the center. Step 3: Add a thin connecting line between leaves so the fan looks continuous, then finish with a tiny bangle line at the wrist base.
AvoidDon’t add too many leaves — if the fan is too dense, it turns into a dark smear.
4. Floating Triangle Border on Fingers
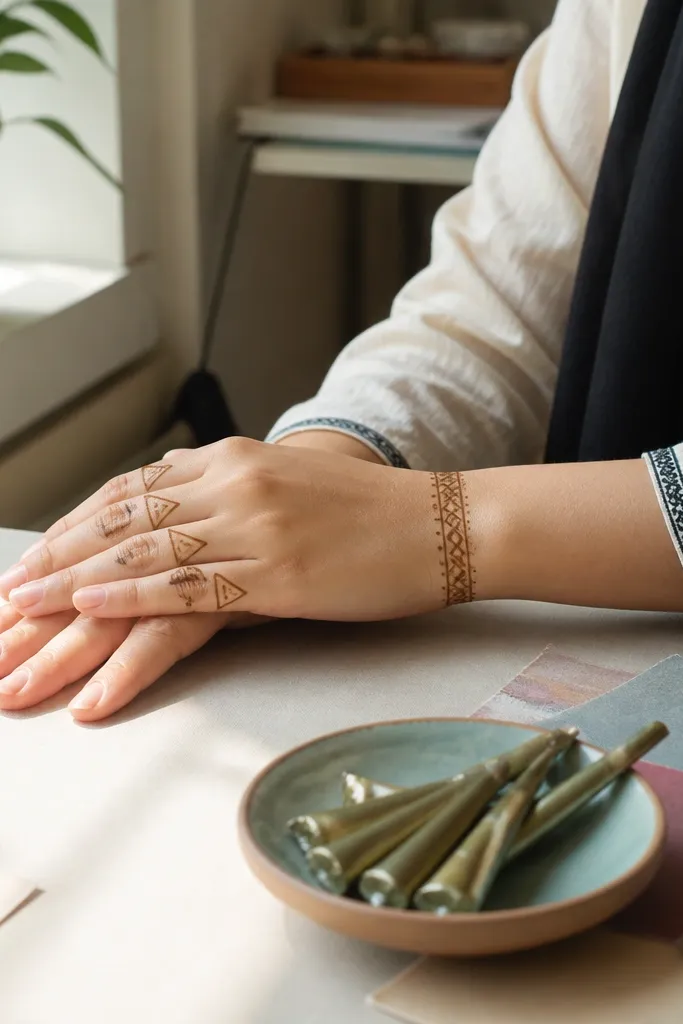
This design looks modern and tidy because it uses repeating triangle outlines instead of filling the whole hand. Triangles create sharp shapes that show up well even if the stain is lighter, which is common with budget mehndi. The wrist border keeps it framed, so it doesn’t look like disconnected doodles. It’s a smart choice when you want something subtle for daytime festival events, but still pretty for close-up shots. The finger triangles also look great with nail polish and rings.
Pro tipMake triangles all the same height. If one finger has taller triangles, the whole look shifts.
Step 1: Draw a thin border line around the wrist, then extend two short lines upward along the finger sides. Step 2: Add small triangle outlines on one side of each finger, keeping the triangle base near the wrist. Step 3: Connect the triangles with a single dotted line so the pattern feels continuous.
AvoidDon’t make triangles too big — large triangles need more paste and will blur during drying.
5. Simple Circular Mandala Half-Palm
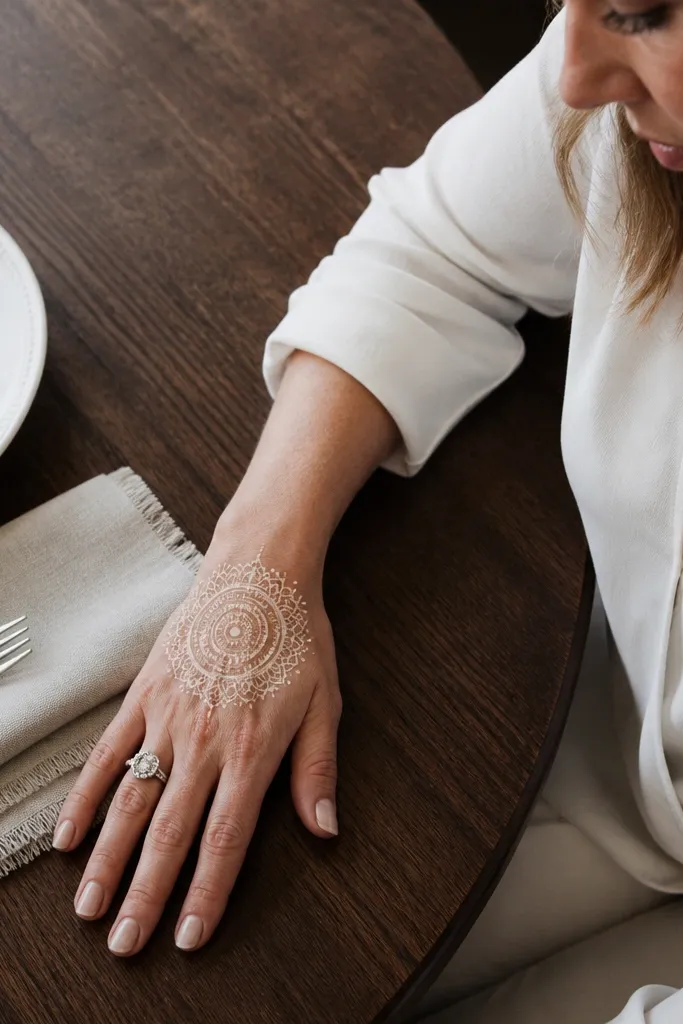
A half-palm circular mandala gives you that “mehndi wow” look without doing full palm coverage. The outer ring frames your design, and the inner circles add depth through spacing, not heavy shading. This is ideal for holiday parties because it pairs well with bangles and looks balanced from the camera angle. It’s also forgiving: if your lines aren’t perfectly identical, the circle structure still holds. Budget-wise, you’re repeating circles and dots, not filling large areas.
Pro tipUse dot spacing like a rhythm: consistent dot clusters make the mandala look intentional.
Step 1: Draw a large circle on the upper palm near the center, then add a second circle inside it. Step 2: Add tiny dot clusters between the rings at equal intervals. Step 3: Finish with a thin arc band at the wrist and two short curved lines toward the ring and middle finger.
AvoidDon’t rush the circle. Wobbly circles make the whole mandala look messy.
6. Lace-Style Wrist Cuff with Micro Bars

This one is all about a crisp cuff. A lace-style wrist design makes your whole hand look dressed up while keeping the work concentrated in one area. Micro bars between loops give it a delicate look, and the dots keep it from looking empty. It’s a good option when you’re short on time because you can finish a clean cuff in 25-35 minutes. The cuff also makes your rings look better since it frames the wrist. It’s holiday-friendly for Eid, Diwali, and winter gatherings.
Pro tipKeep your loop arcs the same width. That’s what makes lace look lace, not random loops.
Step 1: Draw a curved cuff outline around the wrist, like a bracelet shape. Step 2: Inside the outline, alternate loop arcs and short horizontal micro bars, then add dots at the loop ends. Step 3: Connect the cuff to the finger base with two thin lines, one on each side.
AvoidDon’t thicken every bar. A few thicker bars ruin the delicate pattern.
7. Minimal Palm Vine with Three Leaf Tips
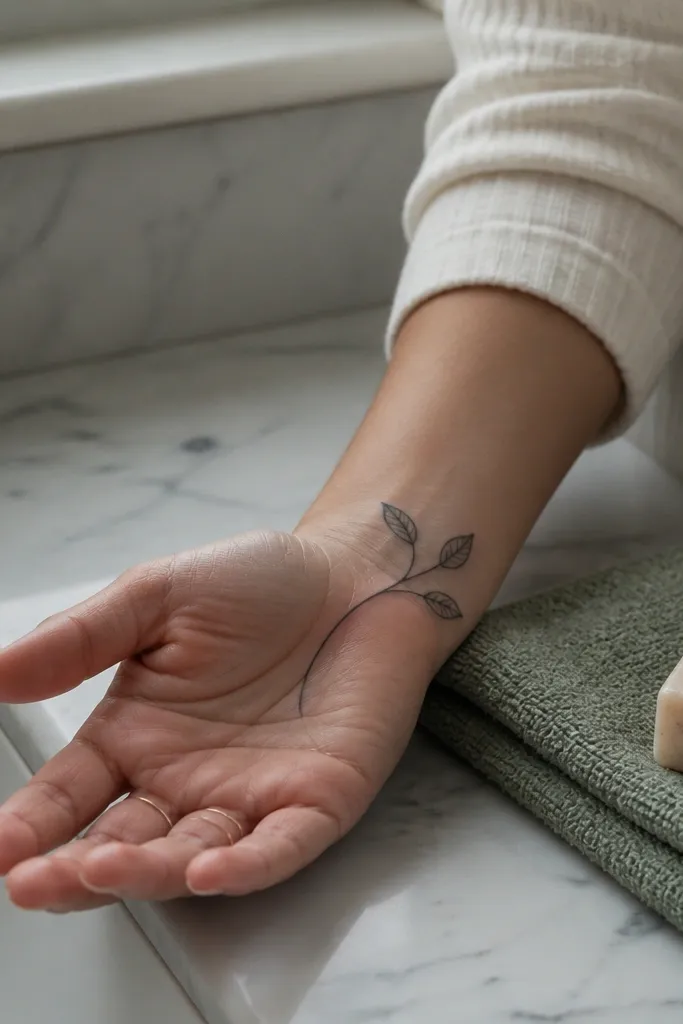
If you want simple but still aesthetic, this minimal vine design is a strong pick. It uses one sweeping vine across the palm and ends with three leaf tips, so your eye has a clear path. Minimal palm designs are great when you don’t want mehndi to feel heavy on your hand, and they dry faster too. The leaf tips are where you put your best linework, since they’re the focal detail. This works well for casual holiday dinners and also for people who want something lighter than full coverage.
Pro tipKeep the vine line smooth. If your vine jerks, the whole design looks rushed.
Step 1: Draw a gentle vine curve from the wrist into the center of the palm. Step 2: At the end, add three leaf outlines fanning slightly apart, each with a small dot near the base. Step 3: Add two tiny branch off-shoots along the vine and connect them back with dots.
AvoidAvoid adding extra filler dots everywhere. Stick to the vine path.
8. Diagonal Ribbon Lines with Hollow Squares
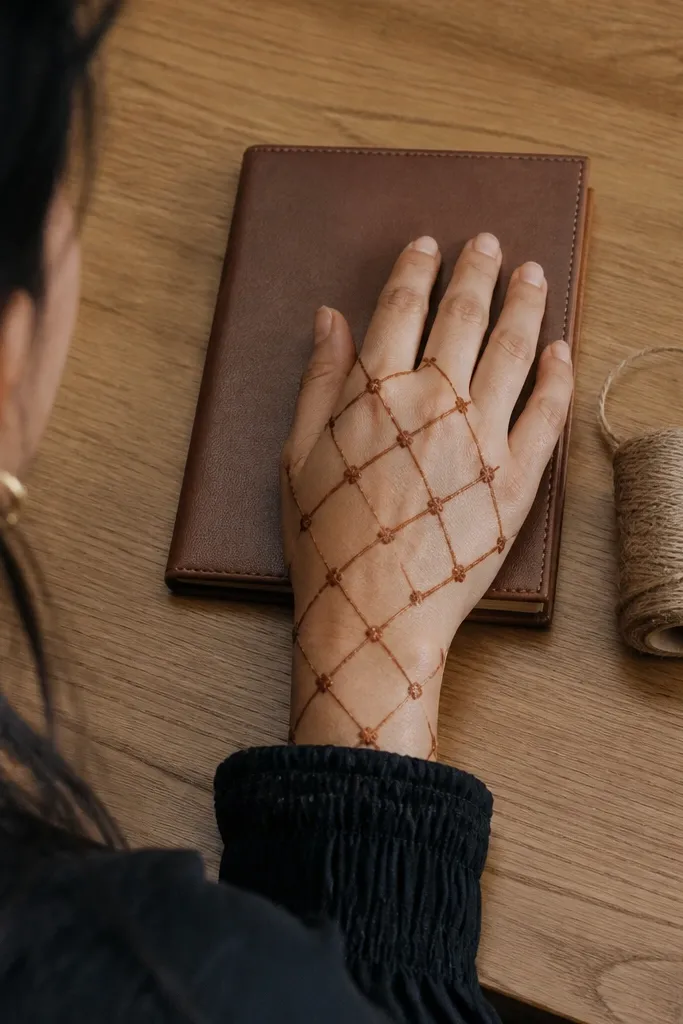
This design looks stylish because it uses geometry instead of floral filling. Diagonal ribbon lines create a sense of structure, and hollow squares give you a crisp, airy look that still reads bold. It’s budget-simple because hollow shapes use less paste than filled ones, and they’re easy to repeat. The back-of-hand placement looks great for photos because the pattern runs across the natural lines of your hand. Choose this if you want something that looks modern for holidays, not traditional-heavy.
Pro tipUse a ruler or a straight edge lightly under your paper reference so your diagonal stays consistent.
Step 1: Draw two diagonal parallel ribbon lines from the wrist toward the outer hand edge. Step 2: Between the ribbons, add hollow squares in a staggered pattern, keeping each square outline thin. Step 3: Finish with a small bangle line at the wrist and a dot at the corner points of a few squares.
AvoidDon’t fill the squares. Hollow squares keep the look airy and prevent smudging.
9. Five-Finger Dotted Caps with Central Dot Column

This is one of the easiest “looks expensive” designs because it uses dot placement like a pattern. Dotted caps at each finger create a uniform, clean look, and the central dot column adds symmetry. It’s perfect for last-minute holiday events because you can do it quickly and still get a tidy result. The dot column also helps guide your eyes toward the center of the hand, so it looks balanced even if your stain is lighter. If you’re new to mehndi, this is a strong starter that still looks photogenic.
Step 1: Draw a thin vertical line in the center of the back of the hand, from wrist up toward the middle finger. Step 2: On each finger, add a dotted cap near the base and connect it loosely with a couple of dots to the central line. Step 3: Add a thin bangle outline at the wrist and place a few extra dots between the finger bases.
Keep dot size consistent by squeezing the cone gently and holding the same pressure.
Skip long continuous lines in this design. Dots and short connections keep it neat.
10. Rosebud Cluster on Side of Hand
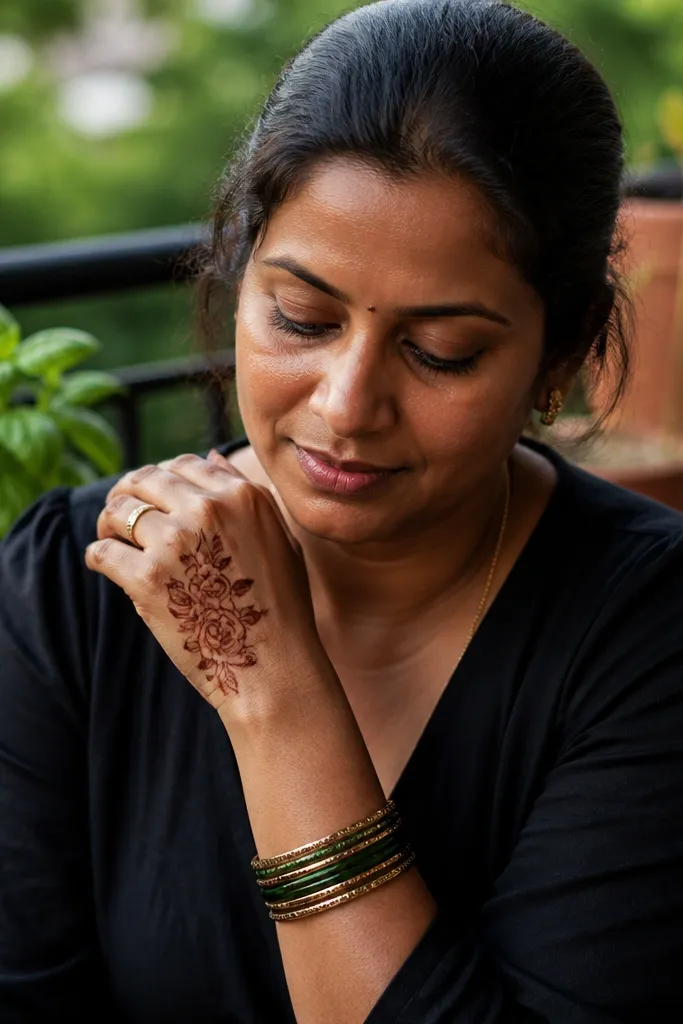
Rosebud clusters look festive without covering the entire hand. This design sits on the side of the hand, so it’s flattering with bangles and rings and it photographs cleanly from different angles. You create three rosebuds and small leaf accents around them, which gives a “bouquet” effect. It’s budget-simple because each rosebud is a repeatable petal outline, not a complex shaded flower. Choose it for Eid and Diwali because the side placement looks like jewelry.
Step 1: Draw a curved guideline from near the wrist up toward the ring and pinky side. Step 2: Create three rosebuds along the curve using small petal outlines around a tiny center. Step 3: Add two small leaf shapes between rosebuds and finish with a thin wrist bangle line.
Make the center of each rosebud a tiny dot, not a filled circle. The contrast reads better after staining.
Don’t make petals too thick. Thick petals take longer to dry and can smear.
11. Half-Moon Wrist with Interlocking Lines
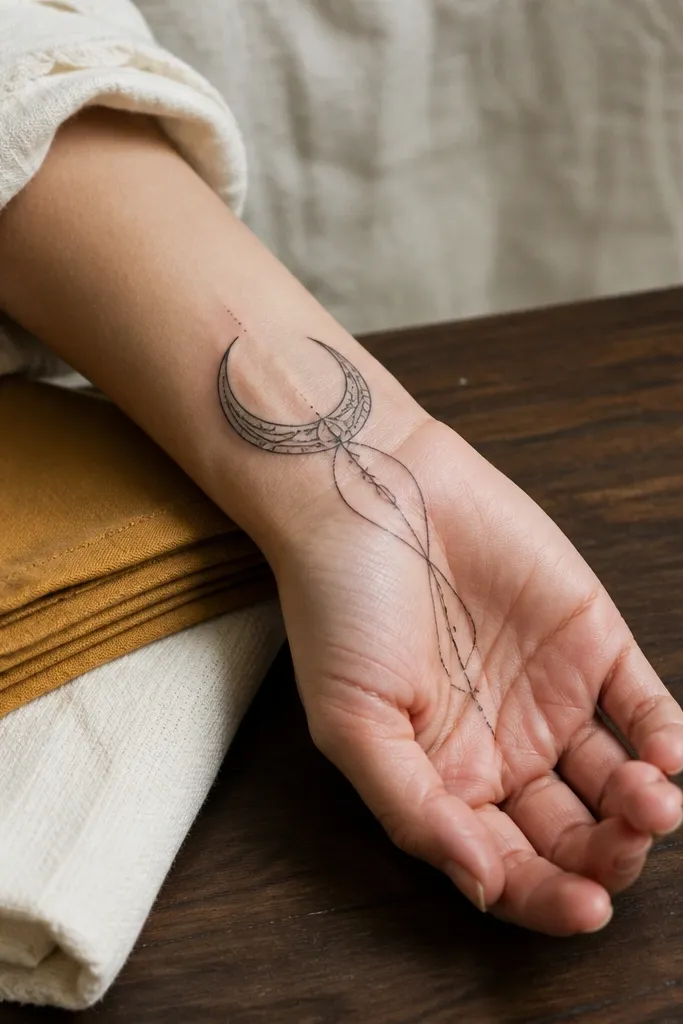
This design is clean, graphic, and surprisingly elegant for how simple it is. The half-moon wrist motif gives you a strong frame, and the interlocking lines create structure without needing full palm filling. It’s budget-friendly because the pattern is mostly linework, and linework is fast. This works well for people who want a modern holiday look that still feels traditional. It also pairs well with minimal rings since the wrist motif is the focal point.
Pro tipKeep chain-link spacing even. Uneven spacing makes it look accidental.
Step 1: Draw a half-moon arc at the wrist, open toward the fingers, then outline its edges. Step 2: Inside the half-moon, draw interlocking lines like small chain links, with consistent spacing. Step 3: Add two short interlocking lines at the finger bases and connect them back to the half-moon with a thin curve.
AvoidDon’t thicken the outer half-moon outline too much. Heavy edges can bleed into the gaps.
12. Holiday Snowflake Corner on Back of Hand
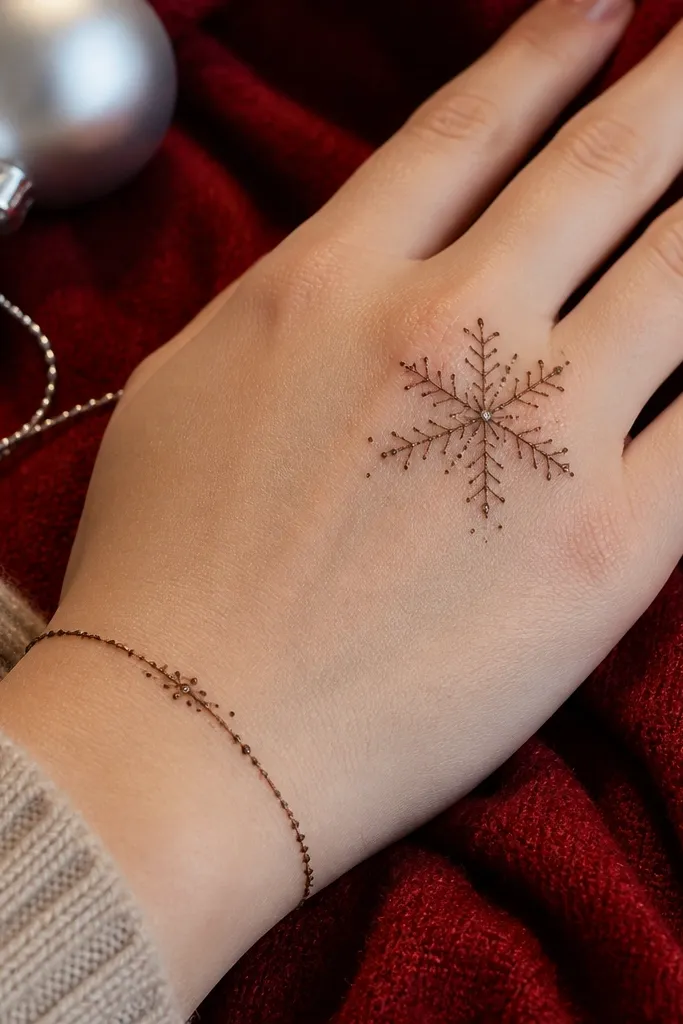
A snowflake corner motif is a holiday win because it’s recognizable and easy to place. Instead of covering the whole hand, you put the snowflake near the outer back of the hand and balance it with a thin wrist band. The small dotted branches make it look delicate, and the overall design stays light enough to dry fast. This is great for winter events when you want something festive without heavy shading. It’s also perfect for beginners because the snowflake arms are repeatable.
Step 1: Draw a small dot center on the outer back of the hand, near the ring finger side. Step 2: Add six snowflake arms using straight lines with tiny side branches, then place a dot at each arm end. Step 3: Add a thin bangle line at the wrist and two short curved lines connecting to the snowflake corner.
Use symmetry by counting arms and matching branch positions on both sides of each arm.
Skip thick shading inside the snowflake. Hollow arms look cleaner after staining.
13. Bangles-Only Full Wrist Focus
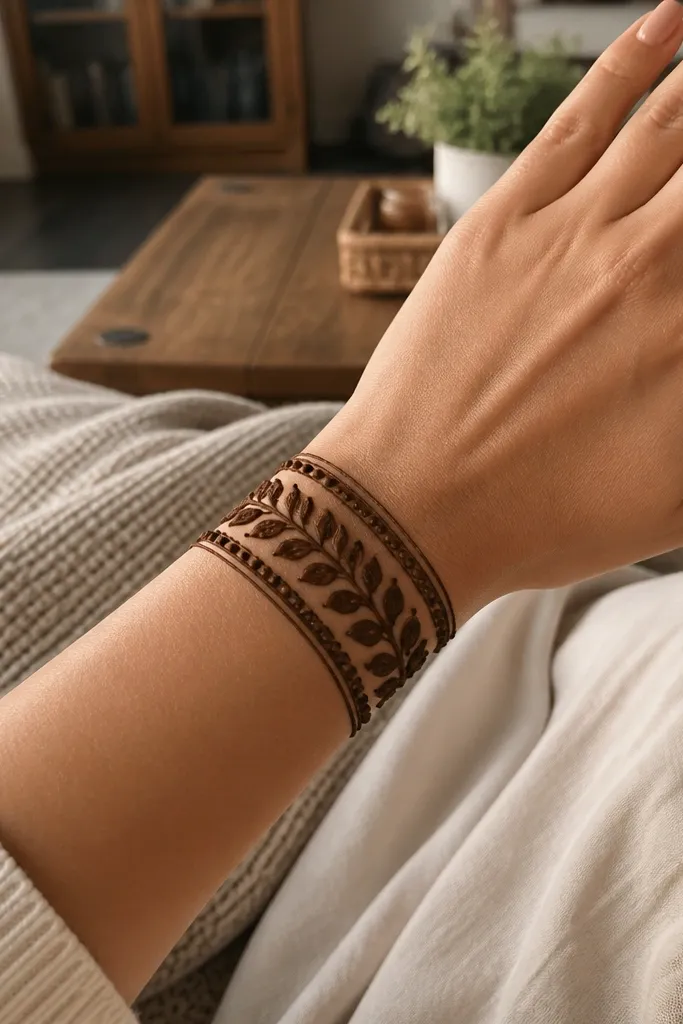
If you want the maximum impact for the minimum work, focus on stacked bangles. This design covers the wrist area with multiple bands — leaf band, dot band, and a thin line band — so the hand looks decorated even if the rest stays plain. It’s ideal for budget because it’s concentrated work and you don’t waste paste on the palm. It photographs well because wrist bangles show up clearly in most angles, especially when you wear a watch or multiple rings. Great for festive nights where you want a bold look fast.
Step 1: Draw three to five stacked wrist bands with equal gaps between them. Step 2: Alternate motifs: one band gets leaf outlines, one gets dot rows, and one gets short curved links. Step 3: Connect the top band to the finger bases with two thin lines on the index and middle sides.
Keep band width consistent so it looks like jewelry, not random doodles.
Don’t make every band the same motif. Variation is what makes it look intentional.
14. Simple Mehndi Bracelet with Side Hearts
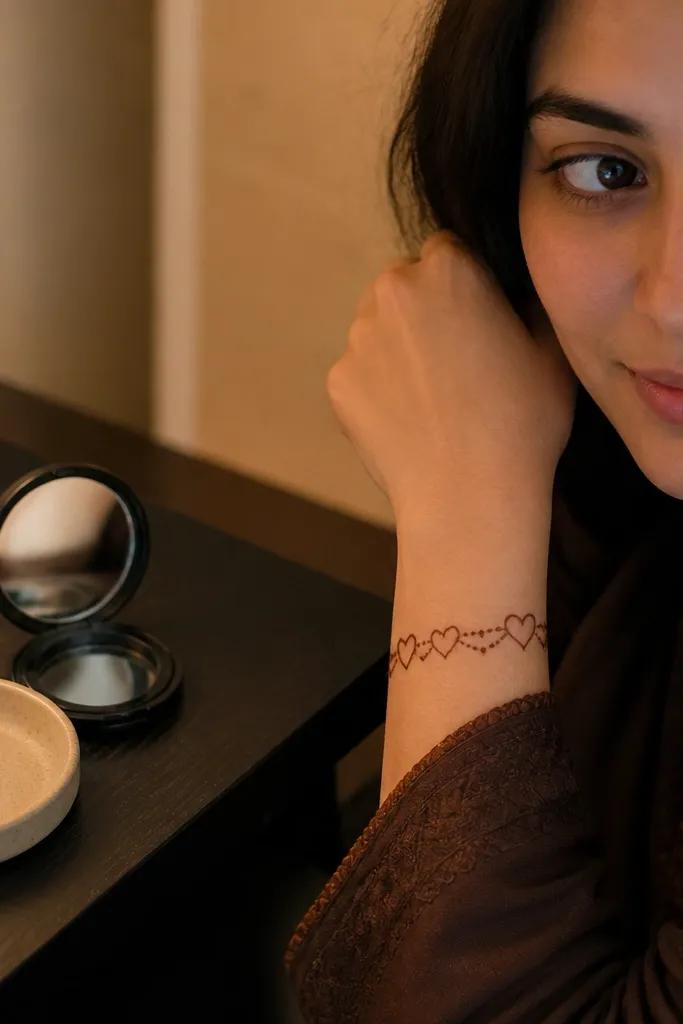
Hearts are a fun holiday twist when you want cute, not heavy. This design uses a bracelet cuff on the wrist and places small heart outlines along the cuff edges, so it looks playful and clean. It’s budget-simple because hearts are quick to draw and you only need a few placements to make the look feel complete. The cuff framing makes your hand look styled, and the hearts stay crisp even with lighter stain. It’s a good choice for festive gatherings, especially if you like cute accents.
Step 1: Draw a curved bracelet cuff outline around the wrist, then add an inner parallel line to create a band. Step 2: Along the band edges, draw small heart outlines facing inward, spaced evenly. Step 3: Add a thin line connector from the center of the cuff up toward the middle finger base and finish with two tiny dots on either side.
If hearts look uneven, draw the two top lobes first, then close the point. That keeps the heart shape consistent.
Don’t fill the hearts. Hollow hearts look cleaner and dry faster.
15. Center Fan with Mini Teardrops
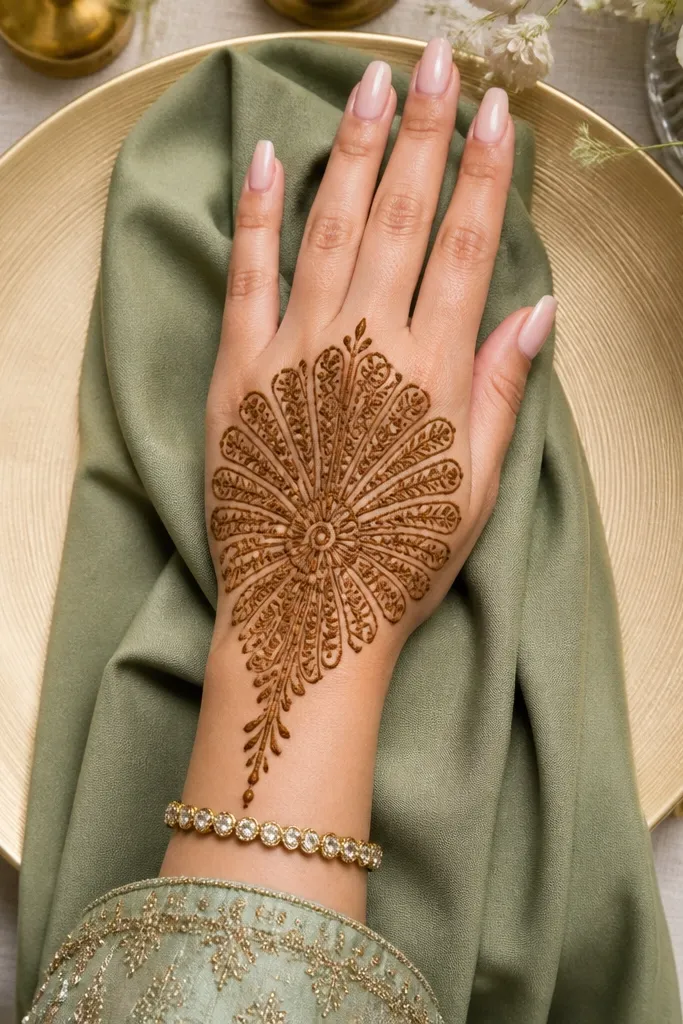
A center fan is one of the best ways to make simple mehndi look fuller without doing a full palm design. You draw a fan shape from the wrist into the center of the hand, then fill it with mini teardrops. The teardrops create a layered look through repetition, and the fan structure keeps the spacing neat. It’s holiday-ready because the fan reads like a decorative motif, not a random scatter pattern. This design also works for both hands and looks great with short nails and rings.
Pro tipKeep teardrops the same size. A fan looks best when the repetition feels uniform.
Step 1: Draw a center line from wrist to middle finger area, then draw two curved guide lines forming a fan shape. Step 2: Between the guide lines, add mini teardrop outlines that point upward, with small dots at the base. Step 3: Finish with a wrist bangle line and one row of tiny teardrops running along the inner edge of the fan.
AvoidDon’t make teardrops too close to each other. Crowding causes smudges when drying.