
1. Wrist-to-Center Column with Tiny Knuckle Dots
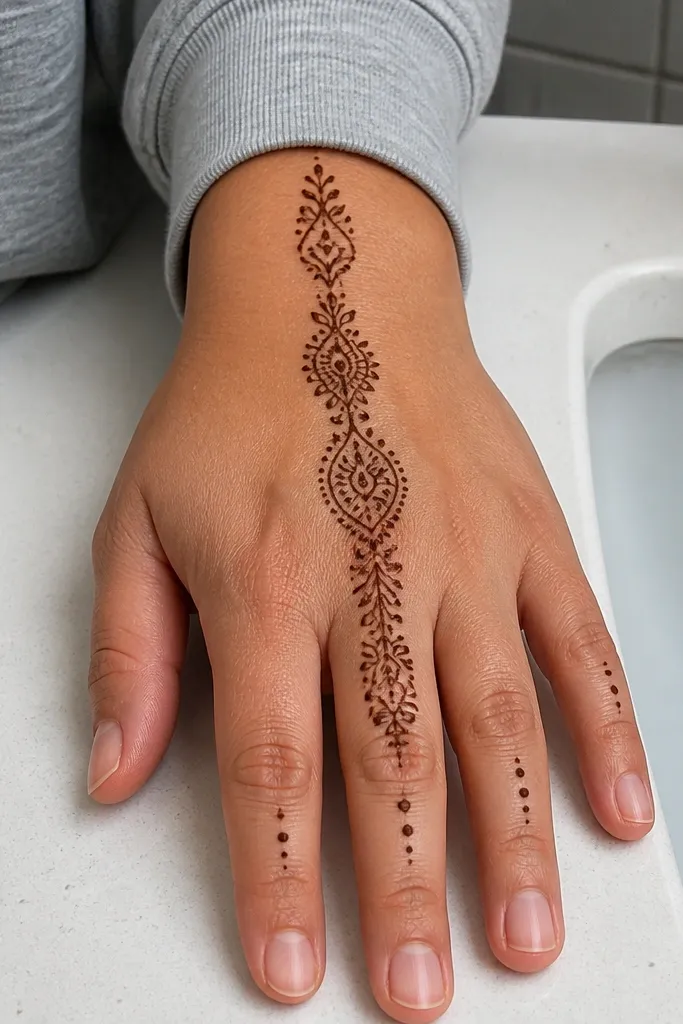
This layout is a reliable pick for budget back hand mehndi designs because it uses one strong vertical line to guide the eye. The center column stays readable even if your henna is a little less dark, since the shape is simple and photo-friendly. Add small dot clusters at the knuckle areas so the back of the hand feels filled without turning into a blot. Keep the side space open; flash photos love negative space. It looks best on medium-length fingers and pairs well with both casual and festive outfits.
Start by drawing a curved guideline from the inner wrist up toward the middle of the back hand. Then outline a thin vine stroke along that line and add 6-10 tiny dots on each main knuckle area, keeping the dots slightly staggered. Finish by adding 1-2 small leaf bumps along the column so the top doesn’t look flat. Let the outline dry for about 1-2 minutes before you add any extra dots so they don’t smear.
Pro tipUse a cone pressure that produces a continuous line; if your line breaks, the whole column looks patchy.
AvoidDon’t fill the entire back of the hand — the dots need breathing room to stay crisp.
2. Geometric Ladder Back with Side Triangles
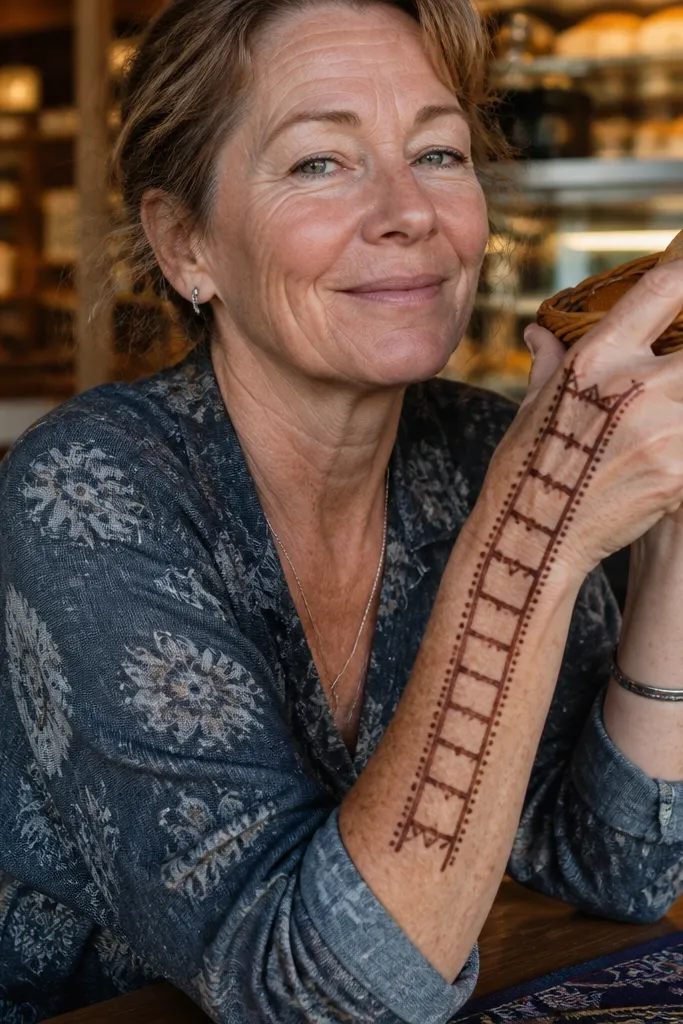
Geometric patterns are the fastest way to look “designed” without spending time on elaborate florals. This one works because it creates a ladder rhythm across the back of the hand and frames it with triangles that pop in close-up photos. The pattern reads clean even with budget henna because straight edges don’t smear as easily as large freehand leaves. Keep the triangles small and evenly spaced so the look stays balanced. It’s also great if you want a modern vibe for festivals, parties, or even a casual day.
Begin at the wrist with two parallel curved guideline lines, spaced about 1 cm apart. Draw ladder rungs across them in small repeating rectangles as you move upward toward the finger bases. Add a row of tiny triangles on the left and right edges — each triangle should touch one rung but not cross into the center. Finally, place a thin border around the outer edge of the ladder so it looks intentional, not accidental.
Use a ruler or the edge of a flat card to keep rung spacing consistent across the hand.
Skip thick outlines on geometry; heavy borders make small triangles look like blobs.
3. Half-Moon Thumb Arc with Feathers
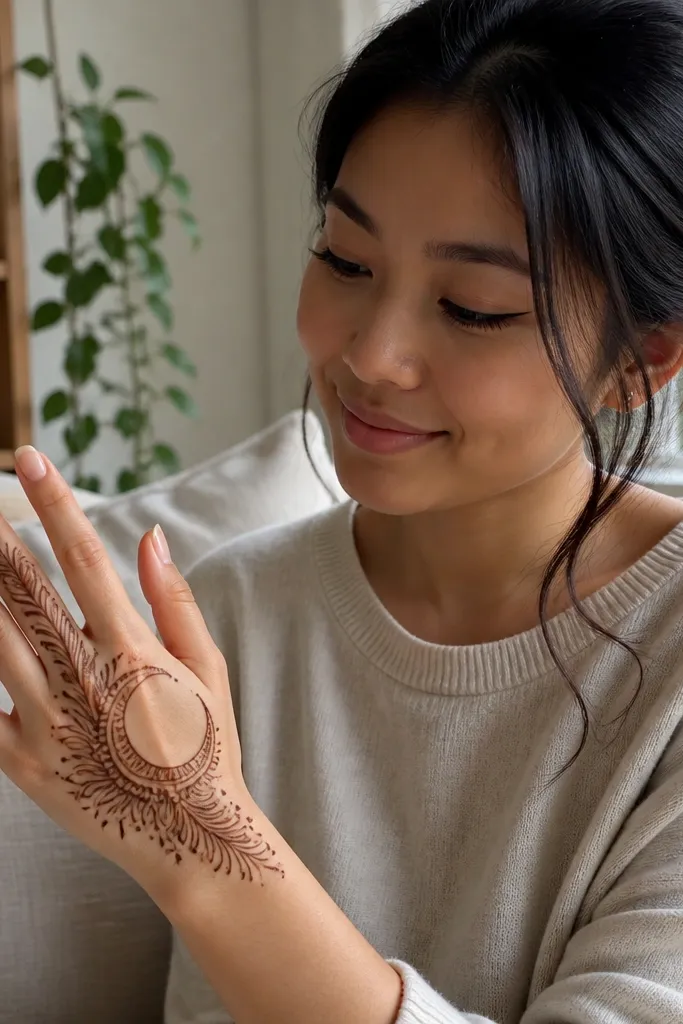
If you want something photogenic that doesn’t require full-hand coverage, this thumb-side arc design is the move. The half-moon shape gives a focal point, and the feather strokes add movement without needing dense fill. It’s budget-friendly because most of the work is linework and small leaf repeats. In photos, the thumb arc catches light and makes your hand look neatly styled even if the rest of the back is mostly open. This one flatters hands with visible knuckles and looks great with bangles.
Start by drawing a thick-ish half-moon arc from the thumb side near the wrist, curving toward the base of the thumb knuckle. Then add 7-9 feather strokes that fan upward from the arc, each stroke ending in a small point. Connect the feather bases with a thin spine line so the fan looks unified. Finish with 2-3 tiny dot clusters near the thumb knuckle to fill the gap without covering the whole back of the hand.
Keep feather strokes the same length by counting them — stopping at a count prevents uneven ends.
Don’t add a lot of shading between feathers; it makes the arc look dirty instead of airy.
4. Double Vine Frame with Open Center
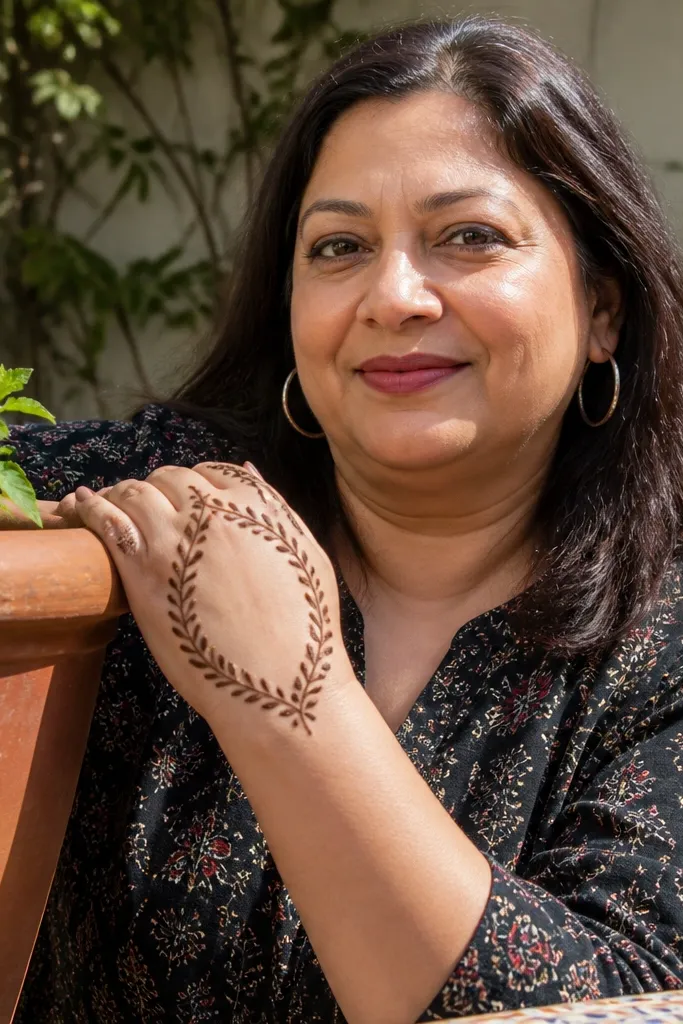
This design is a cheat code for clean, aesthetic budget back hand mehndi designs. The double vine frame creates structure, while the open center keeps the hand from looking crowded. You get a “done” look because the vines outline the shape of your hand naturally. For photos, open centers help the pattern look lighter and more expensive. Add a few small leaves only where the vines meet the finger bases so the design doesn’t feel unfinished.
Draw two vines that start near the wrist on opposite sides and curve toward the ring and middle finger bases. Each vine should loop around once, then split into smaller leaf strokes. Leave the center mostly empty, then add a small teardrop motif at the top of the frame where the vines nearly meet. Finish with a thin border line along the outer curve of the frame, keeping it light so it doesn’t overpower the open space.
Pro tipUse dot accents only at junction points (where vines meet) so your filler looks purposeful.
AvoidDon’t try to fill the open center — the negative space is what makes the frame look elegant.
5. Knuckle Chain with Minimal Finger Caps
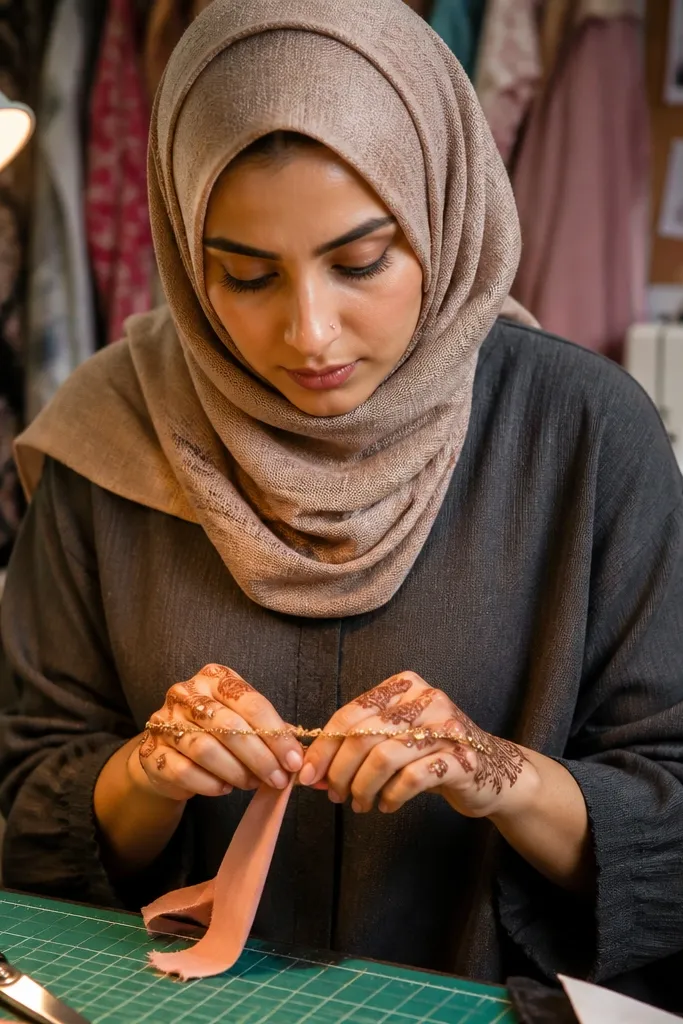
Chain-link designs photograph well because the pattern is uniform and easy to read. This one places a chain band across the knuckles and adds minimal caps at the finger bases, so you get a neat silhouette without covering every inch. It’s ideal for shorter time because it’s repeatable: link, link, link. The minimal finger caps prevent the design from looking flat at the top. Works with both bridal-adjacent looks and everyday outfits.
Start at the wrist with a thin guideline that follows the curve of the back of your hand toward the knuckles. Draw small oval chain links across the knuckle line, keeping each link about the same width. Add tiny crescent caps at the base of each finger, aligned with each chain segment. Finish by connecting the ends of the chain band to the wrist guideline with one short vine stroke on each side.
Mark a dot guide on the back of your hand for where each finger cap will land so they don’t drift.
Don’t make chain links too big; oversized links look clunky on the back of the hand.
6. Central Lotus Pod with Dotted Halo

Lotus-inspired motifs look classy, but you don’t need a full lotus to get the vibe. This budget-friendly version uses a small central pod and a dotted halo that frames it like a spotlight. The halo creates a soft, decorative ring that works even if your henna stain is lighter in some spots. Keep the pod outlined and lightly filled so the center stays crisp. This design is a great pick for events where you want one strong focal point rather than full back coverage.
Draw a small teardrop pod in the center of the back of the hand, around the space between the middle finger and ring finger bases. Outline 6-8 curved petal lines around the pod, but only fill lightly inside the petal shapes. Then add a dotted halo — place evenly spaced dots around the pod, leaving a small gap between dots and petal edges. Finish with two short leaf strokes on each side of the pod to connect toward the knuckles.
Use consistent dot size by keeping your cone tip the same distance from the skin each time.
Don’t pack the halo too tightly; dense dots turn into a dark smear.
7. Starburst Center with Side Micro Vines
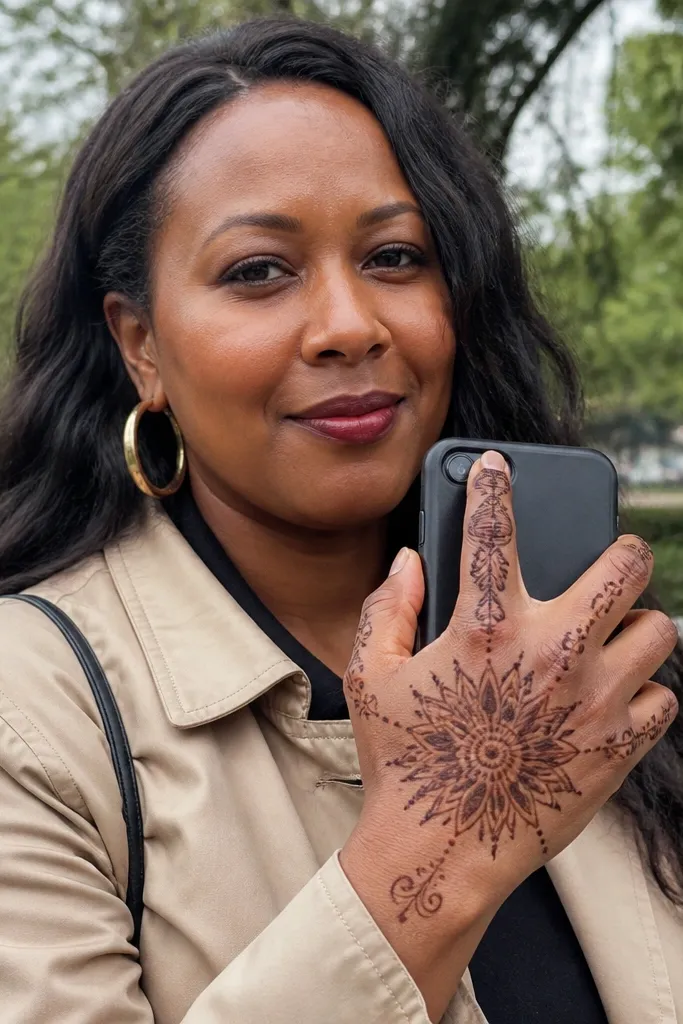
A starburst center is one of the most photogenic choices for budget back hand mehndi designs because it creates instant symmetry. The center draws attention, and the side micro vines add detail without requiring heavy fill. This keeps your henna looking balanced in both bright and low light photos. Starburst motifs also hide minor uneven staining because the lines give the eye a pattern to follow. It’s a strong choice for parties and festive days when you want your hand to look styled from every angle.
Start with a small circle in the center of the back of the hand, then draw 8-10 pointed rays outward from the circle. Connect each ray base with a short curved line so it looks like a starburst flower. Add micro vines on the left and right edges — thin lines that curl toward the finger bases, each ending with a tiny leaf. Finish by placing 10-15 small dots along the space between the starburst and the finger bases to fill gaps lightly.
Pro tipKeep rays the same length by counting them and making each tip touch the same invisible arc line.
AvoidDon’t outline the entire starburst thick; thin rays look cleaner and stain more evenly.
8. Diagonal Cross Vines with Tiny Lattice

This design looks complex without actually being hard. The diagonal cross vines create strong structure, and the tiny lattice near the center adds that “work” look people associate with higher-end mehndi. The best part for budget back hand mehndi designs is that lattice can be done with simple repeated lines and dots — you don’t need shading. It looks great when your henna dries evenly because the lattice lines stay crisp. Perfect for celebrations where you want a modern, stylish back-hand pattern.
Draw two diagonal vine lines crossing at the center of the back of the hand, one going from wrist to index finger base and the other from thumb side to pinky base. Outline small leaves on both diagonals, but keep them minimal. At the crossing point, create a tiny lattice: draw 4-5 short vertical lines and connect them with 4-5 short horizontal lines, then add a dot in each small box corner. Finish with a thin border line following the outer edge of the diagonal shapes.
Pro tipLattice looks best when lines are thin; if your cone is too thick, it turns into a dark patch.
AvoidSkip big filled squares — tiny lattice gives the aesthetic without the mess.
9. Wrist Cuff with Three Teardrop Spikes
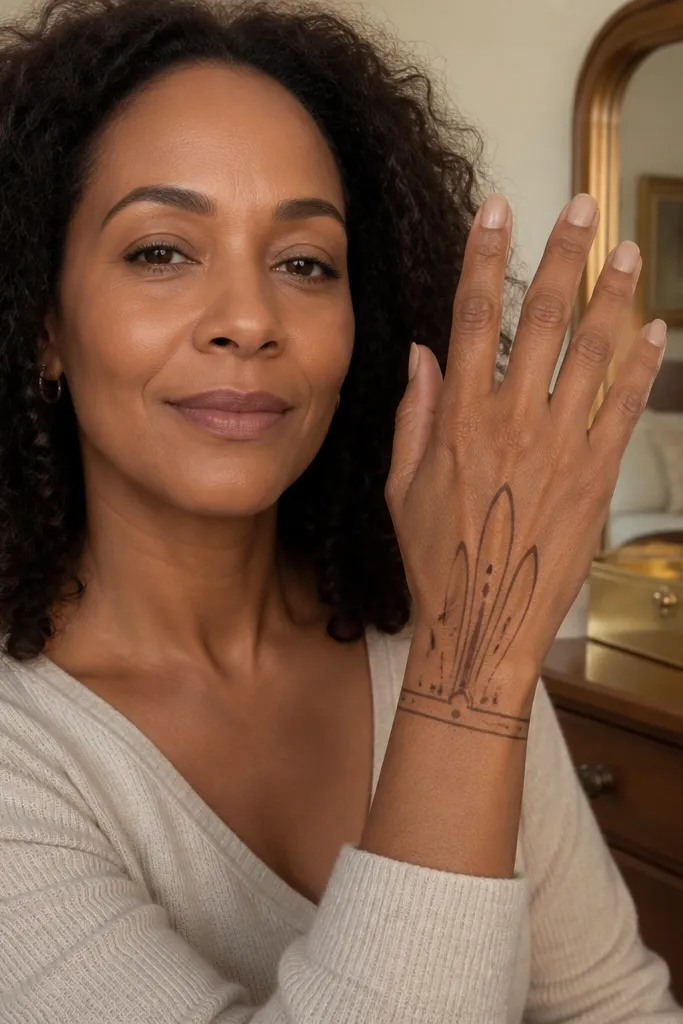
A wrist cuff design is a smart budget choice because it gives you a finished look quickly and keeps most of the work near the wrist. This one adds three teardrop spikes that rise toward the finger bases, which makes the pattern look intentional and lifted. The teardrops are easy to outline and look good even if you don’t fill them heavily. In photos, the cuff frames the hand and helps your mehndi look like a set, not random marks. Great for short sessions or when you’re wearing statement jewelry on the wrist.
Start by drawing a thin curved cuff line around the inner wrist area, then add 6-8 small dot accents along the cuff. From the cuff, draw three teardrop spikes spaced evenly, with the middle spike slightly taller. Outline the teardrops and fill them very lightly with 2-3 internal lines each. Finish by connecting the base of each spike to the cuff with a short vine stroke so the spikes look attached.
Pro tipKeep teardrop point tips sharp by lifting your cone slightly at the end of each shape.
AvoidDon’t overfill teardrops — light lines look cleaner and stain better.
10. Trellis Squares with Thin Border Lines
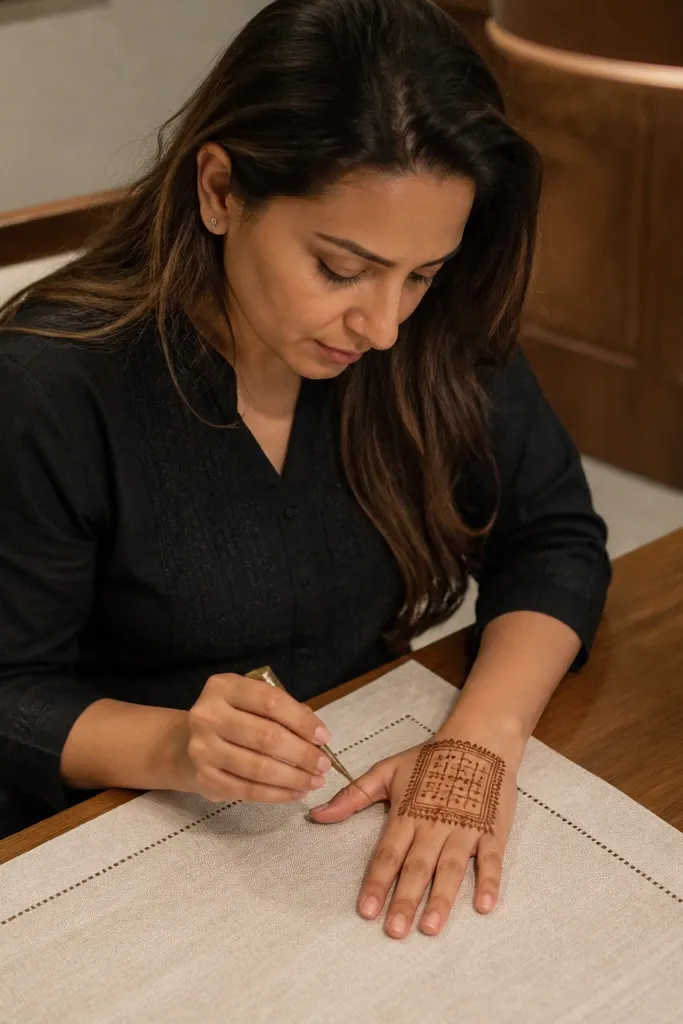
If you want a crisp, modern look, trellis squares do the job. This design uses small grids in the center with thin border lines around the outer edge, so it looks structured even when henna is budget-level. The grid stays readable in photos because each square is separate. You also get a light, airy feel since you’re not painting big shaded areas. It’s a great choice for minimalists who still want their back hand to look stylish.
Draw a soft rectangular boundary on the back of the hand, starting near the wrist and stopping around the finger base area. Inside it, draw evenly spaced vertical lines, then add horizontal lines to form small squares. Use dots at the corners of selected squares to break up the grid and prevent a solid dark block. Finally, add a thin border line along the rectangle edges and one tiny vine flourish at the top center.
Pro tipUse the same spacing for vertical and horizontal lines — uneven spacing is what makes grids look messy.
AvoidDon’t fill every single square heavily; leave some squares mostly empty for a cleaner look.
11. Peacock Tail Fan on Back Hand
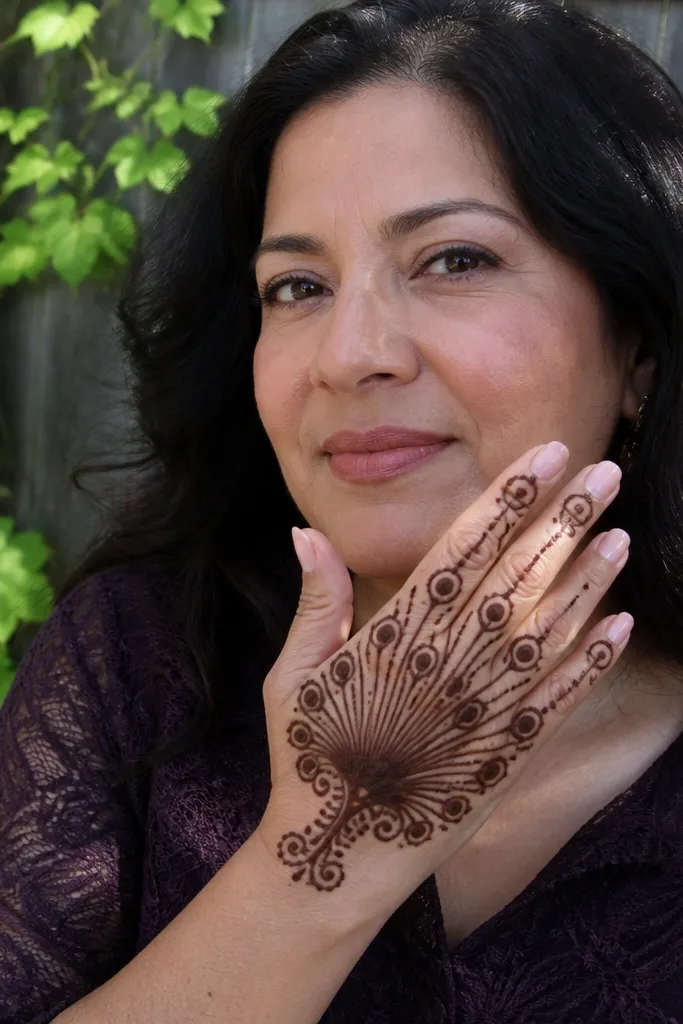
Peacock tail designs look dramatic, but you can simplify them into a budget back hand mehndi design that still photographs beautifully. This version places a fan shape across the back of the hand with small “eye” dots in the feather tips. The feather lines are simple curves, and the “eyes” are just a dot with a tiny ring — easy but striking. It’s a strong pick for festival days because it frames the hand and makes it look like you planned a full design.
Start at the wrist with a single base line and draw 6-8 feather ribs that fan upward toward the finger bases. On each feather tip, add an eye motif: a small dot center, then a thin ring around it. Lightly connect the feather ribs with short curved lines so the fan looks cohesive. Finish with a thin border line around the outer feather edges, keeping the border lighter than the ribs.
Pro tipMake the eye motifs all the same size; consistency is what makes the design look expensive.
AvoidDon’t shade the whole feather — keep it line-based so it stays clean as it stains.
12. Floral Vine Spiral Around the Center
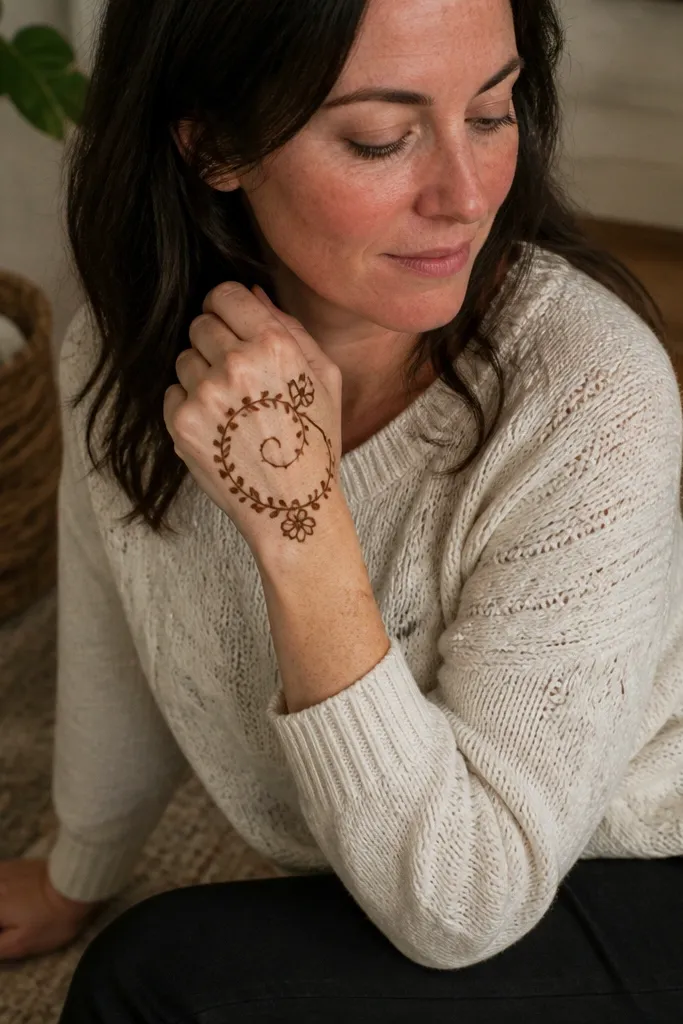
This is a classic look that works because it uses a spiral to control where the eye goes. The central empty circle makes it feel airy, and the spiral vine gives you enough detail to look intentional. Add small blossoms along the spiral at intervals, not every inch, so the design stays light and photogenic. Budget back hand mehndi designs often fail when they try to cover everything, so this one intentionally leaves space. It’s excellent for medium to long hands where the spiral can breathe.
Draw a small circle near the center of the back of the hand and keep it empty. Start your spiral vine at the circle edge and wrap it outward toward the finger bases, making 2-3 turns. Add small 5-petal blossoms along the spiral at three points, each blossom outlined and lightly filled with 2-3 short inner lines. Finish by adding two leaf clusters at the lower end of the spiral near the wrist so the spiral doesn’t float.
Pro tipIf your spiral starts to wobble, slow down and rebuild the next loop — don’t force it straight through.
AvoidDon’t overfill blossoms; heavy fill makes the spiral merge into a dark blob.
13. Finger Base Halo Bands with Dots
This pattern makes your fingers look styled even when your back hand has limited space. Halo bands around each finger base create a neat top frame, and connecting dots link the bands into one cohesive design. It’s a budget-friendly approach because it relies on repeated ring shapes and dot work. In photos, the bands catch light and make the design feel balanced from wrist to knuckles. Great for short sessions, and it looks good under rings.
Start near the wrist with a faint guideline across the back of the hand. Draw a thin band around the base of each finger, leaving a tiny gap between bands so they look separate, not smudged. Add a few dots between each band and the knuckle area to connect them into one pattern. Finish with a small central dot cluster at the midpoint of the hand to anchor the design.
Pro tipUse the same band thickness on every finger base so the top frame looks even.
AvoidDon’t draw bands too close to the finger joints; they can look bulky and smear when you move.
14. Bangles-Style Wrist Wrap with Micro Leaves
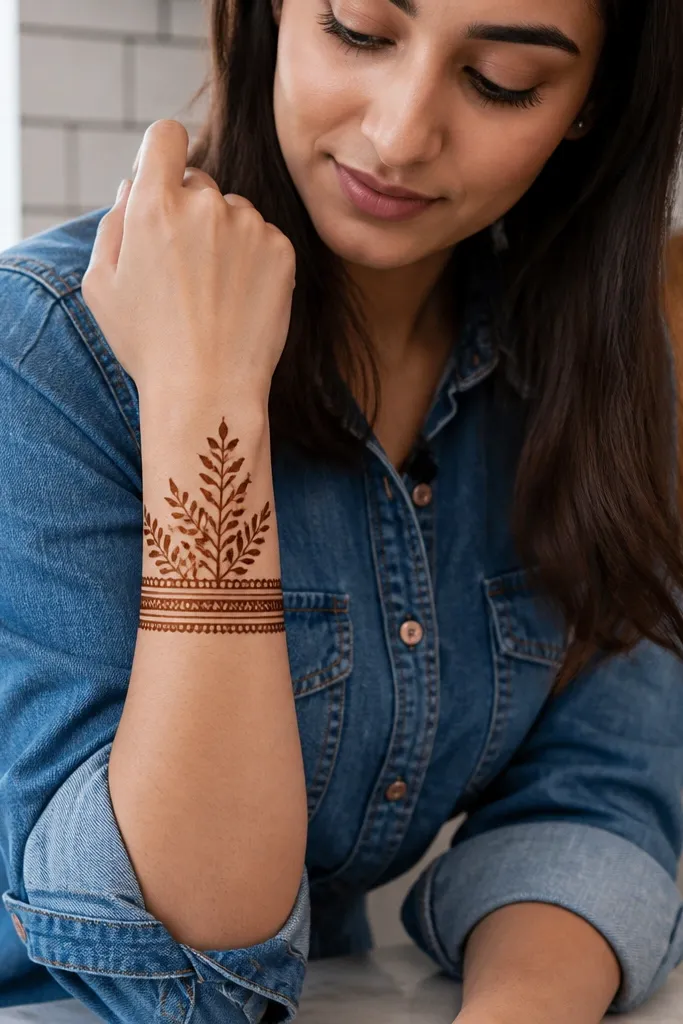
A wrist wrap pattern is perfect when you want the back hand to look styled but you don’t have time for a full composition. This one uses a layered cuff look with micro leaves that creep upward in small clusters. The micro leaves are quick to draw and look detailed in photos without requiring heavy fill. Budget back hand mehndi designs benefit from this because smaller elements stain more evenly and don’t turn into thick blocks. It works well for both casual and festive days, especially if you wear bangles or a watch.
Draw two parallel cuff lines around the wrist area, spaced about 5-7 mm apart. Add small dot separators along the inner cuff line, then attach micro leaf sprigs that point upward in 3-4 clusters. Keep each sprig to 3 leaves max so you don’t spend time shading. Finish by connecting the highest point of each sprig to the cuff with a short thin vine line.
Let the cuff lines set before you add leaves; it keeps the cuff from melting into the sprigs.
Skip thick cuff lines; thick henna can crack as it dries and ruin the clean wrap look.
15. Minimal Rose Buds with Side Curves
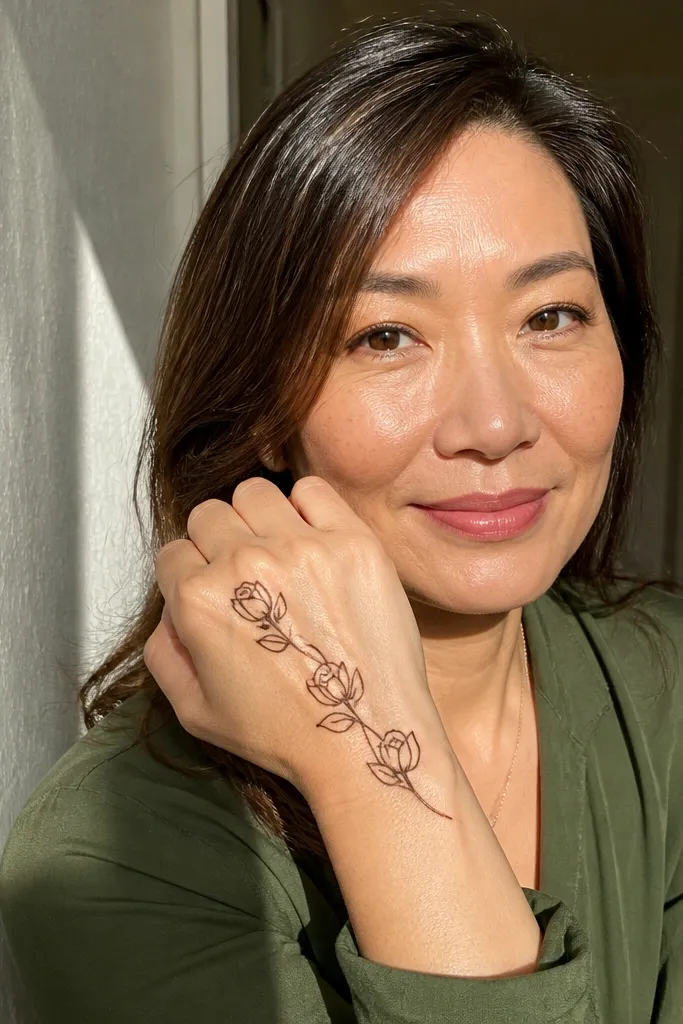
Rose bud mehndi reads sweet and stylish without needing a full rose garden. This minimal version uses three rose buds placed strategically along the back of the hand, connected by simple side curves. It looks photogenic because rose buds create clear focal points, while the side curves keep the design from looking like three separate stamps. It’s also budget-friendly because you can draw each bud with a few tight petals and light inner lines. Great for spring events, birthdays, and any day you want “pretty” more than “heavy.”
Start with a light curved guideline from the wrist toward the ring finger base. Place three rose buds along that curve: one near the wrist, one mid-hand, one near the finger base. For each bud, outline a small spiral-like petal shape and add 2-3 inner petal lines. Connect buds with thin side curves and add a few tiny dots at the ends of the curves to fill gaps.
Pro tipKeep bud size consistent by measuring against your pinky nail width as a reference.
AvoidDon’t add big leaf clusters around the buds; minimal edges look cleaner on a budget design.



