
1. Three-Arc Back Hand with Slim Finger Bands
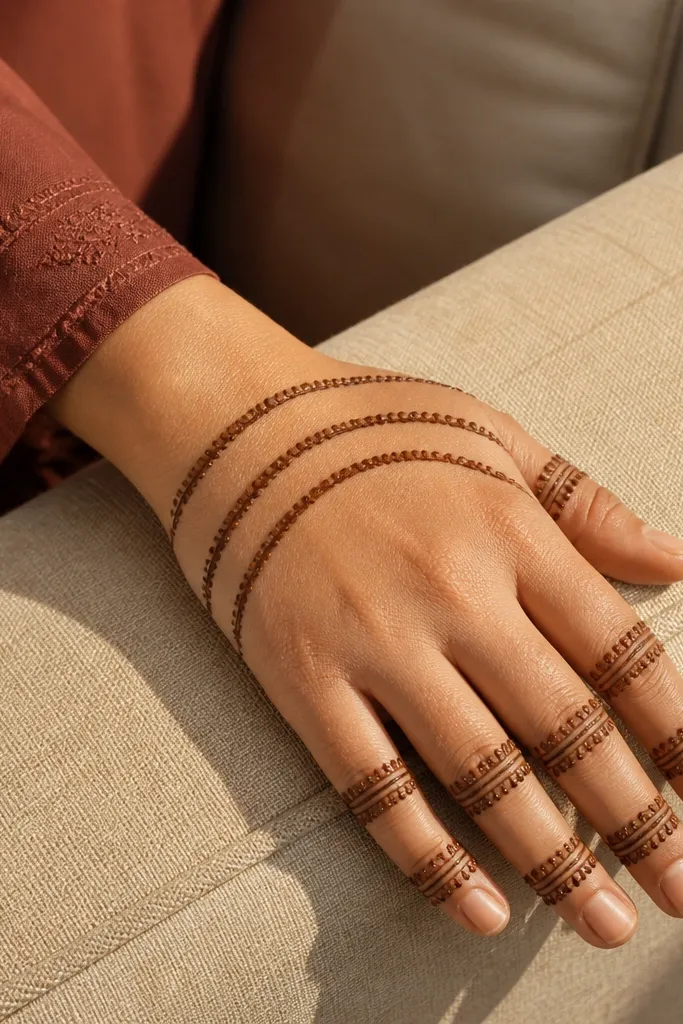
Start by drawing a light guide arc across the back of the hand from wrist to center, then add two smaller parallel arcs above it. Next, make a thin band on each finger — base to mid — with a tiny leaf at the top of each band. Finally, connect the arcs to the finger bands using short diagonal strokes so the pattern feels linked. Let the paste dry, then go back and add a few tiny dots along the arc edges for contrast.
This design is the quickest way to get a “done” look without filling every gap. The back of the hand has three clean arcs that travel from the wrist area toward the center, and each arc connects to finger bands. Finger bands stay slim and evenly spaced, so the knuckle area looks tidy instead of crowded. It’s beginner-friendly because you’re repeating one simple line pattern across fingers. For photos, the arcs catch light and make the hand look longer, especially with a sharp outline around the finger tips.
AvoidDon’t thicken the band lines — thick bands near knuckles make the whole hand look heavy.
Pro tipUse a ruler or the side of a pen to mark the finger band spacing before you draw the first line.
2. Single Teardrop Center with Side Paisley Fingers
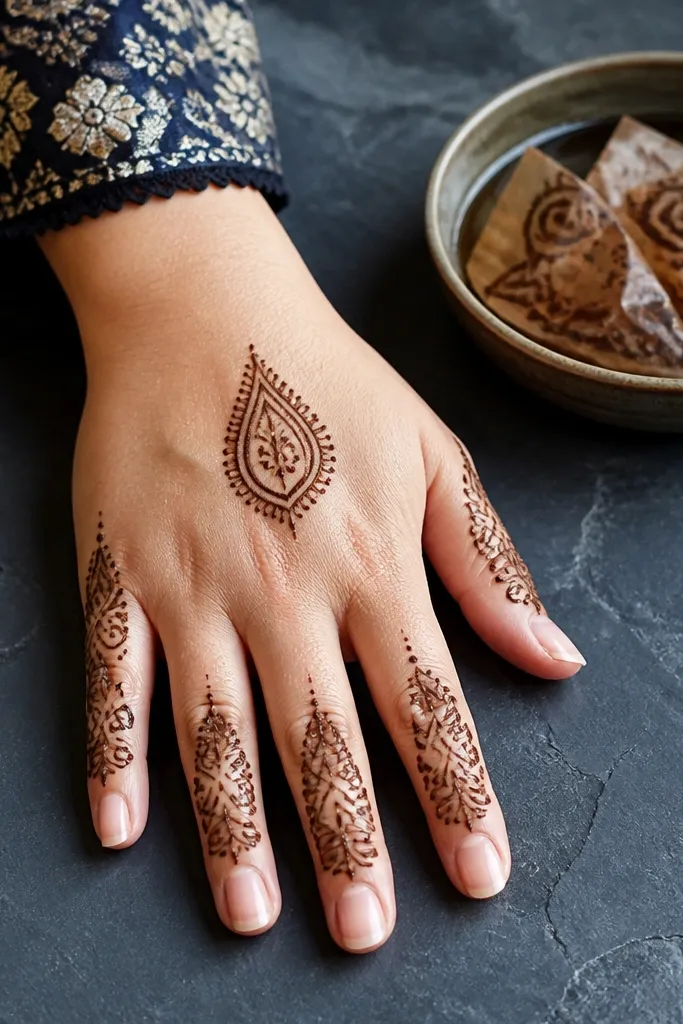
A single teardrop centered on the back of the hand gives you a focal point immediately. Around it, you place light paisley shapes that sit on the sides of the fingers rather than covering the whole finger. This keeps the design airy and beginner-friendly because you’re not trying to fill large areas. The teardrop reads well in one pass, and the side paisleys add detail without making the fingers look crowded. It also looks clean when the paste fades because the outlines still hold the structure.
Draw a teardrop in the center of the back of the hand, pointing down toward the wrist. Add two small paisleys on each finger’s side — one near the base and one near the tip. Connect the teardrop to the finger areas using short curved strokes that act like branches. Finish by adding a tiny dot trail around the teardrop edges for a crisp border effect.
Keep paisleys small and consistent; scale errors are what make side-finger patterns look messy.
Avoid filling the teardrop fully — outlines with light hatching look better and dry darker.
3. Lattice Outline Back Hand with Four Finger Bars
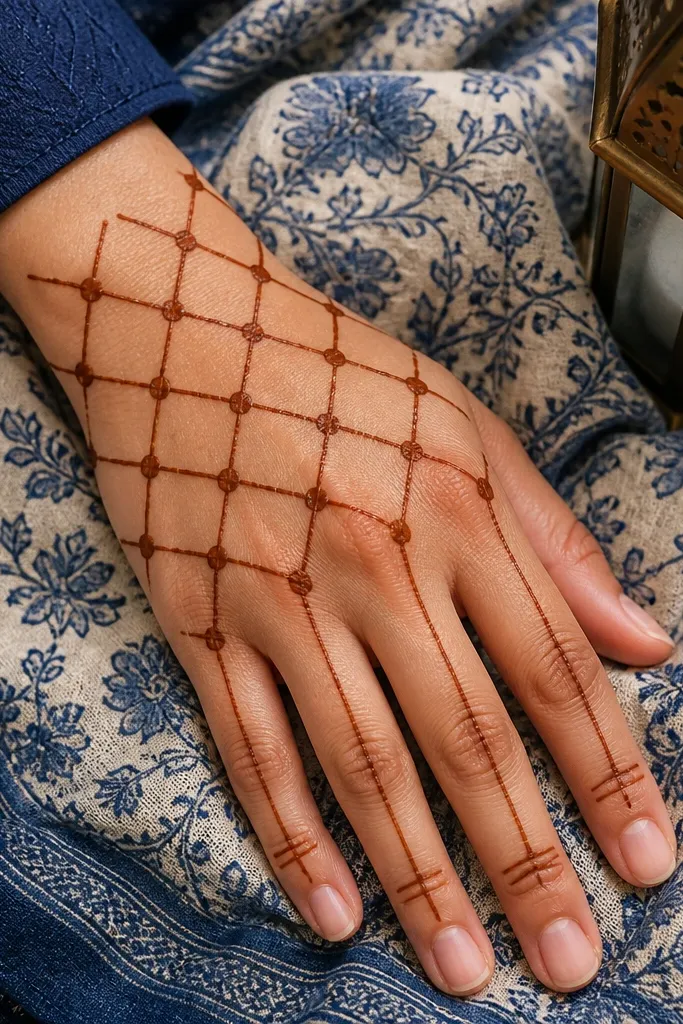
If you want a modern look that still feels traditional, lattice outlines do it. You draw a loose grid on the back of the hand, then place four vertical bars on the fingers that echo the grid spacing. The lattice gives texture without heavy filling, and the finger bars keep the pattern structured. This is a smart choice for beginners because straight lines are easier to control than delicate florals. It also photographs beautifully because the grid creates strong contrast and clear edges.
Outline a rectangle or rounded square on the back of the hand using curved corners, leaving space around it. Fill the area with diagonal lines to form a lattice, then add one thicker border line around the grid. On each finger, draw one vertical bar from base to near the tip, and connect bar tops to the back grid with short diagonal strokes. Finish with a row of small dots along the outer border for definition.
Draw the border first, then fill the lattice inside — it keeps your grid from drifting.
Don’t over-tighten the grid; very dense lattice turns into a gray smudge as it dries.
4. Feather Spine with Knuckle Leaflets
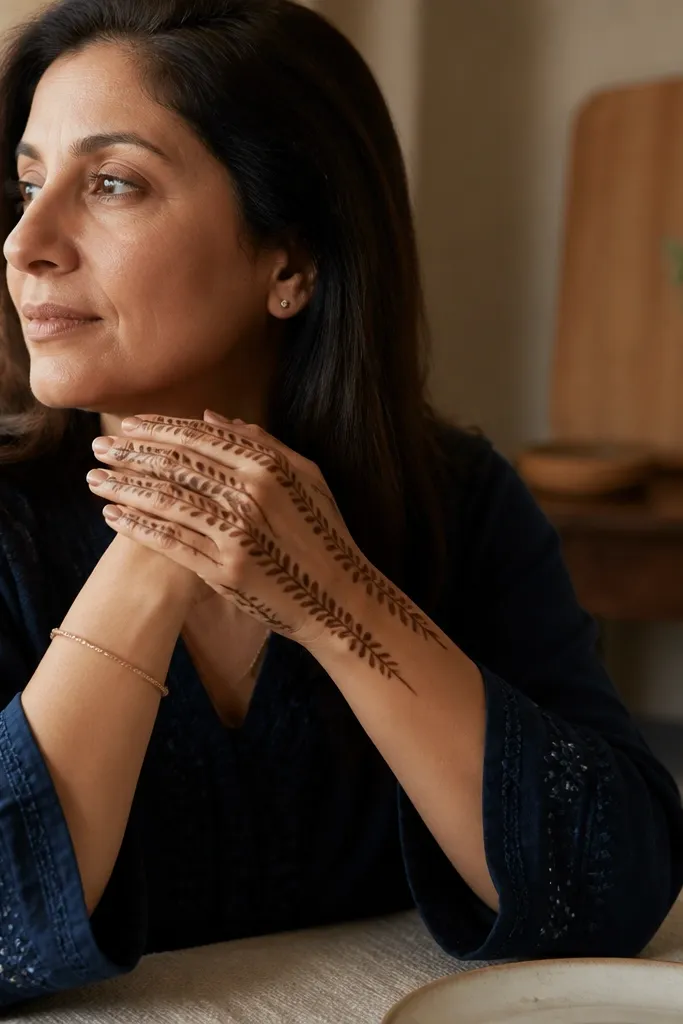
This one looks elegant without being complicated. The back of the hand gets a feather-like spine — a central line with short angled “feather barbs” on both sides. At each knuckle, you place a tiny leaflet that repeats the feather angle. The finger tips get simple curved caps so the design stays cohesive. It’s beginner-friendly because the feather bars are repeatable and the leaflets are small. The overall look stays light and photogenic, especially with a single dark outline and minimal fill.
Start with a straight-ish spine line from wrist toward the center of the back of the hand. Add short angled strokes on both sides like feather barbs, keeping them the same length for consistency. At each knuckle, place a small curved leaflet that touches the barbs edge. On each finger, add a thin curved cap at the tip and a short vertical line connecting it to the knuckle area.
Keep your barbs short; long barbs hit the finger bands and can crowd the knuckles.
Skip full filling between barbs — it makes the feather look blotchy on the back of the hand.
5. Palm-to-Digits Crescent with Micro Dots
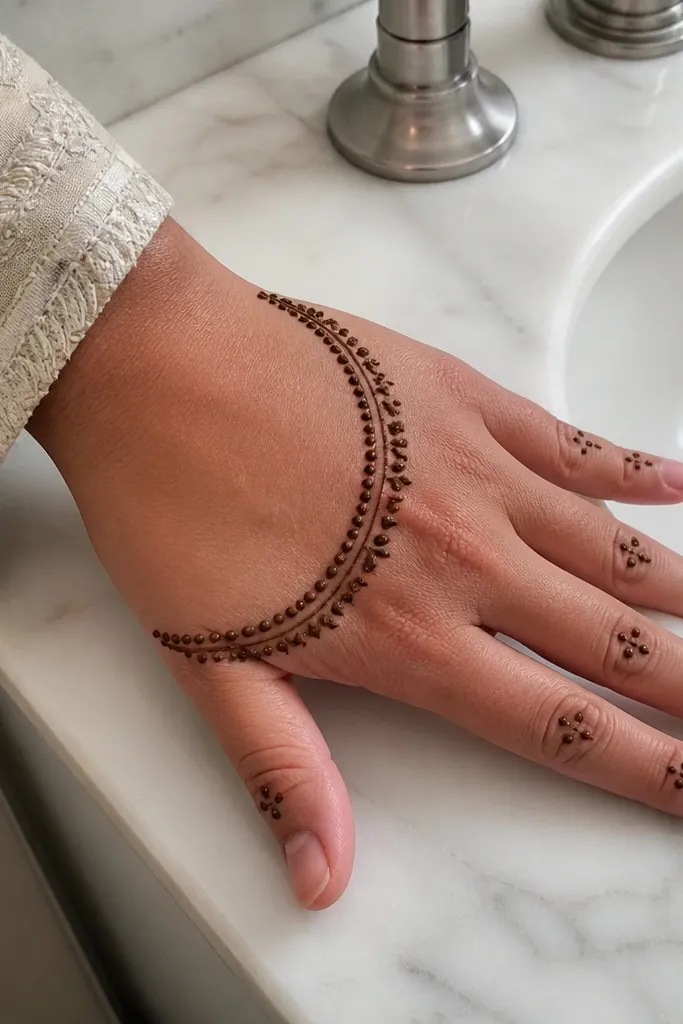
This design uses negative space in a way that flatters most hand shapes. You draw a crescent arc across the back of the hand, then let it “kiss” each finger with a tiny dot cluster. Between fingers, the micro dots act like separators so the design looks planned rather than random. For beginners, the dots are forgiving; even if your dot sizes vary slightly, the pattern still reads. It’s also great for quick holiday wear because it looks fine even with lighter paste staining.
Draw a crescent arc from near the wrist up to the center of the back of the hand. From the arc, extend short curved strokes toward each finger base, then stop before the knuckle. Add a small dot cluster at each finger base and a few dots along the arc edges. Finish with a thin outline around each finger tip using a short “U” shape filled with dots.
Use the cone tip lightly for dots; pressing down too hard creates bumps that smear.
Don’t connect every dot cluster into a full fill — keep it airy so it stays photogenic.
6. Diagonal Vine from Wrist to Middle Finger
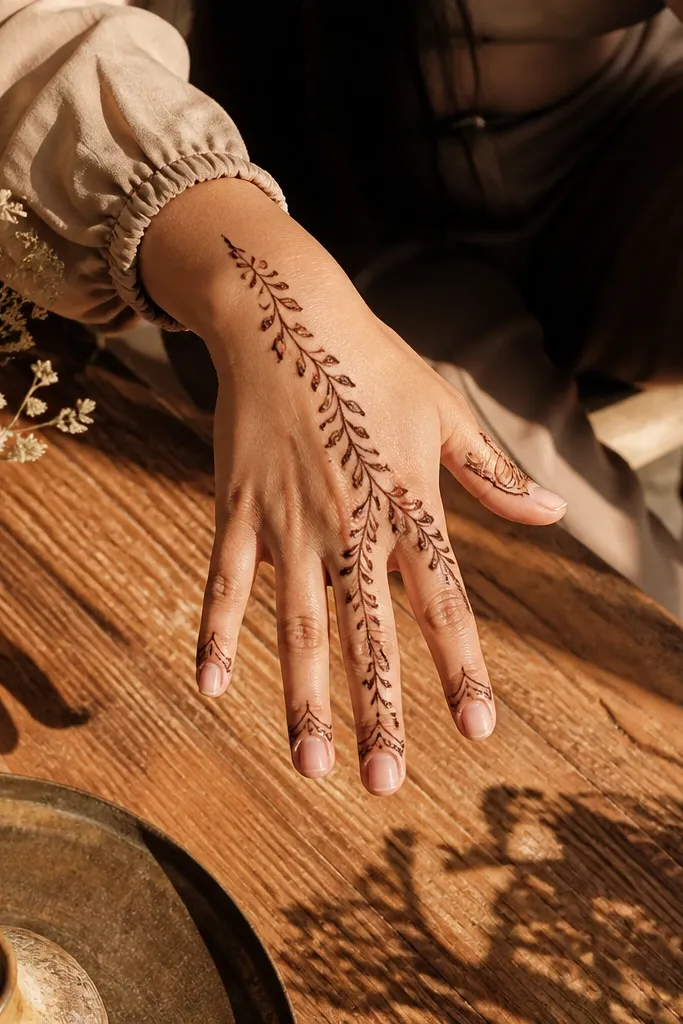
Draw a diagonal line from wrist up toward the base of the middle finger. Add small leaf shapes along the vine — one leaf per segment — and branch once toward the index finger and once toward the ring finger. On each finger, add an outline accent that follows the leaf direction, then add a tiny dot at the leaf tip. Keep the pinky and thumb area light with just one small line and a dot so the design doesn’t crowd.
A diagonal vine creates movement and makes the hand look longer in photos. The vine starts at the wrist and travels toward the middle finger, branching slightly to the ring and index fingers. Each branch ends in small leaf shapes, and the fingers get slim outline accents rather than full coverage. This is beginner-friendly because you’re focusing on one main diagonal line and repeating small leaflets. The result looks intentional even if your leaf shapes aren’t perfect.
AvoidDon’t add too many branches; three main directions look clean and holiday-ready.
Pro tipPlan the diagonal direction first with a faint pencil guide — it’s the backbone of the whole look.
7. Back Hand Flower Burst with Finger Petal Caps
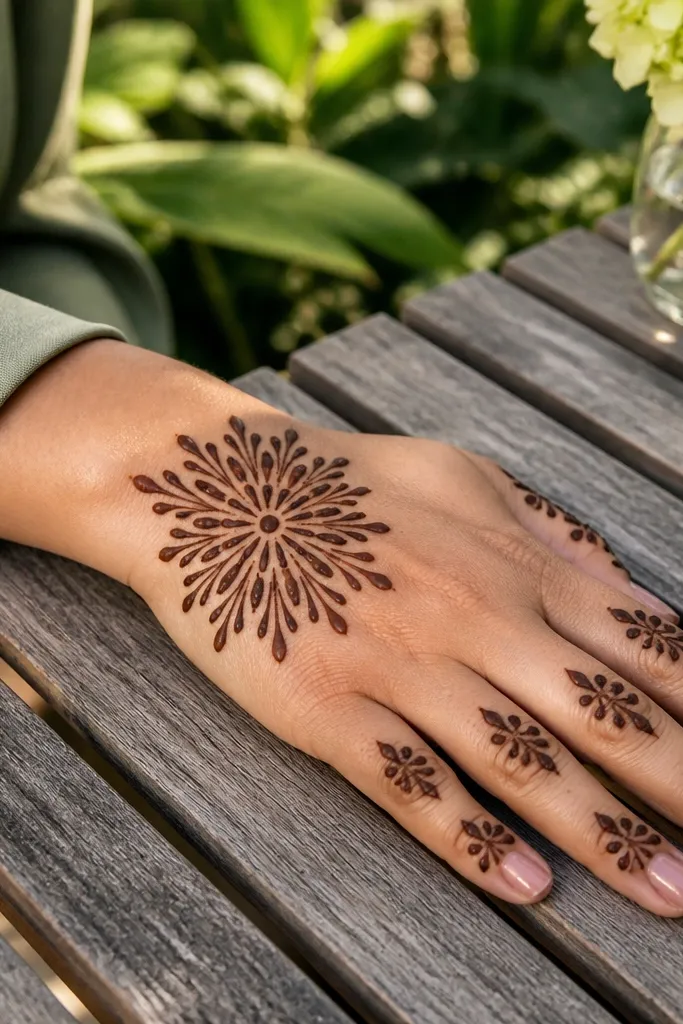
Flower bursts look festive without the heavy filling work. You make one medium flower on the back of the hand, then add petals around it using short teardrops. Instead of covering the fingers, you place petal caps at the tips and small side petals near the knuckles. This keeps the finger pattern neat and helps beginners avoid messy full-finger fills. It also photographs well because the flower shape is a clear focal point and the finger caps frame the hand.
Draw a small circle in the center of the back of the hand, then add 6-8 teardrop petals around it. Connect each petal base to the center circle with a short line so petals look attached. On each finger, draw a petal cap at the tip — a teardrop sitting on its flat base — and add one small side petal near the knuckle. Finish by adding a dotted ring around the center of the flower.
Make the finger caps all the same size; that uniformity is what makes it look “wearable” rather than random.
Avoid drawing petals too wide; wide petals can merge into blobs as the paste dries.
8. Starburst Center with Skinny Finger Ladders
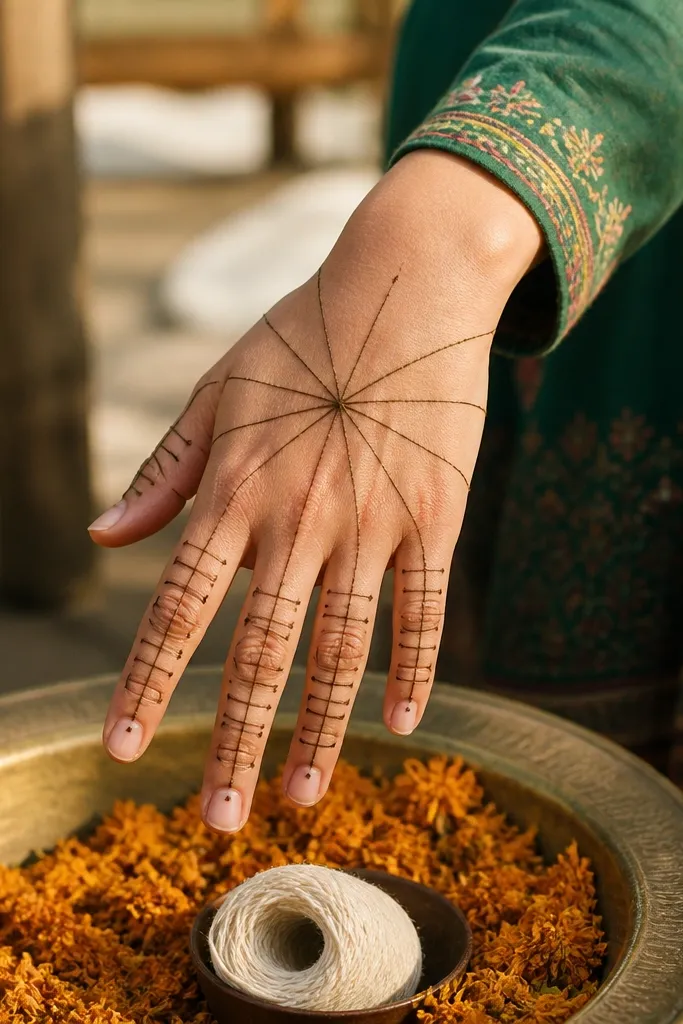
Draw a small dot cluster in the center, then pull 8-10 straight rays outward like a starburst. On each finger, draw two to three horizontal lines and add tiny vertical connectors at the ends to form a ladder feel. Connect the ladder base lines back to the starburst rays using short diagonal strokes. Finish with a dotted border around the starburst center so it looks defined.
This design gives you a party-ready look with simple geometry. The back hand has a starburst center made from straight rays, and each ray connects to a set of skinny ladder lines on the fingers. Ladder lines are just parallel horizontals with tiny vertical connectors, so they’re easier than freehand florals. The negative space between ladders keeps the design crisp. It’s beginner-friendly because you repeat the same ladder unit across fingers.
AvoidDon’t crowd ladders all the way to the finger tip — leaving a small gap makes it look intentional.
Pro tipUse steady pressure for the rays; uneven thickness makes the starburst look shaky.
9. Paisley Chain Across Back Hand
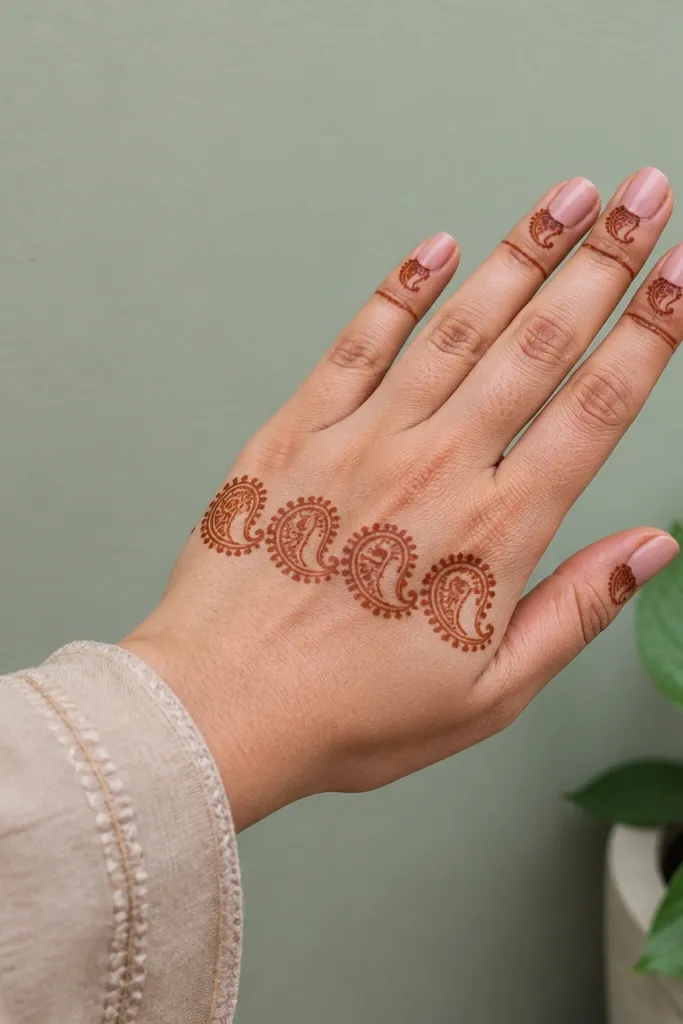
Paisley chains look traditional and clean when you keep the chain consistent. The back of the hand gets a horizontal row of linked paisleys, each one outlined with a small inner curve. Fingers get minimal outline — a thin band at the base plus a single paisley at the side of the tip. This is beginner-friendly because you’re repeating the same paisley shape in a line. It also looks good when you wear it for holidays because the chain reads like a decorative bracelet for your hand.
Draw a horizontal line across the back of the hand as your paisley chain guide. Create 4-6 paisleys along it, linking each paisley tail to the next base with a short curved stroke. For each finger, draw a thin band at the base, then add one small paisley on the outer side near the tip. Finish by adding tiny dot accents between paisleys to separate shapes.
If your paisleys wobble, correct it by keeping the tail curve consistent and only varying the inner swirl slightly.
Avoid filling the paisleys heavily; outline + light inner swirl stains darker and looks cleaner.
10. Outline Mandala Corner with Open Fingers
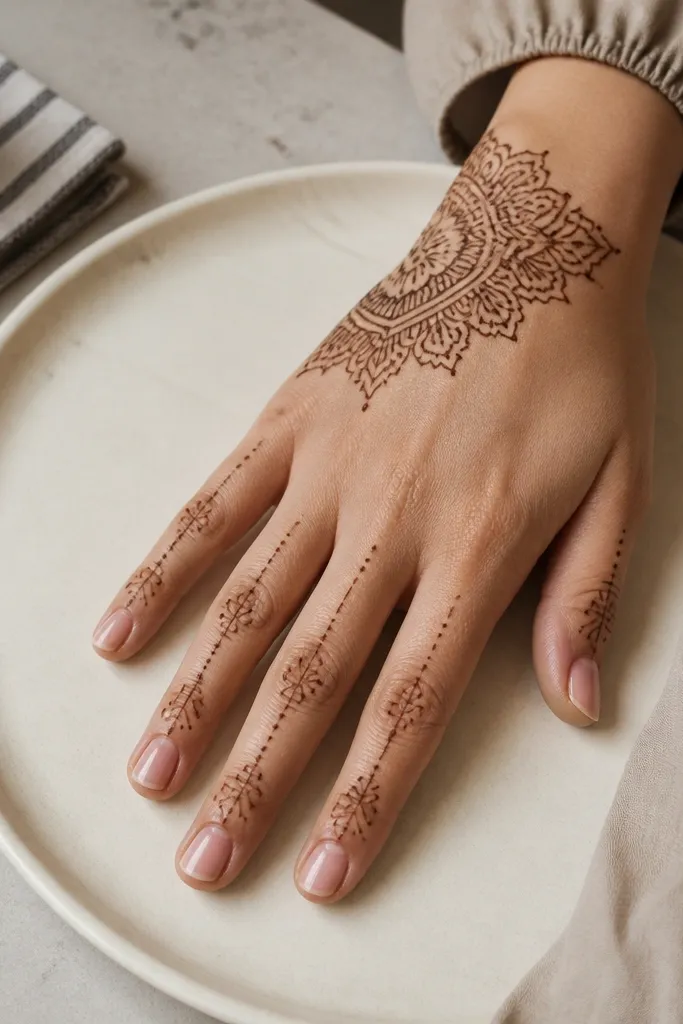
Not every back hand design needs full coverage. This one places a mandala-style outline in the upper corner of the back hand, leaving the center open so the fingers stand out. Finger patterns are light: thin lines down each finger with small corner triangles at the knuckles. Beginners like it because the main work is contained in one corner. It’s photogenic because the outline corner frames the hand and the open center keeps it airy.
Pick the upper corner of the back hand and draw a rounded mandala outline using a small circle center. Add 5-7 petal shapes around the circle, then connect petal tips with short curves. On each finger, draw a thin vertical line from knuckle to near the tip and add a tiny triangle at the knuckle pointing inward. Finish with two or three micro dots around the mandala outline for contrast.
Keep the mandala corner about the size of your thumb pad; too big crowds the fingers.
Don’t extend the mandala outline across the whole back hand — it stops looking beginner-friendly fast.
11. Wrist Band + Finger Garland Set
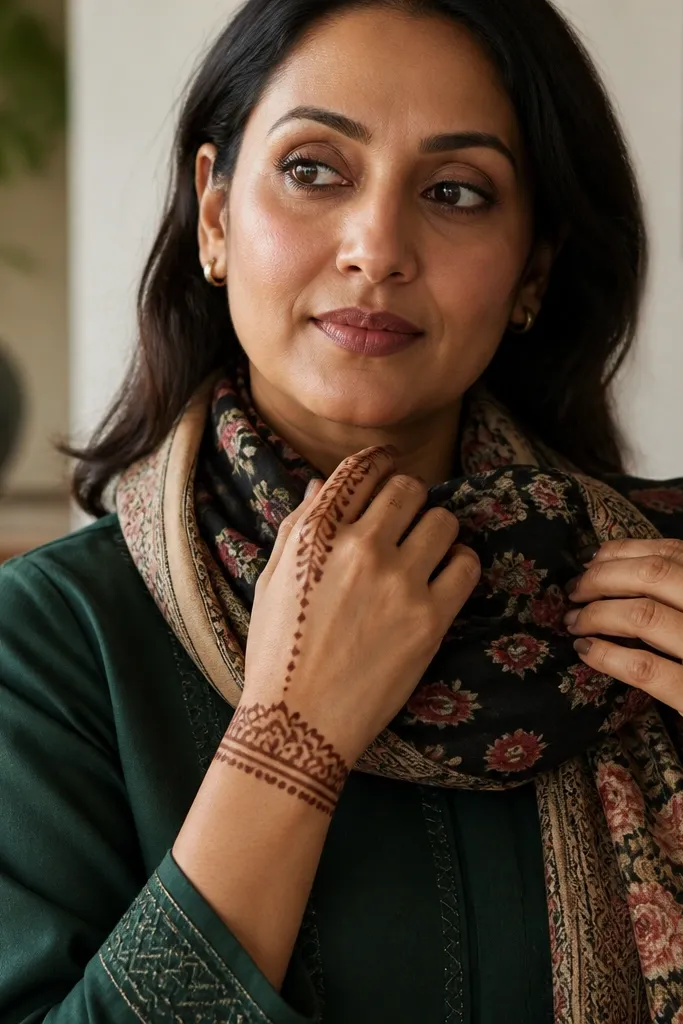
Draw a wide wrist band — a thick outline — across the lower back of the hand, then add small upward arches along the band’s top edge. On each finger, draw a curved line down one side and place small teardrops along it, leaving gaps between teardrops. Near the tip, add one larger teardrop as a cap. Finish by connecting the wrist band to the finger garlands with short diagonal lines.
This set looks like jewelry because it starts at the wrist with a defined band and continues into simple finger garlands. The wrist band is a thick outline with small arches, and each finger gets a repeating garland of tiny teardrops along one side. It’s beginner-friendly because tiny teardrops are easier to place than full florals. It also keeps the finger pattern consistent, so your hand looks put together even with minimal fill.
AvoidAvoid garlands on both sides of every finger; that makes the hand look cluttered.
Pro tipUse one side of each finger as your “garland rail” — it keeps the design from flipping left and right.
12. Half-Moon Border with Center Dot Fill
Draw a half-moon outline across the back of the hand, with the flat side near the wrist. Inside the border, place tiny dots in rows, keeping spacing consistent. On each finger, draw a thin outline at the tip and add 3-5 dots inside the tip outline. Connect the half-moon border to finger areas with short curved lines so it feels like one set.
This one is all about clean borders and controlled fill. You draw a half-moon border on the back of the hand, then fill the inside with tiny dots instead of heavy shading. Finger tips get slim outlines that match the dot style. Dot fill is beginner-friendly because it hides small line mistakes and still looks detailed in photos. It also dries evenly and stains reliably, which matters if you want strong contrast without complicated work.
AvoidDon’t use big dots; large dots look like bumps and blur as they dry.
Pro tipDot fill looks best when dots are the same size — squeeze the cone gently and keep pressure steady.
13. Back Hand Net with Finger Tip Triangles
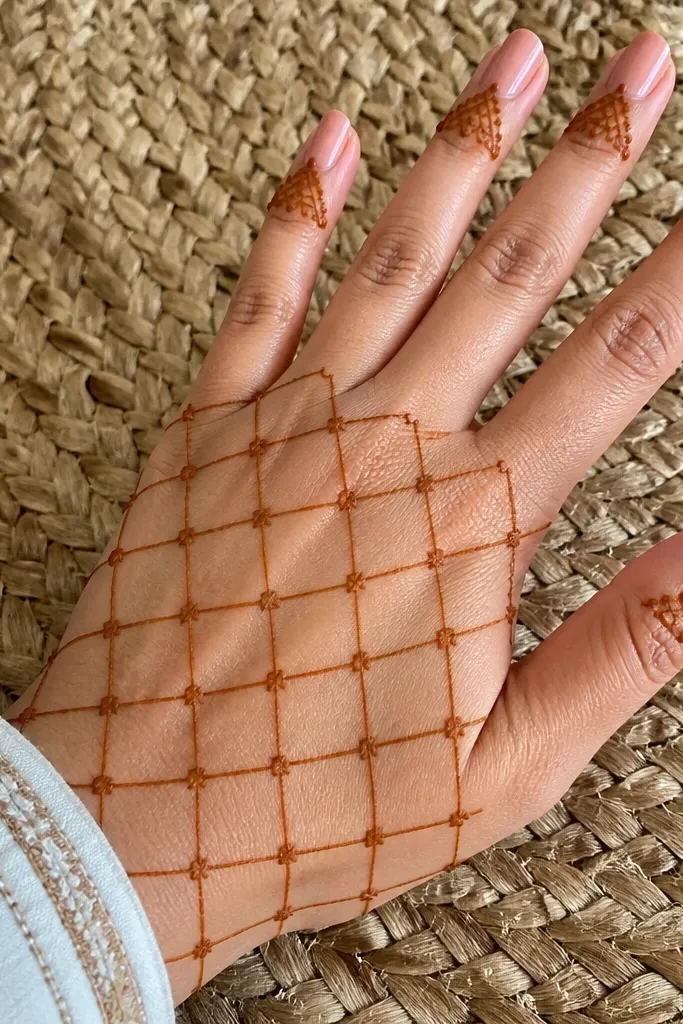
Outline a rounded rectangle on the back of the hand, then draw diagonal lines to form a net. Add a second set of diagonal lines to complete the grid, then thicken only the outer border line. On each finger, draw a thin band at the base, then add 2-3 triangles at the tip stacked in a row. Finish by adding a tiny dot at the base of each triangle.
A net pattern looks modern and clean while still reading as mehndi. The back of the hand has a light net grid, and each finger tip gets small triangles that point upward like little peaks. This makes the fingers look neat even if you keep the rest of the finger light. It’s beginner-friendly because grids and triangles are straightforward shapes. The design also photographs well because the net creates a soft texture and the triangles add sharp structure at the top.
AvoidAvoid filling the net too dark; keep it outline-light so it stays airy.
Pro tipFor triangle tips, keep their bases aligned to the same point on each finger.
14. Curved Ribbon Across Fingers
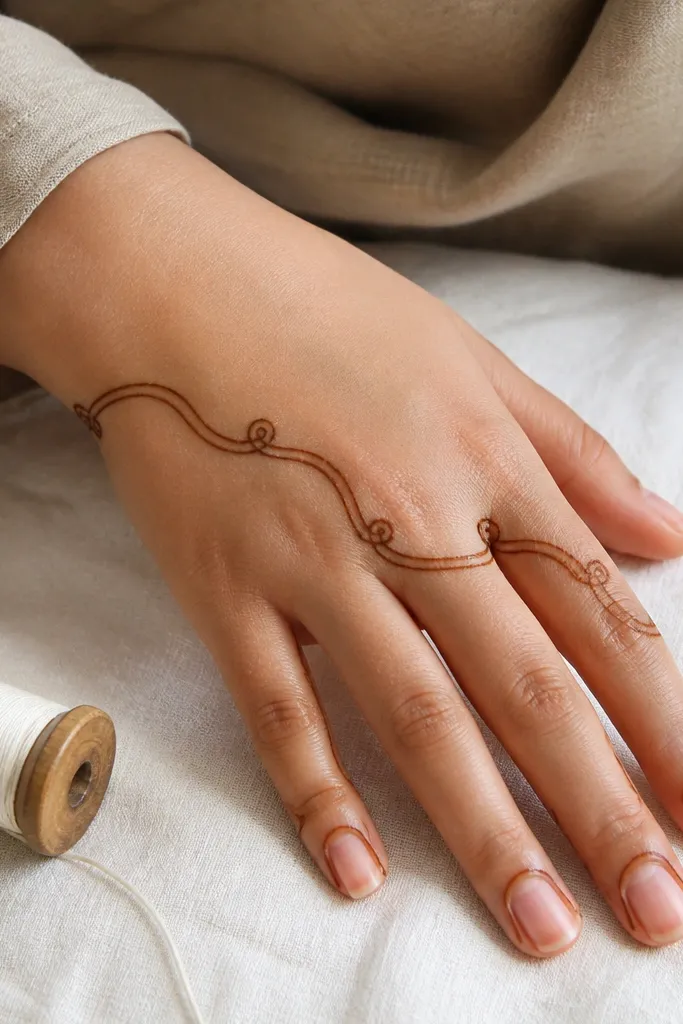
This design uses a ribbon idea to connect fingers visually. You draw a curved ribbon that crosses from one finger to the next at the knuckle level, then add small loops where the ribbon changes direction. It’s beginner-friendly because you’re repeating one curve and one loop unit. The back of the hand stays mostly open except for a matching ribbon tail, so the look stays clean. In photos, the ribbon makes the hand look coordinated and smooth.
Draw a curved ribbon line across the back of the hand from index side toward the middle, then bring it down to the finger knuckle area. On each finger, add a small loop at the knuckle where the ribbon passes, then continue the ribbon into the next finger. Keep the ribbon tail thin and add one small dot at the end near the wrist. Finish by outlining each finger tip with a thin “U” and filling the inside with 2-3 dots.
Keep ribbon curves wide. Tight curves look messy and crowd the knuckles.
Don’t draw the ribbon too thick — it swallows the loop detail.
15. Back Hand Rosebud with Side Scroll Fingers
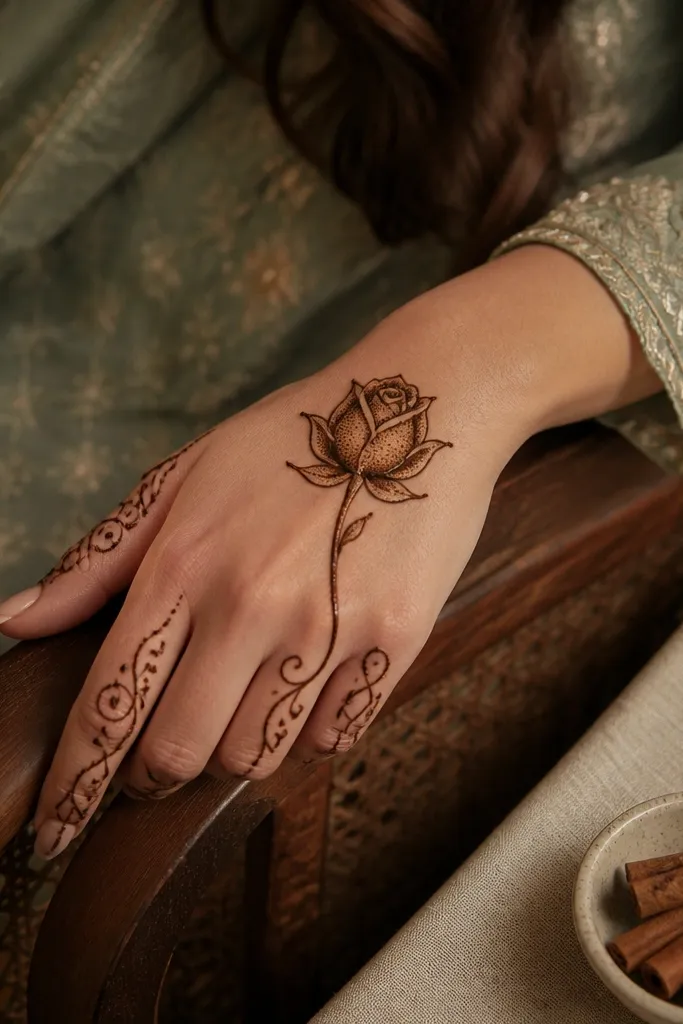
Draw a small teardrop center rosebud in the middle of the back of the hand. Layer 5-6 smaller teardrops around it, slightly overlapping, and outline each petal with a clean line. On each finger, draw a thin vertical line down the side, then add a scroll near the tip that curls inward. Connect the rosebud to the finger side lines with short curved strokes so the whole set looks connected.
Rosebuds look sweet and holiday-appropriate without requiring a full floral sleeve. You draw one rosebud on the back of the hand using layered teardrops, then add side scrolls on fingers — thin curls that sit beside the finger lines. This keeps the fingers elegant and avoids bulky fill. Beginners like it because rosebud petals are repeatable, and scrolls are easy to outline. The rosebud is your focal point, and the side scrolls give detail without covering the entire finger.
AvoidAvoid filling the rosebud center heavily — leave a clear outline so it stays defined.
Pro tipMake rosebud petals slightly different heights; identical petals can look flat in photos.
16. Zigzag Border Back Hand with Dot Steps
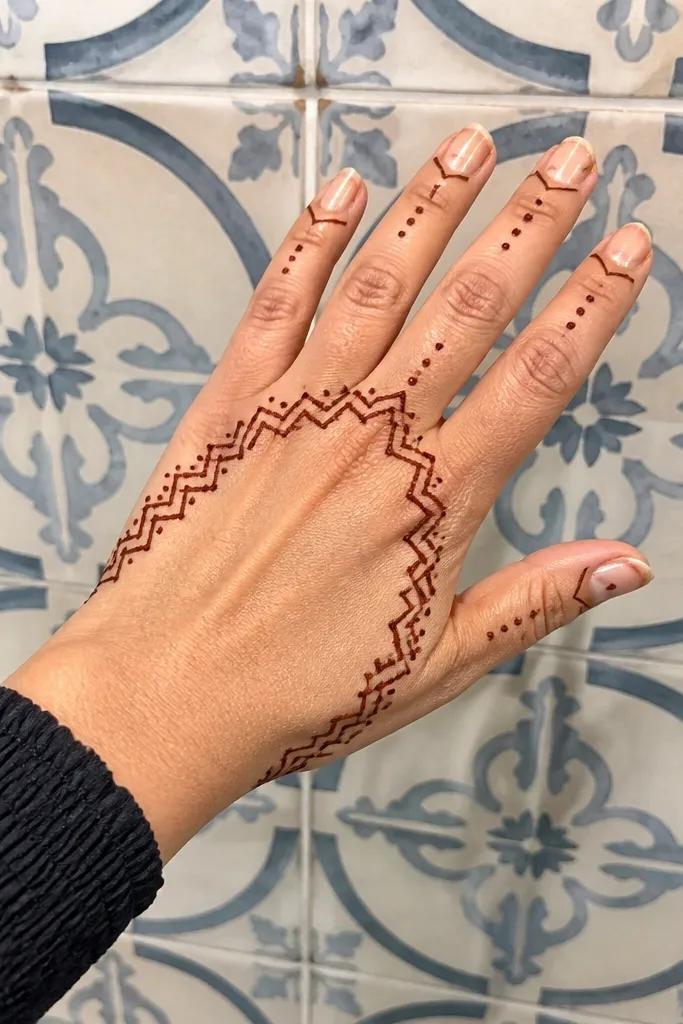
Outline a zigzag border across the back of the hand, leaving the center open. Inside the center, draw 3-4 diagonal dot steps — dots aligned in a staircase pattern. On each finger, add a thin base line, then place three dot steps along the finger outer edge and finish with a small outline cap at the tip. Add a few dots along the zigzag border corners to sharpen the look.
Zigzag borders create a graphic look that still counts as mehndi. The back of the hand has a zigzag border around a mostly open center, and the center has dot steps that lead toward the fingers. Each finger gets a small set of three dot steps and a thin outline cap. It’s beginner-friendly because zigzags are easy to repeat and dot steps hide uneven line thickness. This is a great option when you want something photogenic but don’t want to spend time filling.
AvoidDon’t try to fill the open center; the empty space is what makes the zigzag border pop.
Pro tipKeep dot steps in straight diagonal lines by using the cone tip as a guide, not freehand floating.
17. Spider Web Corner with Finger Knuckle Rings
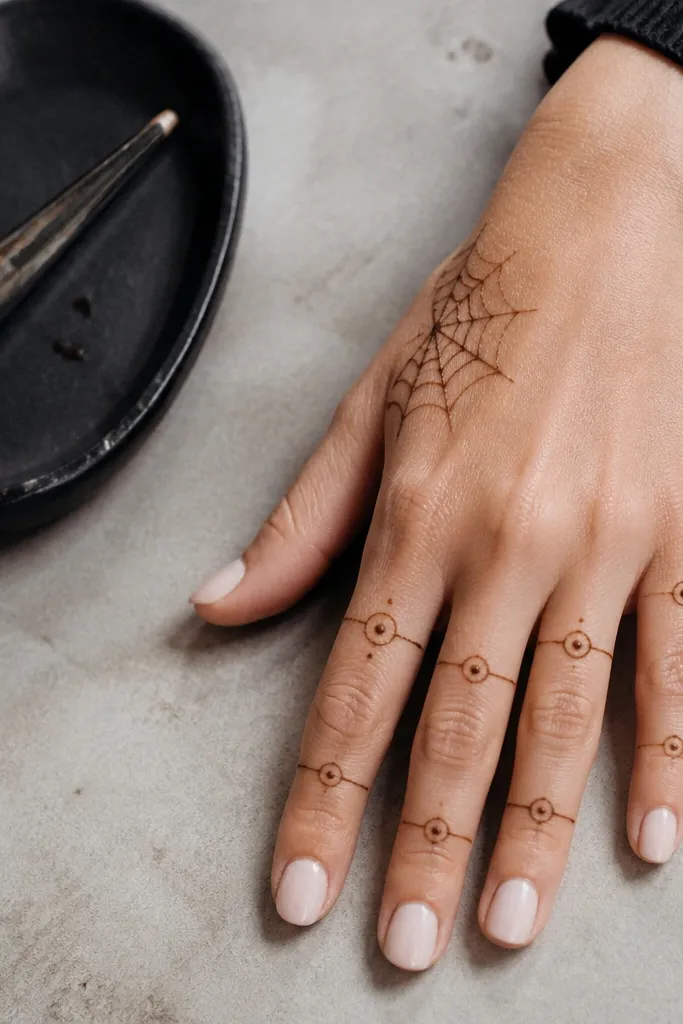
Draw a small circle in the back hand corner and add 8-10 spokes radiating out. Then draw a few curved lines connecting the spokes to make a web, thickening only the outer ring. On each finger, draw a thin knuckle ring — one circle around the knuckle area. Place a dot at the center of each ring, and connect the web to the ring area with one short diagonal line.
Web patterns look detailed but the beginner version is simple and fast. You place a small spider web in one corner of the back of the hand, then add rings at each knuckle — thin circles that frame the joint. Finger tips get a tiny dot at the center of each knuckle ring. This gives a jewelry-like look without heavy fill. In photos, the web corner reads clearly, and the knuckle rings keep the fingers structured. It’s a strong choice for holiday wear when you want something “wow” without long time.
AvoidAvoid placing the web in the center of the hand; corner placement keeps it balanced.
Pro tipWeb lines should be light and spaced; a dense web turns into a dark patch.
18. Two-Flower Side Spread with Thumb Focus
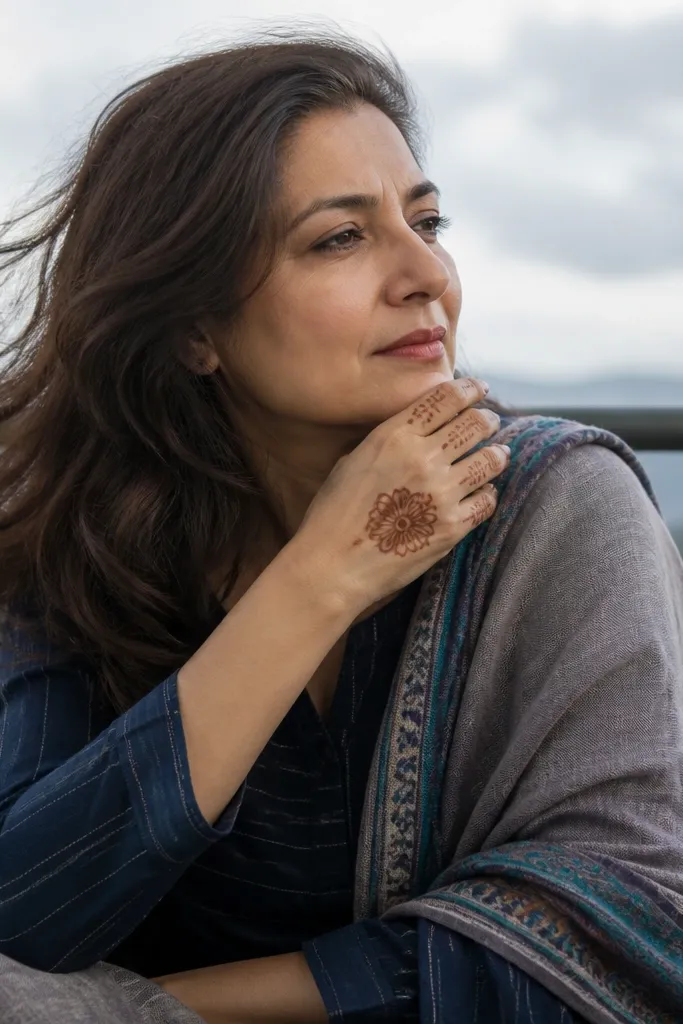
This design uses side flowers to give the hand a balanced, decorative spread. Two small flowers sit on the left and right sides of the back of the hand, and the thumb gets extra attention with a mini band and a tiny bud. Finger patterns are simple: thin lines down each finger with small petal caps. It’s beginner-friendly because you only need to master one flower shape twice. The thumb detail makes it look more complete in photos where the thumb often looks empty.
Draw two small flower centers on the back of the hand — one toward the index side and one toward the ring side. Add 5-7 teardrop petals around each center and outline petal tips with tiny dots. On the thumb, draw a mini band at the base and one petal cap at the tip. For each finger, draw a thin vertical line and add a small petal cap at the tip, keeping the scale consistent across fingers.
Make both flowers the same petal count. Matching count is the fastest way to make it look “designed.”
Don’t over-detail the pinky compared to other fingers; keep it as light as possible.
19. Mini Mehndi Frame with Central Leaf
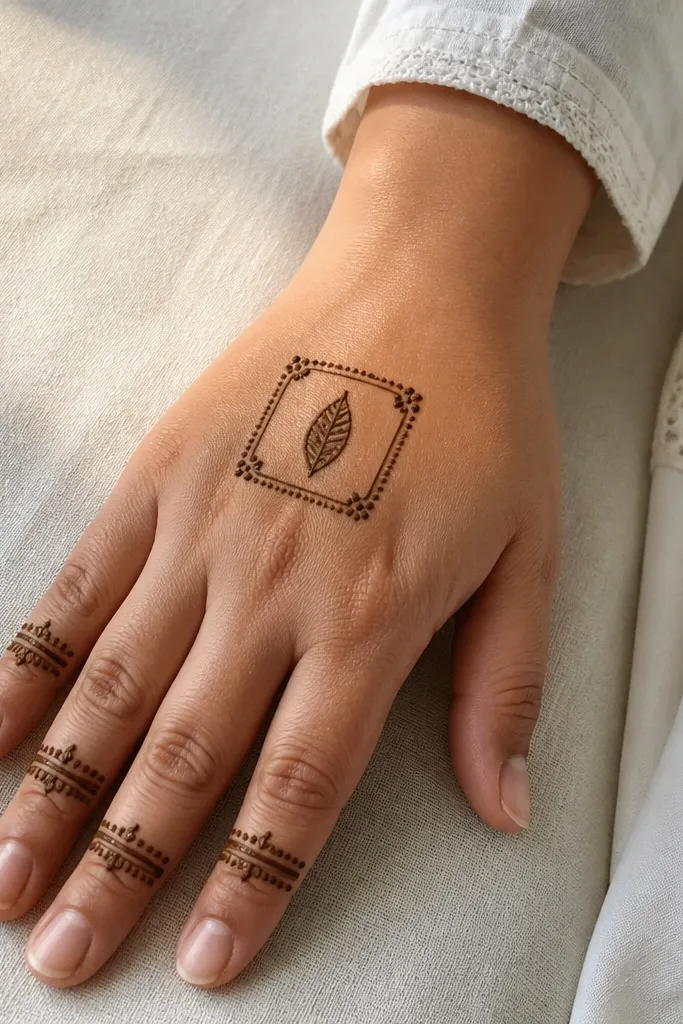
Frames make the design look tidy even if you’re still learning line control. This one draws a mini frame — like a rounded square — around the center of the back of the hand. Inside, you place one central leaf, then add tiny dot corners where the frame turns. Finger patterns are light: a band at the base and a thin outline at the tips. It’s beginner-friendly because the frame lines give structure, and the leaf is a single focal shape. The look is especially photogenic because the frame edges catch contrast and hold the design together.
Outline a rounded square frame on the back of the hand, leaving a gap from the wrist and finger bases. Draw one central leaf inside the frame, outline it cleanly, and add light hatching only on the leaf veins. On each finger, draw a thin base band and a small tip outline with 2-3 dots inside. Add dot clusters at each frame corner to finish the structure.
If your frame line wobbles, redraw only the outer border — keep the inside leaf as your clean focal line.
Avoid making the frame too big; it will crowd the finger base areas.
20. Single Line Bracelet Across Back Hand
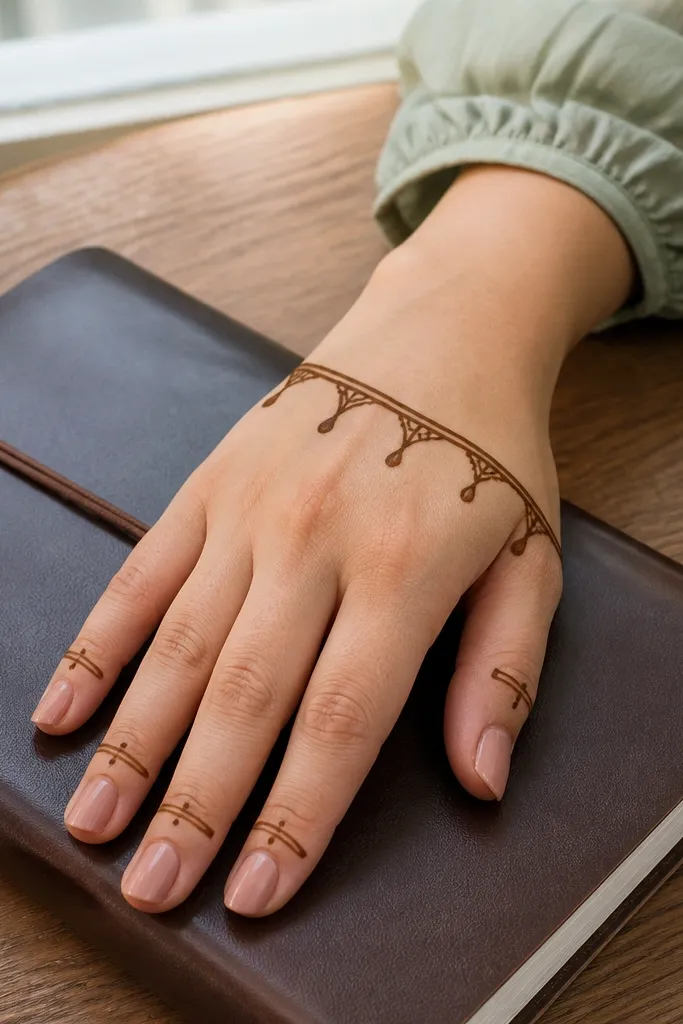
Draw a bracelet-like arc across the back of the hand from one side near the wrist to the other side near the center. Thicken the arc line and add small teardrops hanging down at each finger spacing point. On each finger, add a thin curved outline at the tip and a short vertical line connecting it to one nearby teardrop. Finish by adding 3-4 dots near the bracelet ends so it looks balanced.
This is the “I want it to look neat in 45 minutes” design. You draw a single bracelet line across the back of the hand — a thick outline — and hang tiny teardrops from it at finger intervals. The fingers get only a thin tip outline so the teardrops do most of the visual work. It’s beginner-friendly because you’re drawing one continuous curve and repeating small teardrops. The bracelet line makes the pattern look intentional, and the hanging teardrops add a holiday feel without heavy filling.
AvoidDon’t add teardrops to every single gap between fingers; pick the main finger intervals to avoid crowding.
Pro tipKeep teardrops all the same length so the bracelet looks even in photos.
21. Herringbone Back Hand with Finger Side Bars
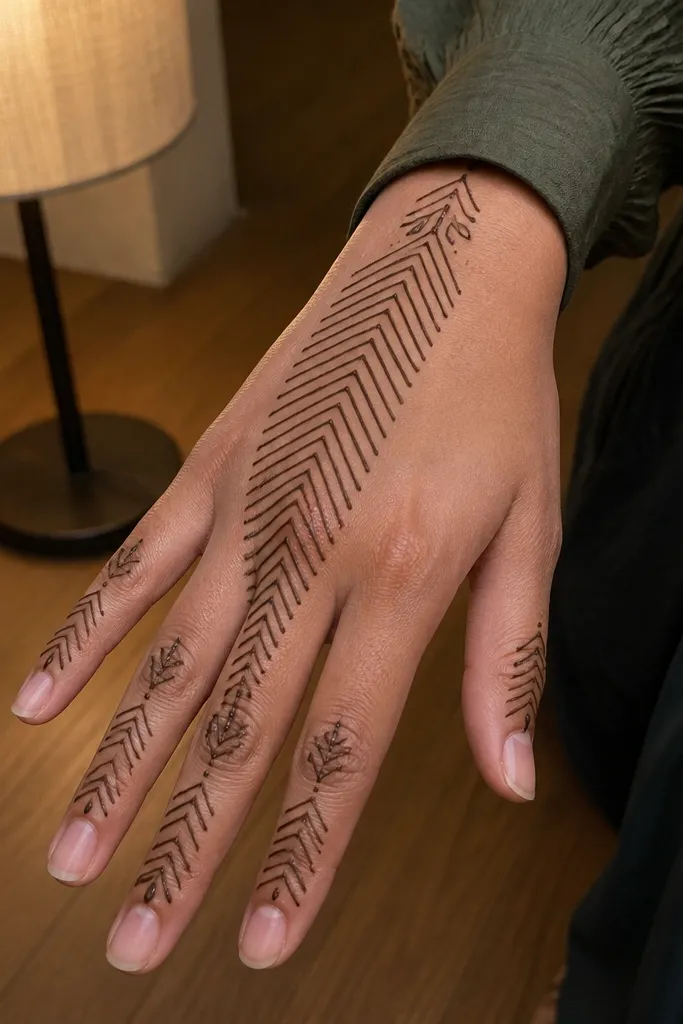
Herringbone is one of the cleanest patterns for beginners because it uses repeated angles. The back of the hand has a herringbone band — V shapes stacked — and the fingers get thin side bars that match the V angle rhythm. This gives a modern, photogenic look without complex florals. It also dries dark when you outline the V shapes clearly. If your mehndi often looks “thin” or incomplete, this pattern has enough structure to look full even with light fill.
Outline a horizontal band on the back of the hand, then fill it with herringbone Vs — draw a V, then place the next V so it touches at the center. Add a clean outer border around the herringbone band. For each finger, draw one thin side bar on the outer edge and add tiny V notches near the knuckle. Finish with a small dot at each bar base to keep the pattern crisp.
Use the same V width across the band. Width drift is what makes herringbone look messy.
Avoid filling beyond the band into the open center; it makes the design feel overcrowded.
22. Paisley Tip Caps with Open Back Hand
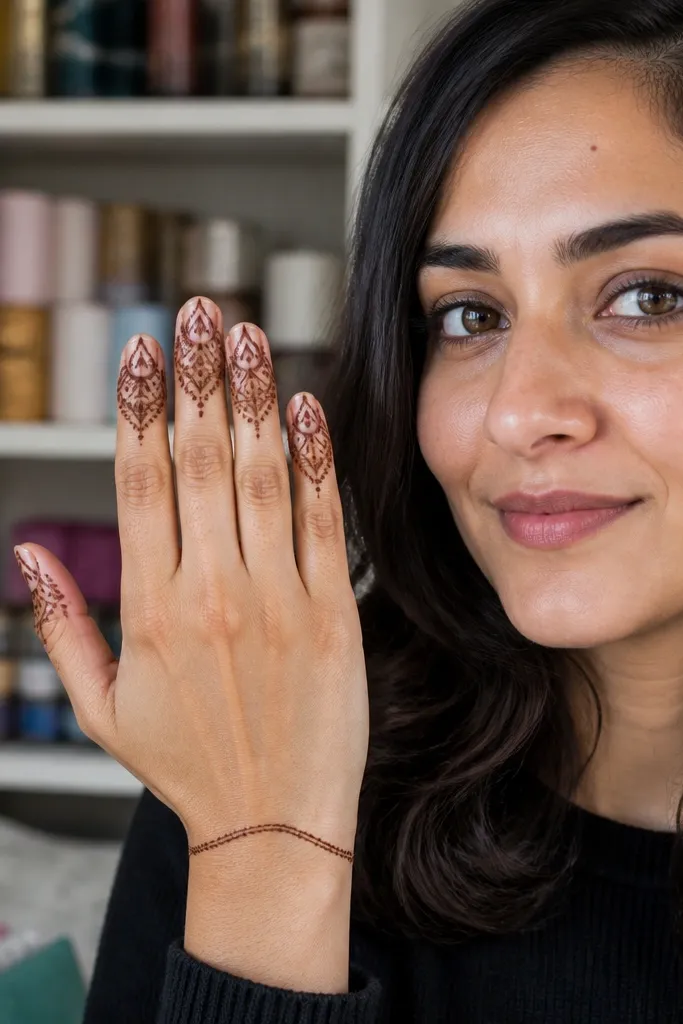
This design is for days you want a clean, fast finger look without drawing a full back-hand pattern. The back of the hand stays open with just a light outline near the wrist, while the fingers get paisley tip caps. Each finger tip has a small paisley facing the same direction, and the outer edges of the fingers get a thin line for definition. It’s beginner-friendly because paisley caps are smaller than full paisley motifs. Photographically, the finger tips become the star, which works great with rings and bracelets.
Draw a thin wrist outline arc on the back of the hand and stop there — keep the center open. On each finger, draw a paisley cap at the tip using an outer paisley outline and a small inner swirl. Add a thin line down the outer edge of each finger from knuckle to near the cap. Finish by adding 2-3 dots around each paisley cap for separation.
Keep all paisley caps facing the same direction so the fingers match in photos.
Avoid adding heavy lines on the back of the hand; the open center is the point.
23. Back Hand Triangle Panel with Finger Fan
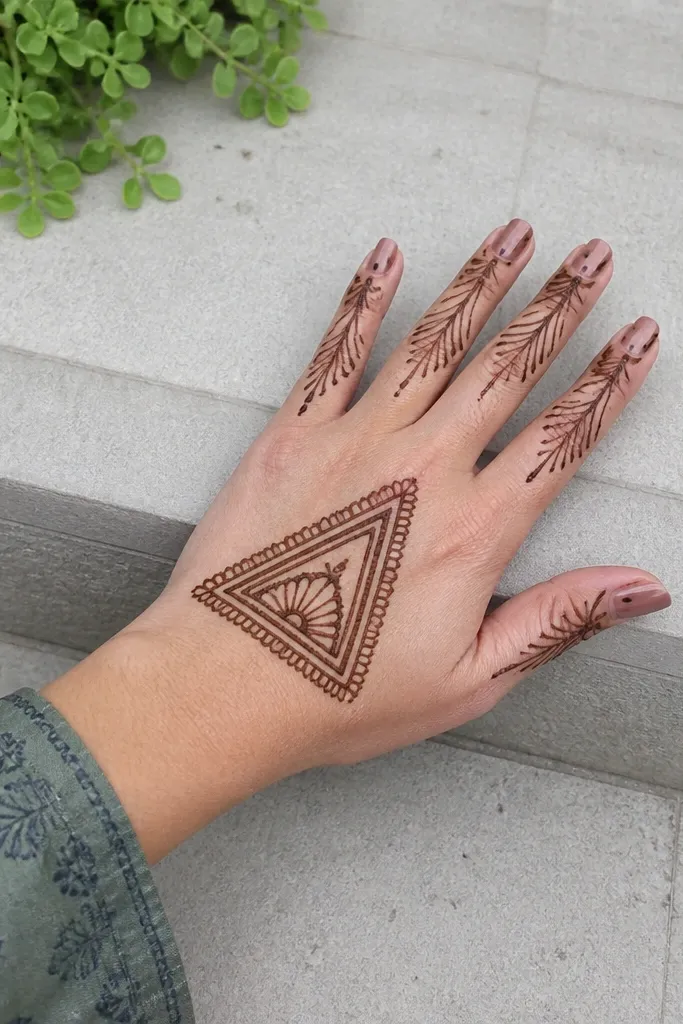
Triangle panels look sharp and structured, like a mini geometric panel on the back of the hand. You draw one triangle panel in the center, then add a fan pattern across the fingers — thin curved lines that spread outward. Finger tips get small dots at the fan ends. This is beginner-friendly because triangles and fans are predictable shapes. It’s also very photogenic: geometry reads clearly even when mehndi fades. Great for holiday wear when you want a clean, modern aesthetic.
Draw a triangle panel centered on the back of the hand with the base near the wrist and the point toward the middle of the hand. Outline the triangle and add one internal line down the center to split it. On each finger, draw a fan of 2-3 thin curved lines that start near the knuckle and spread toward the tip. Place a dot at the tip end of each fan line, then add a thin outline at the finger tips to close the shape.
Make the fan lines start at the same height on each finger for a matched look.
Don’t let fan lines cross over each other; crossing makes it look like a tangle.
24. Double Border Wrist-to-Finger Sweep
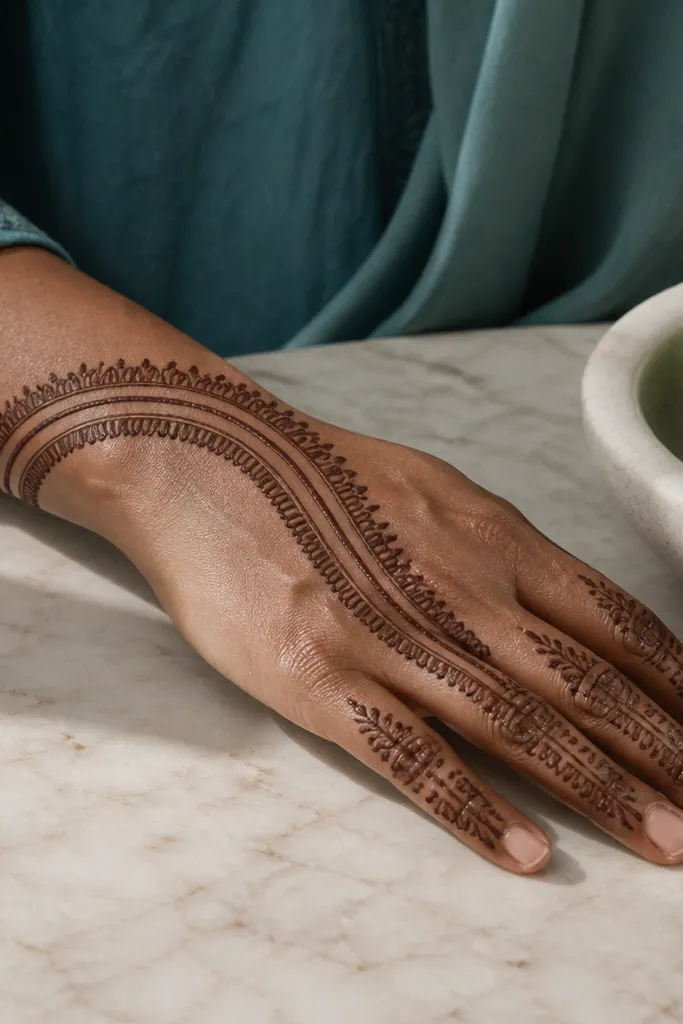
Double borders make beginner mehndi look finished fast. You draw a sweeping arc from the wrist across the back of the hand using two parallel lines, then you add finger outlines that follow the sweep rhythm. Finger bands are minimal and sit mostly on the outer edges, so the design stays clean. This is beginner-friendly because you’re repeating one sweep and adding simple outlines at the fingers. It also photographs well because the double line creates strong contrast that holds up even when the paste fades.
Draw the first sweeping arc from the wrist to the center of the back of the hand, then draw a second parallel arc close to it. Connect the sweep to each finger with short diagonal strokes at the knuckle level. On each finger, add a thin outline band that follows the arc direction and ends with a small cap at the tip. Finish by adding tiny dots along the outer border of the sweep where it meets fingers.
Keep the two border lines the same thickness. Uneven thickness makes the sweep look accidental.
Don’t add full fill inside the sweep; keep it outlined so it stays crisp.
25. Sunburst Back Hand with Tiny Finger Rays
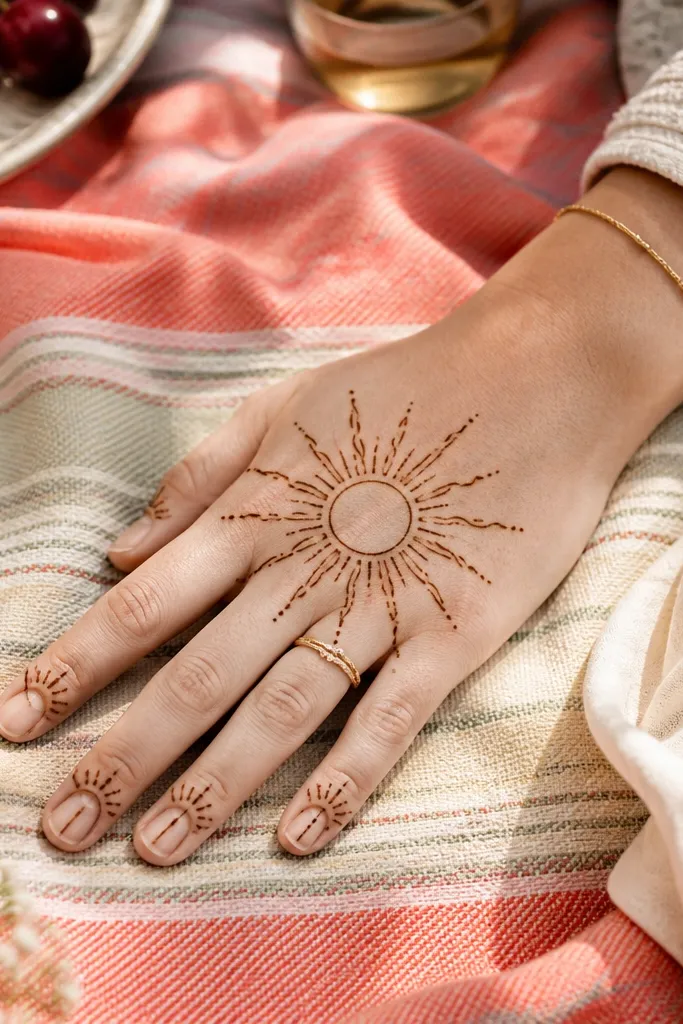
Draw a small circle in the center of the back of the hand. Add 10-12 short rays around the circle using straight lines, keeping spacing even. On each finger, draw a thin outline at the tip and add 2-3 tiny ray marks angled outward from the tip. Connect the center sunburst to the finger tips with short diagonal lines so the rays feel like they travel across the hand.
Sunburst designs look cheerful and holiday-ready while staying simple. You place a sunburst center on the back of the hand, then echo the rays as tiny marks at each finger tip. The back hand rays are short and evenly spaced, which keeps the design beginner-friendly. Fingers get just a thin outline and a few ray marks — no heavy filling needed. This is one of the best options if you want a strong photo look without spending time shading.
AvoidAvoid long rays — they spill into the fingers and crowd the knuckles.
Pro tipCount your rays and keep the count consistent; it makes the sunburst look deliberate.



