
1. Double Vine Border With Thumb Dot Cluster
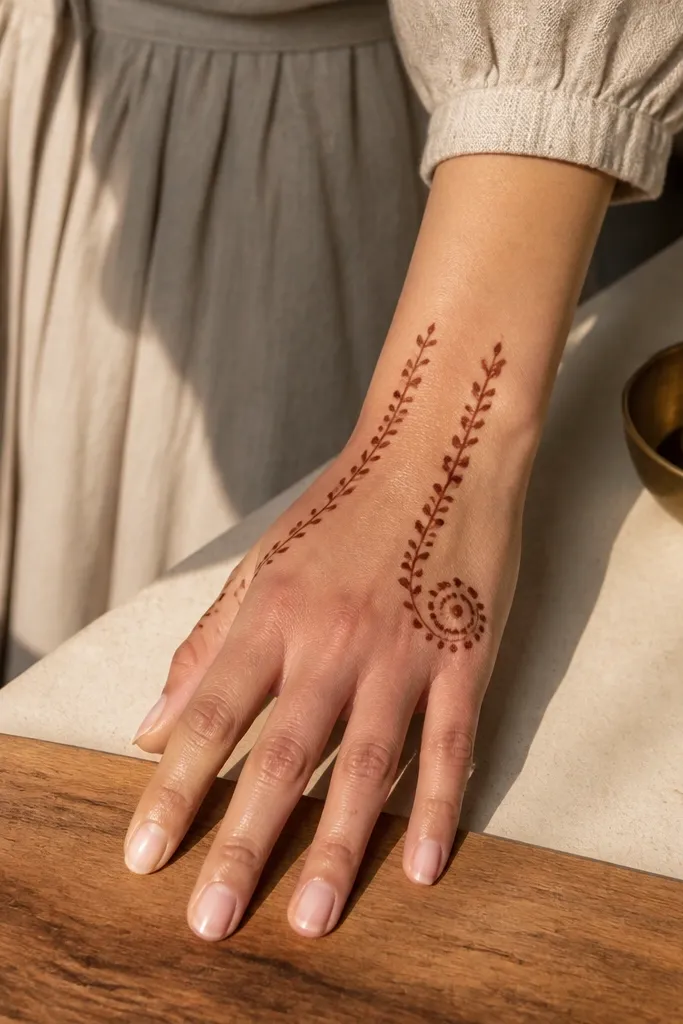
This is the back-hand look I’d pick when you want “simple” but still want it to photograph like a full design. Two parallel vine lines create a clean frame from wrist toward the knuckles, and the thumb-side dot cluster adds a focal point that balances the hand. Keep the vines medium thickness and use hairline swirls only at the ends so the pattern stays airy. This design works great for beginners because you’re repeating the same vine shape on both sides, which makes spacing easier.
Step 1: Draw a light placement guide: one line from wrist center to the start of the index-knuckle area, then mirror it on the ring side. Step 2: Pipe a medium vine along each guide and add a tiny leaf at the midpoint of each vine. Step 3: Near the thumb base, add 7-10 dots in a tight cluster, then connect two dots with a short hairline curve so it looks intentional. Step 4: Finish by adding 2-3 small dot groups between the vines so the negative space stays clean.
Let the vine dry 2-3 minutes before adding dots so they don’t smear into the outline.
Don’t fill the gaps with heavy paste — the frame loses its airy look.
2. Three Fan Pattern Across the Upper Back Hand
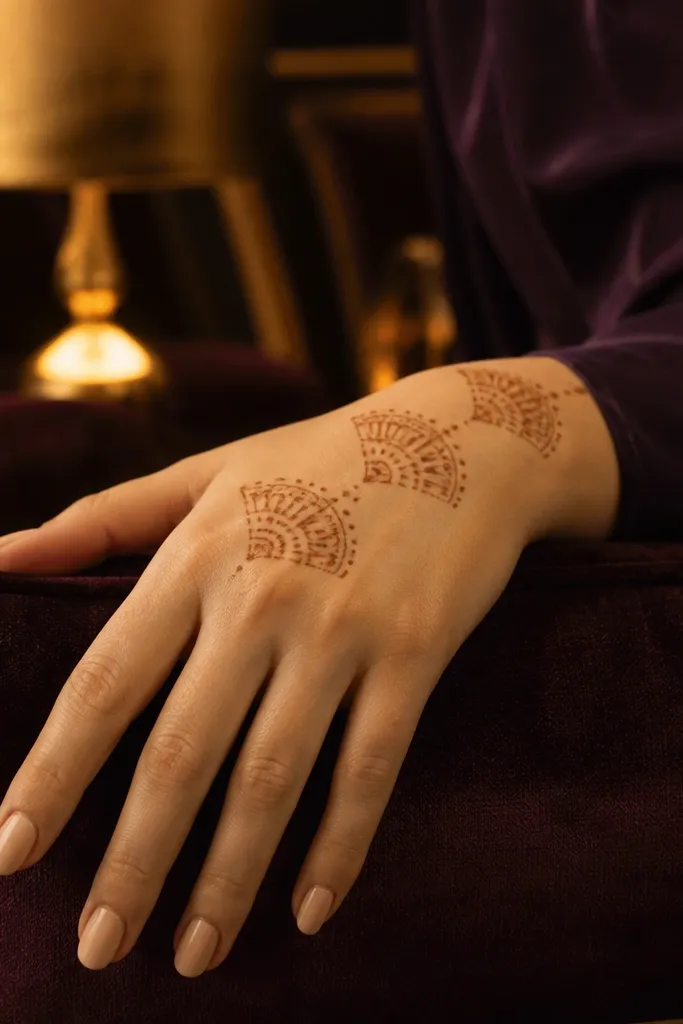
Fans look delicate and festive without needing a full sleeve. This design places three fan motifs across the upper back of the hand, usually spanning from thumb side toward the center knuckles. Each fan has a light outline and small dots in the gaps, so even a simple build reads as lace. It’s a smart choice for holiday wear because it looks crisp even if your lines aren’t perfect; the fan structure hides minor unevenness.
Step 1: Start at the wrist edge and mark three points where each fan will sit: one near thumb side, one center, one near ring side. Step 2: Pipe a fan outline at each point using 6-8 short hairline arcs that meet at a base point, then add a dot row between arcs. Step 3: Connect the base points with a thin vine line that runs across the top of the hand. Step 4: Add one tiny leaf to the end of each fan to finish the edges.
Pro tipUse a smaller cone tip than you think you need; fans look sharper with thinner arcs.
AvoidSkip big petals here — larger shapes take too long to dry and blur.
3. Knuckle Sparkle Lattice With One Center Leaf
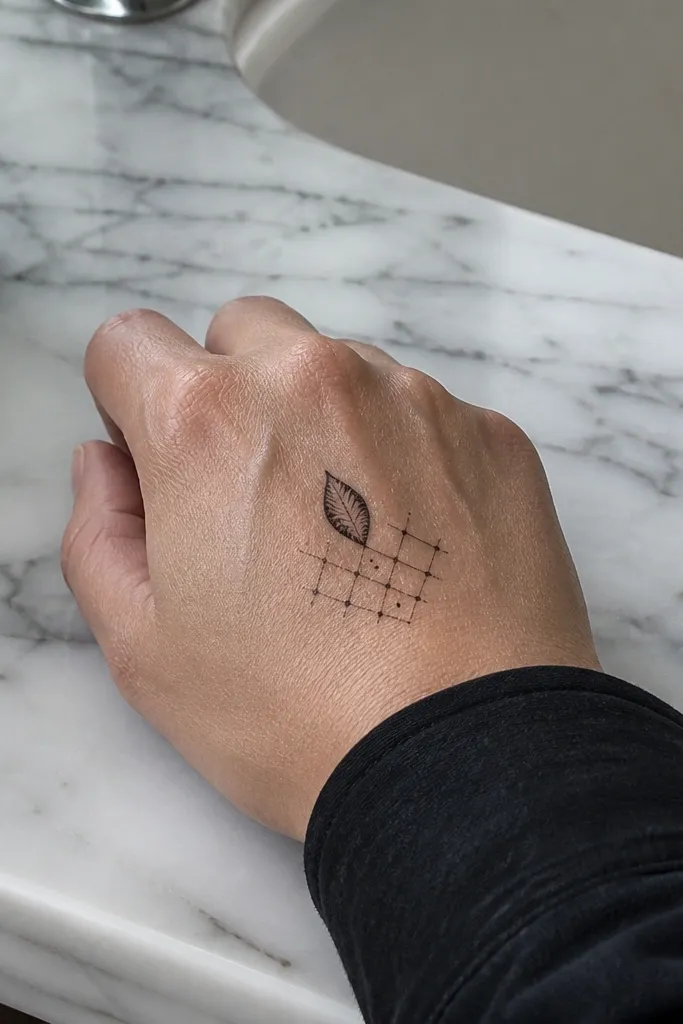
If your past designs turned uneven around knuckles, this one keeps you anchored. A simple lattice of short lines and dots sits near the knuckle area, while a single leaf in the center gives the design direction. The lattice gives texture without flooding the hand, and the center leaf keeps the whole look from feeling random. This works well when you want something photogenic but you don’t want to cover the entire back hand.
Step 1: Pipe a central leaf vertically up the back of the hand, keeping it narrow and letting the tip reach close to the index knuckle line. Step 2: For the lattice, draw two short horizontal guide lines across the knuckle zone. Step 3: Between the guide lines, draw tiny diagonal ticks and connect them with dots at intersections, aiming for a grid that’s 3-4 squares wide. Step 4: Finish by adding 2-3 sparkle dots along the leaf stem to tie the center and knuckles together.
Keep the lattice to the knuckle zone only; extending it downward makes it look crowded.
Don’t over-ink the leaf — a thick leaf turns into a blot.
4. Wrist-to-Center Vine With Side Petal Steps
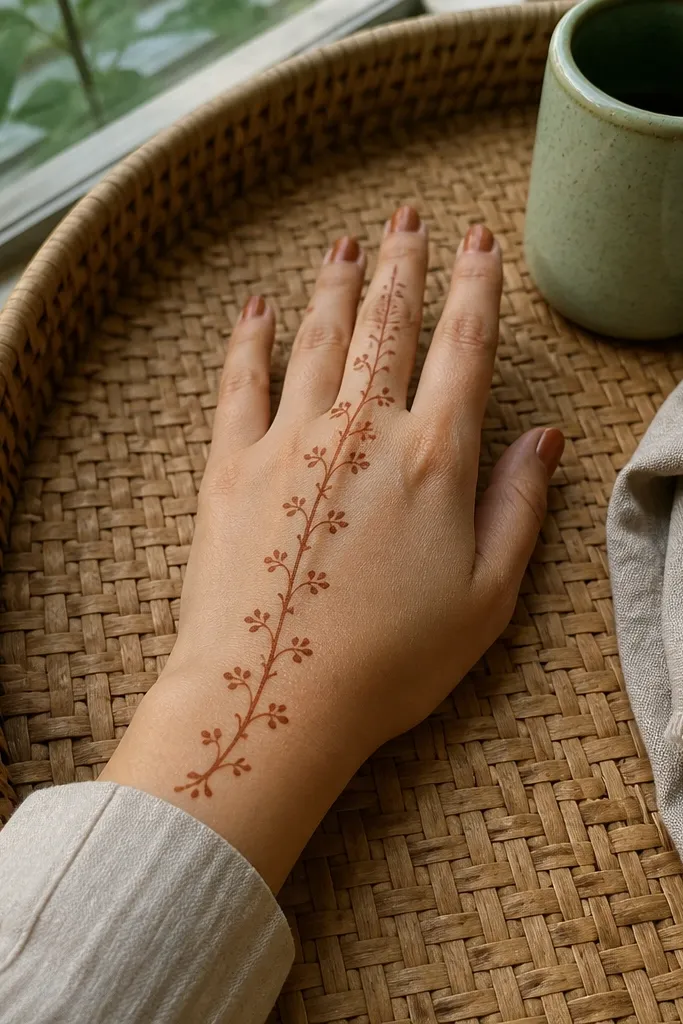
This is a clean “one line does most of the work” design. A wrist-to-center vine creates vertical movement, and side petal steps add structure without needing finger coverage. It looks especially good when you keep the petals small and repeat them at even intervals; the back hand reads like a neat composition instead of scattered motifs. It’s also fast because you repeat one petal shape multiple times along the vine.
Step 1: Draw a straight center stem from wrist center toward the gap between index and middle knuckles. Step 2: On both sides of the stem, pipe small petal steps: each step is a teardrop outline that opens outward, placed every 8-10 mm. Step 3: Add dot-fill inside every second petal so the texture isn’t uniform everywhere. Step 4: At the top, cap the vine with a tiny swirl and 3 dots so it looks finished.
Pro tipMark intervals with your cone lightly by touching the tip to the skin without squeezing paste, then go back and outline.
AvoidAvoid uneven spacing; if one petal step is wider, match the next one immediately.
5. Thumb Arch Border With Micro Dots
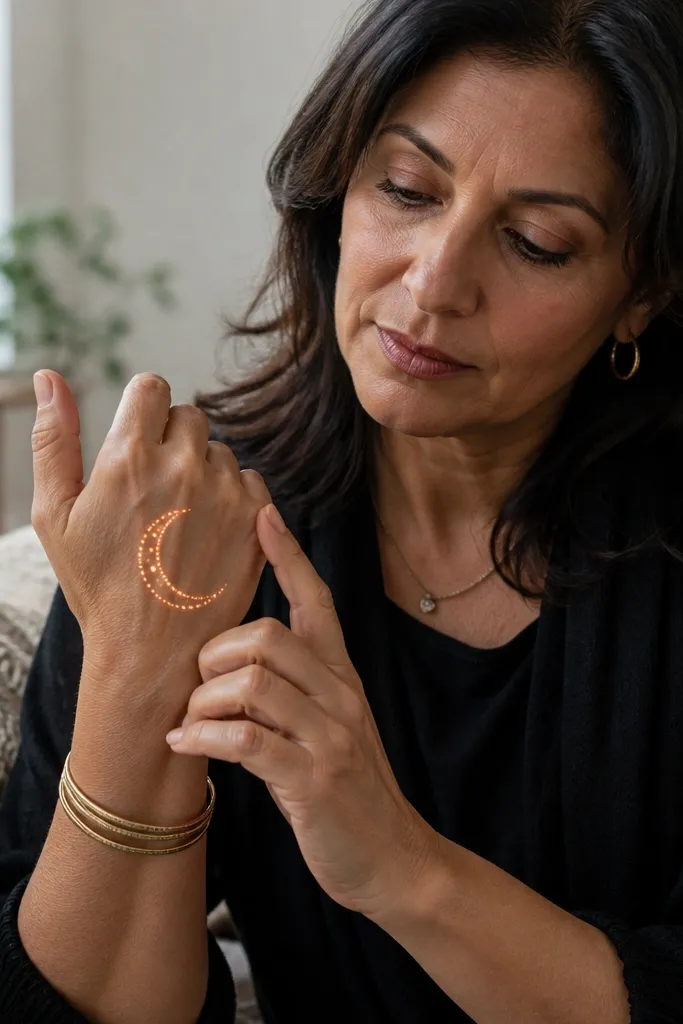
This is a minimalist look that still pops because it uses a tight border and micro dots. The thumb arch sits like a crescent near the thumb base, and the micro dots create a soft halo that looks intentional in photos. It doesn’t require finger patterns, so it’s great for short sessions and for people who want their design to look neat even when it fades. Keep the arch smooth and the dots consistent in size.
Step 1: Start with a crescent arch near the thumb base, curving from the lower thumb side toward the center of the back hand. Step 2: Outline the arch with hairline paste, then add a second thin line just inside it to give it a frame look. Step 3: Pipe micro dots along the outside edge of the arch — aim for 2-3 dots per centimeter. Step 4: Add one tiny curl at each end of the crescent so the arch doesn’t look cut off.
Use dot-fill only on the ends; inside the arch keep it mostly negative space.
Don’t make the arch too thick — it turns heavy fast.
6. Single Line Geometric Triangle Cluster
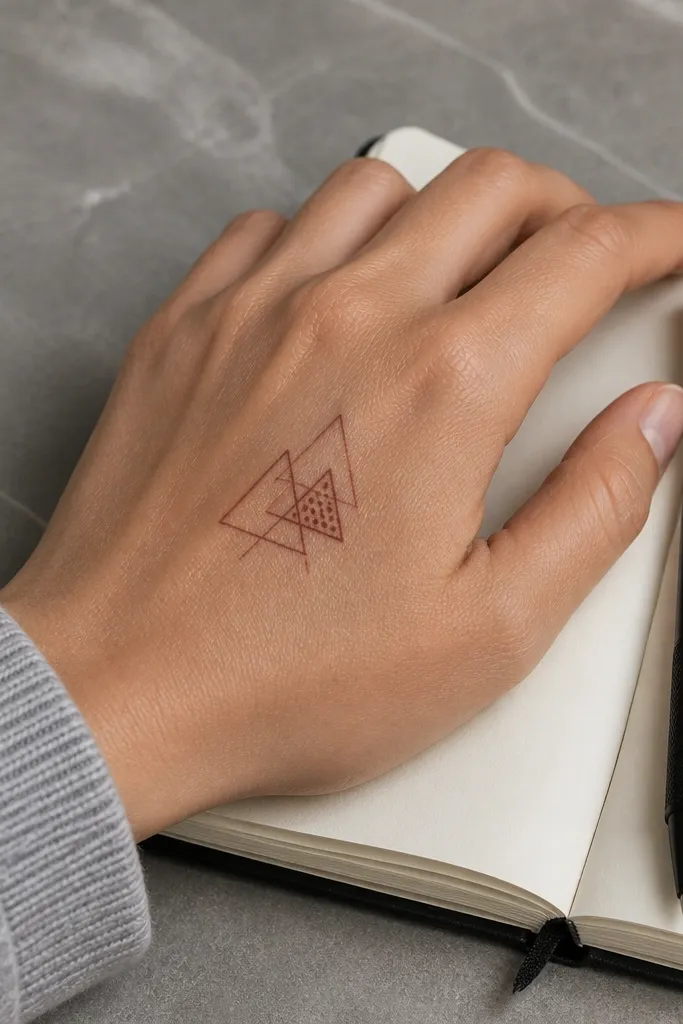
Geometric patterns are the easiest way to get a sharp look without complex shading. This design places a cluster of small triangles around the upper center back hand, connected by a single thin line so it feels structured. The triangle outlines stay crisp, and the small dot fills inside one triangle add just enough contrast. This one is good for holiday outfits because it looks modern and tidy even when you keep it simple.
Step 1: Draw one larger triangle outline in the upper center of the back hand, with the point facing down toward the knuckle gap. Step 2: Add two smaller triangles on either side, connecting their edges to the larger triangle using a continuous line. Step 3: Fill only one triangle with dot-fill, keeping the others outline-only. Step 4: Add 4-5 tiny dots around the cluster like punctuation, then stop — no extra vines.
Use a ruler edge under your palm as a guide for straight lines, then pipe freehand on top of that line.
Don’t overfill triangles with solid paste; outline + dots looks cleaner.
7. Lace Dot Trail With Two Leaf Corners
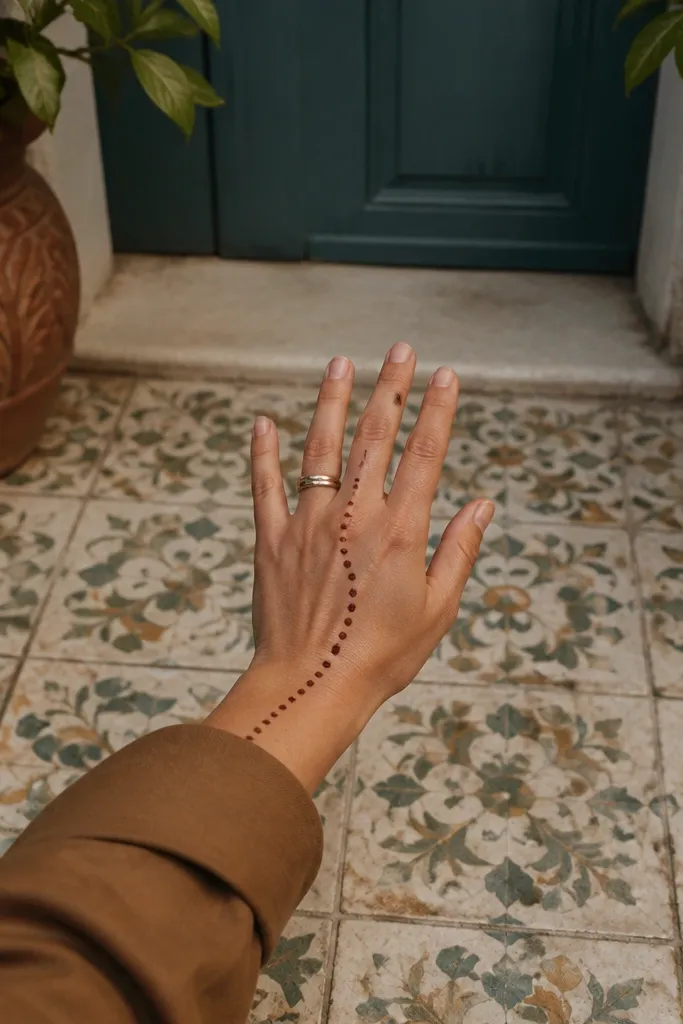
This one mimics lace without the heavy work. A dotted trail curves from the wrist up to the center, and two small leaf corners sit near the top sides to frame the trail. It’s photogenic because the dots create a textured path that catches attention even from far away. It’s also beginner-friendly since the “work” is repetitive dot spacing and a simple leaf outline.
Step 1: Pipe a curved dotted trail starting at the wrist center, bending slightly toward the index side. Step 2: Every 6-8 mm, add a dot and connect every third dot with a short hairline curve so it reads like lace. Step 3: At the top corners, add two small leaves facing inward, each leaf about the width of one knuckle. Step 4: Tie the leaves to the trail with one tiny dot connection per side.
Pro tipKeep your dot size consistent by not changing pressure mid-line.
AvoidDon’t add extra vines after the leaves; the lace trail is the main feature.
8. Finger Gap Minimal Vines With Wrist Teardrop
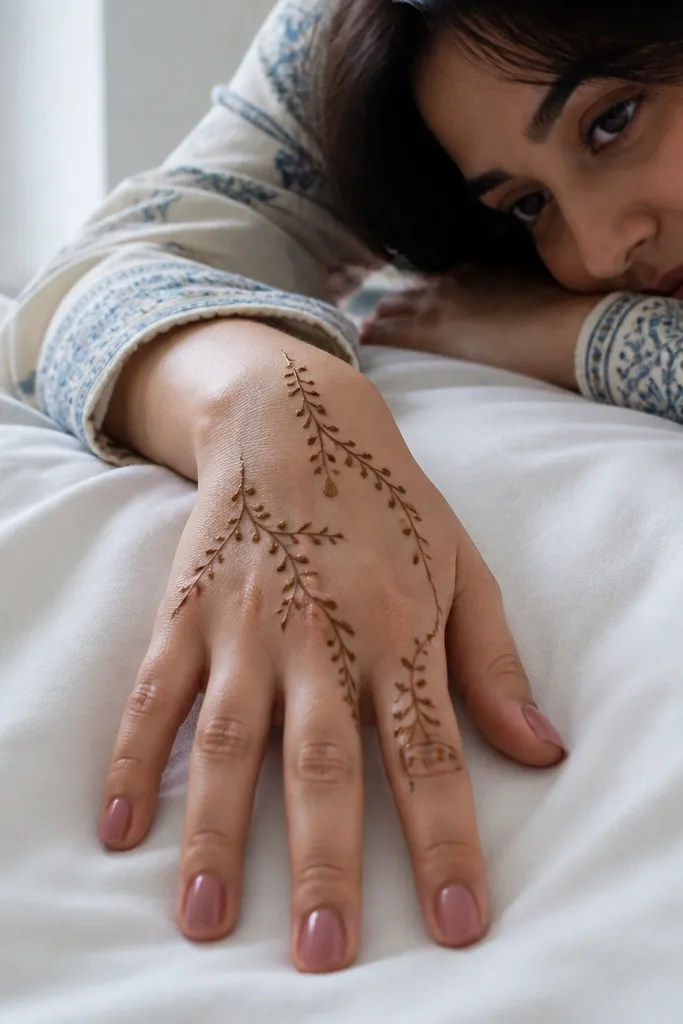
This design is for people who hate when mehndi looks messy around the finger gaps. Thin vines start from the wrist and stop cleanly before the finger base lines, leaving negative space that makes the pattern look intentional. A single teardrop at the wrist adds weight and makes the design feel balanced. It’s perfect for quick festive wear, and it looks neat even if you do it on a day when you’re not sitting for long.
Step 1: Draw a small teardrop shape at the wrist center, then outline it and add dot-fill inside. Step 2: From the teardrop base, pipe two thin vines — one toward the index side, one toward the ring side. Step 3: Stop the vines before the finger gaps; add a tiny leaf at the end of each vine. Step 4: Add three single dots near the vine ends to finish the visual weight.
Pro tipIf your vines start to thicken, lighten pressure and keep the cone tip touching the skin for shorter bursts.
AvoidAvoid vines that reach into every finger gap — that’s where it gets crowded.
9. Back Hand Crescent With Side Swirl Stars
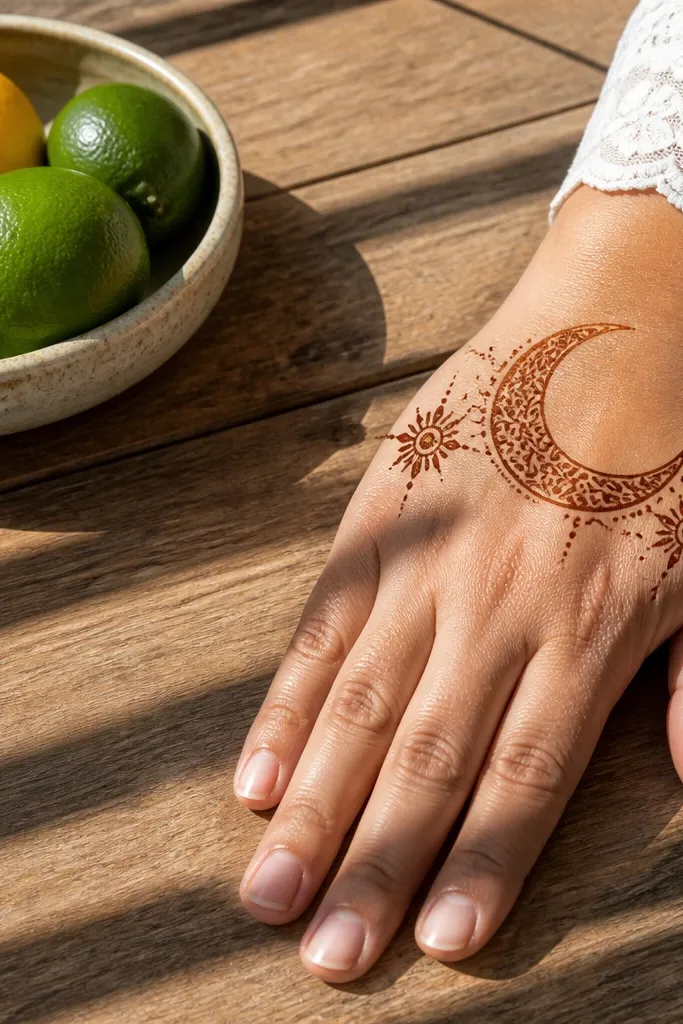
A crescent band is a classic back-hand move because it naturally follows the hand’s curve. This version keeps it simple: one crescent band across the upper back hand, then small swirl star shapes on the sides for decoration. The crescent gives structure, and the side stars add that festive sparkle without covering the whole hand. It’s a good pick when you want a clear silhouette that still looks delicate.
Step 1: Draw a crescent outline across the upper back hand, thicker at the middle and thinner at the ends. Step 2: Inside the crescent, add a row of small dots or tiny teardrops only along the inner edge. Step 3: On the sides near the crescent ends, pipe two swirl star shapes: a tight swirl center with 4 short points. Step 4: Connect each star to the crescent with one short hairline stroke so it feels like one composition.
Make the crescent slightly higher on the thumb side; it balances the hand curve in photos.
Don’t fill the crescent solid — outline + inner dots looks more photogenic.
10. Minimal Center Rosebud With Two Surrounding Dots

When you want “simple” to look intentional, a single rosebud centered on the back hand is hard to beat. This design uses a compact rosebud outline with a few layered petal curves, then adds two dot accents to balance it left and right. The rosebud reads clearly even if your lines are light, and it gives you a focal point that looks good in close-up and from arm-length photos. It also dries faster because it stays small.
Step 1: Place the rosebud in the center of the back hand, starting slightly above the knuckle midpoint. Step 2: Pipe 5-6 petal arcs around a center dot, keeping the arcs small and evenly spaced. Step 3: Add two dot accents, one on each side of the rosebud, slightly lower than the petals. Step 4: Add a tiny stem line or hairline curl below the rosebud, no more than 1-2 cm long.
Pro tipKeep the rosebud smaller than you think; larger rosebuds smear more easily while drying.
AvoidDon’t add extra petals after the first layer — it turns into a blob.
11. Dot Ladder Across the Back Hand With Leaf Caps
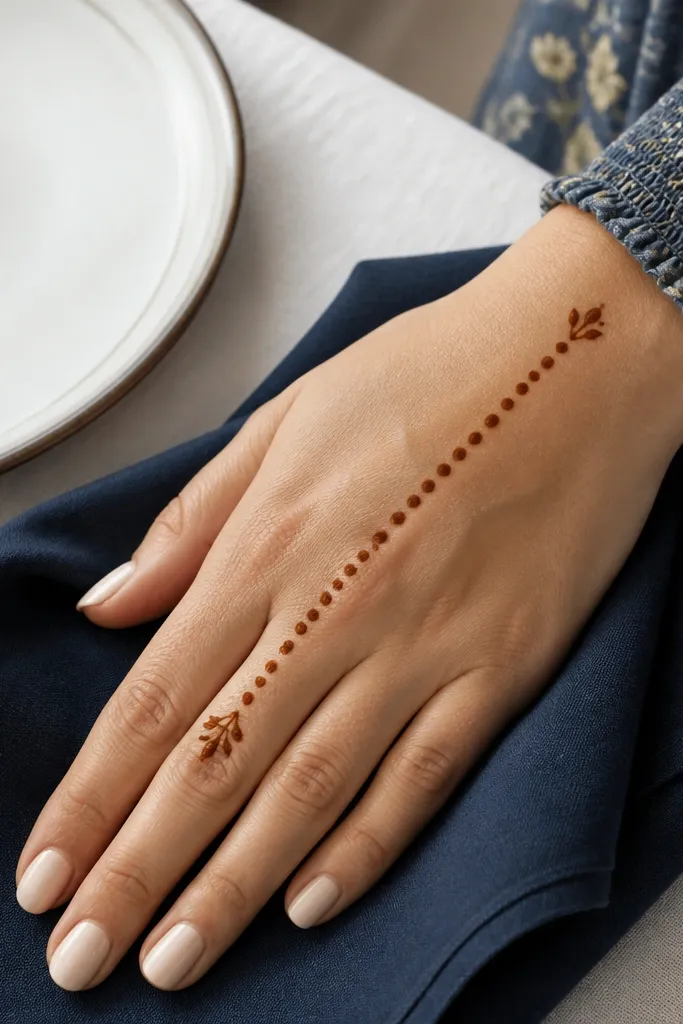
This is a graphic, easy-to-execute design that looks clean and modern. A dot ladder runs diagonally across the back hand, and leaf caps at the ends make it feel finished. The ladder pattern is repetitive, so it’s forgiving on symmetry — you can correct spacing as you go. It’s also a good option for holiday events when you want something that looks neat even after a long day.
Step 1: Draw a diagonal guide line from wrist center to the upper center of the back hand. Step 2: Pipe dots along the guide at 8-10 mm intervals, then add a second row of dots next to it to form ladder rungs. Step 3: Connect every other rung with a short hairline curve so the ladder feels connected, not floating. Step 4: Add leaf caps at the top and bottom — small teardrop leaves facing inward.
If your dots look uneven, slow down and keep the cone tip steady for the same time each dot.
Don’t over-connect every rung; too many lines make it look heavy.
12. Palm-Edge Frame With Micro Vines at the Back
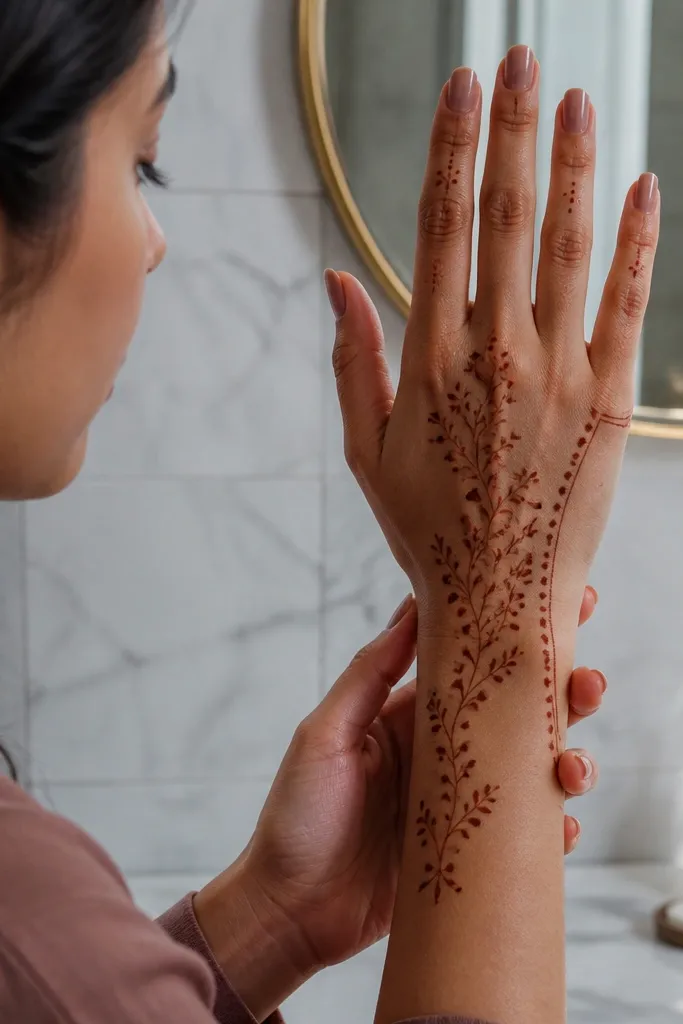
This design uses a frame line near the palm edge and sends micro vines upward onto the back of the hand. The frame gives you a clean boundary, while the tiny vines add movement without cluttering the back of the hand. It looks good with bangles and rings because the frame line catches light and draws the eye toward your jewelry. It’s also great if you want something that grows well as it fades; the frame stays readable longer.
Step 1: Pipe a thin curved frame line along the palm edge area on the back side of the hand. Step 2: From that frame line, add micro vines every 1-1.5 cm — each micro vine is a short stem with a tiny dot at its end. Step 3: Keep the vines short so they stop around the middle of the back hand. Step 4: Add one micro vine with a slightly larger dot at the center to create a focal point.
Pro tipUse dot ends instead of filled leaves; dots dry darker and cleaner faster.
AvoidAvoid long vines that reach the knuckles — they blur and look uneven.
13. Simple Peony Style Center With Short Side Vines
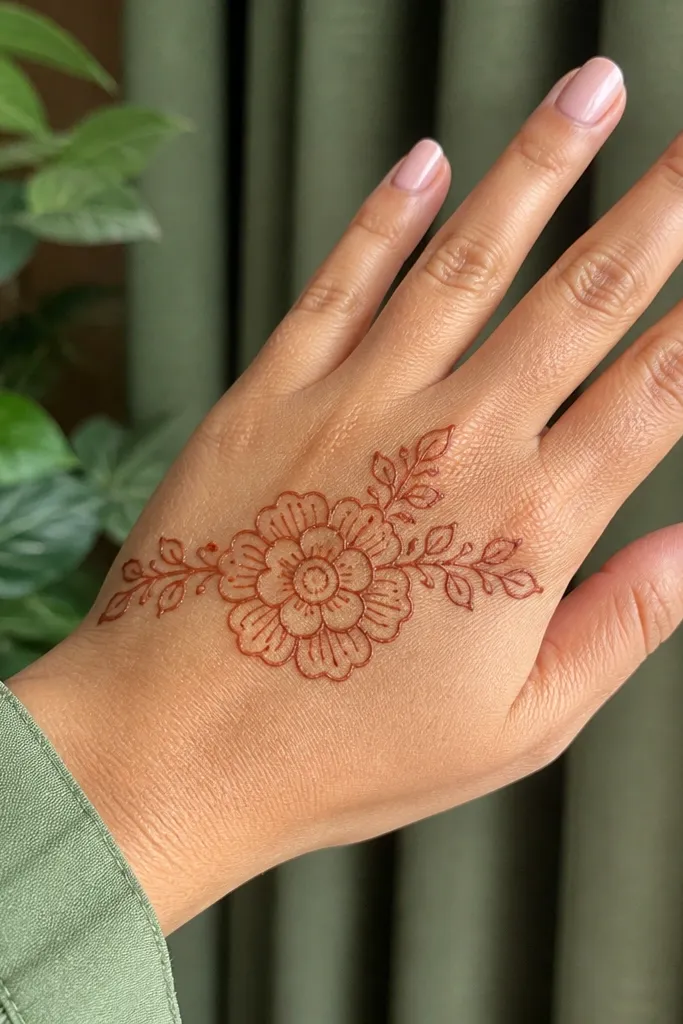
A peony-style center looks like a full design but it stays simple if you keep the petals minimal. This option places a small peony in the center with 6-7 petal curves, then adds short side vines that stop before the finger gaps. The center petal curves create a clear focal point, and the side vines add balance without taking over. It’s a strong choice for holiday wear because it looks detailed from a distance but doesn’t require a full hand fill.
Step 1: Draw a small center circle dot, then pipe 6-7 petal arcs around it, each petal about the size of a matchstick head. Step 2: Add dot-fill only in the very center space so the petals stay light. Step 3: From the left and right of the peony base, pipe short side vines — each vine ends with a tiny leaf or swirl. Step 4: Add 3-4 dots around the peony edges like scattered seeds.
Keep petal arcs slightly overlapping; gaps make the peony look like separate doodles.
Don’t outline every petal thick — hairline outlines read better.
14. Wrist Mandala Corner With Two Tiny Arches
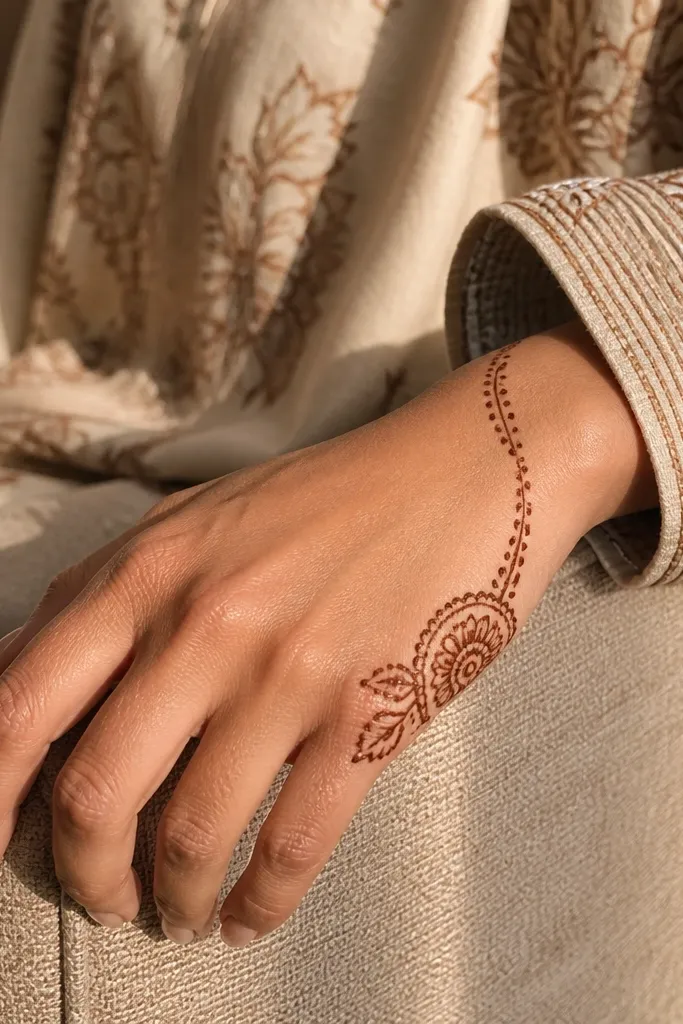
This is a corner design that looks like you planned it, not like you stopped halfway. A small mandala sits near the wrist corner, and two tiny arches extend upward to frame the center space. It’s photogenic because it creates a strong shape in one area, then leaves breathing room on the rest of the back hand. This works well for short sessions and for people who want a “statement wrist” without heavy coverage.
Step 1: Place a small mandala near the wrist corner, using 6-8 petal outlines around a center dot. Step 2: Add dot-fill in the center only, then keep the petal outlines thin. Step 3: From the mandala edges, pipe two tiny arches that curve toward the upper back hand on left and right. Step 4: Finish each arch with a tiny dot at the outer end to lock the shape.
Pro tipUse a slightly thicker paste only for the center dot; it boosts contrast in photos.
AvoidDon’t extend the arches past the mid-back hand; keep them short for a clean silhouette.
15. Back Hand Grid Dots With Center Spiral
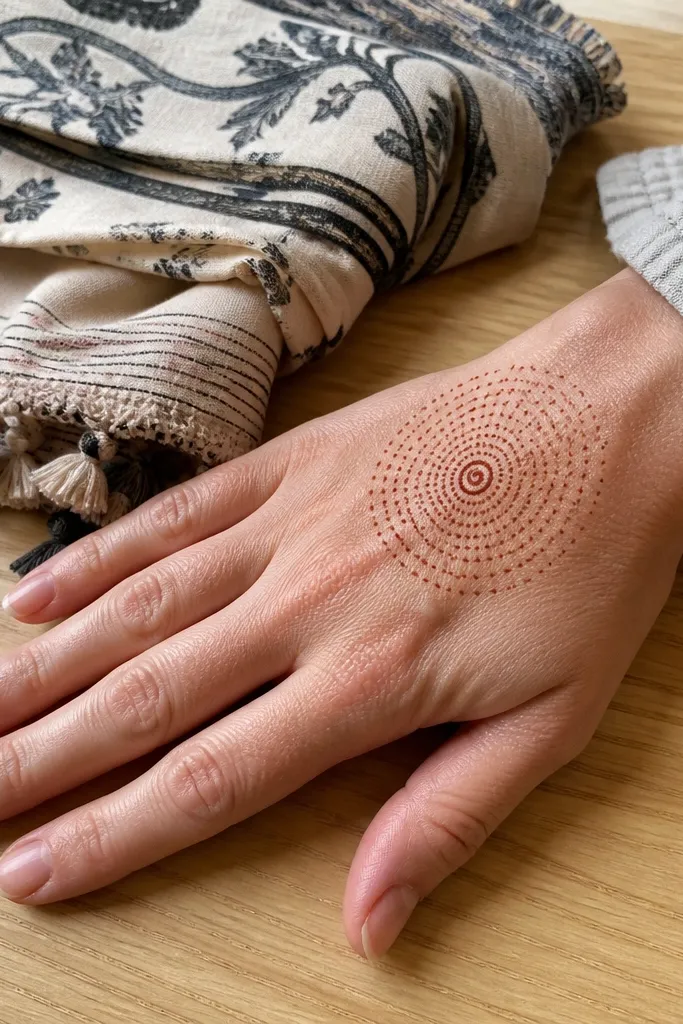
A dot grid looks neat because it turns chaos into order. This design places a small dot-grid area on the upper back hand, then anchors it with a center spiral. The grid gives texture without filling large spaces, and the spiral gives direction so it doesn’t look like random dots. It’s a great option for beginners because you can keep the grid small and adjust dot spacing as you go.
Step 1: Draw a small square or rectangle outline lightly in the upper back hand using hairline paste. Step 2: Fill it with dots in rows and columns, spacing them evenly at about 6-8 mm. Step 3: Place a center spiral in the middle of the grid: 4-5 tight turns, ending with a small dot. Step 4: Add one tiny leaf or swirl at the spiral end to make it feel like a complete motif.
If your dots run together, squeeze less paste and lift the cone sooner.
Avoid making the grid too big; large dot grids turn muddy when they dry.



