
1. Thin Finger Bands With a Single Oval Center
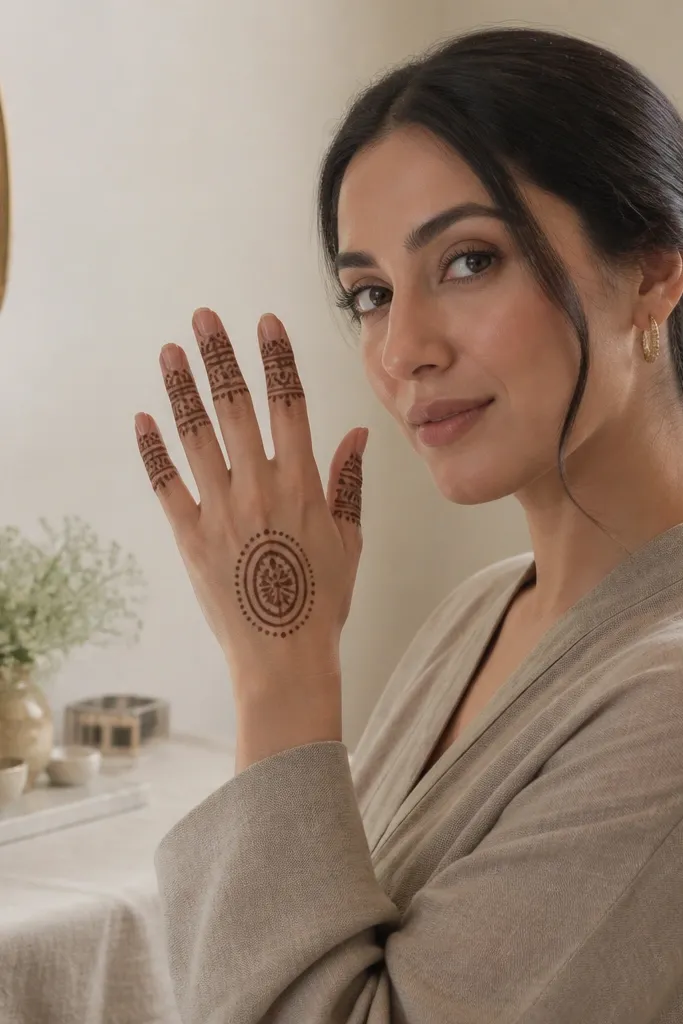
This design looks polished because it keeps the pattern disciplined. Thin bands on each finger give you a clean frame, and the single oval in the center acts like a focal point instead of turning the whole hand into a patchwork. The trick is to keep the oval outline sharp and fill it with small dots or a light swirl so it darkens nicely. It works for weddings, Eid, or everyday festive wear because you’re not covering every inch, just the right places. Skill level is beginner-friendly, and the time stays around 20-35 minutes if your paste consistency is steady.
Start by drawing a thin band around the base of each finger — one line, a tiny gap, then a second line. Then sketch one vertical oval on the back of the hand, centered between the thumb side and pinky side. Fill the oval with a dotted grid or tiny curved strokes, then add a few short curved lines extending from the oval edges toward the wrist. Finish by outlining the wrist with a simple arc border.
If your lines blur, squeeze slower and keep the cone tip 1-2 mm above the skin for more control.
Skipping a centered oval makes the design feel empty instead of elegant.
2. Leaf Chain Across the Back of the Hand

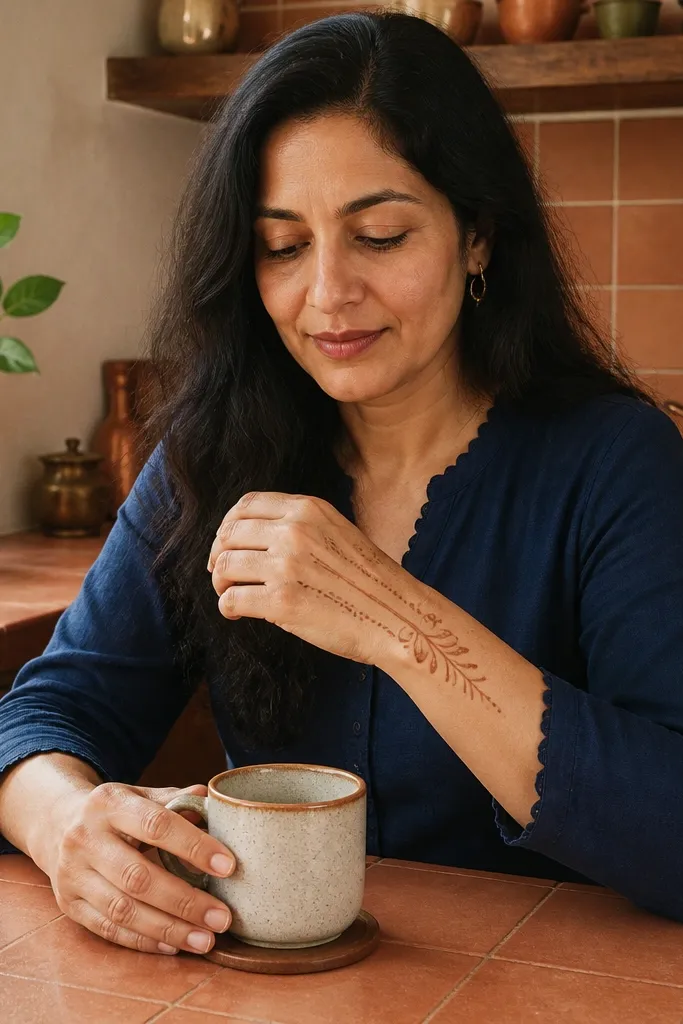
A leaf chain reads “mehndi” instantly because leaf petals have a natural rhythm. This one stays budget-simple: you repeat one petal shape and connect them with a thin stem line. It looks great even when your filling is light because the outlines do most of the visual work. The diagonal placement makes your hand look longer in photos, which is a big win for smaller hands. It’s a good choice when you want something festive without spending hours tracing heavy medallions.
Draw a thin diagonal line from near the wrist toward the space between index and middle finger. On both sides of that line, pipe small leaf petals — pointy at the top, rounded at the base — alternating left and right. Add a few dots in the empty gaps to keep the pattern from feeling sparse. Finally, frame the bottom wrist area with a short curved border line.
Use a consistent petal size by counting: 7-9 petals total looks balanced for most hands.
Filling every leaf heavily can turn the chain dark and messy instead of crisp.
3. Dot Grid With a Tiny Border Medallion
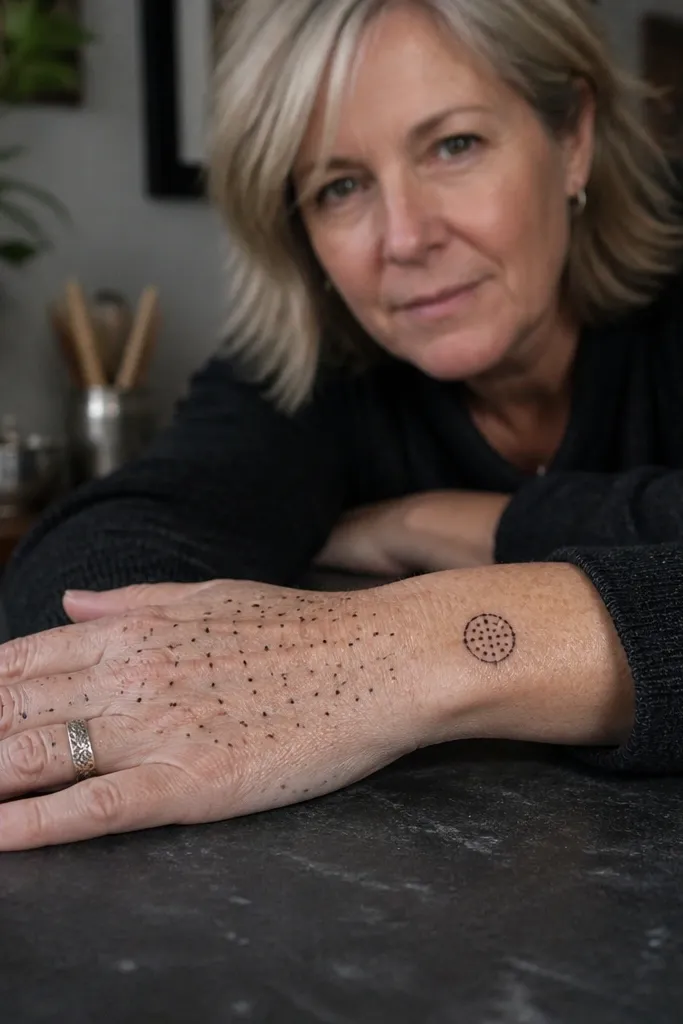
Dot grid designs are cheap in effort because dots are fast, but they look expensive because the pattern feels dense and intentional. This version uses a mostly dot-filled back-of-hand area and saves the real detail for one small medallion near the wrist. The medallion gives you an “event-ready” focal point without needing a big central motif. It’s also forgiving if your lines aren’t perfect; dots hide small unevenness. This one fits Eid, birthdays, and compact mehndi where you still want a full-looking back of hand.
Start with a thin border around the wrist and a finger band on the ring and middle fingers. Then draw a rectangle-like area on the back of the hand where you’ll place dots — keep it narrower near the thumb side. Fill it with evenly spaced dots, then add a tiny medallion at the lower center using one outlined circle plus 6-8 small spokes. Finish by adding two or three short dot clusters near the finger bases.
Mark dot spacing lightly with a pen dot guide on the back of your hand first, then remove it with a wipe before piping.
Overfilling the entire hand with dots can make it look like one dark stain.
4. Two Finger Lattice Panels
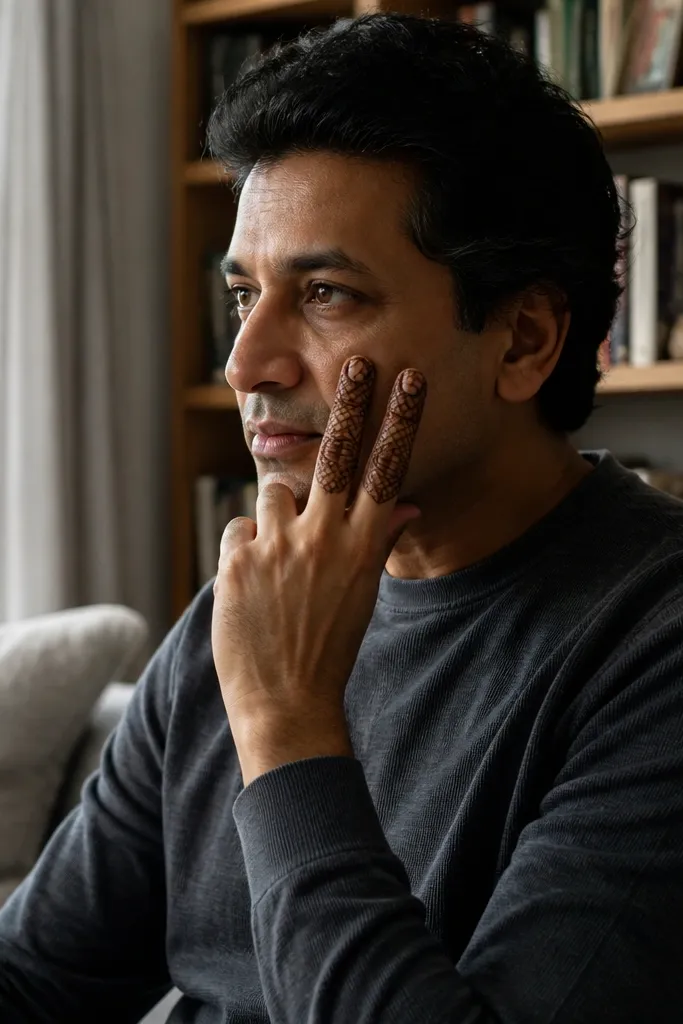
Pipe a thin outline band around the base of the index and middle fingers. Inside each finger band, draw vertical lines from base to tip, then cross them with short horizontal lines to form small squares. Connect the two lattice fingers with a thin arc line across the back of the hand. Add a couple of dots at the connection point and a simple wrist border line.
Lattice looks intricate, but it’s simple once you commit to a grid. This design places the lattice only on the index and middle fingers, leaving the rest of the hand clean. That contrast is what makes it look stylish instead of crowded. It’s also a smart budget choice because you’re not doing heavy work across the back of the hand. The overall vibe is modern-festive, and it photographs well because the lattice creates tiny highlights where paste lines are thinner.
AvoidMaking large squares forces uneven filling and makes the pattern look unfinished.
Pro tipKeep lattice squares small — about 2-3 mm each — so the grid stays crisp.
5. Wrist-Only Mehndi With a Palm Spark

If you want a quick, clean look that doesn’t smear when you move, go wrist-only. This design uses stacked bands at the wrist and adds one small “spark” motif near the base of the fingers. It gives you a festive frame for bangles without touching the palm area too much. The palm spark also balances the visual weight so it looks intentional, not like you ran out of time. It’s perfect for low-effort touch-ups and for people who hate full-hand coverage.
Start by piping 3-4 stacked curved bands around the wrist, with tiny gaps between each band. Add small dot clusters on the outer edge of each band to create texture. Then draw a small starburst or spark shape at the top center of the wrist area — 6 short lines with a dot at the center. Finish by adding two thin lines that taper toward the index and ring finger bases.
Keep the wrist bands slightly thicker than the finger lines so the design holds up after washing.
Going too close to the palm crease can cause smudging where your wrist bends.
6. Mini Medallion Corner on the Back of the Hand

Corner medallions are a cheat code for simple mehndi that still looks styled. You place one small medallion near the thumb side or near the center gap between fingers, then support it with thin lines and dots. The rest of the hand stays light, so the medallion doesn’t look heavy or messy. This is great for budget work because it uses fewer filled areas, but the shape reads like a “set” when you wear rings or watch. It’s also easy to resize for smaller hands.
Draw a small circle medallion outline near the back of the hand corner you choose, about the size of a big pea. Inside, add 6-8 petal loops around a central dot. Connect the medallion to the nearest finger bases with 2-3 thin curved lines. Add a thin border line across the wrist and scatter 8-12 dots around the connection paths.
Use one bold outline line for the medallion, then thin fill lines inside so it looks dimensional.
Putting the medallion dead center with no support can make it look like a sticker, not a design.
7. Feather Stem With Tiny Dot Tips

Feather stems are elegant without being hard. You draw one central stem line, then add small branch lines that end in dots. The dot tips create a soft, airy look that still photographs dark because dots pack density. This design looks good on the back of the hand and pairs nicely with a simple finger band. It’s a smart pick when you want something light but not empty. Time is usually 25-40 minutes with clean outlines.
Pipe a thin straight or slightly curved stem line from wrist toward the center of the hand. On both sides, add short angled branch lines — each ends with a dot at the tip. Keep branches spaced evenly so it looks like one feather, not random marks. Add a thin finger band on the middle finger and a small wrist arc border.
Make the dot tips slightly larger than your branch line thickness so they stand out after drying.
Overcrowding branches makes it look like scribbles instead of a feather.
8. Thumb Fan Pattern With a Clean Wrist Border
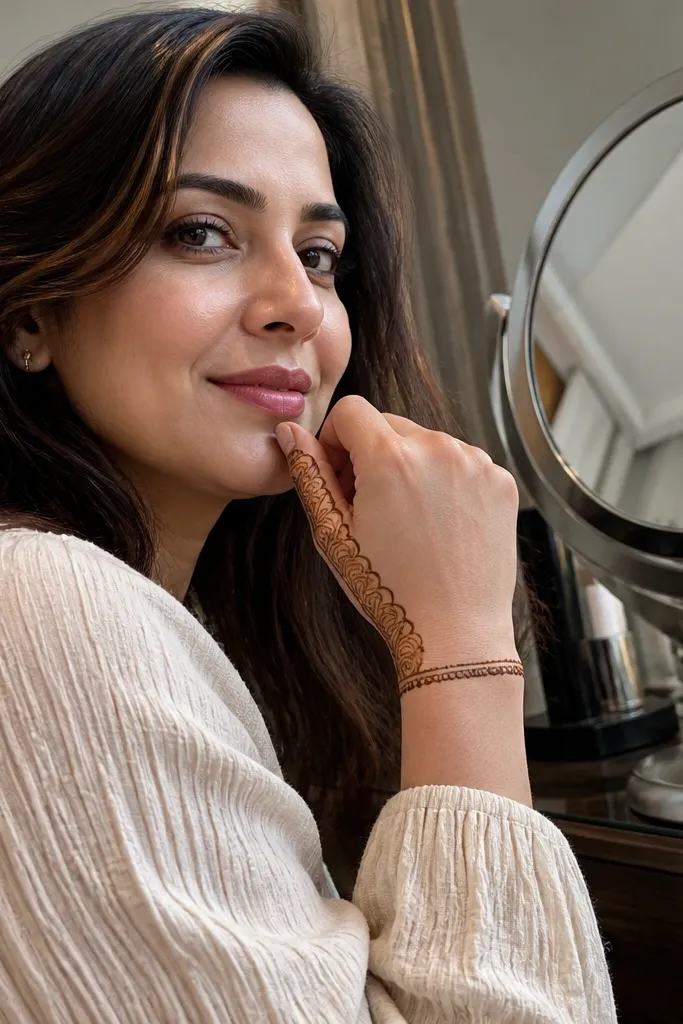
Start with a thin border line across the wrist. Then draw a curved base line near the thumb side of the back of the hand. Pipe 6-10 small arcs upward from that base, like a handheld fan, and outline each arc. Add a single dot cluster at the bottom of the fan and thin lines connecting the fan to the index finger base.
This design focuses on the thumb side, which is where photos catch the most light. A fan of small arcs looks decorative even with minimal fill, and the clean wrist border keeps everything looking finished. It’s also budget-friendly because you’re only doing one concentrated area plus a few lines on fingers. If you hate full-hand mehndi, this gives you a “done” look without covering everything. It suits festive days, especially with short sleeves and bangles.
AvoidFilling every arc thickly — outlines are enough for a crisp fan effect.
Pro tipKeep arc spacing consistent; uneven spacing is what makes fans look messy.
9. Ring Finger Focus With a Side Vine

Draw a thick band around the ring finger base and outline a small oval or leaf cluster in the middle of the ring finger. From the bottom of that cluster, pipe a thin vine line down the side of the back of the hand, adding 4-6 small leaves along it. Add tiny dots between leaves for texture. Finish with a thin wrist border line and one small arc near the pinky base.
This is a ring-and-watch friendly layout. You put the most detail on the ring finger and keep a thin vine trailing from it across the side of the hand. The rest stays airy with dots and thin lines. It looks intentional because the design has a clear “track” — from ring finger to wrist — instead of spreading everywhere. It’s also practical: you can do it in one sitting and it won’t feel heavy on the hand.
AvoidLetting the vine wander without a direction — keep it angled and controlled.
Pro tipMake the ring finger motif slightly taller than the other fingers so it reads clearly in photos.
10. Simple Crossed Lines With Dot Corners

This one looks graphic and modern. You create a grid-like feel using crossed lines, then anchor each corner with dot clusters. It’s simple because the pattern uses only straight strokes and dots, and it looks sharp because the negative space stays open. It’s ideal if you want a clean, minimal mehndi for smaller events or for your first few attempts. The design also works well with short nails and rings because it frames the hand without covering everything.
Start by drawing a thin rectangular guide area on the back of the hand. Pipe two vertical lines and two horizontal lines inside it, then cross them with one diagonal line from top left to bottom right. Place 3-5 dots at each corner of the rectangle where lines meet. Add a finger band on the middle finger and a simple curved wrist border.
Use a single consistent line thickness; if one line is too thick, the whole grid looks off.
Skipping dot corners makes the design look unfinished and flat.
11. Fez-Style Border With Center Dots
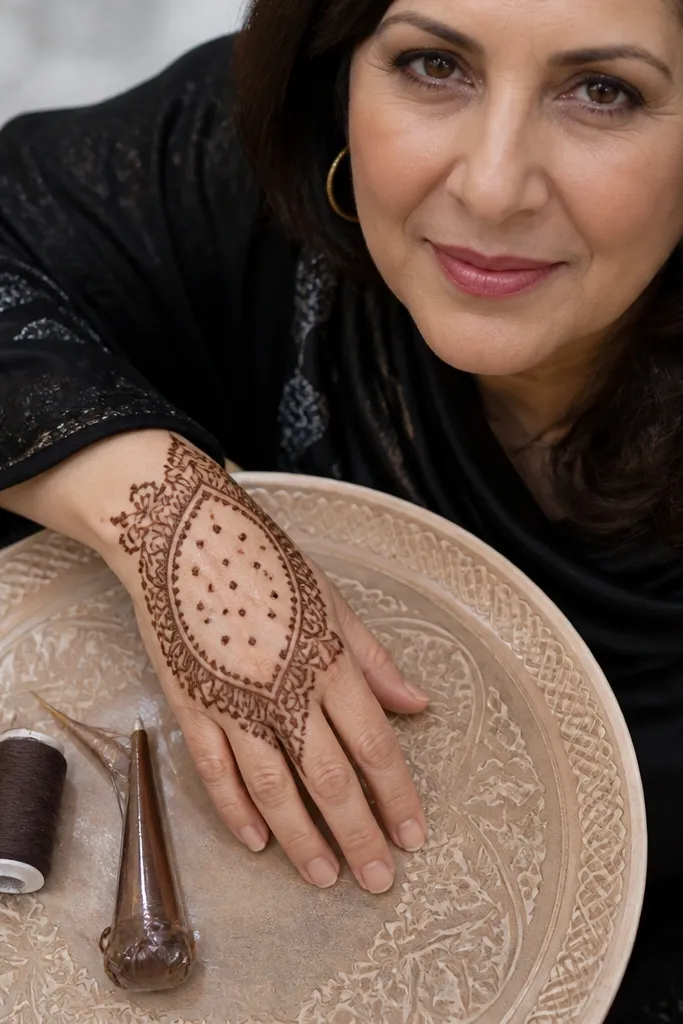
Fez-style borders look fancy because of the repeated curls along the edge. This design keeps that border on the outer perimeter of the back of the hand and fills the center with dots and a few thin lines. The result is a “frame” look — clean, photo-friendly, and not heavy. It’s also budget-simple because you’re repeating one border element rather than filling large sections. Great for festive days when you want something pretty but not time-consuming.
Outline a curved border on the back of the hand — like a soft oval frame — leaving a clear empty center. Inside the frame, add a dotted line down the center and scatter small dot clusters around it. For the border, pipe small curled loops along the outer edge, about 6-10 curls total. Finish by adding a thin finger band on two fingers and a wrist arc border that matches the frame curve.
Keep the center empty enough to show skin — that negative space is what makes it airy.
Filling the whole frame border and center turns it into one dark mass.
12. Double Border With Tiny Teardrops
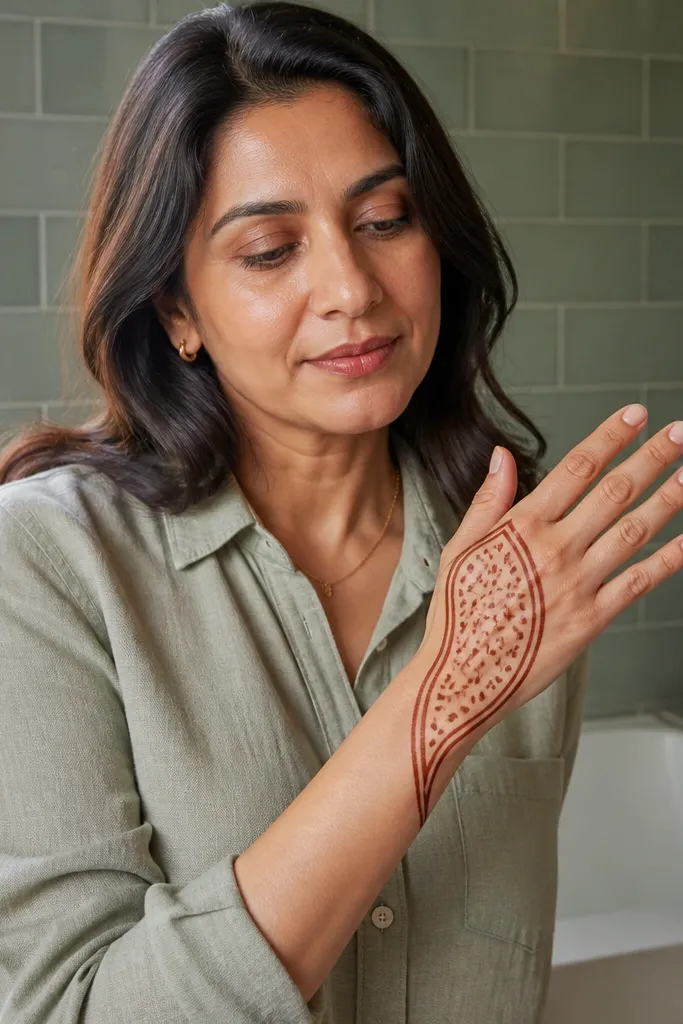
Double borders make simple mehndi look finished fast. You draw two thin curved lines around a main area, then fill the gap with tiny teardrops. The teardrops give you a textured look without needing thick paste coverage. This design is great for beginners because it uses a single shape repeated in a controlled area. It also photographs well because the border creates a clear silhouette for the hand.
Start by drawing two parallel curved borders on the back of the hand, leaving a gap between them. Fill the gap with small teardrops pointing inward, 10-14 teardrops depending on hand size. Add a thin finger band on the index finger and a small wrist arc border. Let the border outlines dry slightly before adding any extra dots so they don’t smear.
Make teardrops uniform by keeping the base width the same on each one.
Overlapping teardrops — separate them so the pattern stays readable.
13. Wrist Bands Plus a Single Vertical Vine
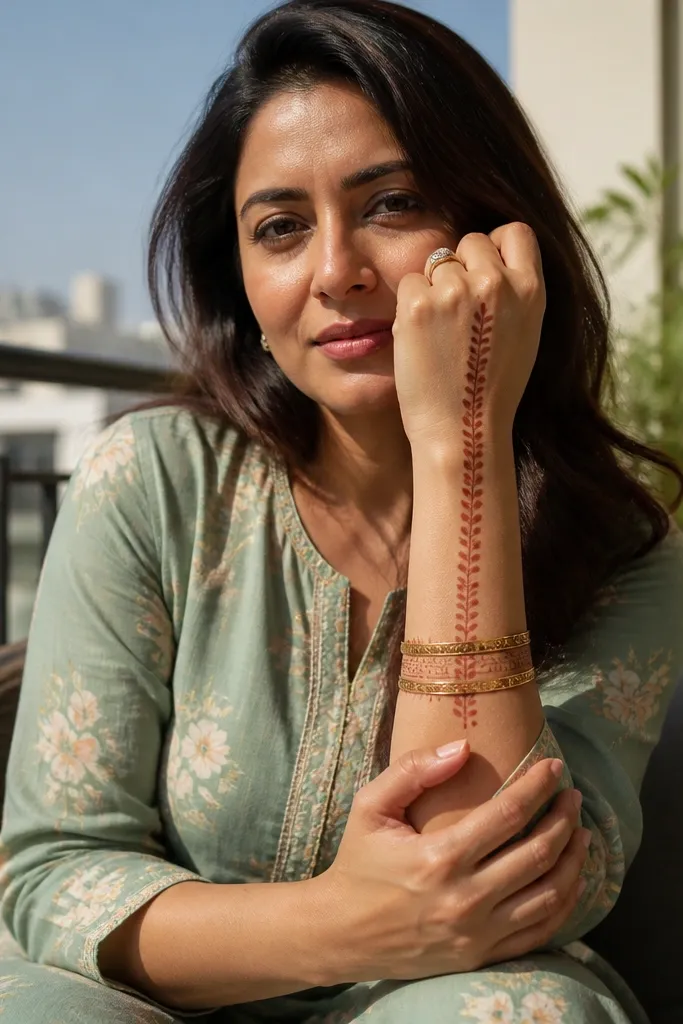
This design is a clean “ladder” layout. Stacked wrist bands create the base, and one vertical vine gives you direction up the hand. It looks stylish because it uses only one main path plus small leaf repeats, so nothing feels chaotic. If you’re doing mehndi for a quick event or want something that still looks good after a short wear time, this one is reliable. Time is usually 20-30 minutes with simple leaf outlines.
Pipe 3 stacked curved bands around the wrist with tiny dot gaps between bands. From the center of the wrist, draw a straight vertical line up the back of the hand. Add small leaf petals on either side of the vine line — 6-10 leaves total — and outline each leaf tip. Finish with a thin line around the base of the middle finger and 6-8 stray dots near the vine.
Keep the vine perfectly centered; a slight tilt makes it look accidental.
Using too many vines — one vine looks intentional, multiple vines look busy.
14. Palm-Friendly Crescent Motif

Start with a thin wrist border line. Draw a crescent outline on the back of the hand near the thumb side, with the ends pointing slightly up. Fill the crescent with dots in rows and add 3-4 short curved lines inside for texture. Finish with a thin finger band on the thumb-adjacent finger and a couple of dots between the crescent ends.
Crescents are forgiving and flattering because they follow the hand’s natural curve. This design uses one crescent near the thumb side and fills it with light dots and thin line strokes. It doesn’t require heavy paste coverage, so it stays neat when your hand moves. The crescent shape also looks good with bracelets because it sits right above the wrist line. This is a good choice for simple holiday mehndi when you want a clean, photo-ready look without full coverage.
AvoidMaking the crescent too wide — keep it narrow for a clean silhouette.
Pro tipUse smaller dots inside the crescent than you use on the outside border so it looks layered.
15. Triangle Corner Pattern With a Single Dot Center

Draw a thin outline triangle in one corner of the back of the hand. Inside the triangle, pipe 3-4 parallel lines that angle from the top toward the base. Add a single larger dot in the triangle center and scatter 6-8 smaller dots outside the triangle along the border area. Finish by adding a thin band around the middle finger and a simple wrist arc border.
This design is geometric and looks sharp on camera. You place a triangle corner pattern on the back of the hand and add one dot center motif, so it reads clearly even if you keep everything light. The geometry gives a tidy look without needing lots of filling. It’s also fast, which matters for budget setups where you want impact quickly. Great for simple holiday looks where you want something different from floral vines.
AvoidOverfilling the triangle — keep it line-based so it stays crisp.
Pro tipKeep triangle edges straight; if you curve them, the geometry becomes muddy.
16. Tiny Flower Buds Along the Outer Hand
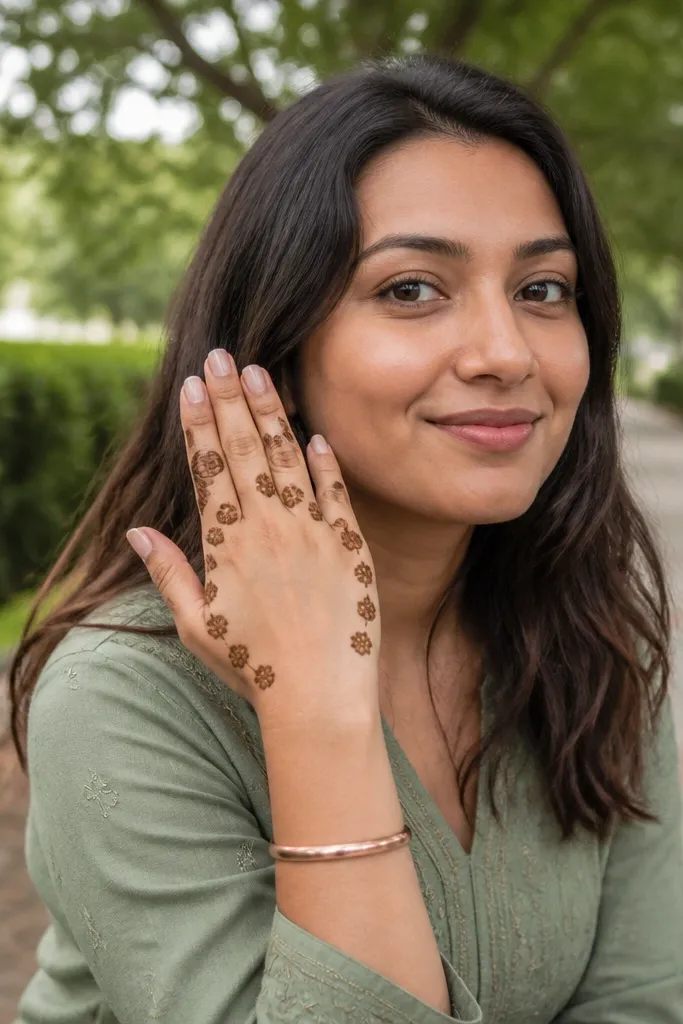
Tiny flower buds look sweet and festive without taking forever. You place small bud motifs along the outer edge of the back of the hand, then let the center stay lighter. This gives you a delicate, “holiday accent” look that still shows up in photos. The buds also help hide slight unevenness in paste lines because each bud is small and consistent. It’s a good option if you want something pretty for parties but don’t want to cover everything.
Draw a thin curved line along the outer edge of the back of the hand from wrist toward the ring finger side. At regular intervals, pipe tiny flower buds: one small center dot and 4-6 petal loops around it. Add a few dot clusters between buds to fill empty space. Finish with a thin finger band on the ring finger and a wrist border line.
Space buds about 1 finger-width apart for a balanced look on most hands.
Putting buds too close together — they merge and lose the flower detail.
17. Single Spiral With Dot Halo

A spiral with a dot halo is a simple way to create a focal point without heavy filling. The spiral gives movement and structure, while the dot halo frames it like a mini medallion. This design works well for budget mehndi because the “dark work” is concentrated in one small area. It also looks clean because the halo uses dots instead of thick paste blocks. Perfect for holiday events when you want one standout feature rather than full coverage.
Start by drawing a small spiral in the center of the back of the hand — about the size of a grape. Outline the spiral with a continuous line, then add 2-3 inner spiral lines if you want more density. Create a dot halo around the spiral by piping dots in a circle, leaving a small gap between each dot. Add a thin wrist border and a single finger band on the index finger.
Let the spiral outline set for a minute before adding the halo so dots don’t smear into the spiral.
Making the spiral too big — it starts to look like a scribble on the hand.
18. Back-of-Hand Lace Using Thin Lines
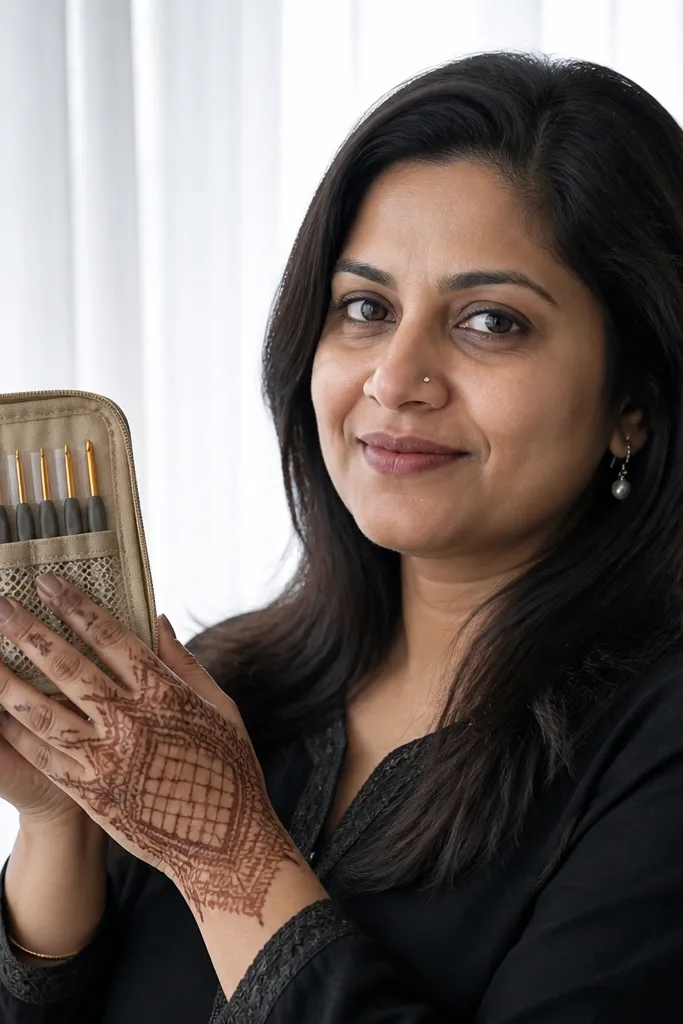
Lace mehndi looks complicated, but you can fake it with thin line grids that leave lots of skin showing. This version stays budget-simple by using only thin lines and small diamond openings rather than thick filling. It photographs like lace because the gaps catch light and the linework stays crisp. You get a stylish, airy effect that suits festive outfits without feeling heavy. Skill level is beginner-intermediate, but the pattern is still manageable.
Draw a light outline for a lace panel on the back of the hand, sized to about the width of your palm. Inside, pipe a grid of thin vertical and horizontal lines, then cross diagonals to form small diamonds. Keep the diamonds open — do not fill them solid. Add two small dot clusters near the top corners and finish with a thin finger band and wrist arc border.
If your lines wobble, slow down and pipe in short sections, then connect — it stays cleaner.
Filling the diamond spaces solid — lace should stay airy.
19. Four-Point Star Corner Motif

Start by drawing a thin wrist border line. Place a four-point star near the back-of-hand corner you prefer by piping one vertical line and one horizontal line crossing, then adding two angled lines to form points. Outline the star shape and add a small dot at its center. Pipe 3-4 short rays extending outward from the star and then add 6-10 small dots around the rays.
Star corners are underrated for simple mehndi. You get a holiday vibe without needing floral work across the hand. This design places a four-point star near the back-of-hand corner, then supports it with thin line rays and a few dots. It’s photogenic because the star shape is high-contrast and easy to see even with minimal paste coverage. Great for quick Eid and Diwali looks when you want something cute but not full coverage.
AvoidOvercomplicating with extra stars — one star reads cleaner.
Pro tipKeep rays short and evenly spaced so the star stays balanced.
20. Leaf + Dot Border at the Wrist

This is a wrist statement design that still counts as “simple.” The border uses repeating leaf shapes with dots in between, which creates a high-impact look with low effort. You keep finger work minimal — just one or two thin bands — so the wrist border becomes the hero. It’s perfect for holiday bangles and looks neat even if you wash faster because the border is thick enough to hold color. Time is usually 15-25 minutes.
Start by piping 1-2 thin curved lines at the wrist to mark the border zone. Along that zone, repeat small leaf shapes facing upward, then add a dot between each leaf. Keep leaves consistent in size and spacing. Add a thin band on the middle finger and a small dot trail toward the index finger base. Let it dry before moving around.
Make the leaf outlines slightly thicker than the dots so the border stays readable after washing.
Skipping spacing — if leaves touch, it turns into a single dark strip.
21. Minimal Triangle Bands on Fingers

Outline a thin band around each finger base, stopping before the nail area. Inside each band, pipe 4-6 small triangles — base on the band line, point upward. Connect the bands with a thin curved line across the back of the hand using 2-3 short segments. Finish with a wrist arc border and a few dots near the thumb side.
This design is all about repeating one tiny triangle band detail. You draw a thin line around the finger base, then place small triangles pointing upward into that band. Because the triangles are small and consistent, the overall look is crisp and aesthetic even with minimal coverage. It’s a strong budget pick for people who want mehndi that doesn’t cover the whole hand. It also pairs well with rings because it sits right where your jewelry catches attention.
AvoidUneven triangle sizes — one finger will look off even if the rest are fine.
Pro tipUse the same triangle count on each finger for symmetry.
22. Central Drop Medallion With Side Dots

Draw a vertical drop outline in the center of the back of the hand, sized to about the length of your ring finger joint area. Fill the drop with a dotted grid or small curved strokes, leaving a thin outline for definition. Add two small dot clusters on each side of the drop, aligned with the top and mid sections. Finish with a thin wrist border and finger bands on the middle and ring fingers.
A drop medallion makes simple mehndi look curated because it has a clear shape and natural symmetry. This design uses one centered drop filled lightly with dots, plus side dot clusters that balance the composition. You get a “centerpiece” look without filling large areas. It’s also forgiving for beginners because the drop shape guides your hand — you’re repeating one outline and one fill method. Ideal for festive events where you want the back of the hand to look complete.
AvoidFilling all the way to the outline — leave a tiny edge gap for cleaner definition.
Pro tipKeep the drop outline slightly thicker than the fill so it darkens evenly.
23. Vine Loop Border Around the Back of the Hand
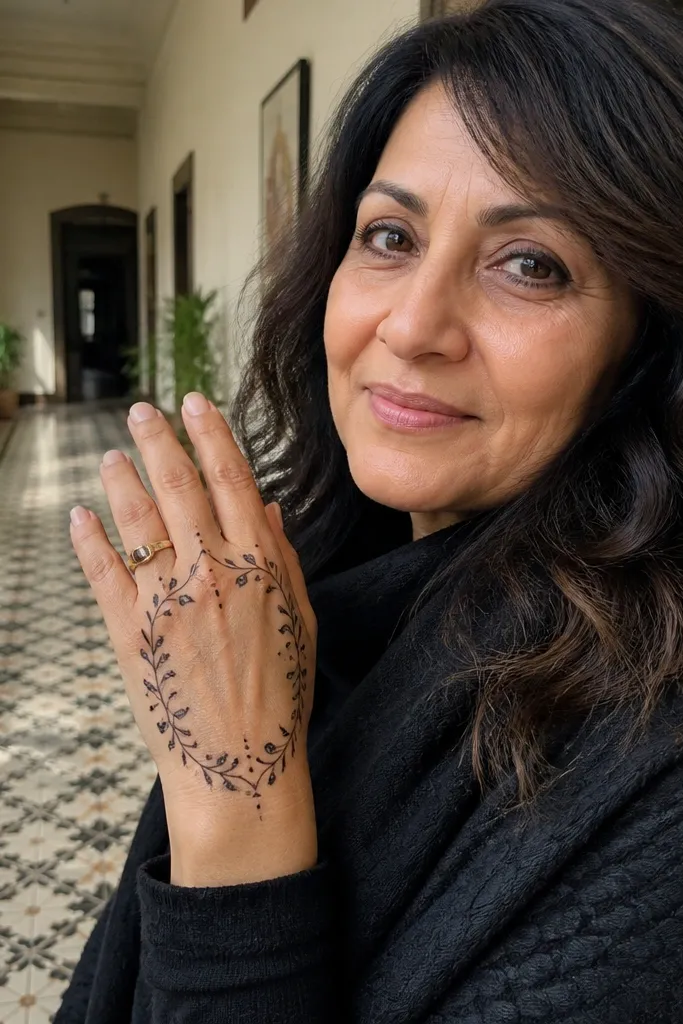
This is the “frame” design that makes minimal mehndi look full. You outline the back of the hand with vine loops, then leave the center mostly open with just dots and a couple of thin lines. The border loops do the heavy visual lifting, so you don’t need to fill the entire hand. It’s a strong budget choice because it keeps paste usage low but still looks detailed. Great for holiday outfits when you want something aesthetic without taking over your whole hand.
Start with a vine loop border: pipe small loops along the outer edge of the back of the hand, connecting them with thin stems. Keep the border about 1-1.5 cm thick in outline. Leave the center empty and add a vertical dotted line down the middle, plus 8-12 scattered dots around it. Finish with thin finger bands on two fingers and a wrist arc border that matches the vine curve.
Use open loops, not filled spirals — open loops read more like vine and dry cleaner.
Closing every loop completely — it turns into a heavy outline that blurs.
24. Side Swirl With Micro Dots on the Back of Hand

Side swirls are simple but look intentional because they create a direction. This design places one swirl on the side of the back of the hand, then supports it with micro dots and a thin wrist border. It’s a good option when you want a minimalist festive look that still looks “done” in photos. The micro dots add density without heavy filling, so it stays budget-friendly. Time is usually 15-25 minutes, depending on how many micro dots you add.
Draw a thin wrist border arc. Pipe one side swirl starting near the wrist and curving toward the finger base — keep the swirl width narrow. Fill the swirl outline with 1-2 inner curved lines, then add micro dots around the swirl in a loose crescent pattern. Add a thin band on the ring finger and stop there.
Micro dots should be smaller than your main outline — if they match thickness, it stops looking delicate.
Making the swirl too thick — it will smear and look like a blob.
25. Diagonal Triangle Ladder Across Fingers

This design looks like a modern pattern because it uses repeated triangles in a diagonal ladder. It’s simple to execute because you repeat one triangle unit and shift it slightly each time. The diagonal layout also helps your hand look longer and more balanced in pictures. You keep it budget by avoiding large medallions and relying on linework plus a few dot fills. Great for seasonal looks when you want something different from floral vines.
Start with a thin diagonal guideline from wrist toward the gap between index and middle finger. On the back of the hand, pipe small triangles along that line, with each triangle sharing a side with the next. Add 1-2 tiny dot fills between triangle rows to break up empty space. Finish with a thin band on the index finger and a simple wrist border arc.
Count your triangle units — 10-14 looks balanced and prevents accidental uneven spacing.
Overlapping triangles — they stop reading as a ladder.



