
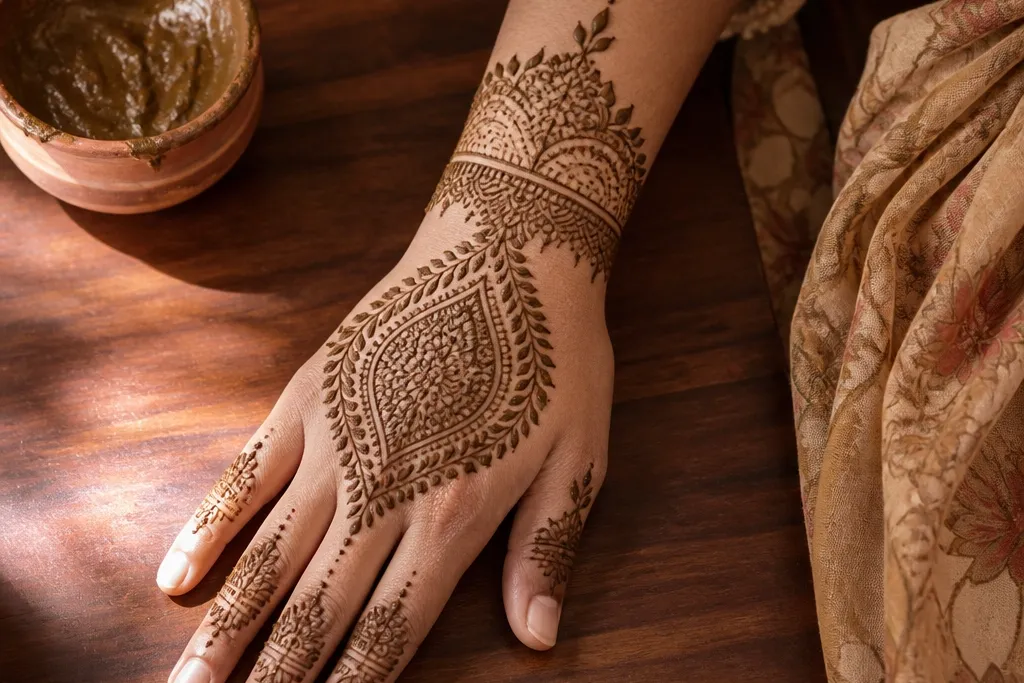
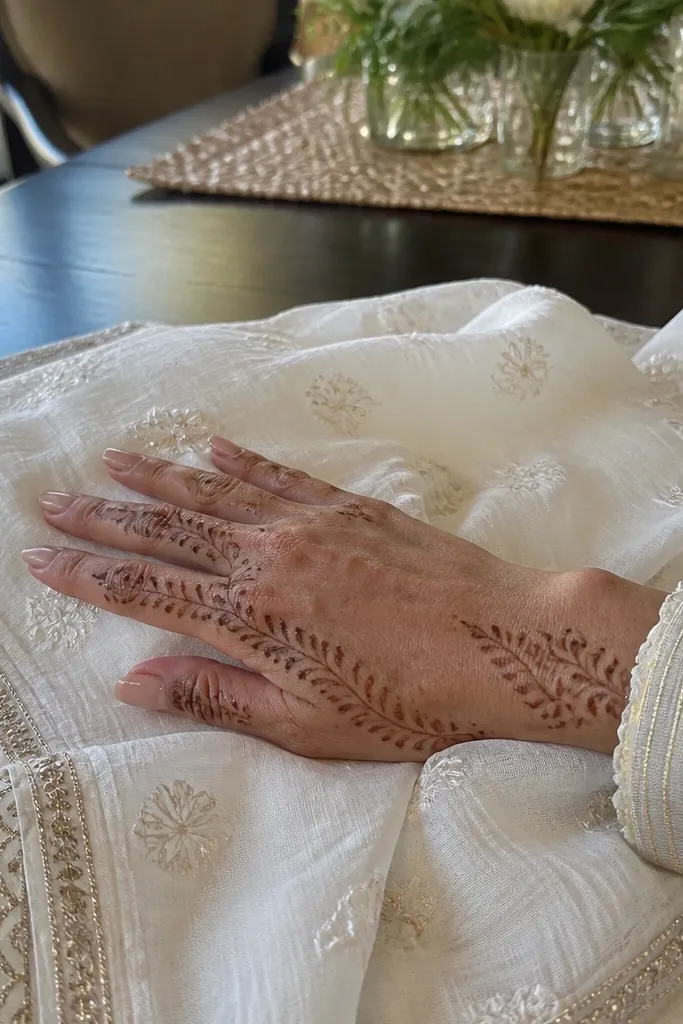
1. Teardrop Center with Double Wrist Cuff
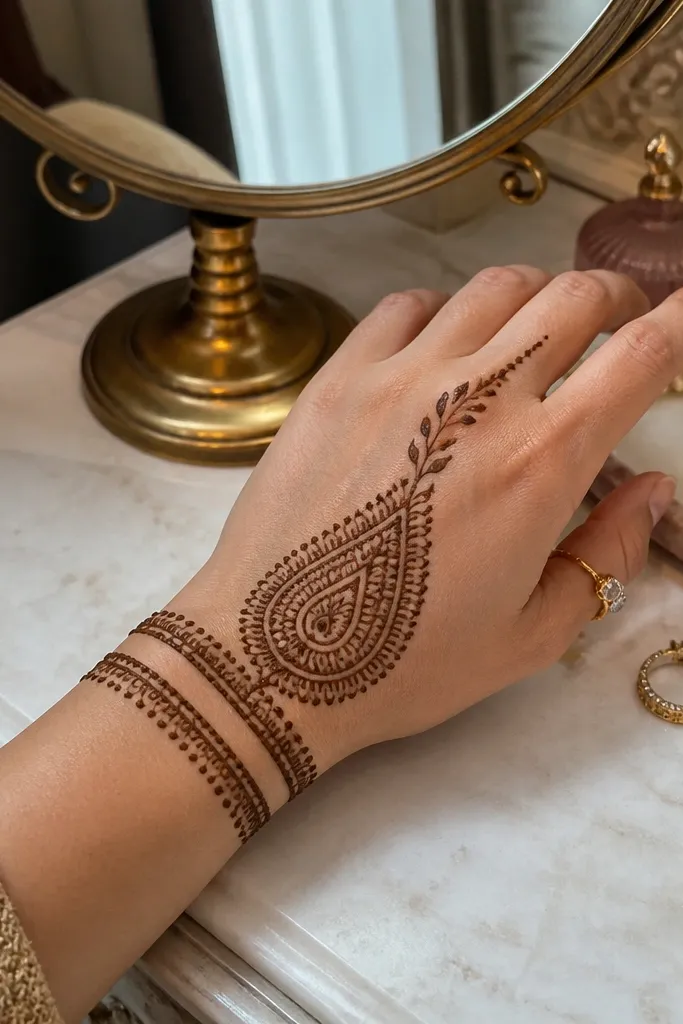
This one looks bridal because it gives you a clear focal point instead of random filling. Start with a tall teardrop in the center of the back hand, then place smaller leaf curves around it so the motif guides the eye upward. The double wrist cuff adds that finished bracelet effect, especially when your wrist jewelry is visible in wedding photos. It’s also forgiving on uneven hand placement because the cuff anchors the design even if the center shifts slightly.
Step 1: Draw a vertical teardrop outline in the center of the back hand and add 5-7 small leaf curls on each side, leaving gaps between leaves so they don’t merge. Step 2: Create two wrist bands that wrap the wrist — the first band is thin with dots, the second is slightly thicker with tiny arches. Step 3: Fill only the teardrop core with a light dot pattern and keep the leaves mostly outline so the lace stays sharp in photos.
Let the outline dry 10-15 minutes before you do any filling so the dot work stays crisp.
Avoid filling every leaf solid at the start — it turns into a dark blob on the back of the hand.
2. Peacock Fan Across the Back Hand
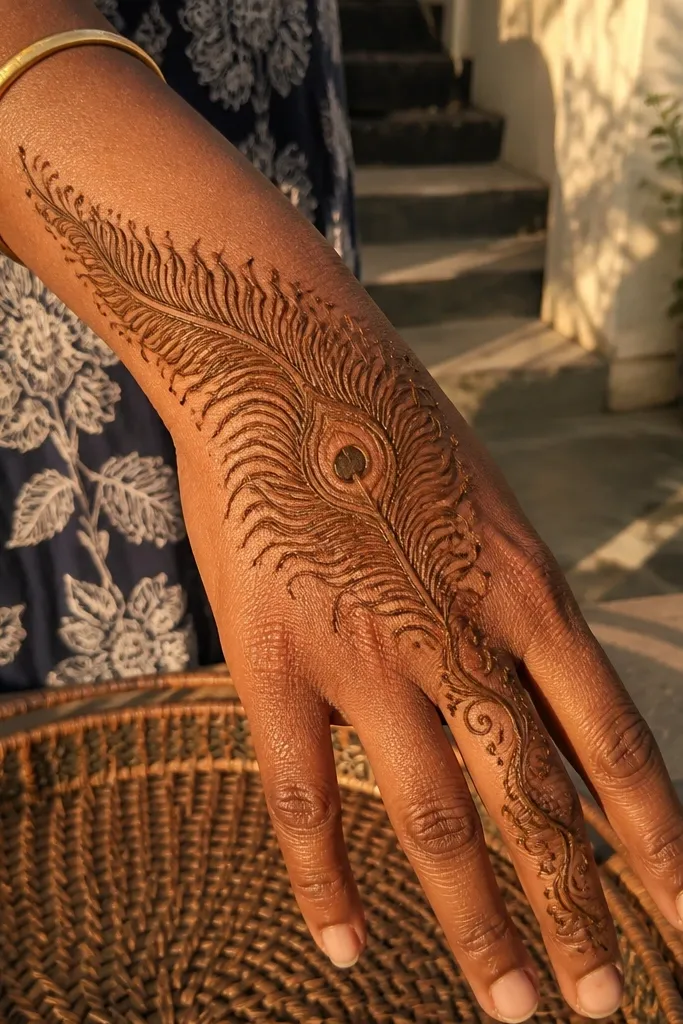
Step 1: Mark a fan arc that starts at the wrist center and ends between the thumb and index knuckle area. Step 2: Draw 7-9 feather ribs outward — each rib should have a short leaf curl on both sides, then a tiny dot at the feather tip. Step 3: Add a small central eye motif where the ribs meet, then finish with a thin wrist chain line and a few micro dots.
A peacock fan works because the feather shapes naturally follow the back-hand curve. You get a wide, photo-friendly sweep from wrist to knuckle area, and the feather tips create movement instead of a static rectangle. For bridal looks, keep the feather lines crisp and use a light “eye” at the center to make it read instantly in pictures. This design looks best when your fingers are slightly relaxed, so the fan doesn’t look squeezed near the knuckles.
AvoidDon’t pack all feather tips at the same height — uneven tips make the fan look heavy.
Pro tipUse a ruler or your palm edge to keep the fan arc smooth so photos don’t show a crooked sweep.
3. Lace Grid with Negative Space Windows
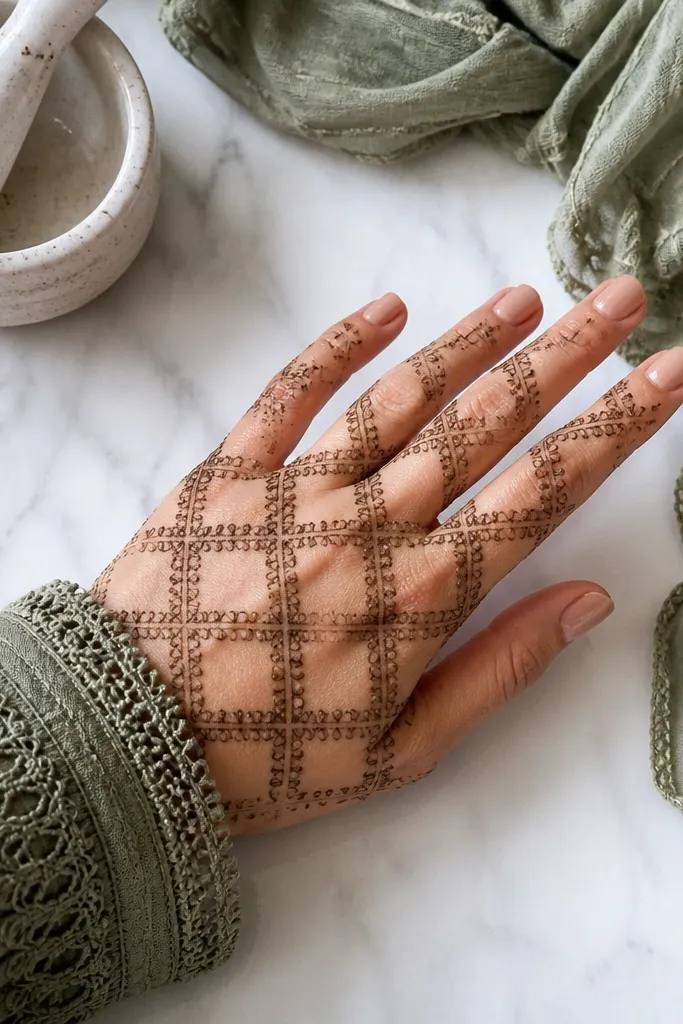
Step 1: Draw a thin border around the back hand area you want covered, then add two horizontal guide lines — one near the knuckles and one near the mid-hand. Step 2: Make a grid of small arches and chain links, but leave “windows” by skipping every other square near the center. Step 3: Add micro dots at the grid intersections and keep fills minimal so the lace stays airy.
This is the bridal “clean lace” look people chase, and it comes from controlled spacing. The lace grid gives you texture, while the negative space windows keep the hand from looking over-dark. It’s especially flattering on hands with prominent knuckles because the open windows emphasize shape instead of covering everything. If you want that Instagram crispness, this is the layout to copy.
AvoidAvoid full-page filling across the entire back hand — it kills the lace effect.
Pro tipPlan your windows as 4-6 bigger gaps, not many tiny gaps — tiny gaps disappear as it dries.
4. Oval Medallion with Side Sprigs
Step 1: Draw an oval in the center of the back hand and outline it with small scallops. Step 2: On both sides, add 4-5 thin sprigs that taper toward the wrist, each with a single leaf curl. Step 3: Fill the oval with a light checker of dots and tiny lines, leaving the sprigs mostly outline.
An oval medallion is photo-friendly because it sits flat and reads well even if the paste spreads slightly. The side sprigs make it look bridal rather than plain, and they balance the weight so the center doesn’t feel too heavy. This design works well for brides who want coverage but not full lace everywhere. It also pairs nicely with mehndi on the front of the hand because the backs can be more “organized.”
AvoidDon’t connect every sprig to the oval — add small gaps so the design looks intentional.
Pro tipIf your paste tends to bleed, keep the oval fill only in the inner half and leave the outer border as outline.
5. Arched Crown Motif Over Knuckles
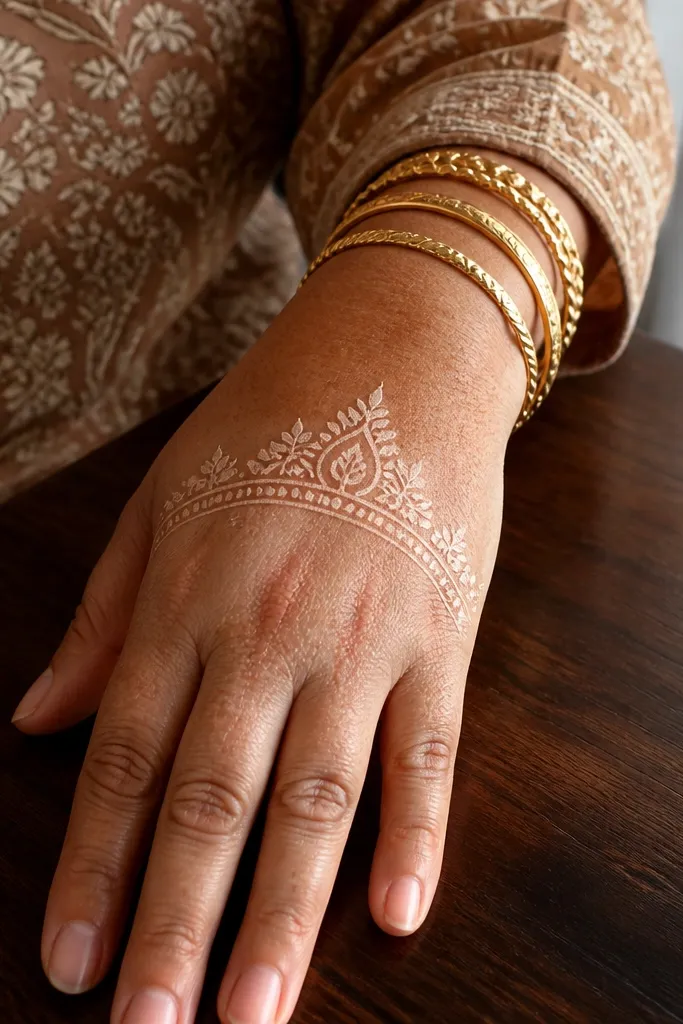
Step 1: Draw a high arch line across the knuckle area, then add 5-7 crown points along the top. Step 2: From each crown point, draw thin leaf drops that fall toward the center of the back hand. Step 3: Finish with a simple wrist band using tiny dots and short vertical dashes.
This one stuns because it frames the hand where cameras focus — the knuckles. A crown arch gives instant bridal drama without needing to cover the whole back. Use it if you want a “statement top” with lighter coverage below, which also helps if you dislike heavy filling. The crown shape also helps hide slight asymmetry because the arch pulls everything into a clean line.
AvoidAvoid heavy fill under the crown — it flattens the arch and makes the knuckle lines disappear.
Pro tipMake the crown points slightly uneven in size — perfectly identical points look mechanical in photos.
6. Wrist Bracelet Chain with Micro Flowers
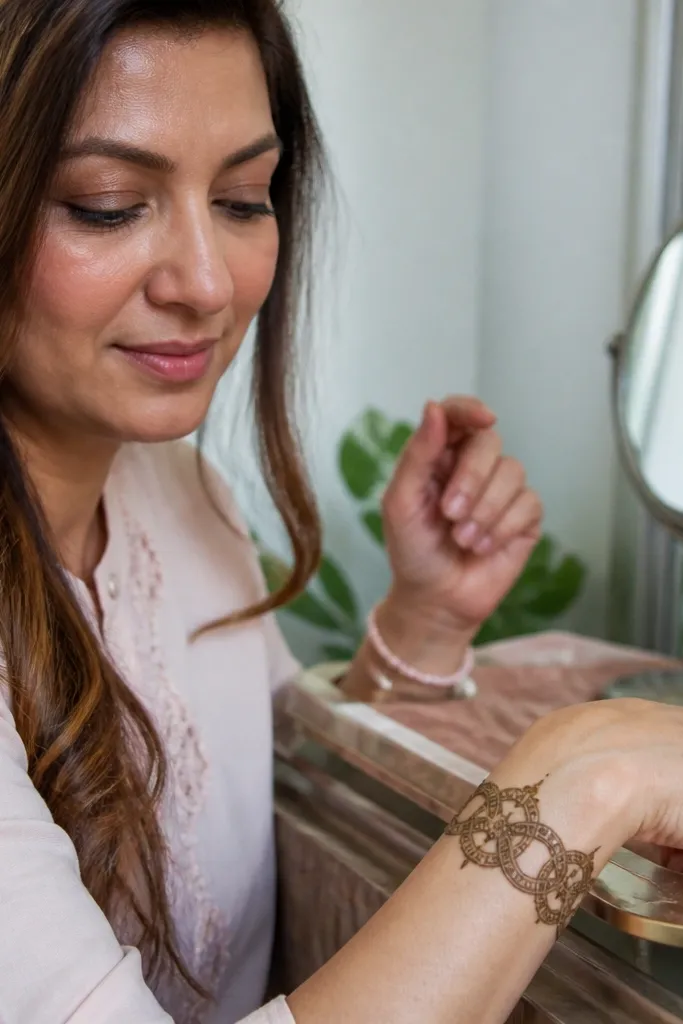
Step 1: Draw a continuous bracelet chain line around the wrist, using small oval links. Step 2: Place micro flower blooms above the chain — 6-8 blooms spread from thumb side to little finger side. Step 3: Add a few tiny dots and short leaf strokes between blooms to connect the composition without filling every space.
If you want bridal but delicate, this design gives you that “jewelry” look. It’s built around a wrist chain that feels like a bracelet, then uses micro flowers as filler so it looks detailed without being dark and muddy. This is a smart choice for brides who want the back hand to look refined, especially if the front hand already has strong motifs. The best part is it stays photogenic even when the hand moves because the chain line stays crisp.
AvoidDon’t overfill the spaces between flowers — it turns airy micro work into a dark sheet.
Pro tipKeep micro flowers to 3 petals each — more petals cause thick paste to pool and blur.
7. Diagonal Ribbon Band with Knot Center
Diagonal patterns look dramatic because they create motion across the back hand. This design uses a diagonal ribbon band that crosses the center, then ends in a knot motif that reads like a tied bridal sash. It’s a great fix for the “my design looks flat” problem because the diagonal guides the eye. Keep the ribbon outline crisp and use minimal fill so the knot stays sharp.
Step 1: Mark a diagonal line from near the wrist outer edge toward the center of the back hand. Step 2: Outline a ribbon band on both sides of the diagonal line, then add small curved “weave” details on the ribbon interior. Step 3: Build a knot in the center by drawing two overlapping loops with a tight center dot cluster, then finish with a thin wrist arc.
Do the ribbon outline first, then fill only the ribbon interior on the second pass so it doesn’t spread.
Avoid thick, fully filled ribbon — it looks heavy and hides the knot detail.
8. Corner-Mehndi Arch with Grid Fill
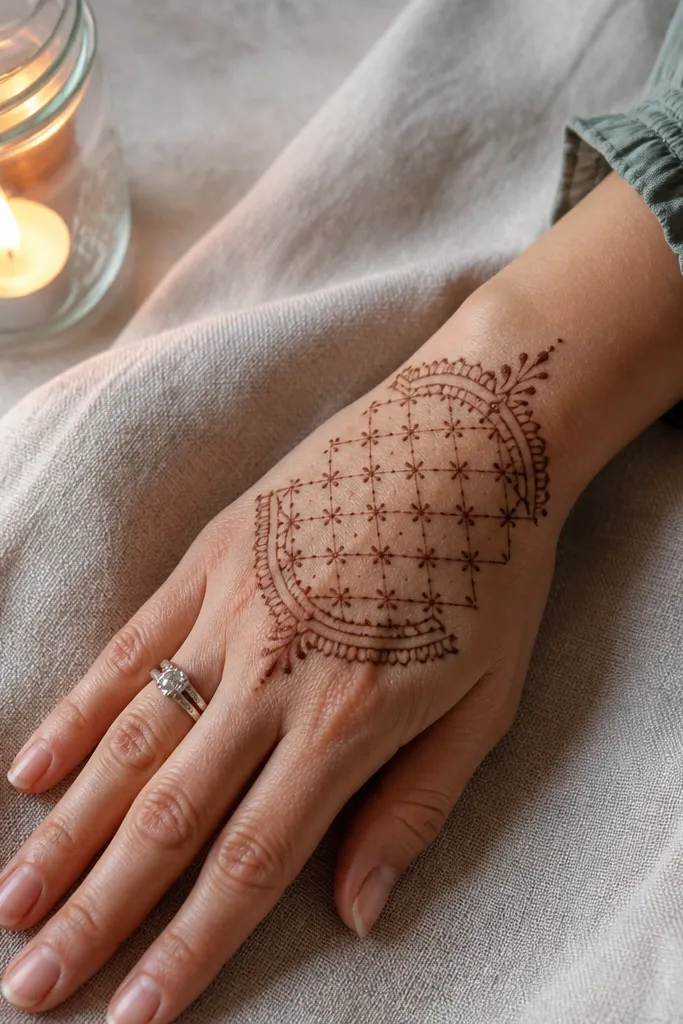
Step 1: Draw two corner arches — one on the thumb-side knuckle area and one on the wrist side. Step 2: Connect them with a central rectangle of grid lines, using small arches and dots rather than solid fill. Step 3: Add a thin border line around the grid and a few micro leaf strokes at the corners to balance the frame.
Corner arches give you a bridal look without covering the entire back hand, and that makes photos cleaner. This design starts with two corner arch frames near the knuckles and wrist, then uses a compact grid fill in the center. The grid gives texture while the frame keeps it organized. It’s a good option if you want the back hand to complement a busy front-hand design.
AvoidDon’t extend the frame arches too far inward — that crushes spacing and ruins the clean look.
Pro tipKeep the grid smaller than you think — it looks more premium and dries darker without blotting.
9. Full Back Lace with Feathered Edges
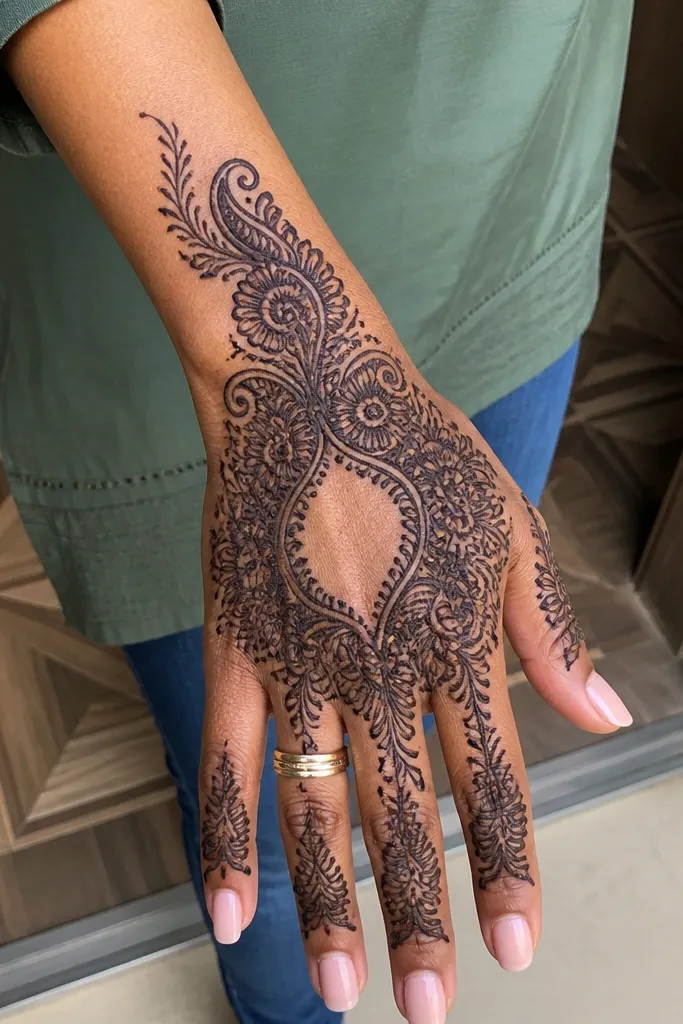
Step 1: Start by outlining a coverage border around the back hand, then add feathered edge motifs along the outer perimeter. Step 2: Fill the inside with lace chains and small arches, keeping the densest fill in the center and thinning it outward. Step 3: Finish with a wrist cuff made of alternating dots and short vertical dashes.
This is the heavy-coverage bridal look, built to still read clean. The trick is feathered edges: instead of a straight border, you end motifs with leaf curls that taper, so the design looks like it flows. The center stays open enough to show detail, and the wrist area has a soft gradation rather than a hard block of paste. It’s stunning in wedding photos because the hand looks dressed from every angle.
AvoidAvoid straight, hard borders — they make the lace look pasted on and boxy in photos.
Pro tipWork from center outward so you don’t accidentally smear fresh paste when you reach the wrist.
10. Geometric Hex Frame with Center Flower
Geometric designs look modern and bridal when they’re crisp. A hex frame gives structure, while a center flower softens the look so it doesn’t feel too sharp. This design also solves the common spacing problem because every line has a job — frame, connectors, center. It’s a strong choice if your hand mehndi tends to look chaotic; geometry forces order.
Step 1: Draw a large hexagon outline in the center of the back hand, then add a smaller hex inside it. Step 2: Build a center flower with 6 petals using thin leaf curves, then connect petals to the inner hex with short lines. Step 3: Fill the outer hex corners with tiny dots and micro arcs, leaving most of the frame outline visible.
Use a light hand on the first outline pass — you want clean lines, not thick borders everywhere.
Avoid overfilling the hex faces — it turns geometric into a dark square.
11. Thumb-to-Wrist Vines with Three Clusters
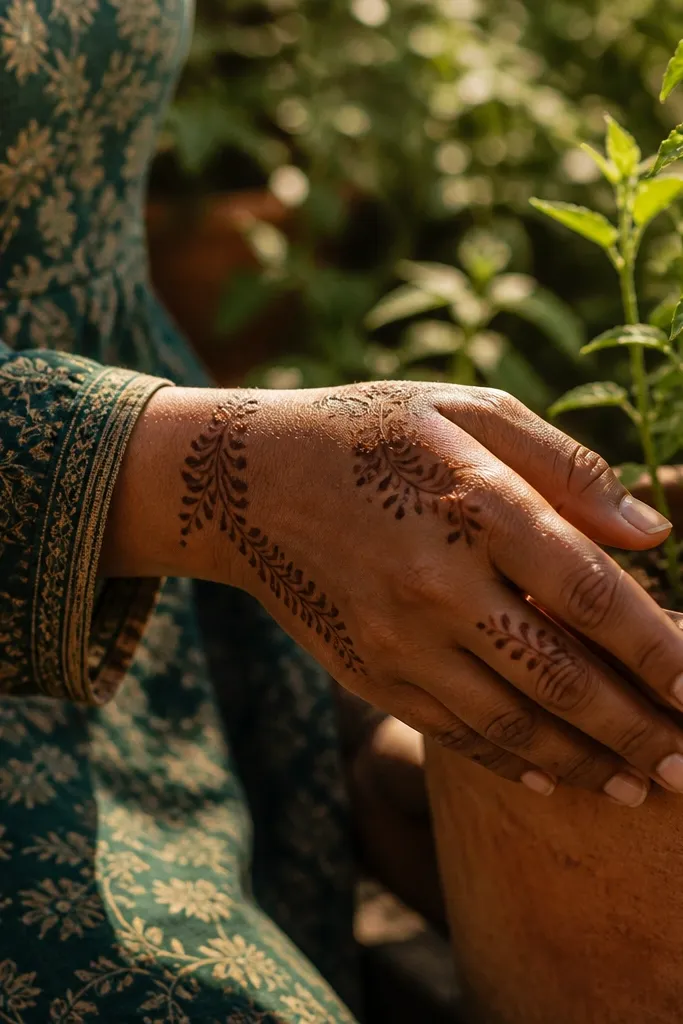
Vine motifs look romantic and polished because they follow the hand’s natural diagonals. This design places three clusters along the vine path, so the eye has stops instead of one flat fill. It’s ideal for brides who want a back-hand design that looks delicate but still bridal in photos. The clusters also help you correct placement — if your vine line is slightly off, the clusters still make it look intentional.
Step 1: Draw a main vine line from the thumb-side knuckle down to the wrist, adding small curls along the way. Step 2: Place three clusters on the vine: one near knuckles, one at mid-hand, one near the wrist. Step 3: Each cluster should have a leaf fan shape with 5-7 curls, mostly outline with light dot fill in the center.
Keep vine curls short and frequent near the wrist — long curls there look messy as the paste dries.
Don’t add too many clusters — three looks bridal; five starts to look crowded.
12. Butterfly Burst with Spark Dot Trails
Step 1: Sketch a butterfly body in the center using a thin vertical line with two small antenna dots. Step 2: Draw wings on both sides using two overlapping leaf arcs, each wing ending in a pointed tip. Step 3: Add dot trails radiating from the wing tips — short lines made of dots that stop before they reach the border, then finish with a thin wrist line.
A butterfly burst is photogenic because it creates contrast: larger wing shapes plus tiny spark dots. Place the butterfly slightly above the center of the back hand so it reads in most angles. Dot trails add that “glitter” effect without using heavy fill, so the design stays light and defined. This is a great bridal option when you want something feminine but not traditional floral medallions.
AvoidAvoid long dot trails that touch the wrist cuff — they merge and look like a stain.
Pro tipMake wing outlines first, then fill only the wing inner lines lightly with dots — full wing fill blurs the butterfly shape.
13. Bride's Kundan Style Square Frame
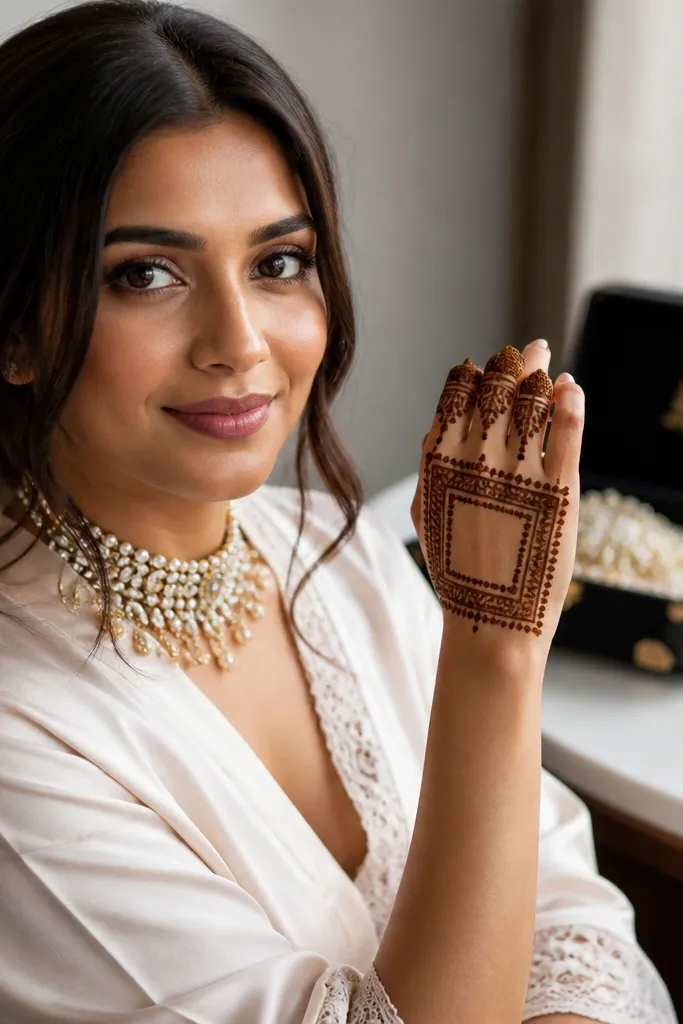
This design mimics kundan jewelry without needing actual stones. The square frame gives a clean, formal look, while the inner grid of dot-and-line accents reads like metalwork. It looks especially good under bridal bangles because the frame sits where your jewelry draws attention. Keep the center open and use small accents instead of heavy fill so the frame stays crisp and doesn’t turn blotchy.
Step 1: Draw a square frame on the back hand, leaving a small margin from the wrist and knuckles. Step 2: Inside the square, create a 3x3 arrangement of small motifs — each mini square has a dot center with short curved lines around it. Step 3: Add a thin wrist cuff with a single row of dots and a short chain line that connects to the square corners.
Use a consistent dot size across the whole frame. If dot sizes vary, the square looks uneven in photos.
Don’t fill the entire square solid — kundan style needs contrast, not full black coverage.
14. Peony Flower Cluster with Open Petal Fills
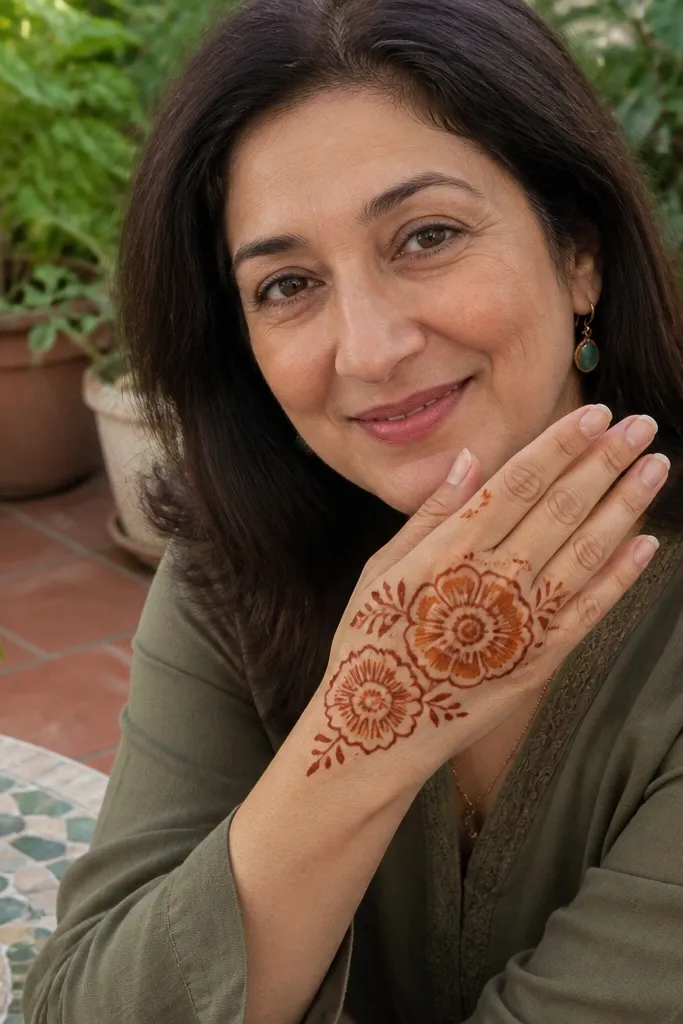
Step 1: Draw a center flower with 10-12 petal outlines, each petal slightly curved and spaced. Step 2: Add two smaller flowers on the left and right, each with 6-8 petals, then connect them with thin leaf strokes. Step 3: Fill petals using outline + a few dots inside rather than full solid fill, then add a wrist cuff line with tiny arches.
Peony-inspired clusters look bridal because they have layered petals, but you keep them airy with open petal fills. Place one main peony in the center and add two smaller flowers toward the sides. This gives a balanced composition that still feels light. The open petal technique keeps the design from turning into a single dark mass on the back of the hand.
AvoidAvoid fully filling every petal — open petal fills are what keep it photo-sharp.
Pro tipIf your paste is thick, skip solid fills and do only dot shading inside petals for a cleaner stain.
15. Wrist Cuff Only with Finger-Edge Dots
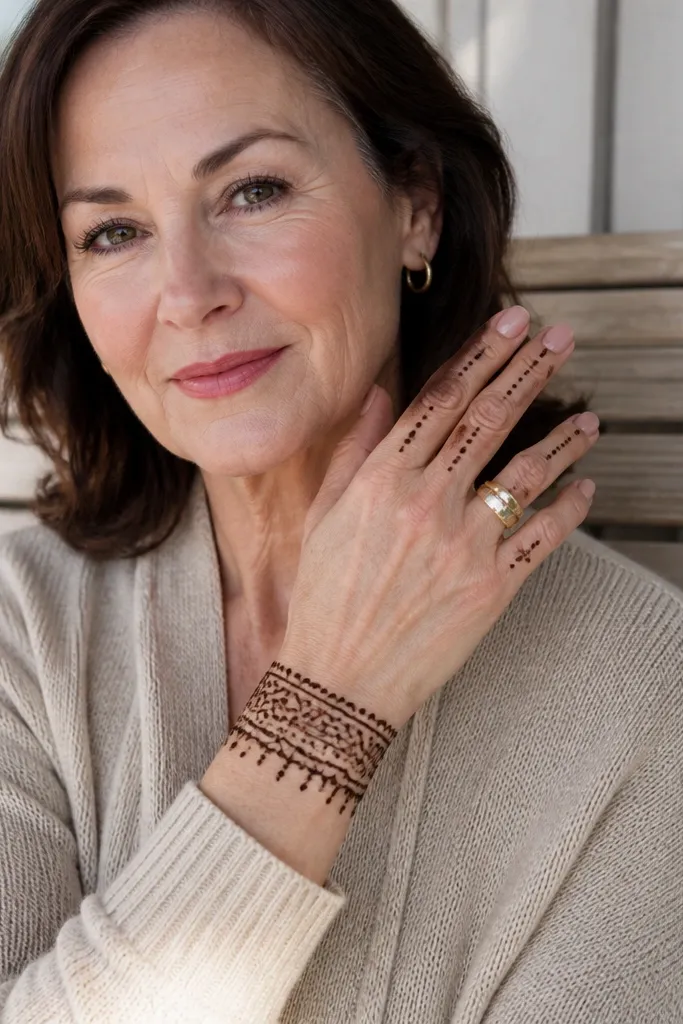
Step 1: Draw a detailed wrist cuff band across the back of the wrist, using alternating arches and dots. Step 2: Add a thin vertical line up from the cuff to each finger edge area (not into the palm), then place 3-5 dots along each line. Step 3: Finish with a few tiny leaf curls at the cuff ends so the design doesn’t look like a sticker.
This is for brides who want the back hand to look neat but still bridal. It focuses on the wrist cuff and adds small dots near the finger edges so the design looks intentional rather than empty. In wedding photos, this reads as delicate jewelry, especially if you have rings or a bracelet stack. It also reduces the common mistakes back hand mehndi designs make when people try to fill too much — you keep spacing clean and the stain stays even.
AvoidAvoid leaving the cuff ends unfinished — broken ends make the whole look look incomplete.
Pro tipKeep the dot count consistent per finger edge so it looks designed, not random.



