
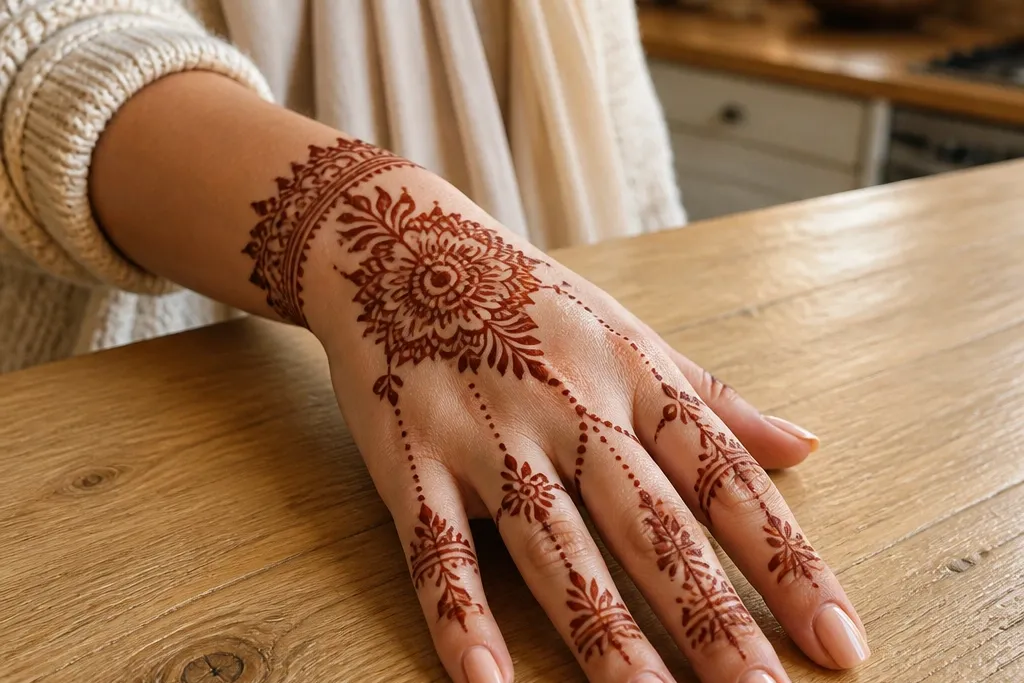

1. Wrist-to-Middle Paisley Ladder
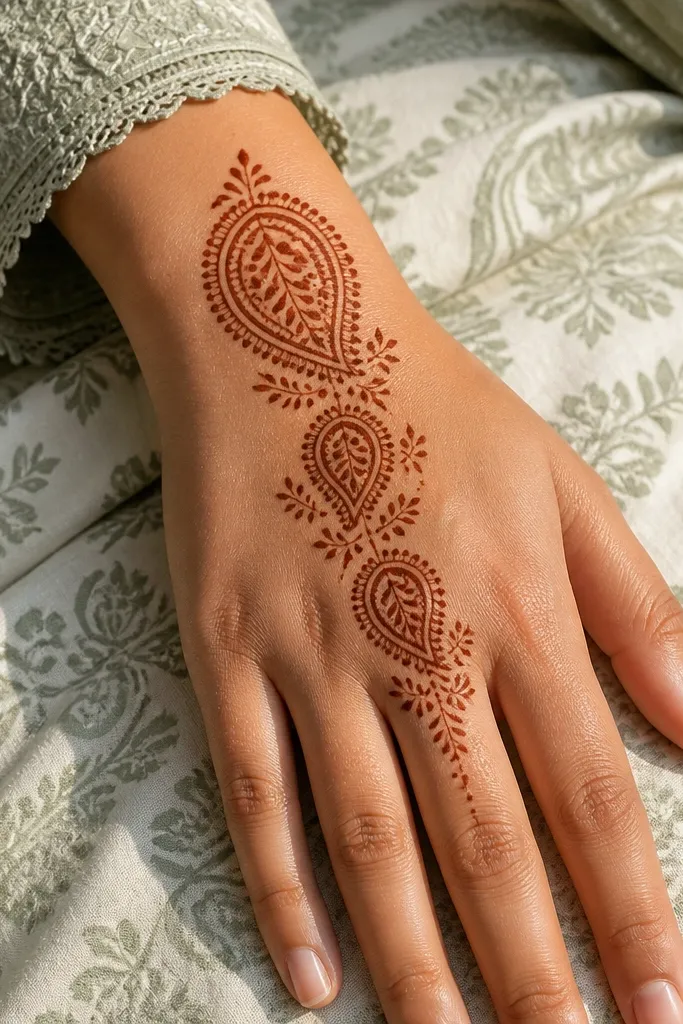
This design gives you a strong vertical rhythm, which is exactly why it looks “simple” but still elegant in photos. Start with one larger paisley at the wrist line, then place two medium paisleys above it so the center motif stays crisp. The side spaces get filled with tiny dots and short leaf strokes, not full vines, so it stays beginner-friendly. It’s ideal for front-hand coverage when you want a cozy holiday vibe without painting the whole hand.
Start by drawing a curved guideline from the wrist toward the base of the middle finger. Place the largest paisley on the wrist, then add two medium paisleys aligned on that guideline, keeping equal gaps between them. Fill the gaps with small dot clusters (3-5 dots) and short teardrop leaves. Finish with simple finger caps on index and middle only, using a half-moon band at the knuckle and a thinner band near the fingertip.
Use a ruler-like guide by lightly marking placement points with a tissue tip, then erase before paste dries.
Don’t make all three paisleys the same size — the ladder effect disappears.
2. Thumb Web Flower Fan
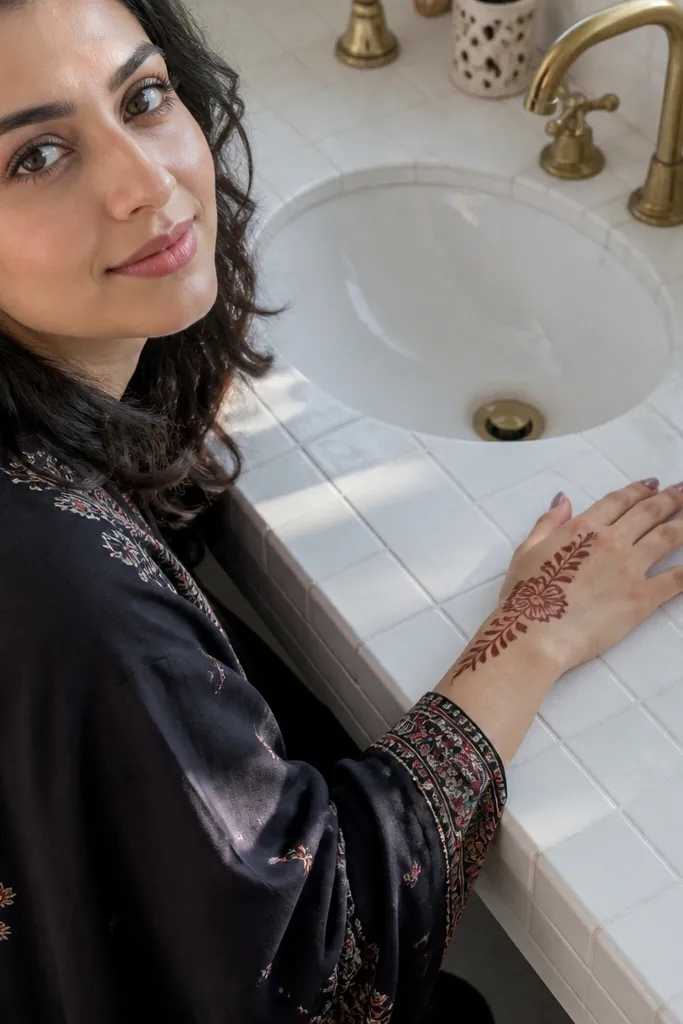
This is one of the most photogenic simple front-hand patterns because it creates a fan shape that frames the thumb web. You’ll draw a small flower at the web space, then extend rounded petals in a gentle arc toward the index finger. A few leaf sprigs on the outer edge make it look intentional rather than empty. It suits cozy seasonal outfits because the petals look warm and rounded, and the pattern stays compact.
Start with a small five-petal flower where the thumb meets the hand, keeping it slightly angled toward the index finger. Draw a curved line from the flower outward, then build 4-6 fan petals along that arc. Add tiny dot fillers between petals, then place two short leaf strokes along the outer edge of the fan. Finish with a thin band on the index finger knuckle and a small dot line across the base of the middle finger.
If your petals smear, let the first flower dry 10-15 minutes before adding the fan petals.
Skip long vines — they stretch the design and make the fan look messy.
3. Half-Moon Border with Dots
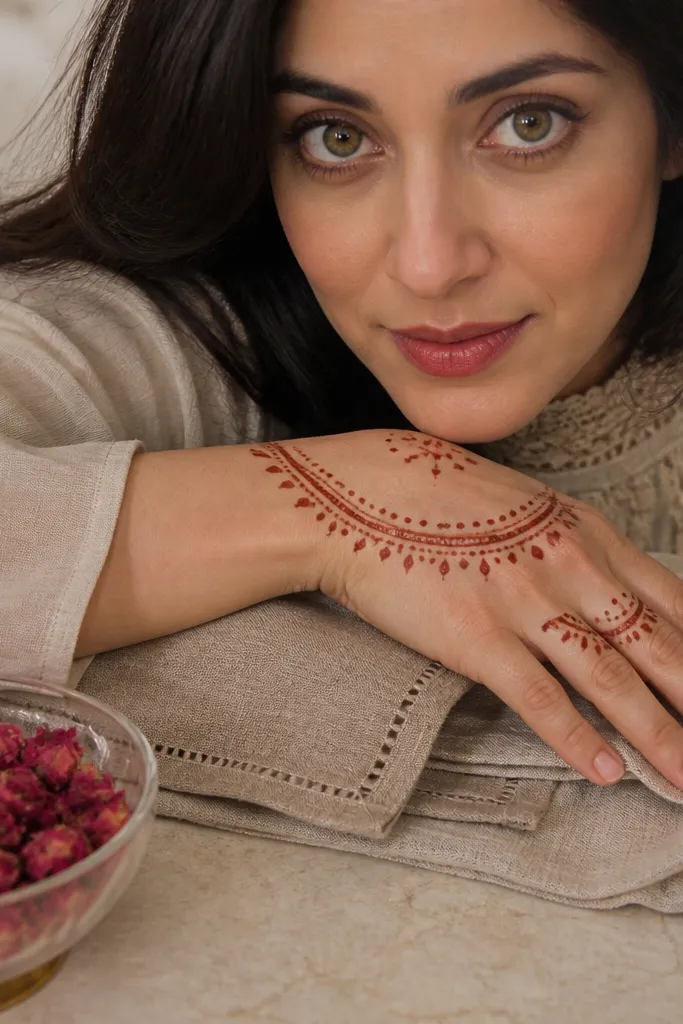
This one is clean, cozy, and ridiculously repeatable. You make a half-moon border across the top of the hand, then echo it with a second smaller arc near the knuckles. Inside, you use dot clusters and tiny leaf commas instead of big fills. The result looks like a holiday lace pattern, but it takes far less time than full lace mehndi. It’s perfect for beginners who want something that photographs crisp.
Pro tipKeep dot sizes consistent by squeezing paste with the same pressure and distance from the cone tip.
Begin with an arc drawn across the top of the hand from just below the index knuckle area toward the pinky side. Add a second inner arc about 1 cm below it. Fill the space between arcs with dot clusters and small leaf comma shapes, keeping the dots evenly spaced. Add simple finger caps using only a thin band at each knuckle, then stop — don’t fill the full finger.
AvoidDon’t overfill the arc space — too many dots make it look cloudy.
4. Circular Mandala Corner
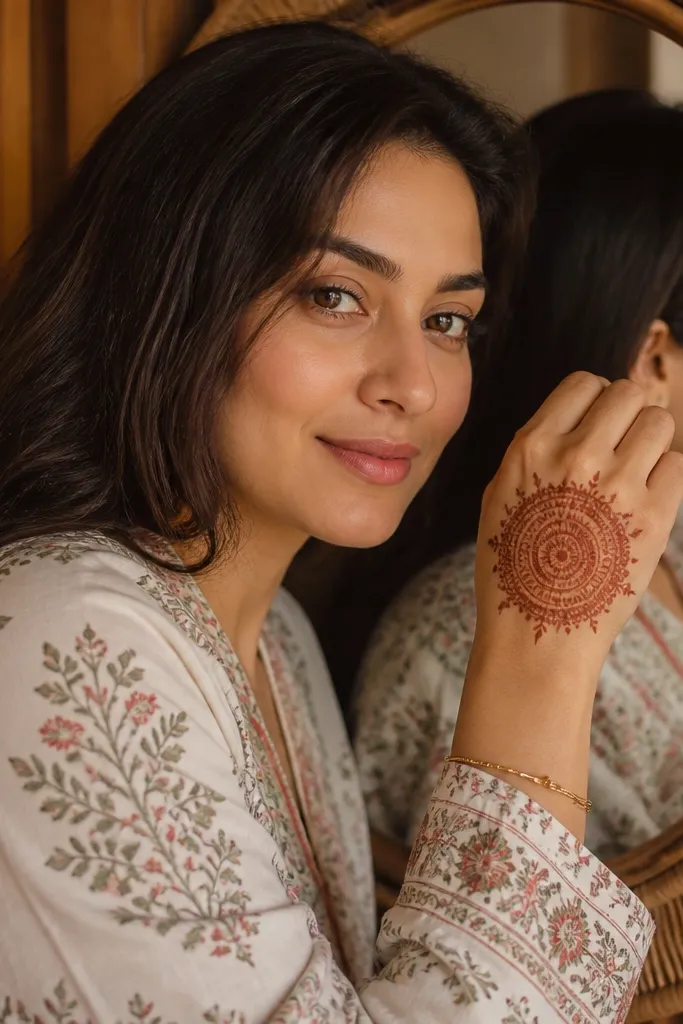
A mini mandala on the back of the hand looks like you planned the whole layout, even when the rest is simple. Place a tight circle motif near the center-right (toward ring finger side), then add small curved spokes that stop before the wrist. This gives you a focal point that holds up in photos, especially with warm holiday lighting. The remaining areas get light dot fillers so the design stays airy but polished.
Draw a small circle near the center of the hand, slightly toward the ring finger. Inside the circle, create a star-like ring using short curved petals or teardrops, then outline the circle with a thicker line. Add 6-8 curved spokes radiating outward but stop each spoke before reaching the edges of the hand. Fill the gaps with dots, then finish with a half-moon band on the ring finger and tiny dot caps on the index and middle.
Outline the circle first, then fill inside — it keeps your symmetry cleaner.
Don’t stretch the mandala too wide; a small one reads sharper.
5. Three-Line Vine with Leaf Sprigs
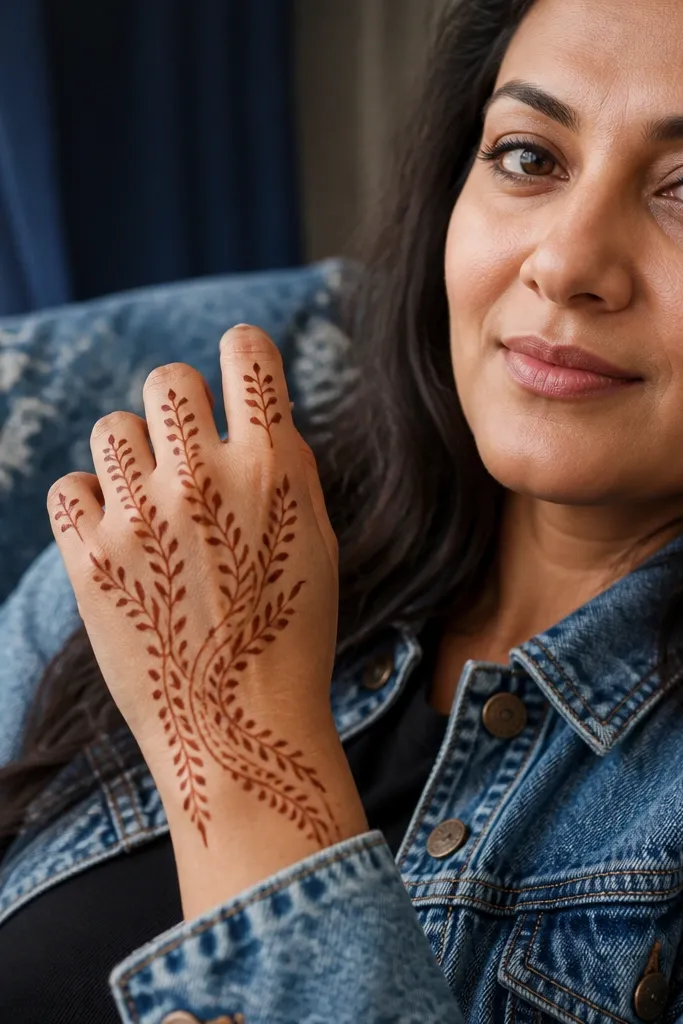
If you want “simple” that still looks designed, use a vine structure with only a few branches. Three main curved lines across the back of the hand create movement, and leaf sprigs give texture without heavy filling. This pattern is great for front-hand mehndi because the lines naturally guide the eye from wrist to fingertips. It also pairs well with jewelry and looks cozy in holiday photos because the leaves have that rounded, warm shape.
Draw three parallel curved lines from the wrist area toward the index-to-middle finger direction, spacing them about 1 cm apart. On each line, add 3-4 leaf sprigs: teardrop leaves with a small dot at the base. Keep fillers minimal — use only tiny dots between leaves, not full vine coverage. Finish with finger caps on index and middle: a thin band at the knuckle plus a small leaf at the center of the band.
Use the same leaf size across the whole design so it looks intentional, not accidental.
Don’t cross the vines randomly; crossing makes the pattern look tangled.
6. Knuckle Dot Garland

This design is for hands that need a light, cozy look without heavy paste work. You create dotted “garlands” across the knuckles of multiple fingers, then connect them with a few tiny leaf accents on the back of the hand. It reads like festive lace because dots catch pigment well and show contrast. The best part is it doesn’t require perfect floral drawing — dot placement does most of the work.
Start with a small leaf or two on the top of the hand near the center, then place dot garlands across the knuckles: one dot line per finger, each line about 1/2 cm long. Connect garlands with short curved micro-lines so the dots look grouped. Add a thin dotted border along the top edge of the hand near the wrist. Finish by adding small dot clusters at the base of each finger and stop — no full finger filling.
Use 2-3 dot sizes only. Too many sizes make the garland look uneven after drying.
Don’t skip connecting micro-lines; isolated dots look unfinished.
7. Crescent Bow on Back of Hand
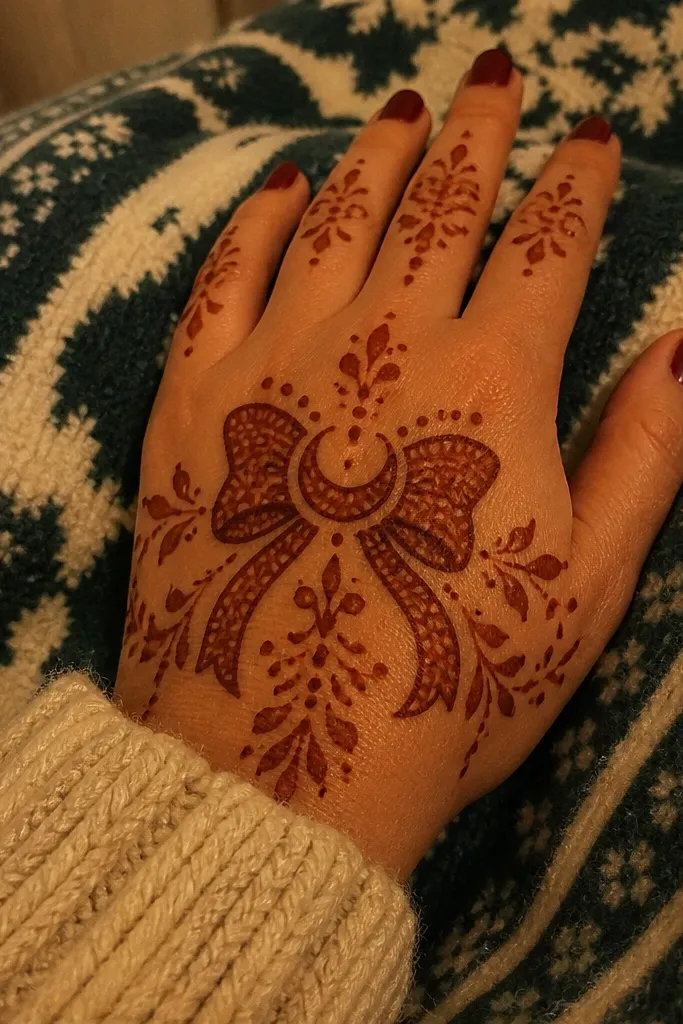
A crescent bow is an easy way to get a holiday-cozy look because it’s rounded, symmetrical, and naturally frames the hand. Draw a thick crescent outline in the center of the back of the hand, then add a smaller inner crescent so it looks like a bow fold. Around it, scatter tiny dot bursts and a few leaf commas for texture. This pattern is great when you want something eye-catching but not time-consuming.
Pro tipKeep the bow slightly higher than center so it doesn’t get swallowed by finger caps.
Draw a bold crescent arc centered on the back of the hand. Inside it, draw a smaller crescent arc using thinner paste so the border shows. Add two or three dot bursts on each side of the bow, each burst made of 5-7 dots. Add leaf commas between dot bursts for movement. Finish with simple finger bands on index and ring fingers only, each band a thin half-moon at the knuckle.
AvoidDon’t make the crescent too thick all the way through; thick paste can crack.
8. Rangoli-Style Corner Swirls
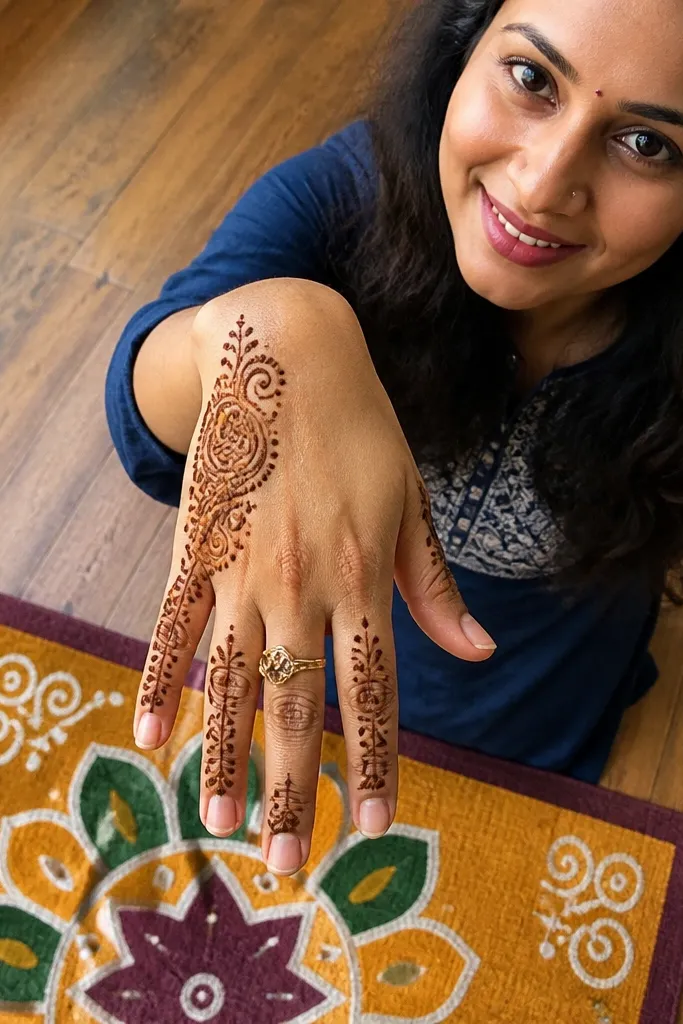
Rangoli-style corners look super cozy because they use curved swirls and dot clusters that feel festive without needing full coverage. Place two corner motifs: one near the thumb web side and one near the pinky side, then let them echo each other with small dots. The center of the hand stays mostly clean, so your design looks airy and photogenic. This is a smart pick if you want a simple front-hand pattern that still looks balanced.
Start by placing a small swirl in the thumb web corner, made of a curved line that ends in a tiny loop. Mirror that swirl on the pinky side, keeping the same size and spacing from the wrist. Fill the area between swirls with dot clusters and short curved “ring” lines. Add one central dot cluster near the middle of the hand to tie it together. Finish with thin dotted bands at the base of the index and middle fingers.
Draw the swirls as one continuous motion, then thicken only the outer edge after the first line sets.
Don’t fill the center heavily; rangoli corners look best with breathing room.
9. Mini Lotus Chain Across Fingers

This is a front-hand pattern that looks delicate but still reads clearly. You place a chain of mini lotuses along the top edge of the hand, then let small leaves point toward the fingertips. Because the lotuses repeat, the design looks intentional even if each one is simple. It’s great for cozy holiday looks because lotus shapes feel soft and warm, and the repetition photographs well.
Draw a gentle diagonal guideline from the wrist to the base of the index finger. Along it, make 3-4 mini lotuses: a small circle center with 4-6 rounded petals around it. Add tiny leaf pairs between lotuses, pointing toward the fingertips. Keep the rest of the hand mostly clear, then add finger caps on index and middle: a lotus at the base plus a thin band upward about 1/3 of the finger length.
Use the same distance between mini lotuses so the chain looks like one unit.
Don’t make the petals too large; mini lotuses need to stay compact to avoid crowding.
10. Peacock Tail Lite
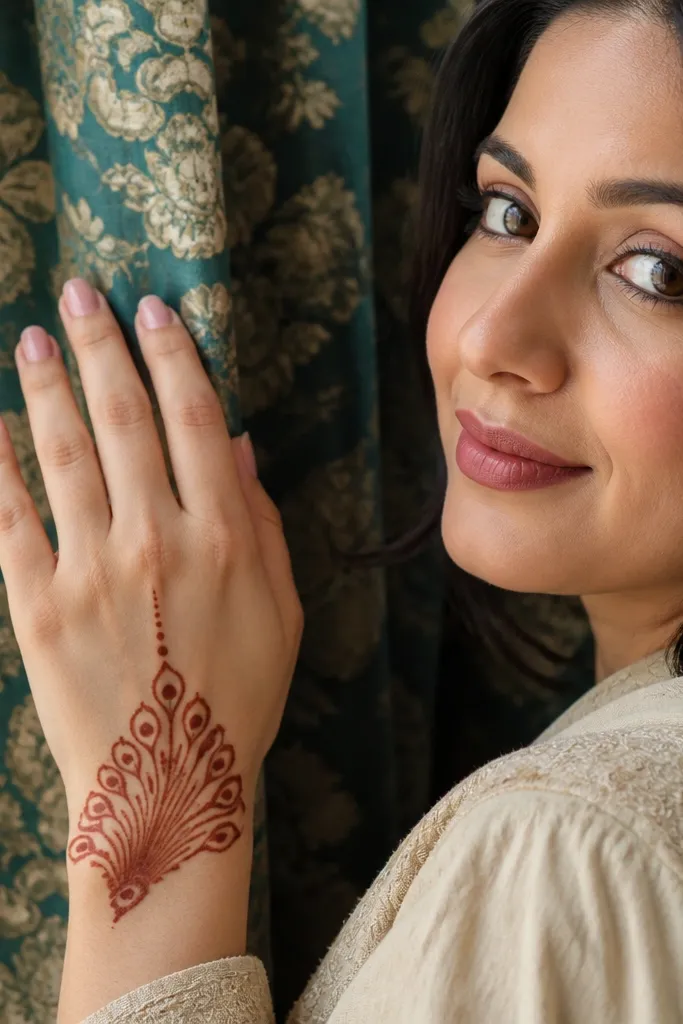
You get the peacock vibe without the long, complicated tail. Place a small fan near the wrist area, then use teardrop feathers that get slightly smaller toward the top of the fan. Add dot “eyes” inside a few feathers for that classic look. This design works well as a front-hand statement because the fan shape naturally covers the wrist-to-hand area without needing full hand filling.
Pro tipKeep feather tips sharp by squeezing paste slightly slower as you finish each teardrop.
Draw a curved base line near the wrist. On top of it, create 7-9 teardrop feathers fanning upward, with the center feather slightly larger. Add a dot or tiny circle in the middle of 3-4 feathers to act like peacock eyes. Fill gaps with small dots and 2-3 short leaf strokes. Finish with a thin band at the base of the ring finger and a dot cap on the pinky.
AvoidDon’t add too many eye dots; too many makes it look cluttered.
11. Wrist Bracelet with Linked Teardrops

If you want cozy front-hand mehndi that looks dressed-up instantly, build the design from the wrist bracelet first. Linked teardrops make a neat band that transfers easily into finger details without overworking the back of the hand. The bracelet gives a clear anchor point, and the top of the hand can stay simple with just a few leaf sprigs. This is also a forgiving design if your lines aren’t perfectly steady.
Start at the wrist with a horizontal band about 1.5-2 cm wide. Draw a row of linked teardrops across the band, touching at the sides so it looks like one continuous chain. Add a dotted border above and below the bracelet band. On the back of the hand, place 2-3 leaf sprigs extending from the bracelet upward. Finish with finger caps on only two fingers: a thin band at the knuckle and a small teardrop at the center.
Press the cone tip lightly at teardrop junctions so the links connect cleanly.
Don’t run the bracelet too wide; wide wrist bands crowd the hand.
12. Center Flower with Side Comma Leaves
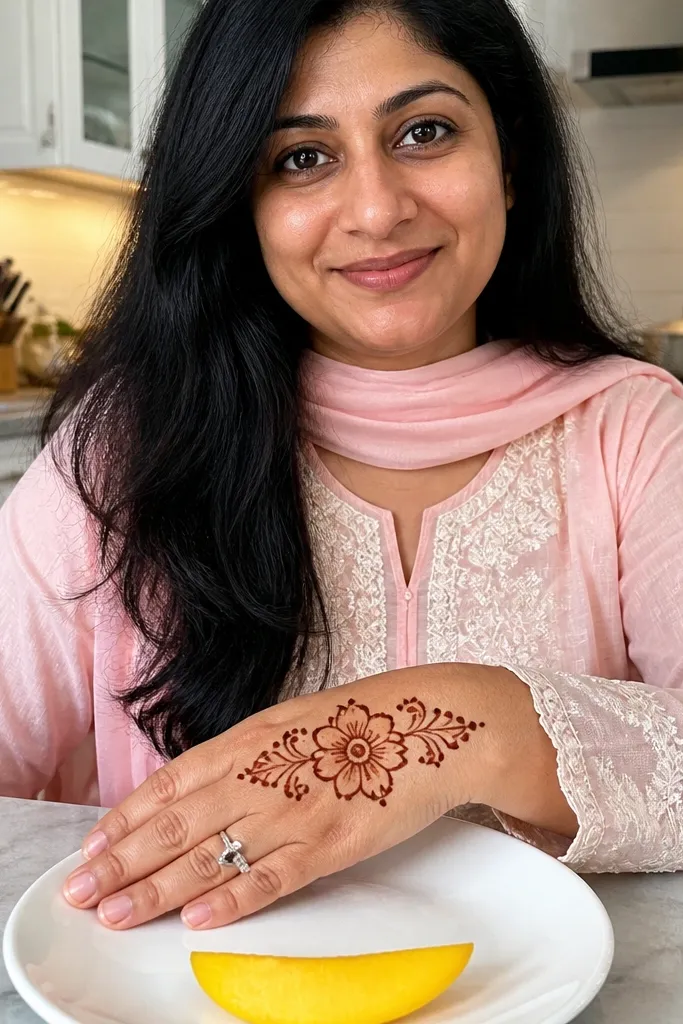
This one is a clean, symmetrical front-hand design that looks like lace even when it’s simple. Put a medium flower in the center of the back of the hand, then add comma-shaped leaves on both sides that point outward. The space between leaves gets dot fillers, giving contrast and keeping the pattern airy. It’s a solid choice for holiday gatherings because it looks neat, not heavy.
Pro tipLet the main flower set for a few minutes before adding side leaves so they don’t smear into the petals.
Draw a medium flower center (a small circle with 6-8 rounded petals). Outline the petals with slightly thicker paste so they pop. Add 4-6 comma leaves on the left and right sides of the flower, alternating small and medium sizes. Fill the gaps with dot clusters, then add two finger bands: one on index knuckle and one on middle knuckle, each a thin half-moon band. Finish by adding one tiny leaf on the center of each band.
AvoidDon’t place leaves too close to the flower edges; it makes the center look crowded.
13. Starburst Dots Around Thumb Web
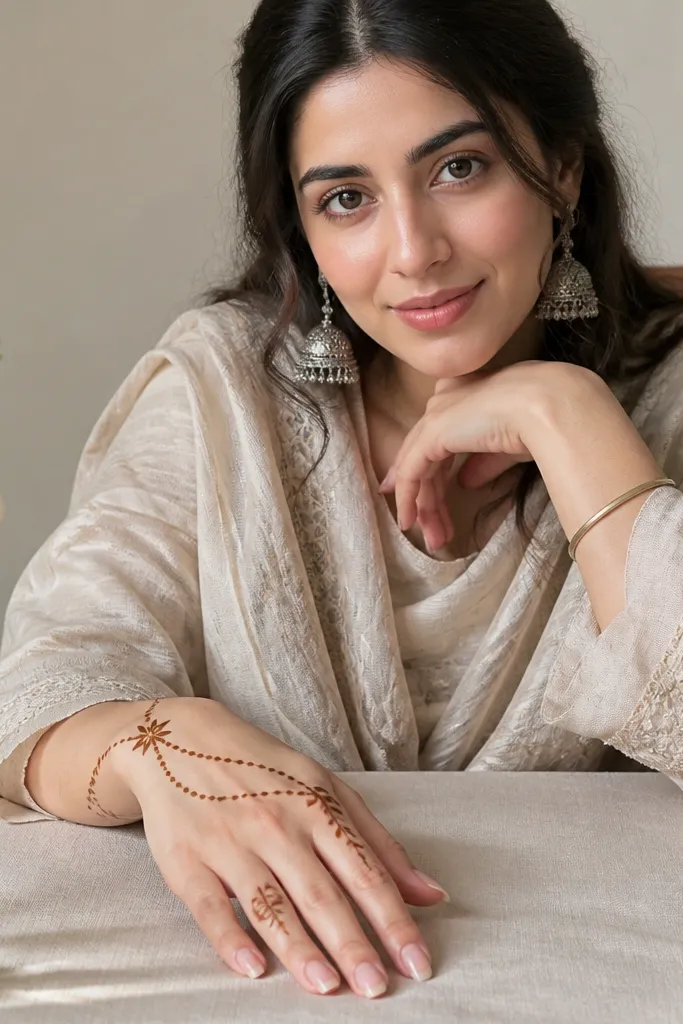
Starburst dot work is the easiest route to a cozy, festive front-hand look that still looks intentional. Start with a small starburst at the thumb web, then add two curved dot lines that sweep toward the index finger. Keep the rest minimal: a few leaf strokes and one tiny accent near the wrist. This design is quick, and it photographs well because dots darken nicely and create crisp texture.
Draw a small starburst at the thumb web using a central dot and 6-8 short lines of dots radiating outward. Then create two curved dot lines starting from the starburst and arcing toward the index finger base. Add 3-4 leaf strokes near the outer arc, each leaf made of a teardrop with one small dot. Add a tiny dot cluster at the wrist edge to balance the composition. Finish with a thin dotted band across the index knuckle only.
Use a slightly thicker paste for dots than for leaf lines so they darken more evenly.
Avoid making the dot lines too long; long lines make the pattern look stretched.
14. Diagonal Lattice Mini Panels
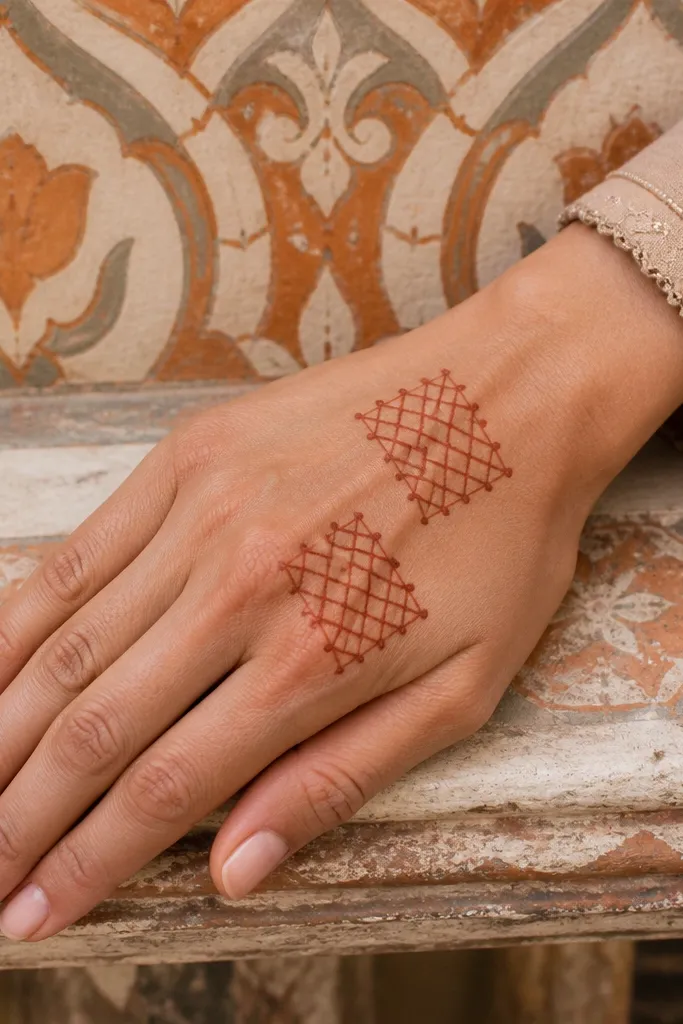
Lattice panels look “done” fast because the grid creates structure. Keep it simple by making two diagonal mini panels on the back of the hand and leaving the rest clean. Each panel gets small cross lines and dot corners, so it looks festive without heavy floral work. This design is great when you want a modern-cozy look that still fits holiday outfits and doesn’t take hours.
Draw a diagonal guideline from wrist toward the center of the hand. Create two mini lattice panels along that diagonal, each panel about 2.5-3 cm long and 1.5 cm wide. Inside each panel, draw short horizontal and vertical lines to form a grid, then place a dot at each corner intersection. Add tiny leaf commas at the panel edges for softness. Finish with finger caps on index and middle: a thin band at the knuckle with one dot at the center.
Use light pressure for lattice lines; heavy lines make the grid look muddy after drying.
Don’t fill the entire hand with lattice; two panels give the best contrast.
15. Side-Flowing Wave Band with Tiny Stars
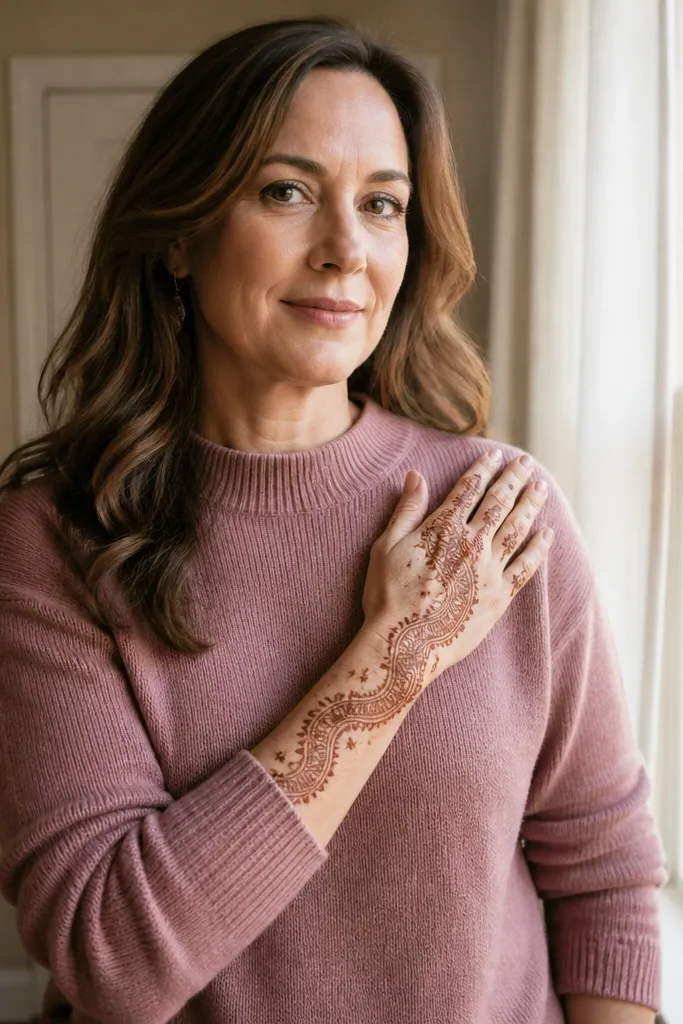
This design gives you that “front-hand mehndi” look without covering every inch. The wave band runs diagonally from the wrist toward the index-side knuckles, so it photographs cleanly even on shorter nails and small hands. Tiny star dots break up the empty space and make the pattern feel finished, not sparse. It works best for people who want something delicate but still noticeable in photos. Skill level is beginner-friendly because it uses repeatable curves, and the time is about 20 to 30 minutes once you’re comfortable with steady paste lines. It suits everyday wear, office-friendly parties, and bridesmaids who want a simple front-hand design that still looks styled.
Pro tipSketch the wave lightly with a henna-safe pencil or eyeliner first, then go over it with paste. If your line wobbles, stop, wipe the tip, and restart from the last clean curve instead of trying to fix the wobble mid-stroke.
Use a cone with a medium-fine tip and plan the placement: start 1.5 cm above the wrist on the pinky side, then aim the wave to end around the knuckle of the index finger. Draw one smooth wave line that looks like a gentle S — keep the peaks about 6 to 8 mm tall and spaced evenly (about 8 to 10 mm apart). Add small “star” clusters right on the wave — each star is 5 short lines meeting at a center dot, with 1 to 2 clusters per wave peak. Fill the center of each star with a tiny dot and keep the rest of the hand mostly clean so the band stays the hero. Let it dry fully before you remove any smudges, then apply a thin layer of lemon-sugar to help it set evenly.
AvoidDon’t pack the stars too close to the wrist — the band gets heavy and the wave loses its shape.



