
1. Single Fan Over Fingers
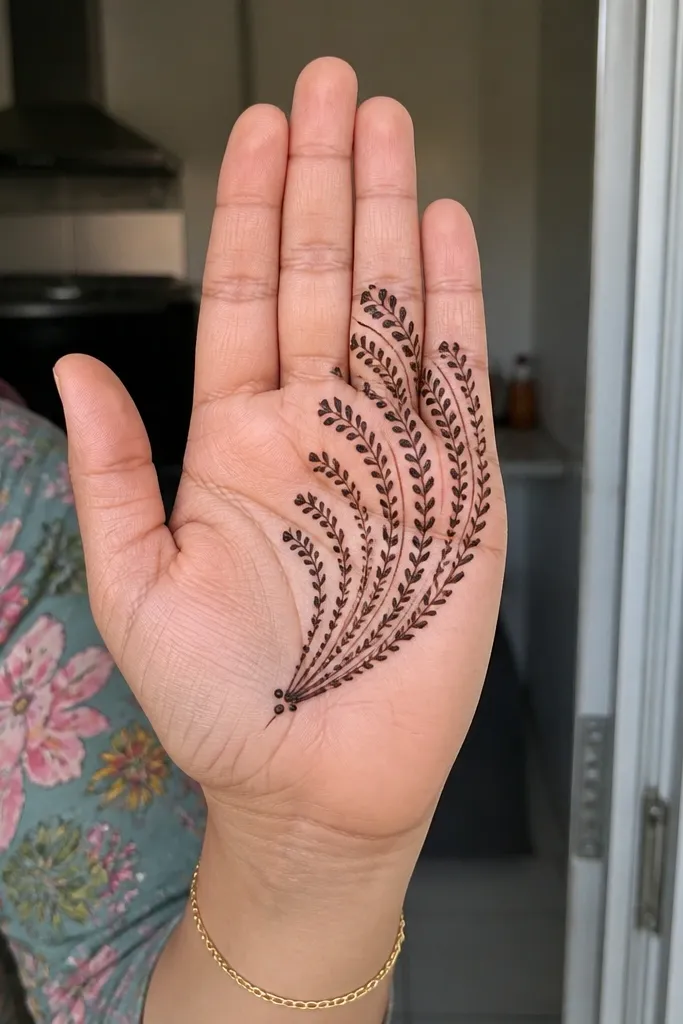
This is the cleanest “Arabic front hand” look when you want something simple but still pretty. You draw a curved fan that starts near the knuckles and opens toward the fingertips, then fill each fan rib with tiny comma strokes. Keep the outline thin so the fan reads crisp instead of bulky. The dots at the base of the fan give it that classic Arabic rhythm and help your spacing stay under control. It looks great with short-to-medium nails because the fan naturally lands in the finger area.
Step 1 — Trace a thin border line across the finger bases, then place a dot at each knuckle corner. Step 2 — Draw one big curved line from the left knuckle to the right knuckle, then add 5-7 parallel ribs inside it using short comma strokes. Step 3 — Add a few micro dots along the fan’s outer edge and finish with a small vertical stem down the center of the back of the hand.
If your commas get fat, squeeze less and move faster for the fill lines.
Don’t fill the fan completely to the edges — leave a few small gaps for that airy Arabic look.
2. Arch Bridge Center Vine
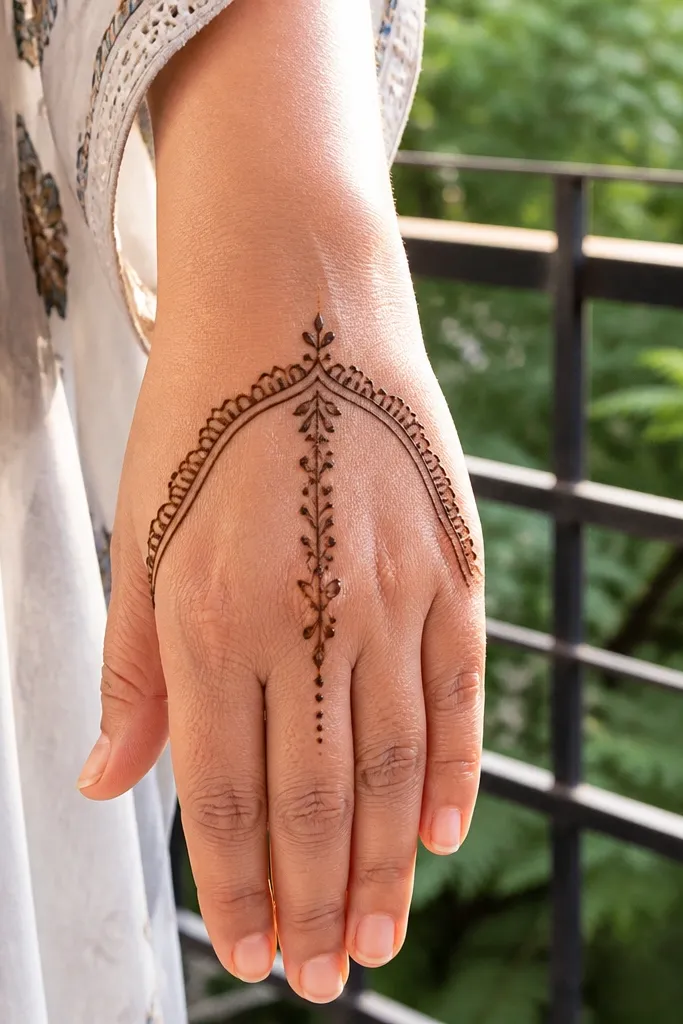
An arch bridge is a front-hand cheat code. It creates a strong visual structure without covering the whole hand, and the center vine pulls the eye downward. The arch outline makes the design look “framed,” while the vine with dots keeps it delicate. This one is perfect for people who want Arabic style but hate heavy coverage on the palm side. It also photographs well because the arch forms a clear shape against your skin.
Step 1 — Draw a thin arch from just above the wrist toward the base of the middle fingers, keeping it symmetrical. Step 2 — From the arch center, draw a vertical vine line down the back of the hand with alternating tiny leaves (comma shapes). Step 3 — Add dot clusters at the top of the arch where the vine starts, then finish with two small curls near the wrist.
Pro tipUse three leaf sizes: small, medium, small so the vine looks natural, not patterned.
AvoidSkip thick outlines — the arch should be fine-line or it turns into a solid band.
3. Two Finger Columns With Dots
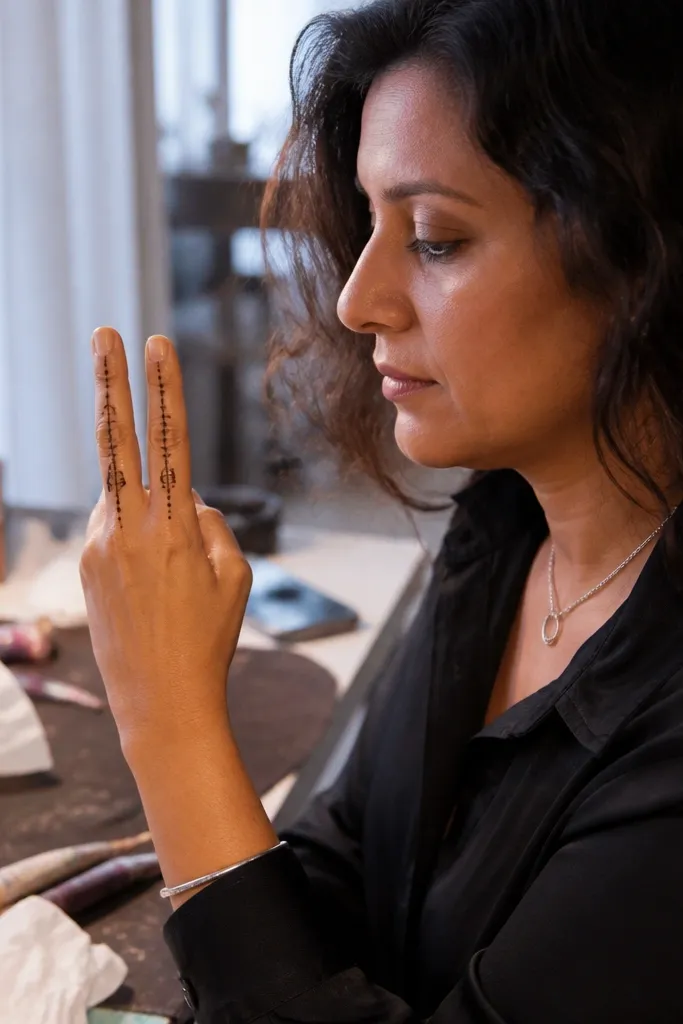
This pattern gives you an Arabic look using only two main columns. It’s great if you’re new and want control: you place a clean column on two fingers, then connect them with tiny dots and a minimal base line. The dotted separators stop the design from feeling flat. Since it stays narrow, it works well for small hands and for front-hand designs that need to sit neatly under bangles.
Step 1 — Pick two adjacent fingers (usually index and middle), and draw a thin vertical stem from knuckle to near the fingertip. Step 2 — Add small comma leaves on each stem at regular intervals, then place 3-5 dots between the two columns. Step 3 — Add a thin horizontal base line across the finger bases and one micro curl at the outer edge of the design.
Mark the leaf spacing lightly with a pencil dot guide before you start the paste lines.
Don’t spread the columns too wide — keep them close enough that the hand still looks airy.
4. Knuckle Halo With Wrist Spark

This one is small but looks intentional. A knuckle halo frames the front of the hand, then a tiny “spark” motif at the wrist gives it that Arabic sparkle without adding clutter. It’s perfect for quick events when you want color on the front without waiting for a full design. The halo also helps your fingers look balanced because it visually aligns all knuckles at once. Keep the spark simple: a star-like cluster of dots and one curved line.
Step 1 — Draw a thin curved line around the knuckle area across the front, leaving small gaps between the fingers. Step 2 — Reinforce the halo with dots at each gap and add short curved commas pointing inward. Step 3 — At the wrist, draw a small cluster of 5-7 dots in a star shape and connect it with a single curved line that points upward.
Pro tipIf your halo line shakes, do it in two passes: outline first, then trace once lightly.
AvoidAvoid filling inside the halo — keep it mostly open so it stays light and photogenic.
5. Finger Tips Micro Net
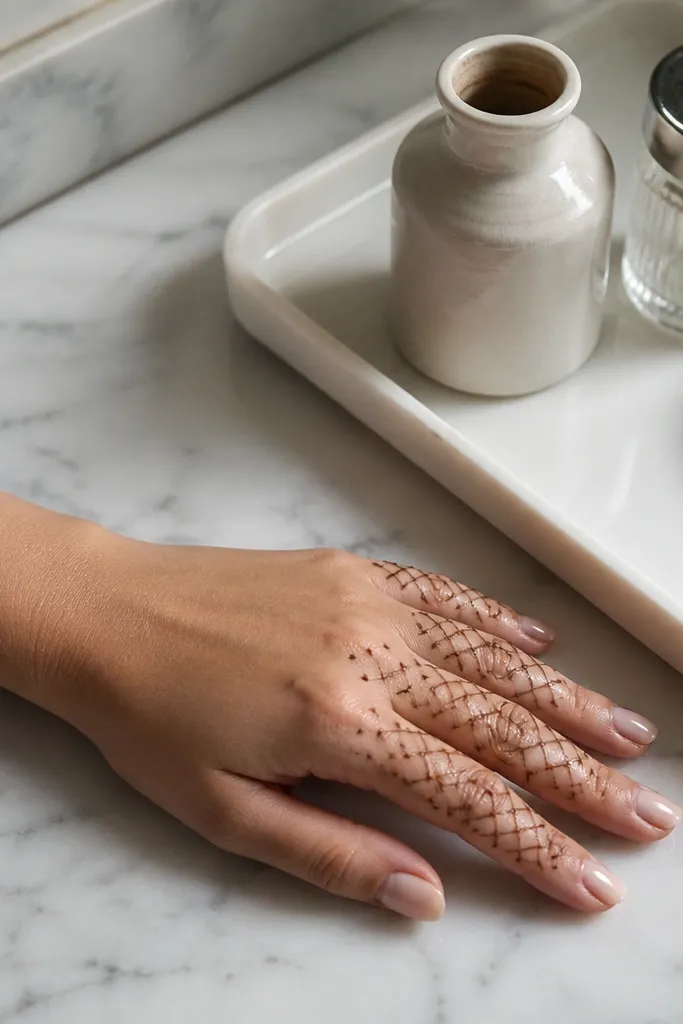
Micro netting on the fingertips reads very Arabic even when the rest of the hand is minimal. You’re basically drawing a grid of tiny lines and dots, then letting it fade into open space below. This is one of the easiest ways to get a detailed look without heavy coverage. It’s also forgiving — if one section comes out uneven, the net texture hides it. Great for short time because the work is concentrated near the fingertips.
Step 1 — For each front finger, draw 2-3 thin vertical lines from near the fingertip downward by about half an inch. Step 2 — Connect those vertical lines with short horizontal micro strokes, leaving gaps so the net isn’t solid. Step 3 — Add a dotted row at the base of the net on each finger and stop there to keep the design clean.
Pro tipUse a slightly looser cone tip for the net lines, so you don’t tear skin with heavy paste.
AvoidDon’t extend the net too far into the palm — it gets crowded fast.
6. Center Star With Leaf Steps
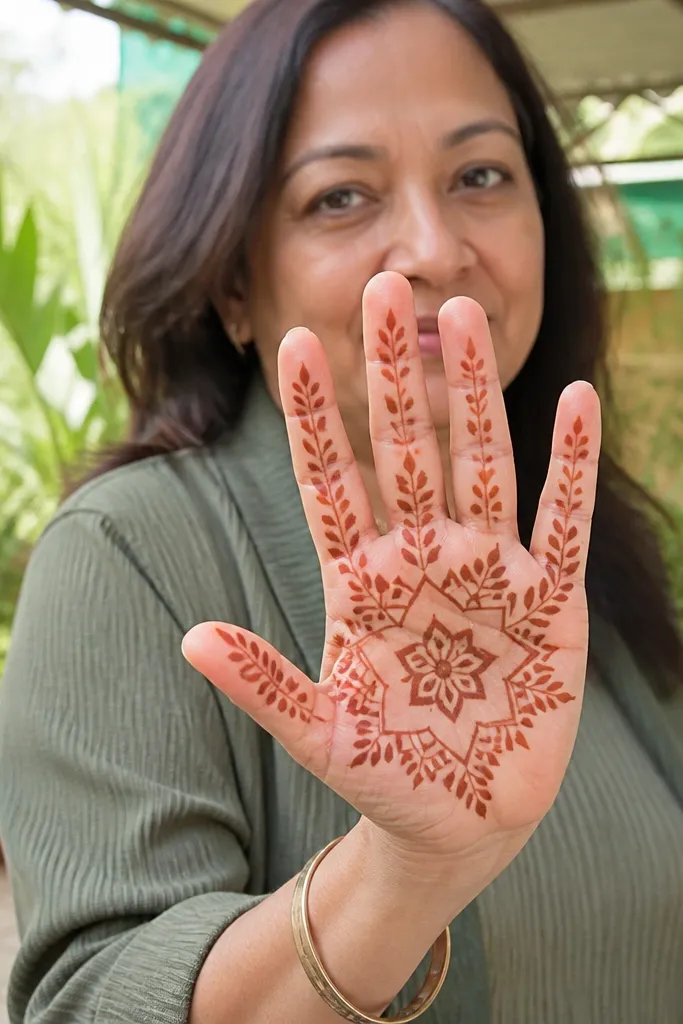
A center star gives you an instant focal point. The star sits on the back of the hand, and leaf steps around it create movement without heavy filling. This design is pretty in daylight because the star edges catch the stain evenly when you keep the lines thin. It also works for medium coverage because you’re not trying to cover every finger — just enough to look finished. If you want “gorgeous” without spending hours, this is one of the best time-to-payoff patterns.
Step 1 — Draw a small six-point star on the front center between knuckles and wrist, using thin straight strokes. Step 2 — Add three leaf steps on each side of the star: each step is a comma leaf pointing outward, spaced like stairs. Step 3 — Finish with tiny dots at the ends of the leaf steps and a short vertical stem below the star.
Pro tipKeep the star small — if it’s too big, the surrounding leaves look rushed.
AvoidAvoid overfilling around the star — dots and open space make it look Arabic.
7. Wrist Vine With Two Side Fans

This design balances a grounded wrist motif with finger interest. The vine starts at the top of the wrist and climbs toward the center, while two side fans sit near the knuckles on the left and right. It feels light because the fans don’t touch each other, and the vine stays thin. It’s a strong pick for seasonal and holiday looks where you want something photogenic but not full-hand. The negative space in the middle keeps it classy.
Step 1 — Draw a thin vine line from the wrist upward with small comma leaves every 1-1.5 cm. Step 2 — Near the top of the vine, draw two small fans on either side using 4-5 curved ribs each. Step 3 — Add dot clusters at the base of each fan and connect them to the vine with one short curved line.
Let the vine line be slightly thicker than the ribs so it looks like a stem.
Don’t make the fans too wide — if they overlap, the front hand looks heavy.
8. Finger Frames With One Main Oval
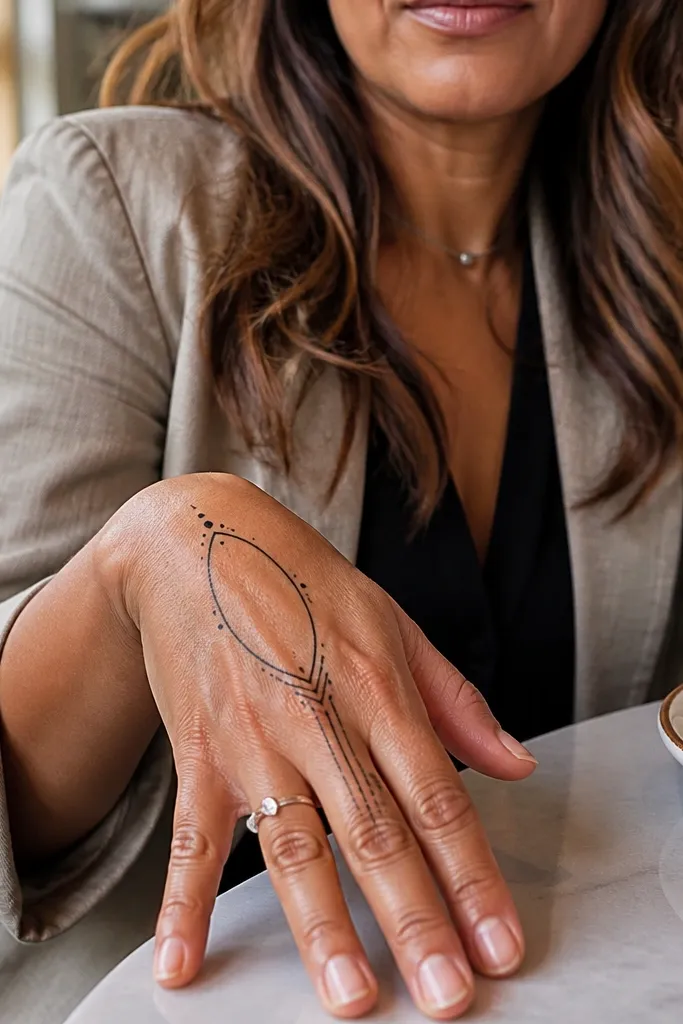
This is a clean “panel” style Arabic design. You frame each front finger with a thin outline, then place one oval motif across the back of the hand to finish the look. The oval is your main decoration, and the finger frames make the whole thing look pulled together. It’s ideal if you want something that feels designed, not random. The oval also gives you a smooth area for stain to deepen evenly.
Step 1 — Draw a thin border along the outer sides of 3-4 front fingers, from knuckle to fingertip. Step 2 — On the back of the hand, draw one vertical oval using a double line, then fill it with tiny dots around the edges. Step 3 — Add a short vertical stem from the oval down to the wrist, then place 2-3 dots at the stem stops.
Use a double-line oval only if your cone tip is consistent; one line ovals also look great.
Avoid filling the oval solid — dots and micro strokes look more Arabic and less messy.
9. Diagonal Vine With Knuckle Steps
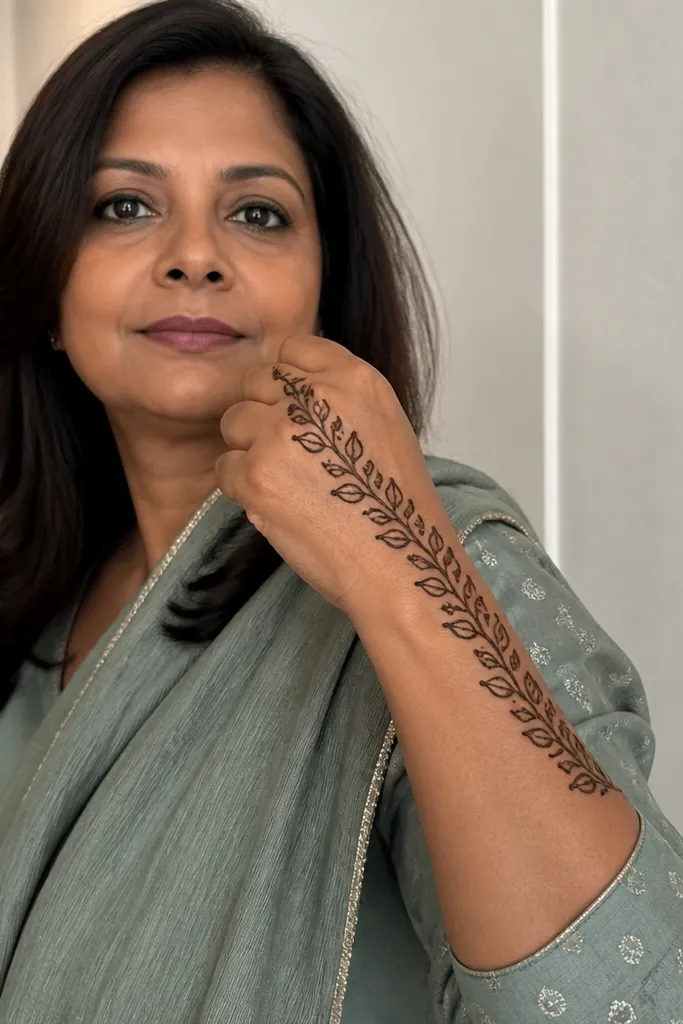
Diagonal placements look lively and make a simple design look styled. This one has a vine that runs diagonally from the wrist toward the outer edge of the hand, with stepped leaf blocks near the knuckles. The steps give you texture without needing big fillers. It’s a good choice when you want coverage that doesn’t extend into the palm too much. Also, diagonal lines tend to hide small mistakes because the eye follows the direction.
Step 1 — Draw a diagonal stem starting at the top of the wrist and ending near the base of the ring finger. Step 2 — Add leaf steps near the knuckles: each step is a short horizontal curve with one comma leaf on it. Step 3 — Finish with a dot trail along the diagonal line and one tiny curl at the end near the ring finger base.
Plan the diagonal with two anchor points first, then connect them so your line doesn’t drift.
Don’t make the diagonal too steep — it should feel like a natural arm angle, not a slash.
10. Three Dot Chain Border
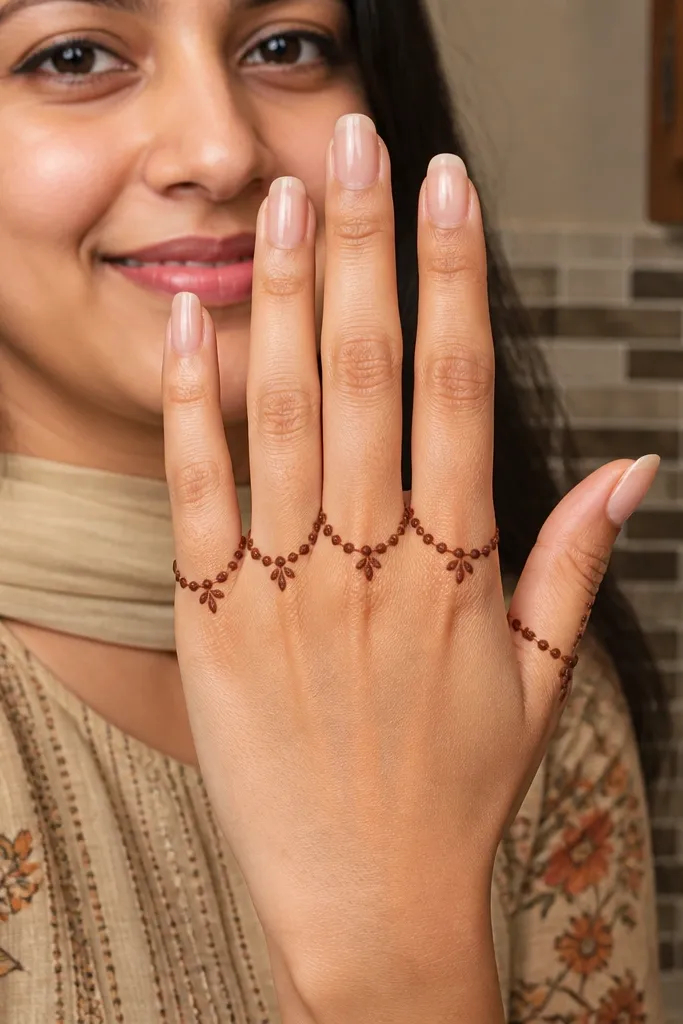
This one is almost too simple, but it photographs like a proper Arabic pattern. You make a border using a chain of three dots per segment, and then you add tiny curved hooks at finger bases. The result is clean, symmetrical, and easy to repeat across all front fingers. It’s perfect for beginners because you’re not drawing complex leaves. Use it when you want a neat front-hand look that doesn’t take more than 20-25 minutes.
Step 1 — Starting at the outer knuckle, draw three dots in a tight row, then curve them slightly to follow the finger base line. Step 2 — Repeat the three-dot segments across all front finger bases, keeping the gaps between segments consistent. Step 3 — Add one small curved hook at the start and end of the border, then stop there or add a mini dot cluster at the wrist.
Pro tipKeep dot size identical by squeezing the cone for the same time each dot.
AvoidAvoid uneven spacing — it makes the pattern look accidental instead of designed.
11. Mini Triangle Palm Line
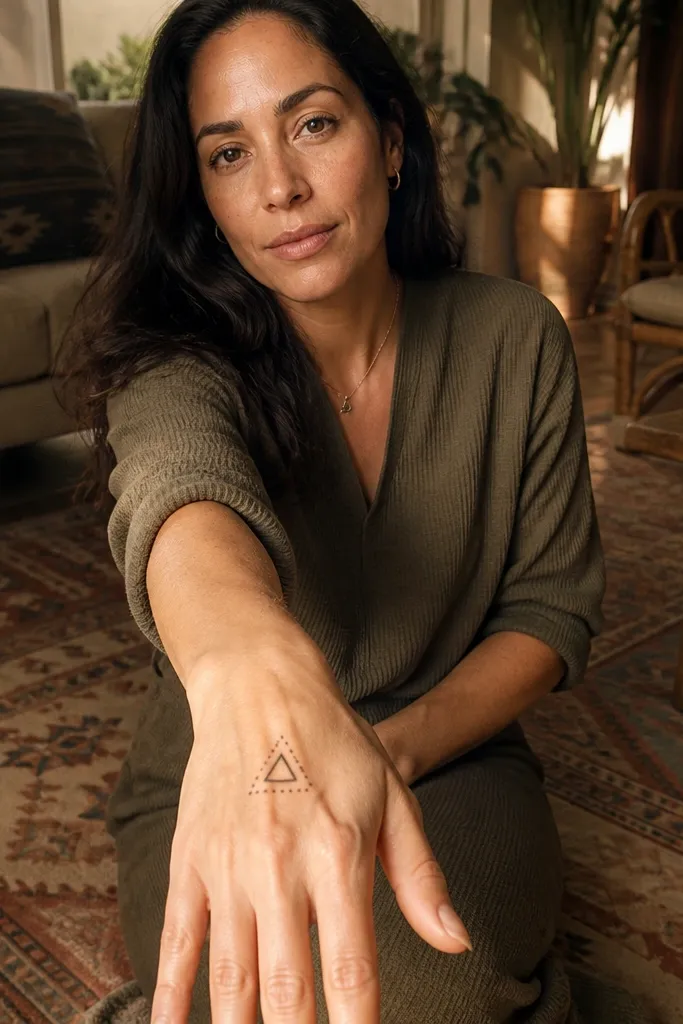
Mini triangles are a classic Arabic detail, and this version keeps it easy. You draw one small triangle on the back of the hand, then build a thin linework frame around it using dots and micro commas. The triangle shape creates a strong focal point without covering the whole hand. It’s also great for holiday looks because geometric motifs look crisp and clean even when the stain varies. If your mehndi tends to smear, this design stays mostly on areas that dry evenly.
Step 1 — Draw a small upright triangle in the center of the front hand using thin lines. Step 2 — Fill only the triangle edges with tiny dots, leaving the middle mostly open. Step 3 — Add a thin curved border around the triangle using short commas, then finish with two dot clusters near the triangle corners.
Outline the triangle first, then add dots — it keeps the geometry sharp.
Don’t overfill the triangle — solid fill makes it look heavy and less Arabic.
12. Reverse U Lace at Knuckles
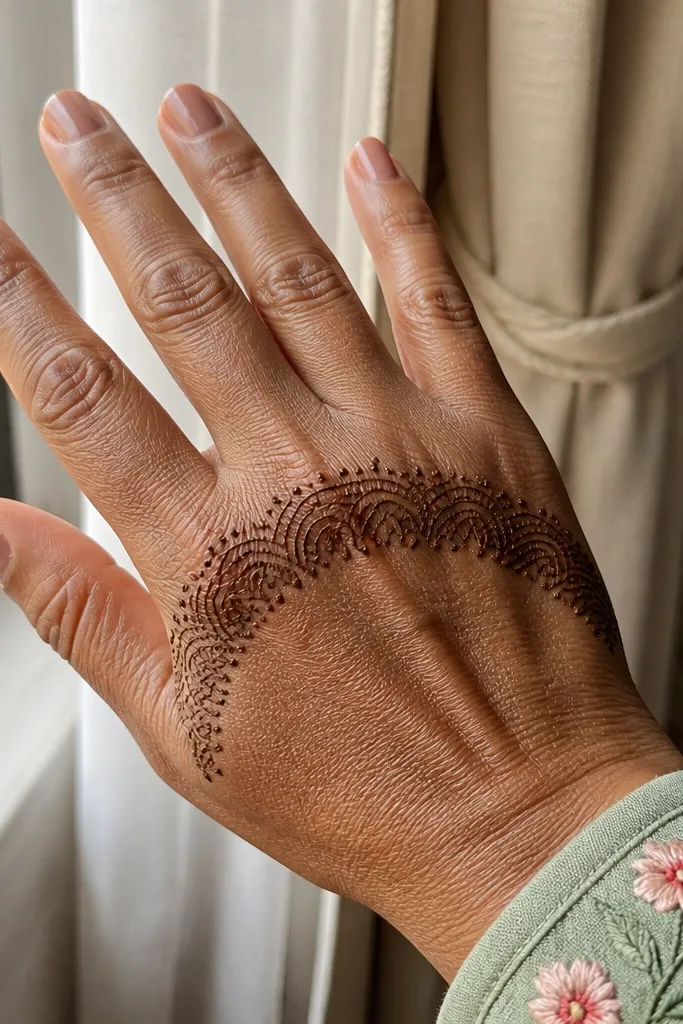
Reverse U lace gives a soft, delicate look that still reads Arabic. You draw a reverse U across the knuckles, then add small lace-like loops inside it. Dots at the loop corners give the pattern a “stitched” feel. This works well when you want a front-hand design that looks airy and feminine without being empty. It’s also easy to scale up or down depending on how much time you have.
Step 1 — Draw a thin reverse U shape from the outer knuckle toward the center, then mirror it on the other side if you want symmetry. Step 2 — Inside the U, draw 6-10 small loop segments like tiny parentheses, each separated by a dot. Step 3 — Add a dotted line down the center between the loops and stop before the wrist unless you want a tiny curl.
Keep loops small and consistent; bigger loops make it look like random doodles.
Avoid thick loop outlines — lace should look light, not carved.
13. Single Line Wrist Bracelet + Finger Pops

This is a clean “bracelet” design that looks styled even with minimal work. A single line bracelet sits around the top of the wrist, while small pops of pattern appear at the finger bases. It’s perfect for days when you want color but don’t want to cover the whole hand. The bracelet line also helps the design look balanced and intentional. It’s a solid pick for holiday outfits because it frames the hand under jewelry.
Step 1 — Draw a thin curved bracelet band across the wrist area, leaving tiny gaps. Step 2 — At each front finger base, add one small motif: a comma leaf plus two dots. Step 3 — Connect the bracelet to the finger pops using short diagonal lines so it feels like one set.
Pro tipMake the bracelet line slightly thicker than the finger pops for a neat visual hierarchy.
AvoidDon’t add too many motifs per finger — one leaf pop is enough.
14. Center Column With Side Dots
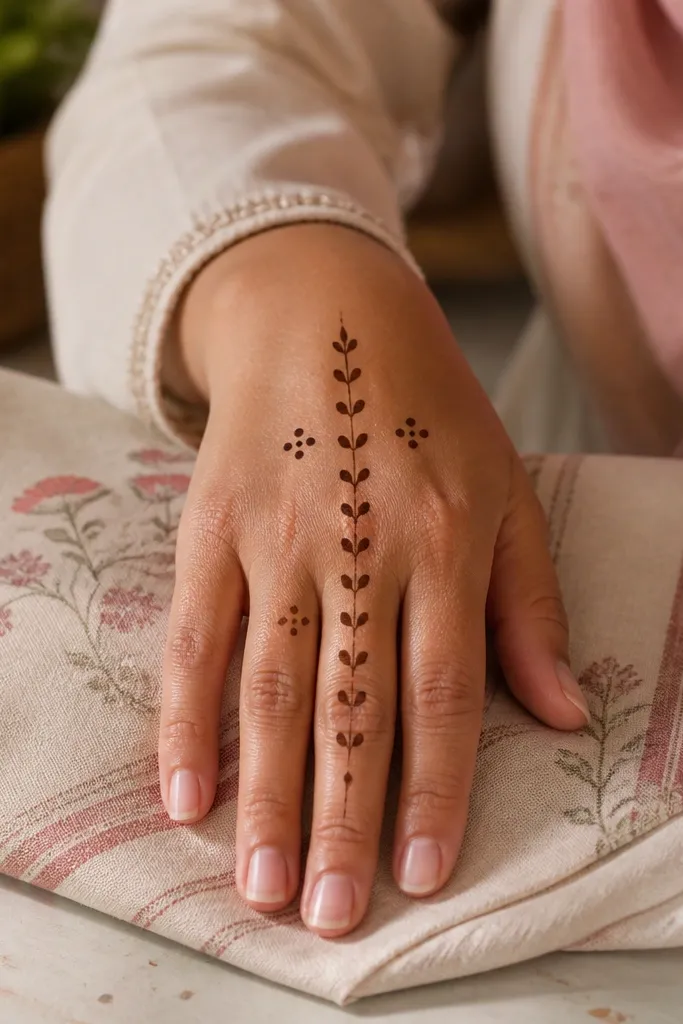
A center column is the simplest way to get that Arabic “front hand” look without clutter. You draw a thin vertical line with small leaf commas along it, and you place dot pairs on either side. The dot pairs make it look decorative even when the column is minimal. This design is friendly for beginners and works for short sessions. It also flatters most hand shapes because the eye is pulled upward.
Step 1 — Draw a thin vertical stem from knuckles to near the wrist center. Step 2 — Place comma leaves along the stem at even intervals, alternating left and right. Step 3 — Add dot pairs on both sides of the stem between leaves, then finish with a small curl at the top of the stem.
Pro tipUse two leaf sizes only — small near the top, medium near the bottom.
AvoidAvoid uneven leaf height — keep them aligned to look like a planned pattern.
15. Twin Oval Frames on Back of Hand
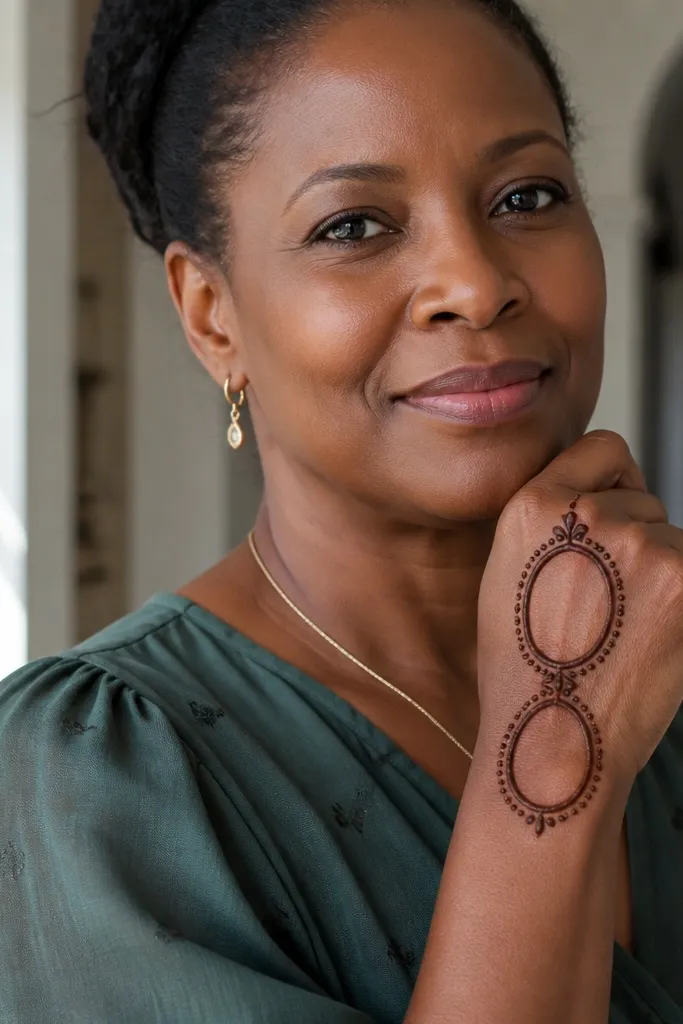
Twin ovals look fancy without being complicated. You draw two small oval frames stacked or side-by-side on the back of the hand, then connect them with a thin stem and dot accents. The ovals create a photo-ready focal section, while the minimal lines keep it easy. This one looks great for front-hand mehndi because the ovals sit in the most visible area when you hold your hand up. It’s also good when you want a design that looks “complete” even if you don’t touch the palm much.
Step 1 — Draw two thin ovals on the back of the hand, one slightly higher than the other, leaving a small gap between them. Step 2 — Fill only the oval edges with dots and add a thin connecting line between the ovals. Step 3 — Add small comma leaves along the connecting line and place 2-3 dots around the bottom oval corner.
Keep oval width consistent; the design looks cleaner when both ovals match.
Don’t make ovals too big — they crowd the front hand and hide finger details.
16. Finger Side Stripes With Micro Chevrons

This pattern uses finger-side stripes, which is where a lot of people naturally want to place Arabic mehndi. The stripes run down the side of each finger, and micro chevrons sit between stripes for texture. It’s easy because you repeat the same tiny chevron shape over and over. The result looks neat and modern while still reading Arabic. Works well if your goal is front-hand coverage without heavy palm filling.
Step 1 — For each front finger, draw a thin stripe down the outer side from knuckle to just before the fingertip. Step 2 — Between stripes on the same finger, draw micro chevrons: small V shapes stacked in a column. Step 3 — Add a dotted base line at the finger base and connect two adjacent finger stripes with a short curved line.
Chevrons look best when they’re the same size — use one cone pressure and don’t pause mid-stroke.
Avoid thick stripe lines — thin stripes keep the look delicate.
17. Wrist Flower With Two Petal Lines
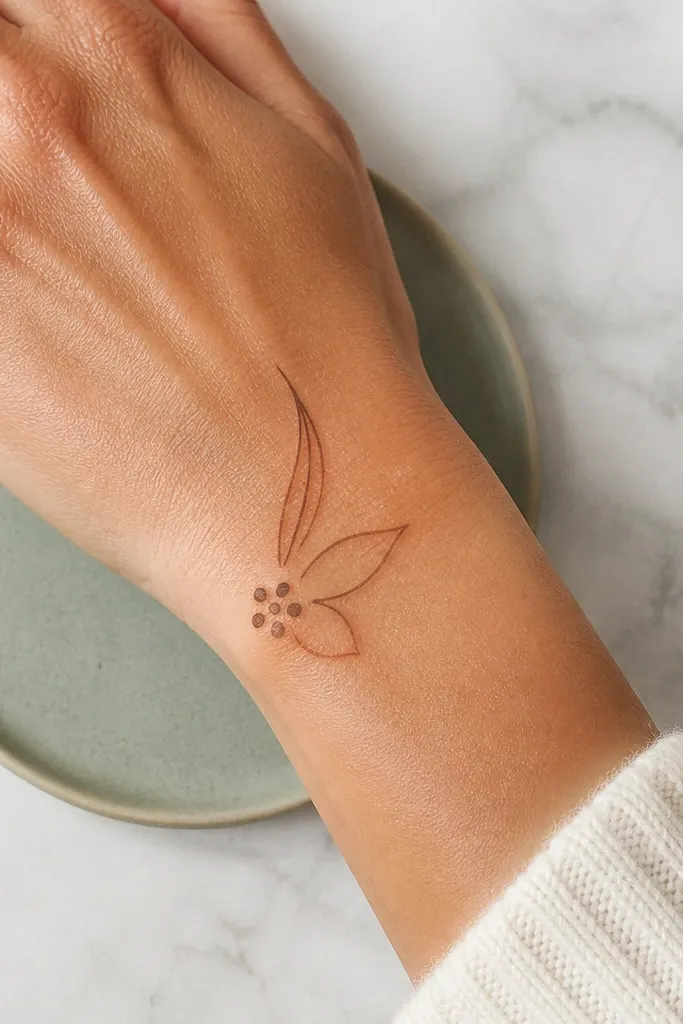
A wrist flower motif is a classic Arabic move, but this version keeps it minimal and clean. You draw a small flower at the wrist using dots and one outline, then add two petal-like lines that climb toward the center of the hand. This gives you a focal point and a sense of direction. It’s great for shorter sessions because most work happens in the wrist area, and the rest is simple linework. The flower also pairs well with bangles because it sits right above them.
Step 1 — Draw a small flower center at the wrist with 7-9 dots in a circle, then outline the outer ring with a thin curved line. Step 2 — From the flower, draw two petal lines upward in a gentle V shape, each made of comma leaves. Step 3 — Add a dot cluster at the top of each petal line and stop near the knuckle area.
Pro tipKeep the flower small — a tiny flower stains darker and looks sharper.
AvoidDon’t cover the wrist band heavily — let skin show so the flower pops.
18. Back-Hand Ladder With Dot Rungs
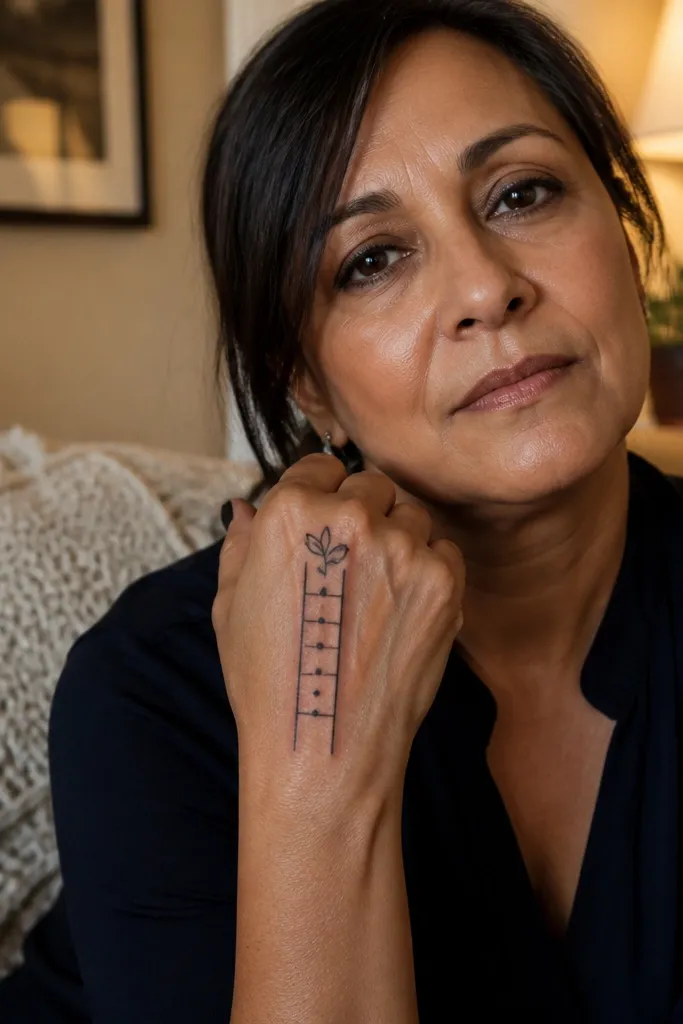
Ladder patterns look bold and graphic, which is exactly what you want for “gorgeous” photos with minimal work. You create two vertical rails and connect them with dot rungs. Then you add one small leaf curl at the top to make it feel Arabic. The design stays light because it’s mostly linework and dots. It’s also fast to draw because you repeat the same rung spacing. Great for people who struggle with filling big areas.
Step 1 — Draw two thin parallel vertical lines on the back of the hand from near knuckles to mid-hand. Step 2 — Add dot rungs across the rails at regular intervals, keeping each rung as 3 dots. Step 3 — At the top, connect the rails with a small curved leaf curl and add one extra dot in the center.
Pro tipUse a ruler-like visual guide: align rung dots with the same angle each time.
AvoidAvoid uneven rail spacing — if rails drift, the ladder looks messy.
19. Palm Side Leaf Corner
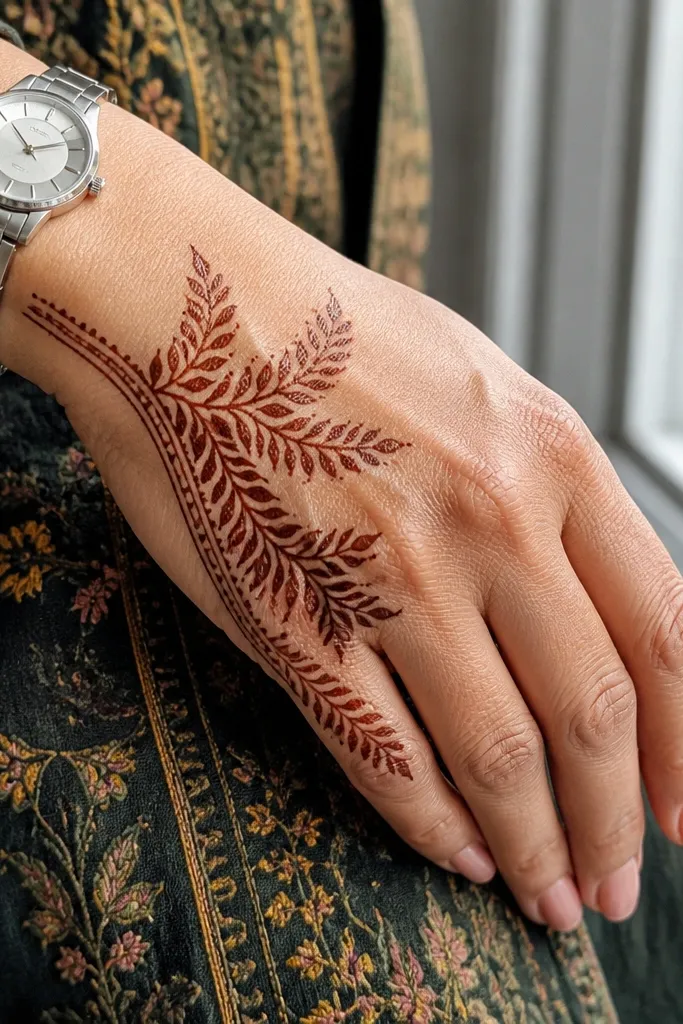
If you want Arabic style without covering the whole back of the hand, corner motifs are the move. This one places a leaf cluster at the corner near the thumb side, then adds a thin border line that frames the edge. The corner focus looks intentional and works well with watches and bracelets. It’s also forgiving because you’re not drawing a complex full layout. The leaf cluster creates that lush Arabic feel while staying simple.
Step 1 — Draw a thin curved border line along the thumb-side edge of the front hand from knuckles toward the wrist. Step 2 — Build a leaf cluster near the corner: 6-8 comma leaves arranged like a half-circle, all pointing upward. Step 3 — Add 2-3 dot clusters between leaves and finish with a tiny hook at the end of the border line.
Pro tipKeep leaf tips consistent length — it makes the corner look designed.
AvoidDon’t spread the cluster too far across the palm side — keep it in the visible corner.
20. Three Finger Garland Arc
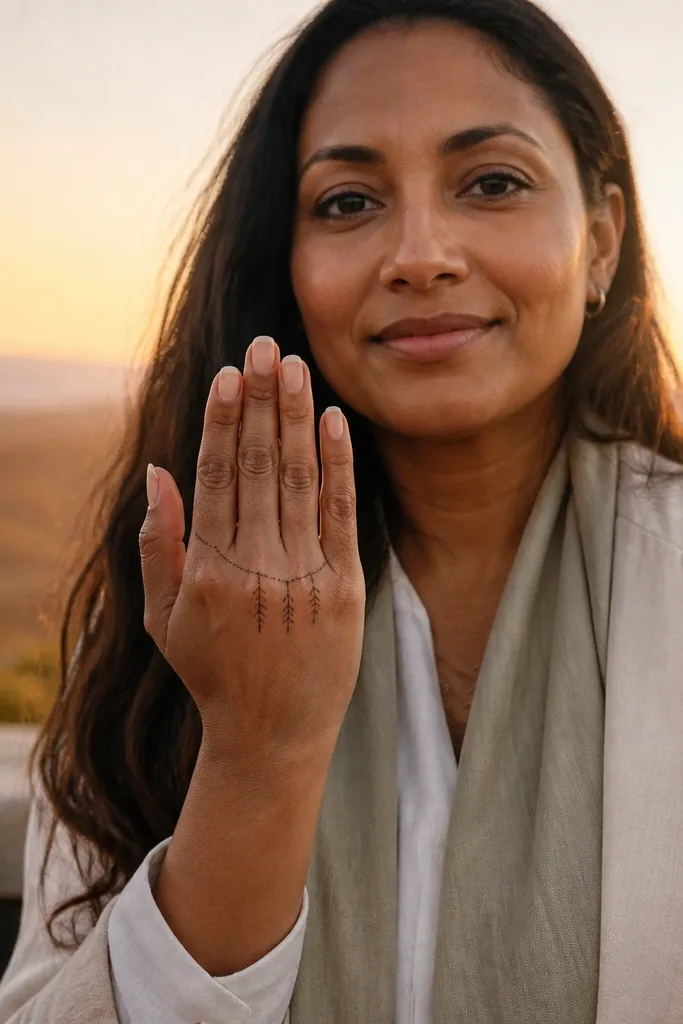
Garland arcs make the front hand look dressed up fast. You pick three front fingers, draw a gentle arc across their bases like a hanging ribbon, then add small bead dots along the arc. Under the arc, each finger gets one simple vertical leaf line so the design ties together. This looks gorgeous on photos because the arc sits in the most visible area and gives a clear shape. It’s also easy to control because you only build on three fingers.
Step 1 — Draw a thin arc across the bases of three front fingers, leaving small gaps between finger lines. Step 2 — Place dot beads along the arc at even intervals, then add a short vertical leaf line down the center of each finger under the arc. Step 3 — Connect the ends of the arc to the outer finger bases with one short curved stroke each.
Use smaller dots near the ends of the arc so the middle looks heavier.
Avoid making the arc too wide — it should hug the finger bases.
21. Minimal Geometric Triangle Ladder
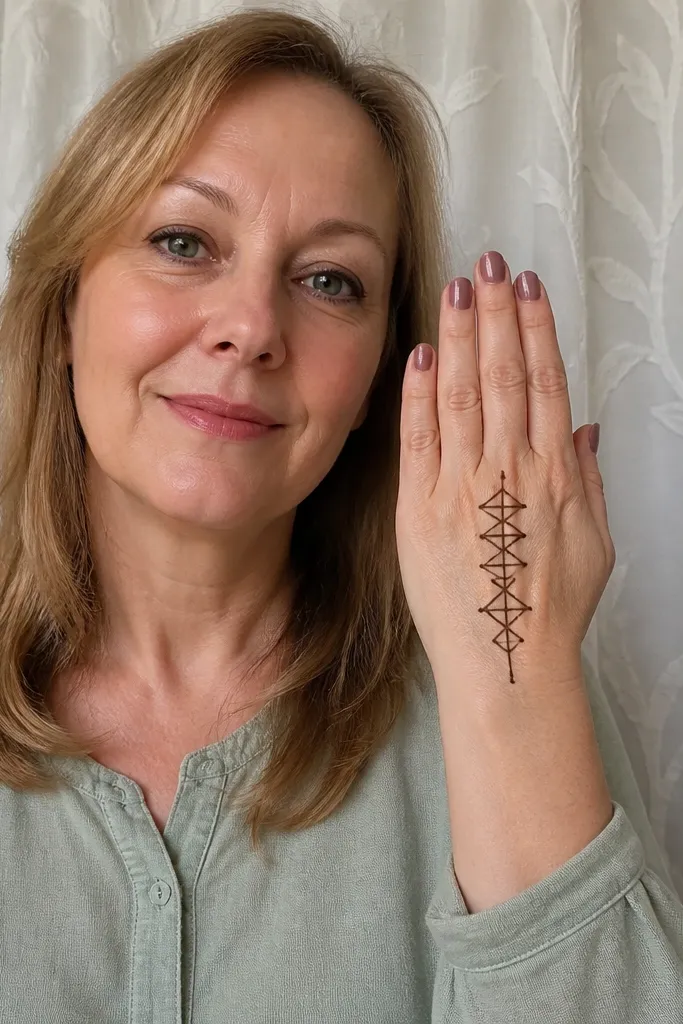
Geometric triangle ladders look very Arabic and very neat, even when they’re simple. You draw a central vertical line, then build small triangles that “step” left and right. Dots at triangle corners keep it lively and prevent blank areas. This design is great for seasonal looks because it reads clean and modern. It also works for beginners because triangles repeat in a pattern you can keep consistent.
Step 1 — Draw a thin vertical stem down the center of the front hand. Step 2 — Starting near the knuckles, draw small triangles on alternating sides of the stem, each triangle made with two angled strokes meeting at a point. Step 3 — Add a dot at each triangle corner and stop after 5-6 triangles so it stays light.
Keep triangles small enough that they fit between finger bases without crossing into the palm.
Don’t add big fillings inside triangles — the corner dots do the work.
22. Outer Edge Vine With Tiny Bells
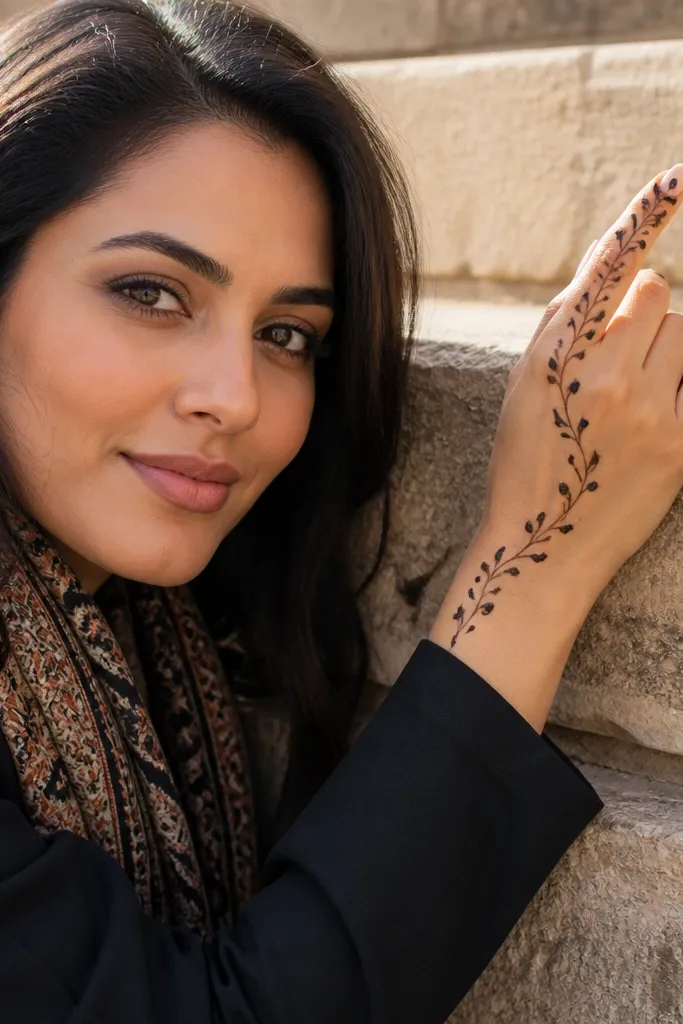
This is a front-hand border design that frames your fingers without covering the whole hand. The vine runs along the outer edge, and each leaf ends in a tiny bell-like loop made from a small curve and a dot. It looks delicate and decorative, which makes it perfect for holiday photos where you want your hand to look “done” but not heavy. It’s also easy to repeat across the outer edge because the motif is one loop shape.
Step 1 — Draw a thin vine line along the outer edge of the front hand from knuckles toward the wrist. Step 2 — Add comma leaves along the vine, and at the tip of every 2nd leaf, draw a tiny bell: a small curved loop with one dot inside. Step 3 — Finish with one thicker comma near the wrist and a dotted line segment at the base.
Pro tipCount leaf spacing as you go: every 1 cm, one bell or one leaf tip marker.
AvoidAvoid thick vine lines — the outer edge should look airy, not like a border tattoo.
23. Center Oval With Side Dotted Trails
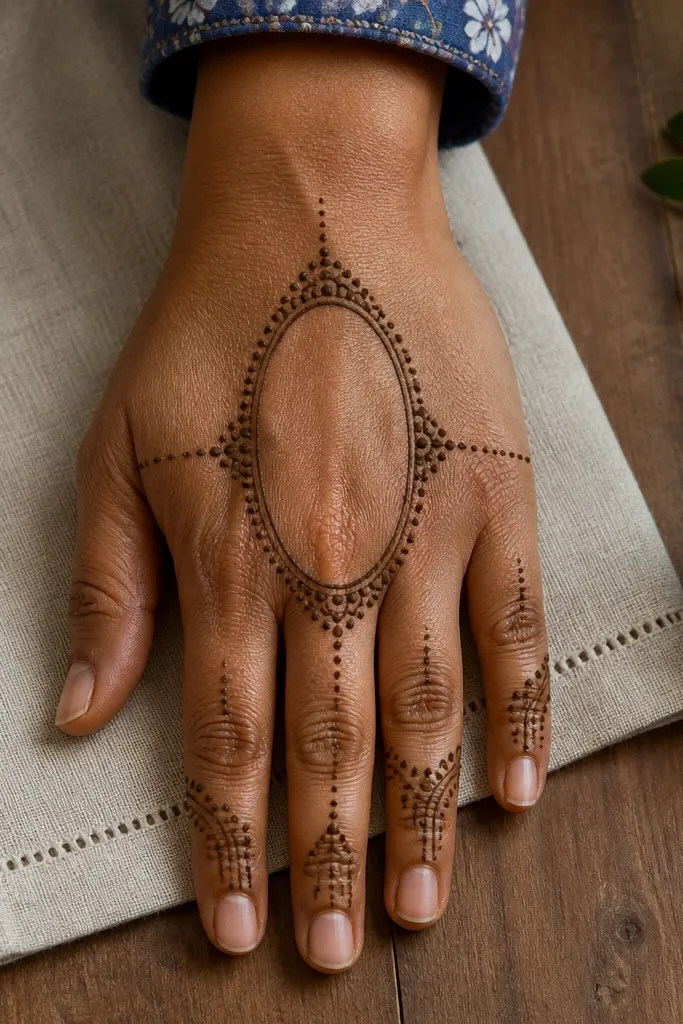
This pattern gives you a centered Arabic focal point with side trails that make it look more detailed than it is. The oval is outlined thin and filled with dot clusters near the edges, not solid fill. From the oval, dotted trails extend toward the sides to connect to finger borders. The dotted trails are the secret — they add movement and balance so the design doesn’t look like one stuck-on shape. Great for people who want a balanced front-hand look for parties.
Step 1 — Draw a vertical oval in the center of the front hand and outline it with a thin double line. Step 2 — Fill only the oval edges with small dots, leaving the center open. Step 3 — From the top and bottom of the oval, draw two dotted trails to the outer sides and connect them lightly to finger base borders.
Pro tipIf your oval line bleeds, let the paste skin-dry for 2-3 minutes before you outline again.
AvoidDon’t thicken the oval — thick ovals look heavy and hide the dotted detail.
24. Finger Base Bracelet With Three Stars

Three stars on the front hand make the design feel festive without adding lots of coverage. You draw a thin bracelet across the finger bases, then place three small star motifs evenly spaced, and connect them with dot lines. It’s photogenic because the stars are distinct shapes that catch the eye. This one is ideal for Eid, birthdays, and holiday dinners when you want a clean, cute front-hand mehndi that doesn’t take half a day.
Step 1 — Draw a thin curved bracelet band across the bases of the front fingers, leaving small gaps between each finger. Step 2 — Place three star motifs on the band: each star is 5-6 dots arranged in a star pattern, then connect the star points with tiny short lines. Step 3 — Add a dotted line above the bracelet connecting the stars lightly, then stop.
Make stars slightly different sizes so they look hand-drawn, not stamped.
Avoid making the bracelet too close to the fingertips — keep it at finger base for best look.
25. Thumb Side Corner Arch
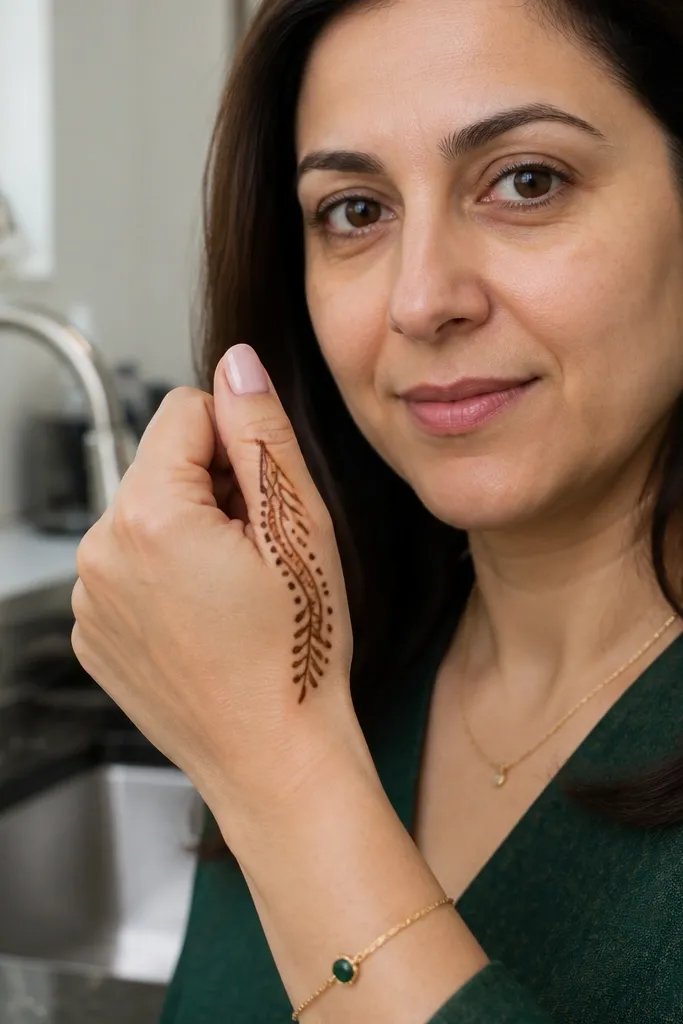
Thumb-side corners look especially good on front-hand mehndi because they match how your hand naturally shows in photos. This pattern uses a small arch that sits near the thumb side and then adds tiny dots along the arch line. Beneath the arch, you add one short vine and a few comma leaves so it looks complete. It’s simple, but the corner placement makes it look intentional and balanced with bracelets. Perfect for short nails and minimal coverage.
Step 1 — Draw a small thin arch line starting near the thumb-side knuckle and curving toward the edge of the back of the hand. Step 2 — Add dots evenly along the arch, then draw one short vine line downward from the center of the arch. Step 3 — Add 3-4 comma leaves along the vine and a tiny hook near the wrist edge.
Pro tipKeep the arch height low; low arches look more elegant and less crowded.
AvoidDon’t extend the vine too far — stop before it reaches the center of the hand.
26. Two-Tone Look With Dotted Fills
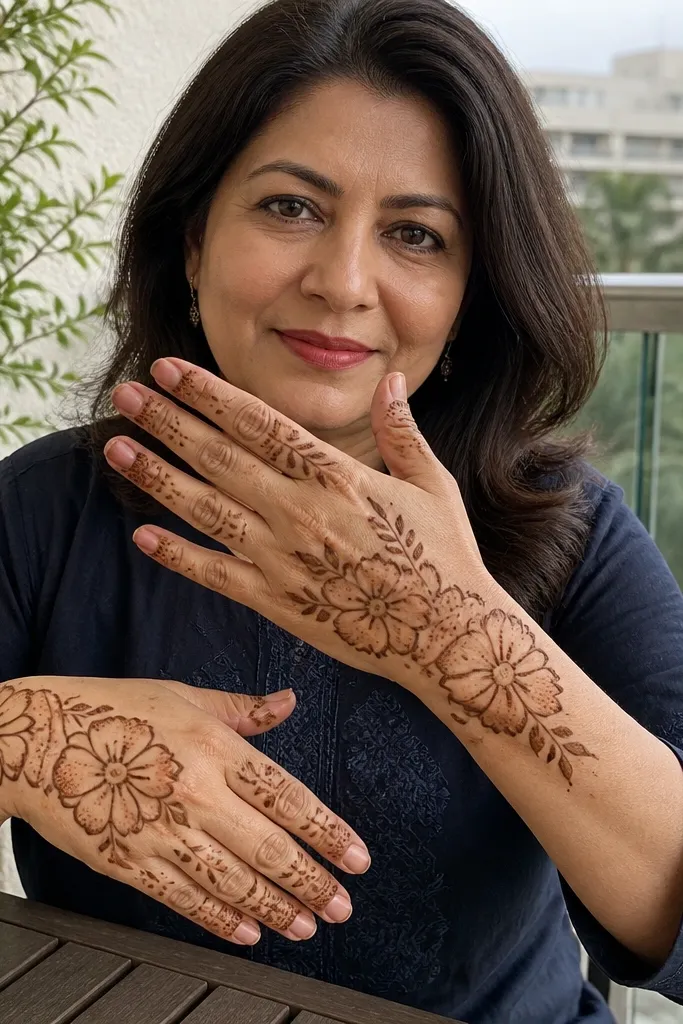
This one is about contrast. You keep outlines thin and add dotted fills only inside small sections, so the design reads layered even when it’s simple. The front hand looks “done” because dotted fills darken slightly differently than open lines, giving a two-tone effect in photos. It’s a strong pick if you’ve had designs look flat before. You build a main motif in the center and then add two small side sections with dotted texture.
Step 1 — Draw a simple center motif like a small arch or oval outline in the middle of the front hand. Step 2 — Inside the motif, fill only the corners and edges with dots, leaving the center open. Step 3 — Add two smaller side shapes (small commas or mini ovals) and fill their edges with dots too, then connect them with a thin central stem.
Use dots for texture instead of filling with lines — it dries cleaner and stains more evenly.
Avoid solid blocks of paste — dotted fills look sharper and easier to peel.
27. Front-Hand Vine With Three Leaves Per Section
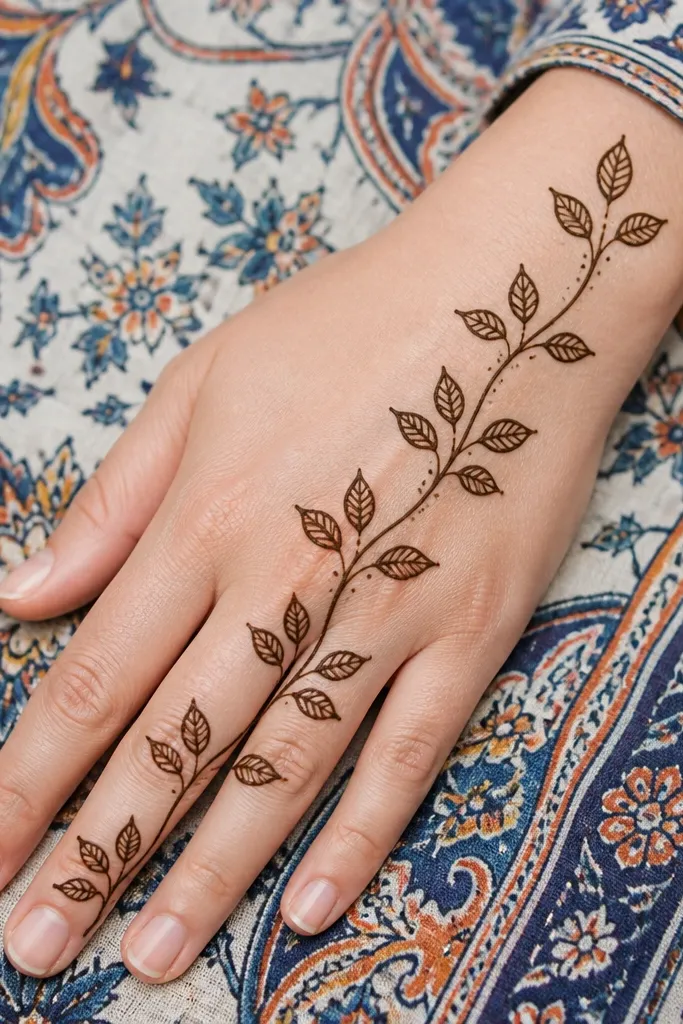
This is the easiest way to make a front-hand vine look structured. The vine runs from knuckles toward the wrist, but instead of random leaves, you place leaves in groups of three. That repetition is why it looks “Arabic” and not like doodle mehndi. It also helps you avoid gaps because each section has the same size and spacing. Great for beginners who want a pattern they can repeat without getting lost.
Step 1 — Draw a thin vertical vine line down the center of the front hand. Step 2 — At even intervals, add a group of three comma leaves: one centered leaf and two side leaves, all pointing outward. Step 3 — Add 2-3 dots between each leaf group and finish with a small curved flourish at the bottom near the wrist.
Count your sections out loud while drawing — it keeps spacing consistent.
Don’t change the leaf shape mid-way — stick to one comma style.
28. Knuckle Fan + Wrist Micro Dots
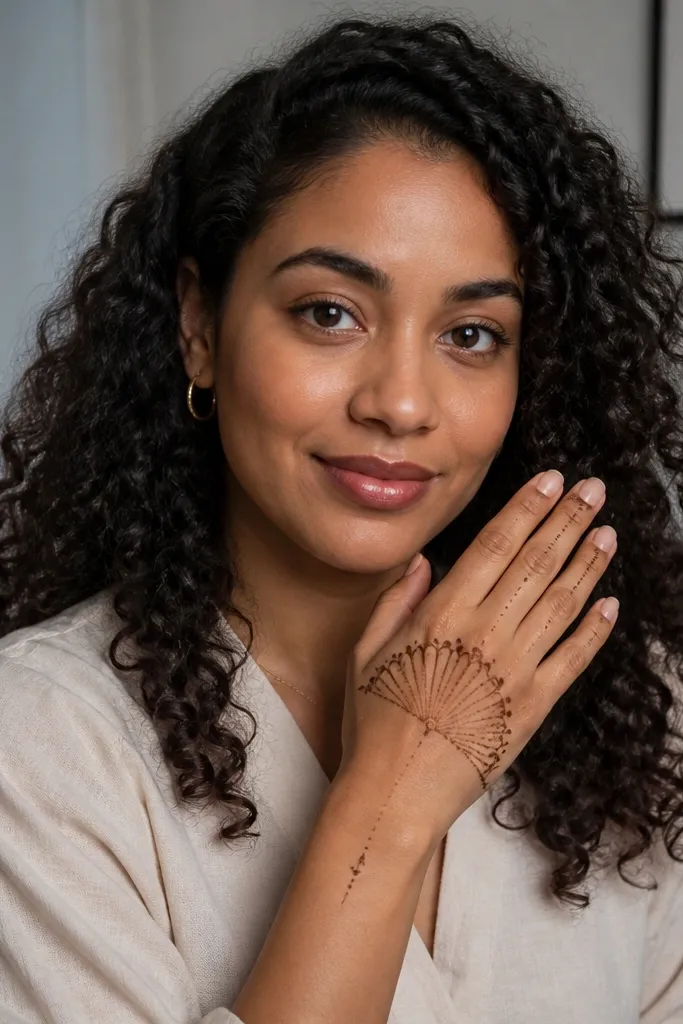
This is a quick, photogenic Arabic design that focuses on the knuckles. You draw one fan across the knuckle area with thin ribs and light dot accents, then add micro dots at the wrist to tie it together. It’s easy because you only build one fan and a small wrist detail, not a full hand pattern. The fan creates that classic Arabic look, and the wrist dots add a polished finish. Perfect for holiday dinners when you want something neat and not too large.
Step 1 — Draw a fan outline across the knuckles with 6-8 thin ribs made from short curved lines. Step 2 — Add a dot at the base of each rib and one dotted arc along the outer edge of the fan. Step 3 — At the wrist, place 10-14 tiny dots in a curved line and connect the center of that line to the fan with one thin stem.
If your ribs get uneven, make them all start from one same base point and end at one same target point.
Avoid thick rib lines — thin ribs give the fan its delicate look.
29. Finger Web With One Central Spine

Finger webs are an Arabic look that feels detailed but stays manageable. You draw a central spine line down the front hand and then add short web bridges between fingers using tiny arcs. The web only covers the upper finger area, so it doesn’t become heavy. This design looks great in photos because the web lines create a lace-like texture across the front of your fingers. It’s also forgiving — small gaps look intentional in a web pattern.
Step 1 — Draw a thin central spine line from knuckles toward the wrist, then add small comma leaves on it at 2-3 points. Step 2 — Between each pair of front fingers, draw 2-3 short web bridges: tiny arcs connecting finger bases without touching the palm heavily. Step 3 — Add dots at the start and end of each bridge and stop at the knuckle level.
Keep bridge arcs short and shallow so they don’t look like accidental lines.
Don’t extend web bridges down the hand — it crowds the front and hides the spine.
30. Outer Finger Swirl Border With Center Dot Column
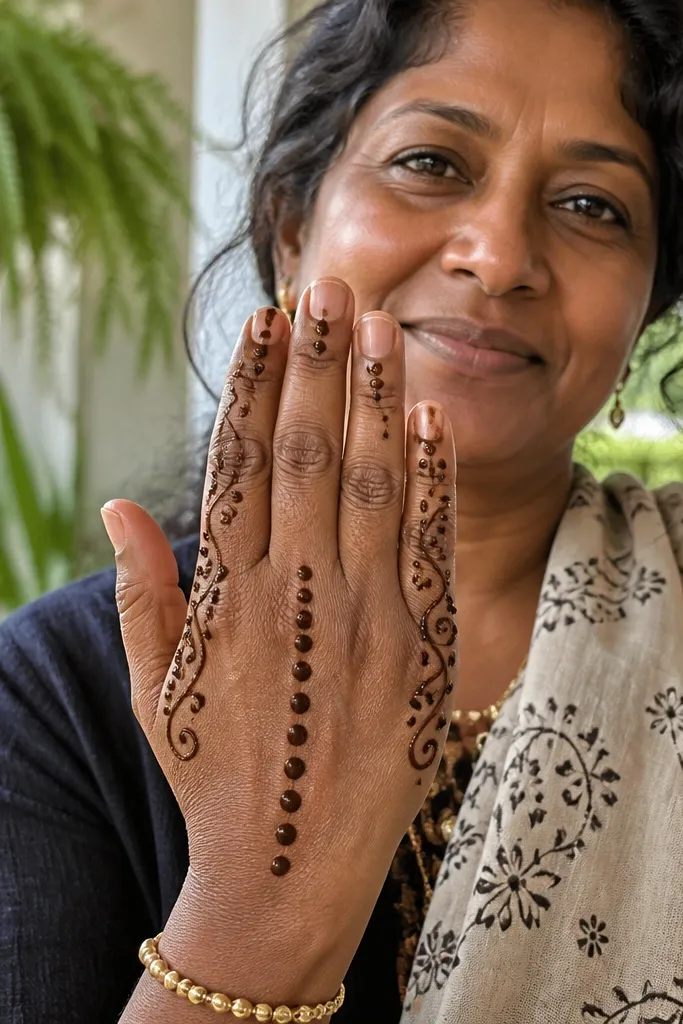
This pattern is built for that clean “front frame” look. You place swirls along the outer sides of the front fingers, then add a center dot column on the back of the hand. The swirls give motion and style, while the dot column keeps it structured and easy. It’s gorgeous in photos because the border catches light and the center motif is crisp. Also, it’s quick because you repeat the same swirl on each outer finger.
Step 1 — Draw swirls along the outer side of each front finger: a thin curve, then a tiny loop at the top near knuckles. Step 2 — Draw a center dot column down the back of the hand: dots in a vertical line from knuckles to mid-hand. Step 3 — Connect the dot column to the outer swirls with one small diagonal line on each side.
Make the swirl loops all the same size; it makes the border look intentional.
Avoid adding leaves everywhere — keep the detail to swirls and dots.



