
1. Wrist Halo With Knuckle Ladder
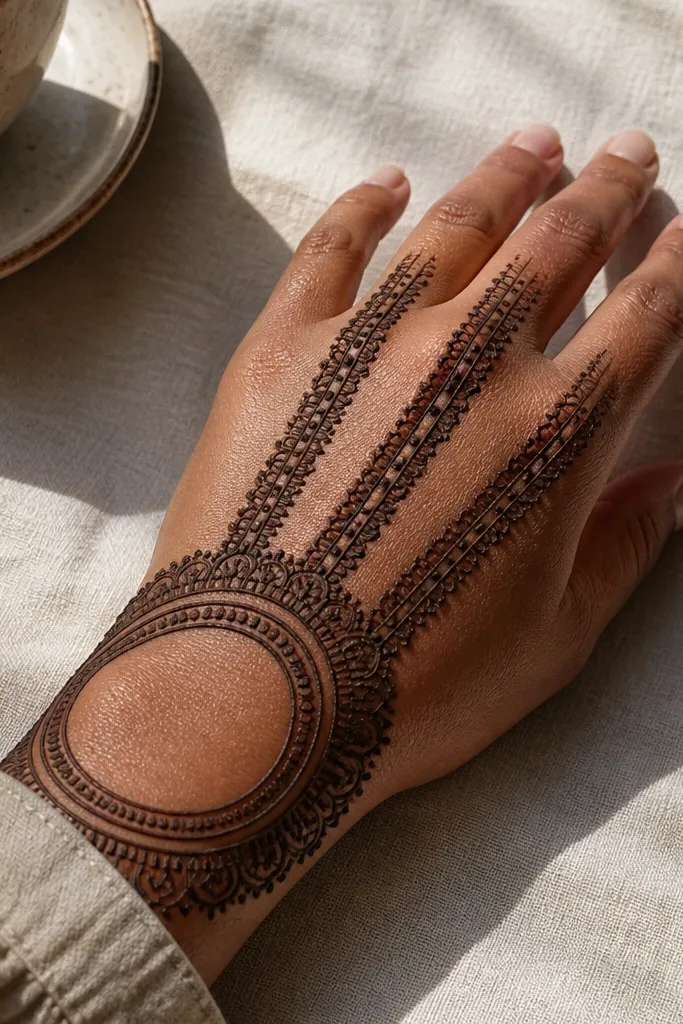
Start by drawing a thick arc band across the outer wrist, then close it into a partial circle so it looks like a halo. Next, create 3-4 vertical “ladder” columns starting at the knuckle line and going upward, each with small rungs made of short horizontal dashes. Finally, fill the ladder interiors with tight dots or short curved strokes, leaving the outer border thick and uninterrupted. Let the lines dry fully before adding any extra dots so they don’t bleed.
This design gives you instant “high-end” weight because the wrist halo acts like a frame for the whole back-hand. Start with a thick circular band at the wrist, then carry two to three vertical ladders over the knuckles. The trick is keeping the ladder lines straight and bold, while the spaces between them stay open enough to show skin. It looks sharp on short nails and long nails because the knuckle ladder reads clearly either way. You’ll get a clean, formal holiday vibe without needing a full sleeve.
AvoidDon’t overfill the spaces between ladders — if everything is the same thickness, the design loses its bold contrast.
Pro tipOutline with a slightly darker, thicker paste consistency so the halo reads even after fading.
2. Center Column With Teardrop Armor
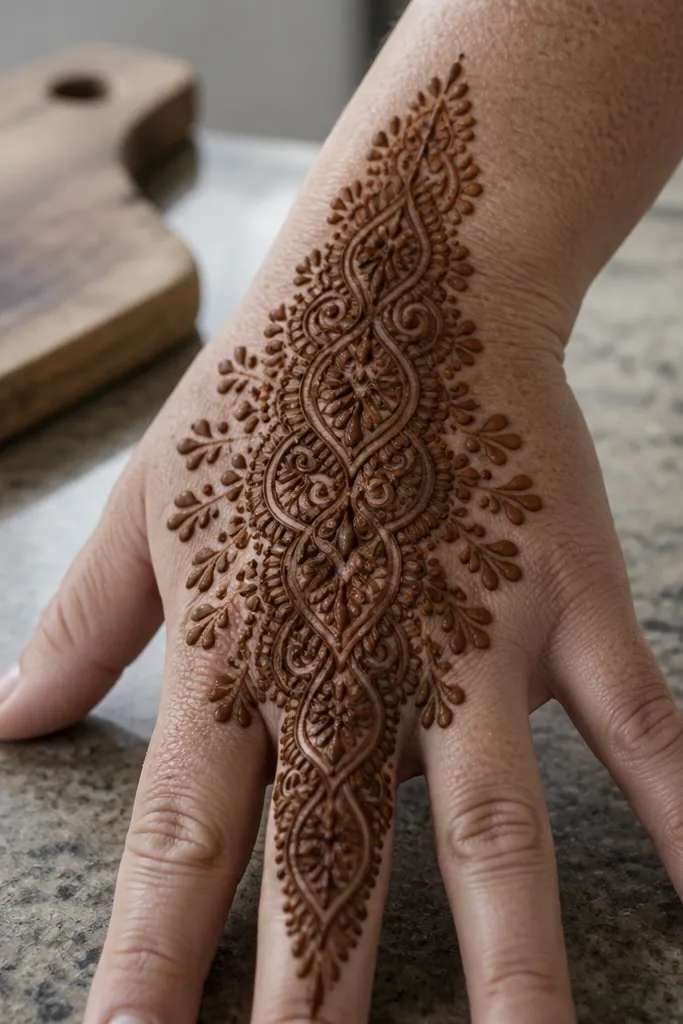
This is one of the most reliable bold Arabic back-hand looks because it uses a single dominant center column. The column gives direction, while the teardrop armor shapes create dense texture without turning into messy lace. Place the largest teardrops in the middle of the hand, then taper them as they approach the knuckles. The result is a clean, graphic silhouette that stands out in photos. It works great when you want a bold look but don’t want to cover every inch of the back hand.
Draw a thick vertical center line from the wrist crease toward the middle of the knuckles. On both sides of the center line, add teardrop shapes that touch the outline but leave small gaps at the edges so the background skin shows. Build the teardrops in 3-4 rows, with each row slightly smaller as you move upward. Finish by adding a thin border line around the outer edge of the design so the teardrops look contained.
Keep teardrops symmetrical by counting them per row before you start filling.
Don’t make teardrops all the same size — the taper is what makes the design look expensive.
3. Geometric Frame With Split Diagonals
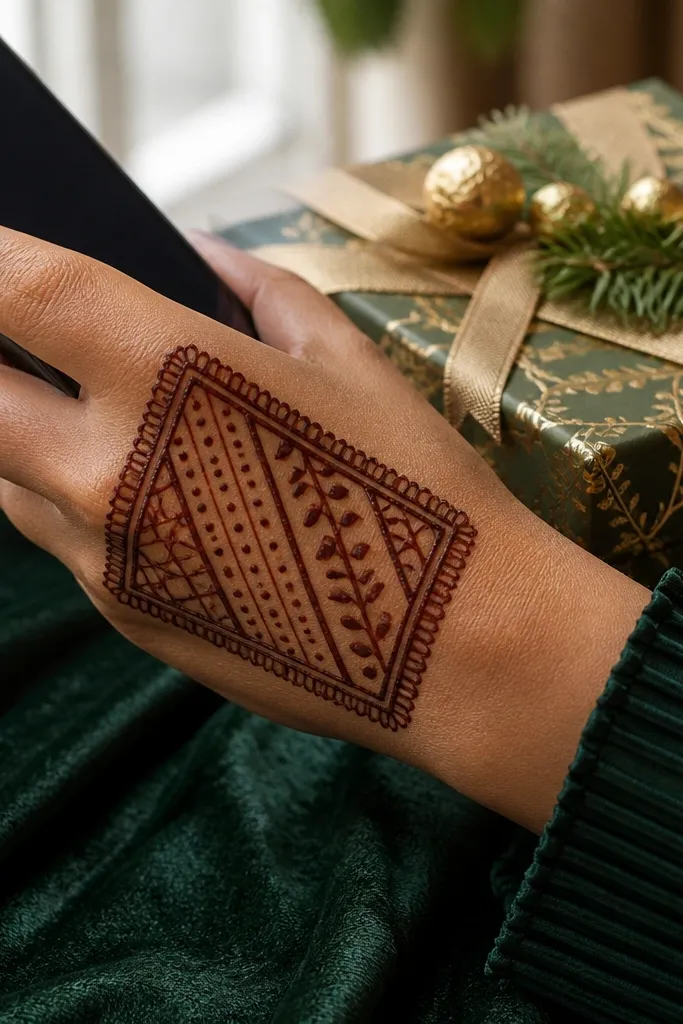
Outline a large rectangle frame on the back of the hand, starting near the wrist and ending around the upper knuckles. Add two diagonal bars that cross the rectangle, dividing it into four sections. Fill each section with a different micro-pattern: one with tight dots, one with curved leaf strokes, one with small zigzags, and one with a light shaded gradient using thicker paste on one side. Close with a thicker border at the wrist to anchor the whole shape.
If you want a holiday-ready pattern that photographs like a poster, go geometric. This design uses a strong rectangular frame across the back of the hand, then cuts it with diagonal bars that split the interior into panels. Each panel gets a different texture — dots in one, short leaf strokes in another, and a slightly shaded center in the last. That variety gives the “high-end” look without requiring tiny details everywhere. It’s also forgiving because the frame hides uneven spacing between lines.
AvoidDon’t let diagonals wander — if the split angles aren’t crisp, the whole frame looks casual.
Pro tipUse a ruler or a straight-edge briefly for the frame edges, then remove it before you fill.
4. Arabic Knuckle Grid With Outer Vine Border
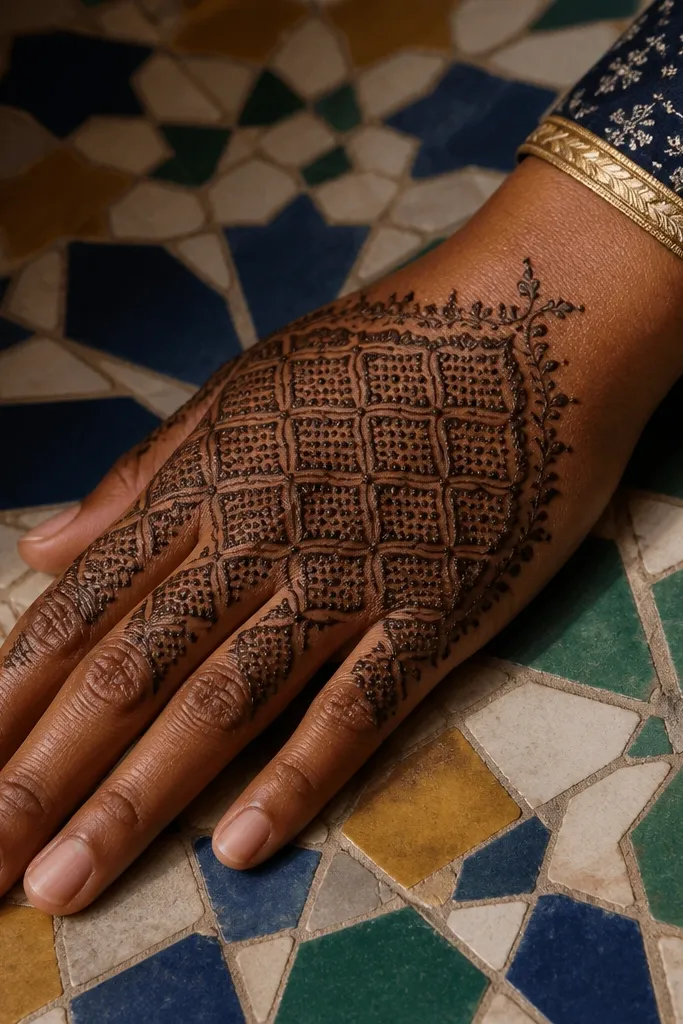
Knuckles are where bold Arabic designs win. This one covers the knuckle area with a grid that looks like lattice, then balances it with an outer vine border that curves around the hand. The grid gives you heavy texture, while the vine border adds motion and keeps it from looking like a stamp. It works beautifully for festive events because the knuckle section catches light and shows dark stain first. You also get a clean boundary at the edges, which helps the design look intentional even if your paste application isn’t perfect.
Start with a thick outline around the knuckle zone, then draw a lattice grid using horizontal and vertical lines across the knuckles. Add small triangular fills inside each grid cell so it stays dense. Next, draw a continuous vine border that runs from the outer wrist up along the sides of the hand, then loops back near the top of the knuckles. Fill the vine with short dot clusters along the inner edge only.
Press your cone tip slightly for the lattice lines so they stay opaque and don’t turn into thin thread.
Don’t extend the vine border too far over the center — the grid should stay the hero.
5. Double Arch Back-Hand Blossom
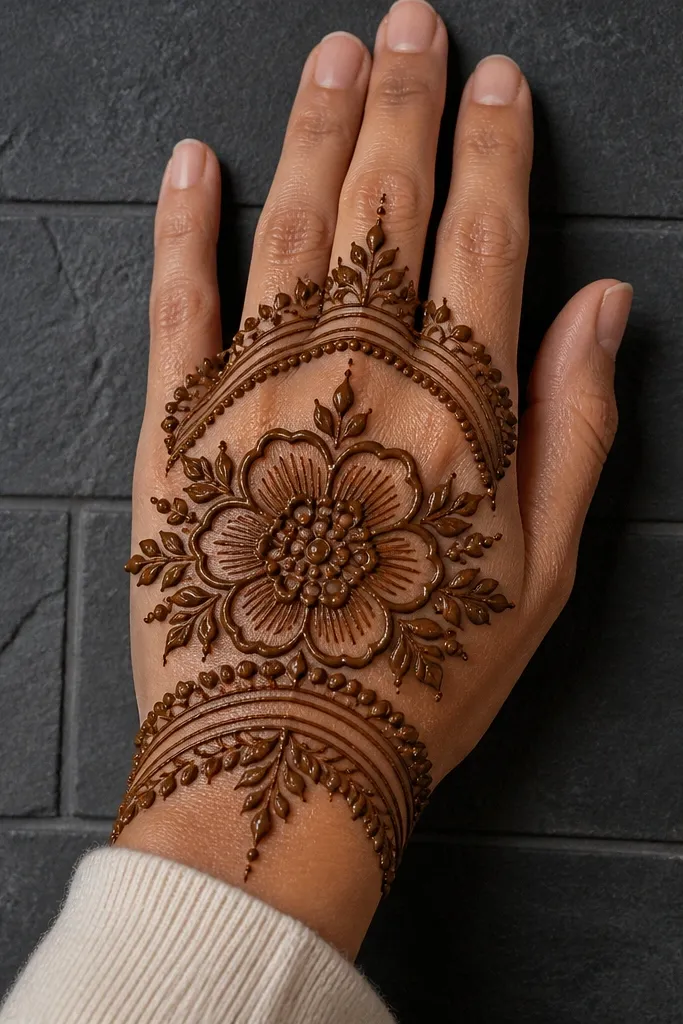
Draw the lower arch first across the mid-back of the hand, then add a second arch above it. Place a large blossom in the center between the arches, outlining each petal thickly and filling with short dot rows inside. Add small half-petal shapes near the left and right edges where the arches meet the blossom. Finish by thickening the arch outlines and adding tiny dots along the inner rim of each arch.
This design makes the hand look structured because it’s built on two arches — one closer to the wrist, one closer to the upper knuckles. Between those arches, you place a large central blossom with thick petals and tight inner dots. The arches act like rails, keeping the blossom centered and preventing the pattern from drifting. It’s a strong pick for holiday photos because the central flower gives a clear focal point. You get boldness without turning the hand into a full sleeve.
AvoidDon’t make the arches too thin — thin arches disappear and the blossom looks floating.
Pro tipKeep blossom petals slightly rounded, not pointy, for a smoother high-end look after staining.
6. Wrist To Knuckle Ladder Fan
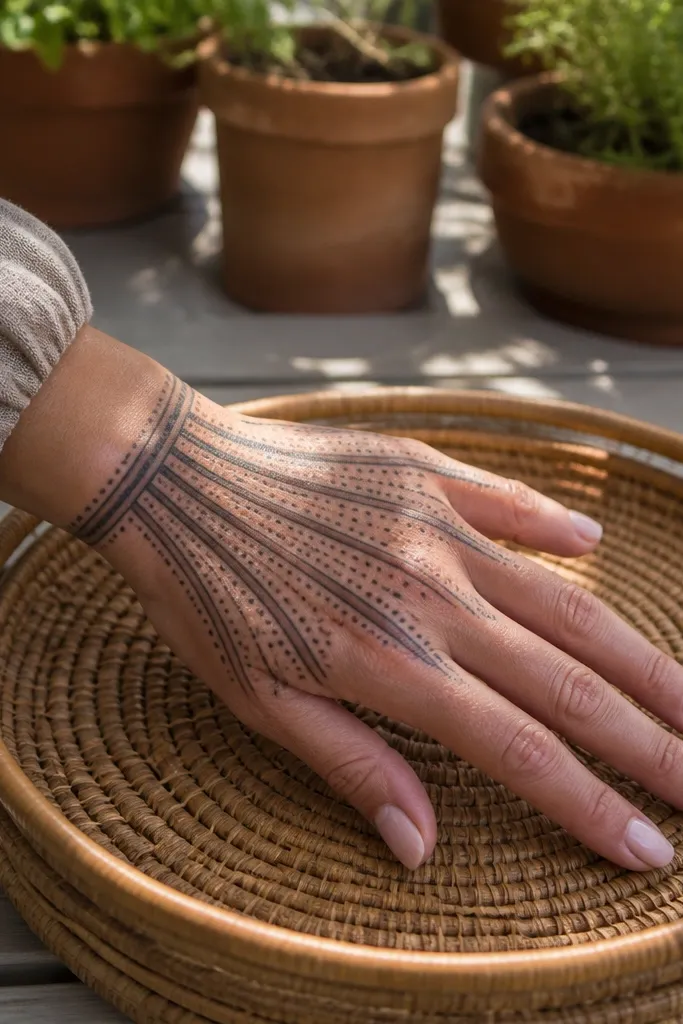
This one gives you boldness through repetition in a controlled direction. A fan of thick ladder lines spreads from the outer wrist toward the knuckles, so your eye reads it as one confident shape. The interiors are filled with tiny dots so the stain looks even and dark. It’s ideal when you want a quick but dramatic back-hand design that still looks Arabic. Because the lines are angled, it flatters both wide and narrow hands — the pattern guides the eye upward.
Start with a thick base band at the outer wrist. From that band, draw 5-7 angled ladder lines that converge slightly as they reach the knuckles. Add rungs across each ladder line using short horizontal dashes. Fill the space between ladders with dense dots, then outline the outer edge with a slightly thicker line to lock the fan shape.
Count ladder lines before you start and keep spacing equal — it’s the difference between bold and messy.
Don’t fill between ladders with big motifs; dots keep the design clean and high-contrast.
7. Oval Medallion Back-Hand Panel
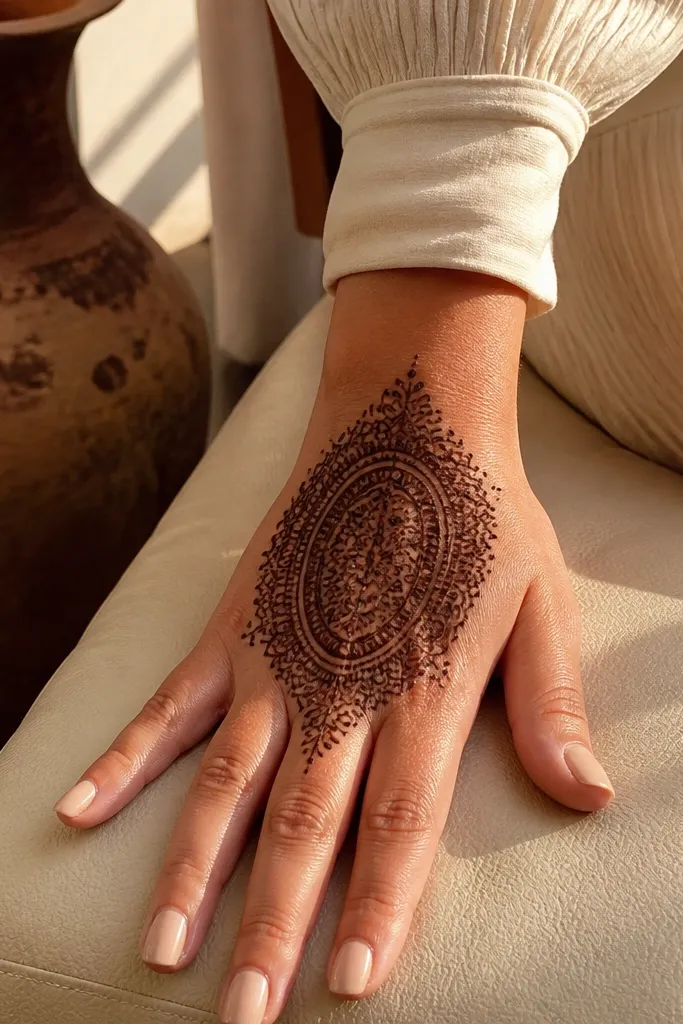
A medallion panel is the fastest route to a high-end look because it creates a single statement area. The oval sits across the back of the hand, with a thick outer border and dense inner filling that looks rich when the henna darkens. Add small side accents near the knuckles so the oval doesn’t look detached. This works for holiday events where you want something bold but not overly busy across the entire hand. The oval also helps hide minor asymmetry since the border defines the shape.
Outline a large oval on the back of the hand, leaving a small gap above the wrist line. Thicken the outer border, then add an inner oval border around it. Fill the inner oval with a repeating pattern: tiny teardrops pointing inward or tight curls that touch the border. Finish with two small curved hooks on each side of the oval near the knuckles.
Use a thicker outline paste for the outer oval so it stays dark even if the inner fill fades first.
Don’t choose a too-small oval — small medallions read as delicate, not bold.
8. Diagonal Ribbon With Dot Shading
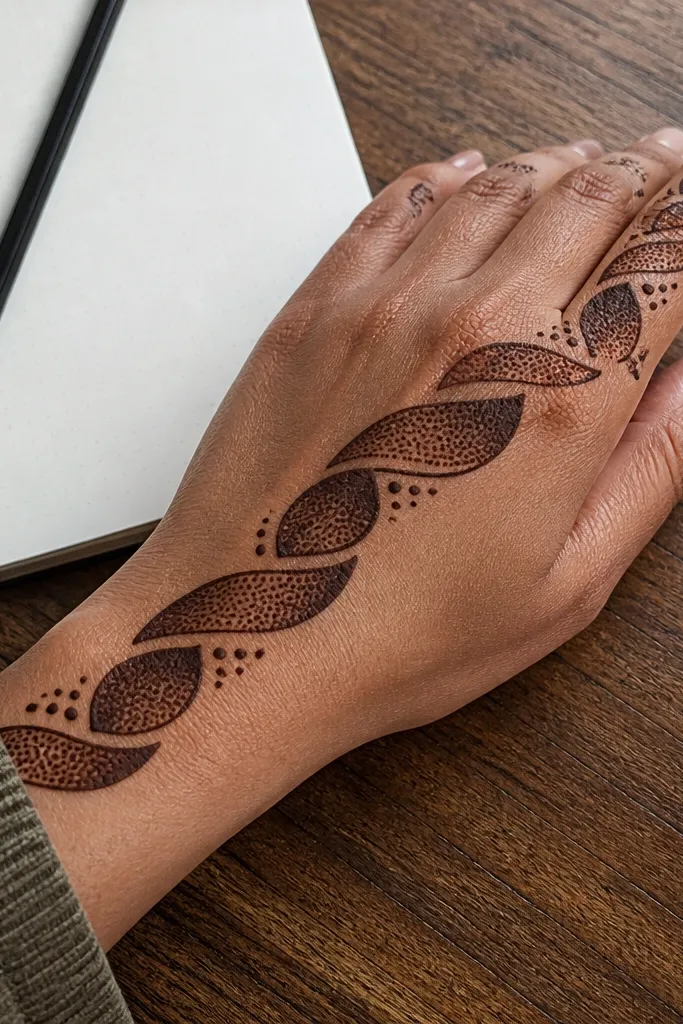
Draw a thick diagonal band across the back of the hand, starting near the outer wrist and ending around the upper knuckle area. Outline the ribbon edges clearly, then divide the ribbon into 3-4 segments with thin lines. In each segment, fill using dense dots — heavier on one side to create a shaded gradient. Add a thin border line around the outer edges of the segments so the ribbon looks crisp.
This design is bold because it treats the back of the hand like a canvas with one strong ribbon. The diagonal ribbon runs from the wrist toward the opposite knuckle, then breaks into smaller sections that each get dot shading. Dot shading gives depth without needing fine lines, so it stays readable even if your henna application is slightly uneven. It looks modern for Arabic style and is very photogenic because the ribbon catches light along its edges. Great for parties where you want a statement without a full coverage look.
AvoidAvoid thin ribbon edges; they fade fast and the design stops looking bold.
Pro tipPlan the ribbon angle first by marking two points lightly with the paste — it stops the diagonal from drifting.
9. Knuckle Caps With Side Barrels
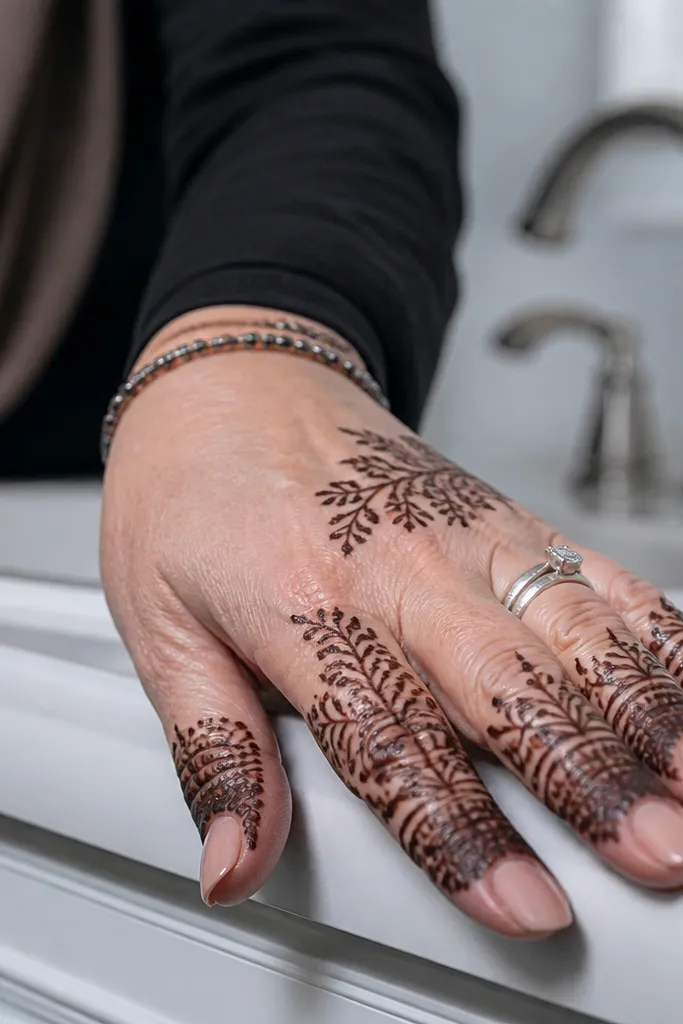
Outline the knuckle zone with a thick base line. Draw rounded cap shapes over each knuckle, connecting them with thin bridges so the caps look like a continuous pattern. Add side barrel shapes on both sides of the knuckle line — each barrel should curve toward the wrist. Fill the caps densely with dots and short strokes, leaving the outer border thicker than the interior.
Knuckle caps are made for bold Arabic back-hand designs because they directly frame each knuckle. This pattern caps the knuckle area with thick rounded shapes, then adds side barrel motifs that wrap slightly toward the outer hand. The caps create dark, heavy sections that look expensive when the stain settles. Side barrels keep the design from looking like isolated knuckle work. It’s a strong choice for short sessions because the pattern is repeatable and doesn’t require endless micro-details.
AvoidDon’t leave gaps between caps; bold designs need continuity across knuckles.
Pro tipKeep cap shapes consistent in height — it makes the pattern look intentional, not random.
10. Wrist Burst With Double Dot Halo
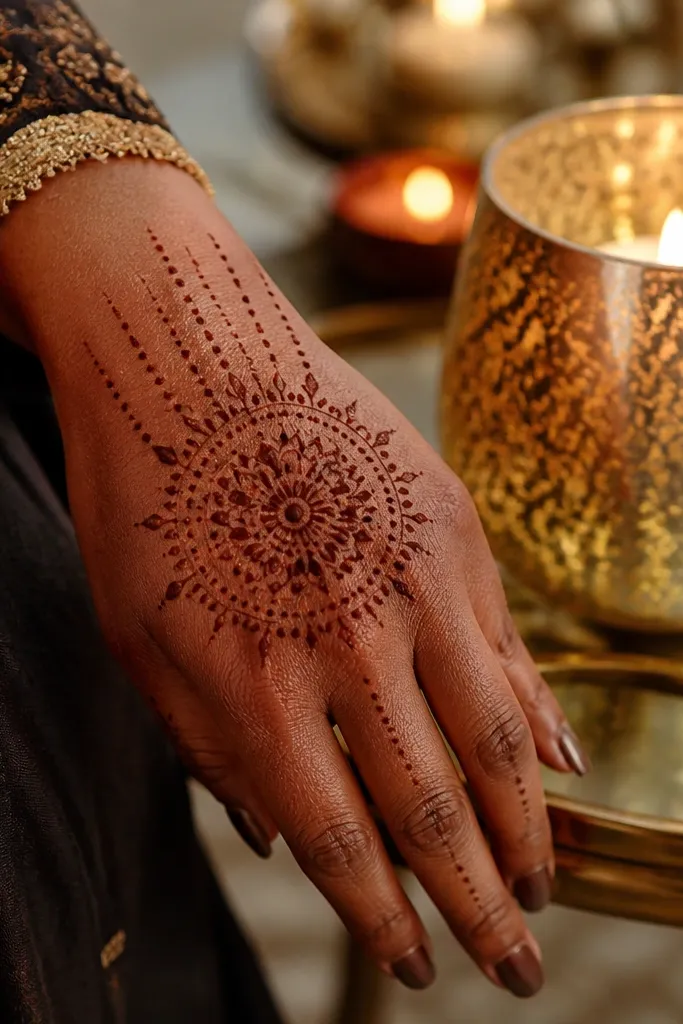
Begin with a thick dot ring at the outer wrist, then add a second ring slightly inside it. Center a burst motif in the middle using short petal spikes drawn in a circle. Draw 3-5 vertical lines from the inner halo up toward the knuckles, each line ending with a tiny hook. Fill the burst center densely with dots and leave the vertical lines open with minimal fill for contrast.
Holiday looks love wrist bursts because they anchor the design and make the whole hand look fuller. This one starts with a burst at the wrist — small petal spikes radiating outward — then surrounds it with two dot halos. From the inner halo, you grow a few short vertical lines toward the knuckles so the burst connects to the rest of the hand. It gives you boldness at the start, which matters because the wrist often stains darkest. The double halo adds that layered “high-end” feel without needing heavy fill across the entire back.
AvoidDon’t overextend vertical lines past the knuckles — it turns into a sleeve instead of a bold back-hand statement.
Pro tipUse two rings with different dot sizes — it makes the halo look layered after drying.
11. Large Flower With Leaf Side Panels
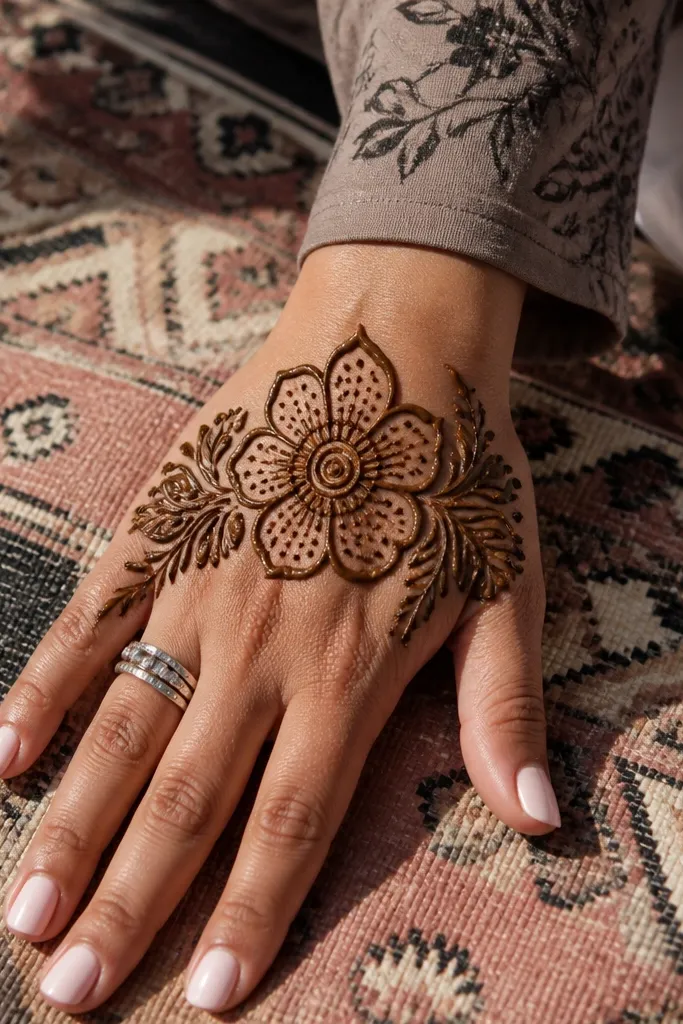
Outline a large flower centered on the back of the hand, with thick petal borders and a round center. Fill petals with dot rows that follow the petal shape. On both sides of the flower, draw leaf side panels shaped like two vertical ovals, then fill them with tight leaf strokes pointing inward. Finish by adding a thin border around the outer edge of the panel area near the wrist to connect it all.
This design is built for photos because it has one large flower that sits high on the back of the hand and two leaf side panels that frame it. The flower petals are thick and outlined, then filled with dot rows so they darken evenly. The leaf panels add movement and fill the empty space around the flower without clutter. It reads bold because the flower is large and the side panels are dense but controlled. Perfect for festive outfits where your hands are in frame often.
AvoidDon’t shrink the flower to fit the side leaves; the flower has to stay dominant for bold.
Pro tipKeep the flower center slightly darker with extra paste so it becomes the focal point in the final stain.
12. Arabic Net With Thicker Corner Blocks
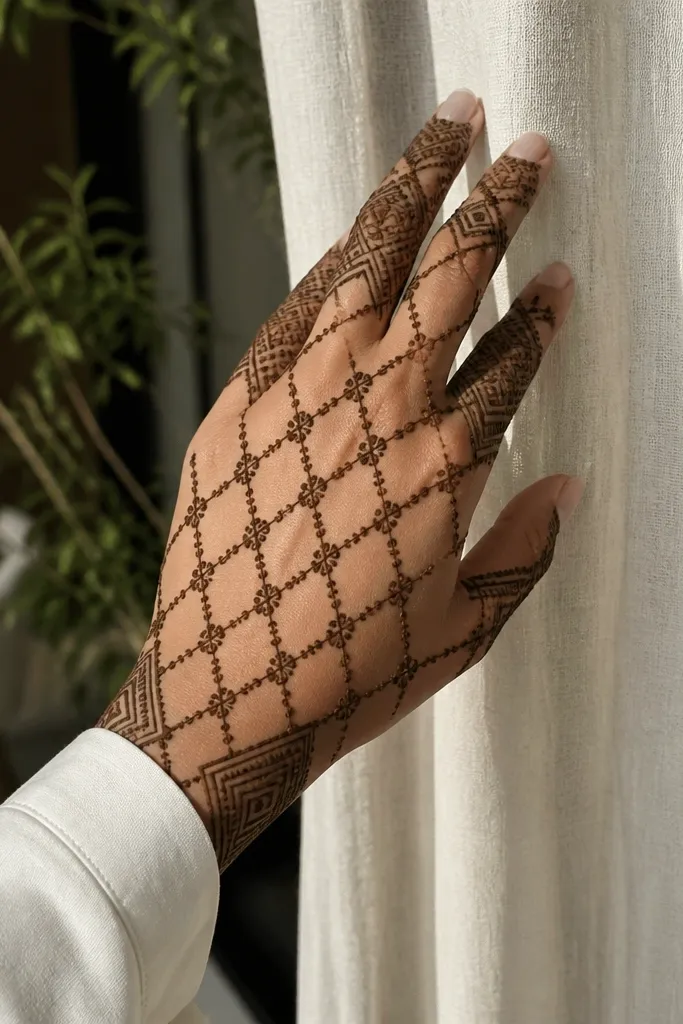
Draw a rectangular boundary across the back of the hand, thick at the corners and slightly thinner at the sides. Inside the boundary, create a net grid with horizontal and vertical lines. Fill each net cell with a small dot or short curl so it stays dense but not bulky. Add heavier block fills on the four corners using solid dots or short strokes, then outline the boundary again lightly to sharpen edges.
Net patterns look classy and bold when the corner blocks are thicker. This one draws a net across the back of the hand, then reinforces the corners with heavy geometric blocks that act like anchors. The net itself uses open spacing so your skin shows through, while each net cell has a tiny dot or short curl fill. Corner blocks give you that “high-end” framing effect even if the net is lighter. It’s a great pick if you like structure and want a design that looks clean on camera.
AvoidDon’t make the net line thickness uniform; the corners need to stand out.
Pro tipMake corner blocks slightly larger than you think — that extra weight reads bold after fading.
13. Outer Vines With Inner Empty Arch
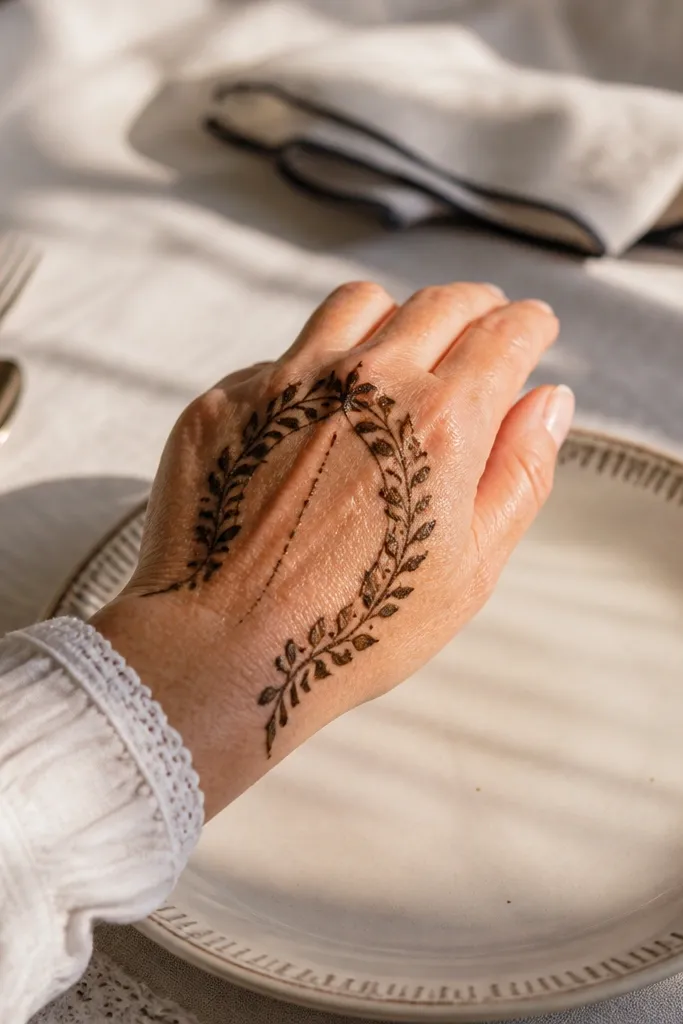
Outline a vine border starting at the outer wrist, curving up along the sides and looping near the upper knuckles. Build the vines with thick lines and fill the vine stems with dot clusters only on the inner side. Now draw an inner arch shape inside the border and keep it mostly open — only add a thin line down the center of the arch. Add a few small leaf accents at the top of the inner arch to connect it to the knuckles.
This design is bold because it uses negative space on purpose. You draw a dense outer vine border that wraps the perimeter of the back hand, then leave a clean inner arch area with minimal fill. The outer vines are thick and slightly irregular, which makes them look hand-done and expensive. The inner arch gives a sleek, modern Arabic look and prevents the whole hand from turning into one dark blob. It’s ideal if your mehndi usually fades patchy — the lighter inner arch keeps the design readable.
AvoidDon’t fill the inner arch. Keeping it lighter is what makes the bold outline pop.
Pro tipUse dot clusters instead of full fills on the vines — dots stain darker and look cleaner.
14. Knuckle Mandala With Wrist Steps
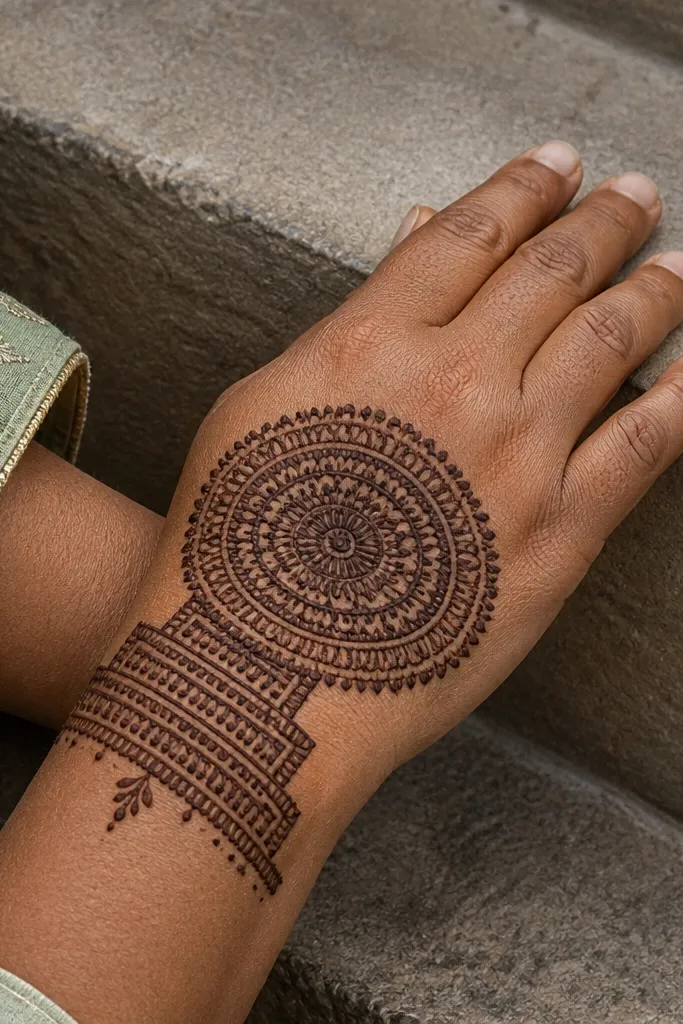
Start with a thick stepped band across the wrist — draw 3-4 horizontal layers that get narrower as they move toward the hand. On top of the steps, outline a circle mandala centered over the knuckle line. Add concentric circles and radial spokes inside the mandala, then fill spokes with dots and short curls. Finish by thickening the outer mandala border and adding small corner dots at the mandala edges.
Mandala placement on knuckles looks luxurious because it packs detail where your hand already has natural curves. This design stacks a circular mandala over the knuckle zone, then adds stepped geometric layers at the wrist that look like tiered architecture. The steps create a strong base, while the mandala pulls the eye upward. It’s bold without needing full hand coverage. Great for formal holiday evenings and bridal-style events where you want something heavier but still crisp.
AvoidDon’t center the mandala too low — it should sit on the knuckles, not spill into the palm side.
Pro tipKeep spoke lines short. Long spokes can blur together as stain deepens.
15. Peacock Feather Back-Hand Panel
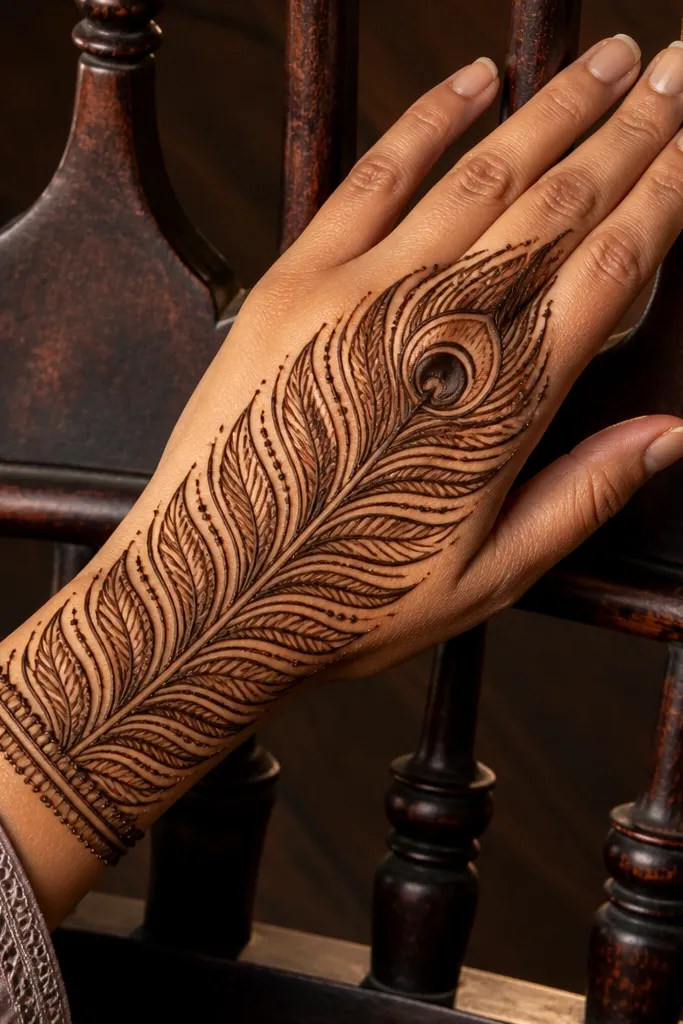
Draw a thick central stem line from wrist to upper knuckles, then outline feather barbs on both sides using curved leaf shapes. Make each leaf shape touch the stem but leave a narrow gap at its outer edge for contrast. Fill each leaf with short strokes and a dot at the center. Add a small fan border at the wrist — 5-7 short arcs — then outline the feather outer edge thickly.
Peacock feather motifs are bold when they become a panel, not a tiny accent. This design stretches a feather across the back of the hand, with a thick central stem and dense leaf-like segments on both sides. Add dots at the base of each segment so the feather looks layered. The wrist gets a compact border so the feather doesn’t float. It’s visually striking for holiday outfits because the feather shape reads from a distance and looks intentional even if your lines aren’t perfectly even.
AvoidDon’t overfill the stem with dots — focus density inside the leaf segments.
Pro tipKeep leaf segments consistent in width; feather motifs look premium when spacing is even.
16. Thick Border Frame With Micro Inside Fill
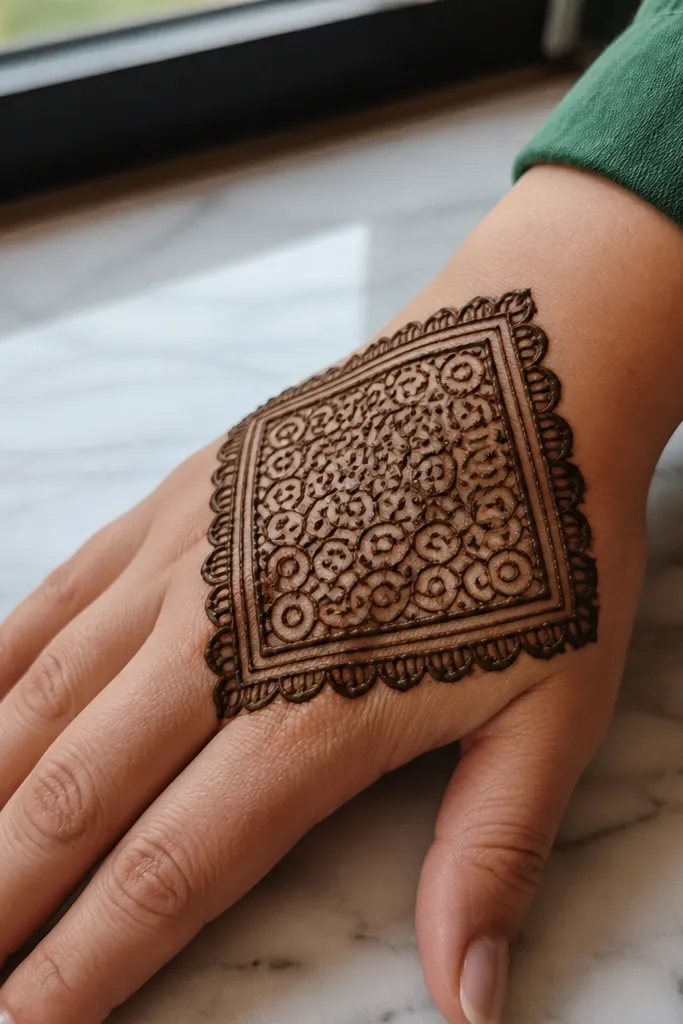
Outline a large frame shape on the back of the hand, with thick edges and a slightly thinner inner border. Inside the frame, fill with repeated micro motifs — small curls, dots, and short hook strokes in a consistent rhythm. Keep the density higher near the border and lighter toward the center so the design looks dimensional. Finish by reinforcing the outer border line and adding a thin wrist connector line to the upper knuckle area.
This is the “instant bold” option. You draw a thick border frame that covers most of the back of the hand, then fill the inside with controlled micro patterns like tiny curls and dots. Because the border is heavy, the design looks high-end even if the inside fill is simpler. Arabic style works well here because micro fill can stay crisp when lines are consistent. It’s a strong choice when you want maximum dark stain coverage quickly. Also, the border keeps the design from looking too random.
AvoidDon’t leave big empty patches inside the frame unless they match a deliberate negative-space pattern.
Pro tipUse a single micro motif for the whole inside fill. Mixing too many patterns makes it look busy instead of bold.
17. Split Heart Center With Arabic Lattice
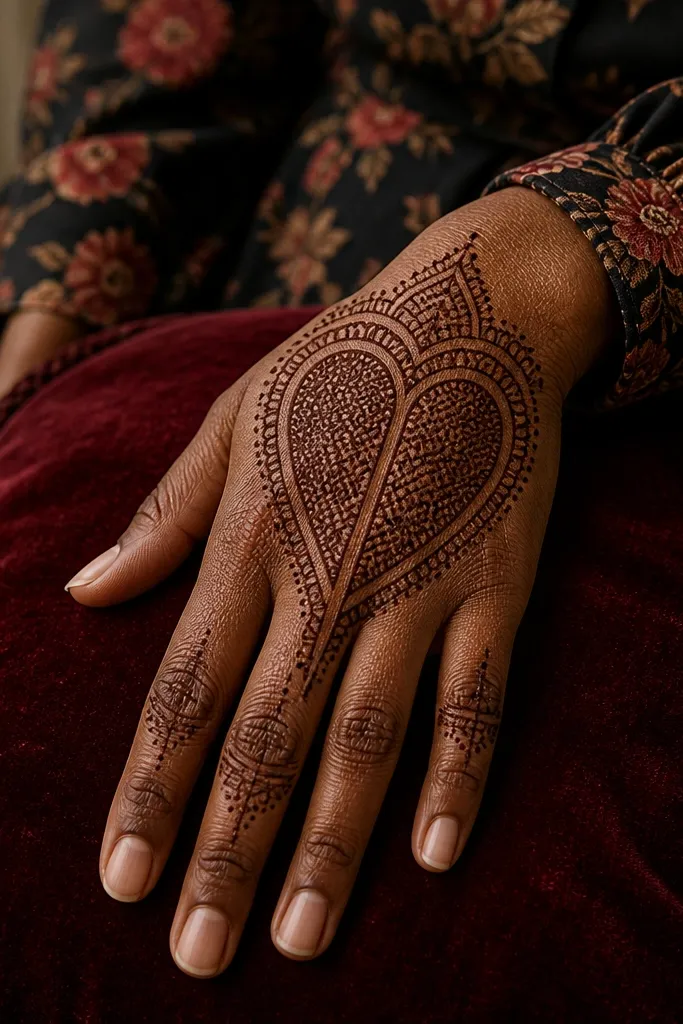
Hearts can look childish unless the placement and structure are Arabic and bold. This one uses a split heart as the center panel and surrounds it with Arabic lattice. The heart outline is thick, then the lattice around it is dense with dots so the heart pops. The split heart shape also creates a strong vertical rhythm that reads as elegant rather than cute. It’s a great holiday pick for parties because it looks romantic but still graphic. Perfect when you want a statement without covering every inch.
Draw a thick vertical line down the center of the back hand. On that line, sketch a split heart shape — two heart halves facing inward — and outline it thickly. Fill inside the heart halves with dot rows, leaving a narrow line of skin where the halves meet for definition. Surround the heart with a lattice grid of intersecting lines, then fill each lattice cell with tiny dots. Add a thin border frame near the wrist to lock the composition.
Keep heart halves symmetrical by tracing the second half from the first outline.
Don’t make the heart too small; the center must be big enough to read as bold.
18. Wrist Chain Links With Knuckle Corners
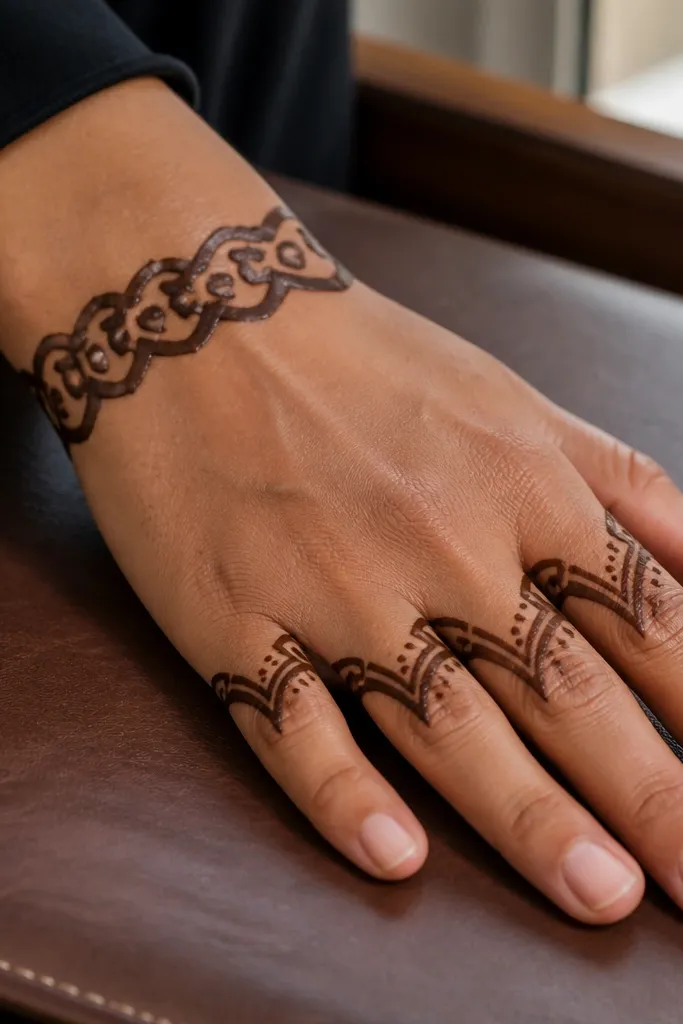
Start at the wrist with a band of thick chain links. Draw each link as an oval with a strong outline, then connect them so they form a continuous strip. Next, add corner block motifs over the knuckles: angled rectangles with rounded ends that point inward. Fill chain links with dot shading inside each oval, and fill corner blocks with solid dots for density. Finish with a thin outline connecting the chain band to the top of the knuckle blocks.
Chain links look expensive when the links are thick and repeated. This design places chain links across the wrist area, then transitions into corner blocks that sit over the knuckles like angled caps. The contrast between round link shapes and angular corner blocks gives it that high-end graphic feel. It also works well if you want a design that doesn’t cover the center heavily — the wrist and knuckle zones do the heavy lifting. Great for holiday dinners when you want hands to look styled without full coverage.
AvoidDon’t extend chain links too far up the hand; keep them wrist-focused.
Pro tipMake every link the same height. Uneven link sizes look casual fast.
19. Center Flower Burst With Side Spiral Columns
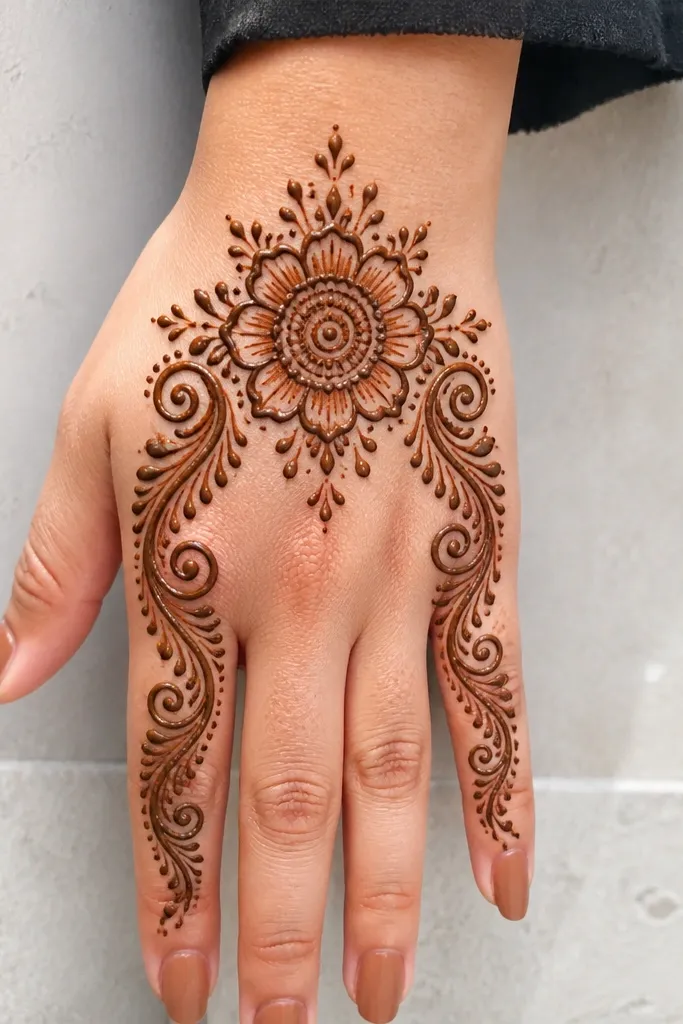
Outline a large flower burst in the center of the back hand using thick petals and a dense center ring. Draw two spiral columns on the left and right sides of the burst, each spiral starting near the top of the knuckles and winding upward. Fill the spirals with small dots along the spiral path and a few short hooks at the ends. Add small connecting dots between the spiral columns and the flower petals so the design looks fused, not separate.
This pattern is bold because it mixes one big centerpiece with two clear supporting columns. The center flower burst sits high on the back of the hand, then two spiral columns run down toward the knuckles. Spiral columns add movement and texture, while the center flower keeps the whole design from looking chaotic. It’s a good choice for holiday events because the burst is what people notice first. If you want an Arabic look that feels structured and premium, this is a strong bet.
AvoidDon’t leave the center burst outline thin; the bold look depends on a heavy border.
Pro tipStart spirals with a clean anchor dot, then wind outward. It keeps the spiral from drifting.
20. Geometric Star Panel With Wrist Caps
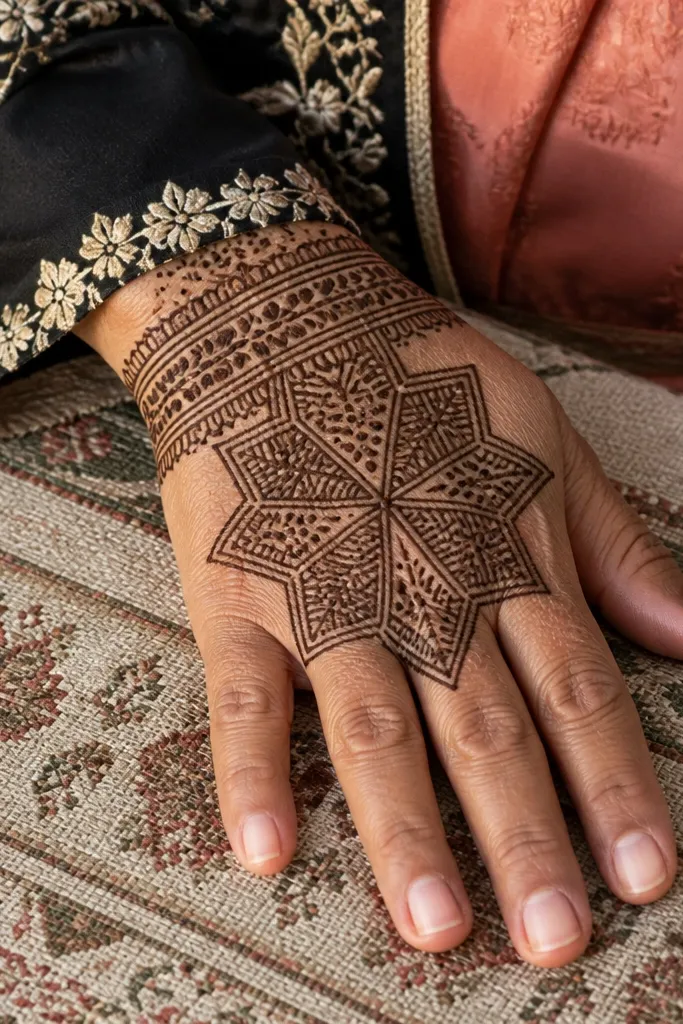
Draw a large star outline in the center of the back hand, keeping points slightly rounded so they don’t look sharp or messy. Create a thick inner star border, then fill the star points with alternating textures: dots in one sector, short straight lines in the next. Add wrist caps by drawing two thick curved rectangles at the outer wrist, pointing slightly inward. Connect the star bottom to the caps with short vertical lines so the composition holds.
A star panel is a bold Arabic shortcut because it creates a strong, readable shape. This design uses a multi-point geometric star in the middle of the back hand, then balances it with thick wrist caps on both sides. The star is outlined thickly and filled with alternating dot and line textures. Wrist caps prevent the design from looking like it’s floating. It’s photogenic because the star edges catch light and the interior textures show depth after staining.
AvoidDon’t overfill the star edges — thick edges plus dense interior is enough.
Pro tipUse fewer star points than you think. 5-7 points looks cleaner and more high-end than 10+.
21. Peony Side Frame With Bold Center Strip
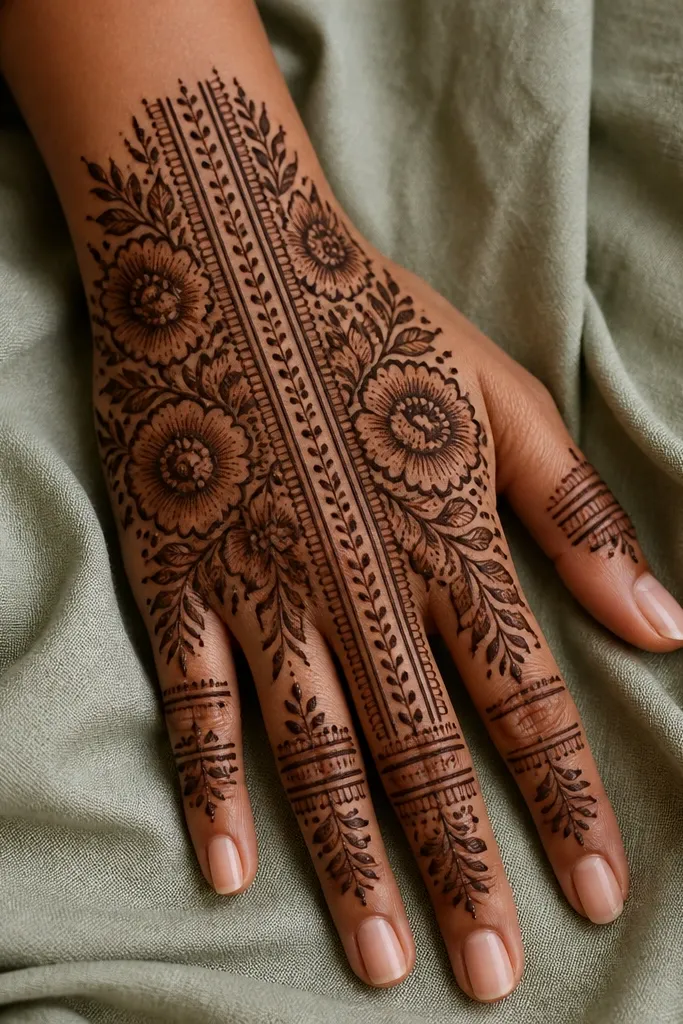
Draw a thick center strip down the back of the hand from wrist to upper knuckles. Outline the strip edges clearly and fill the strip with small dots or short dashes. On both sides, draw two vertical peony frames using petal segments that curve outward, then fill those segments with dot clusters and short leaf strokes. Finish by thickening the outer edges of the side frames and adding a thin wrist border line that connects both sides.
This design uses a straight, bold center strip to anchor everything, then adds peony-like side frames that curve along the edges. The center strip is thick and filled lightly with dots so it stays readable. Side frames are dense and floral, giving the hand a premium look without covering the center fully. It’s especially flattering for holiday looks because it looks styled and not heavy on the wrist area. The best part is it photographs clean even if your knuckles stain lighter.
AvoidAvoid tiny flowers along the whole edge; use the peony frames as the only floral element.
Pro tipKeep the center strip uninterrupted. If it breaks, the bold look disappears.
22. Wrist Step Medallion With Crescent Knuckles
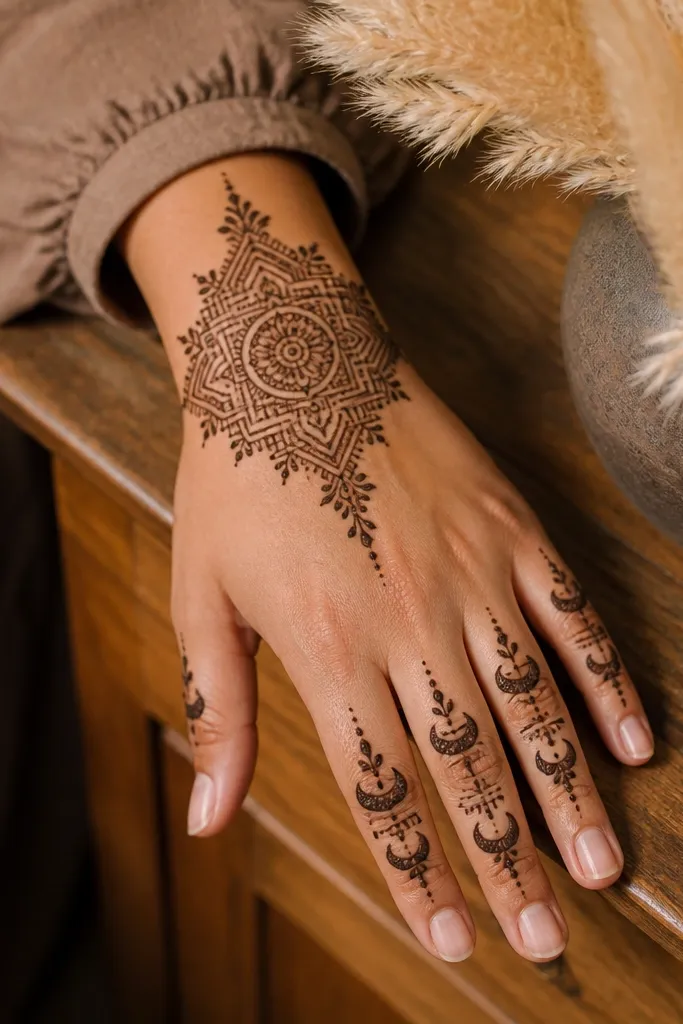
Draw 3-4 horizontal steps across the outer wrist, each step slightly shorter than the one below it. On top of the steps, outline a small medallion circle or oval and fill it with dense dots. Now draw crescent shapes over each knuckle — thick outline, then dot fill inside. Connect the crescents with thin arcs that trace the knuckle curve, and outline the overall outer boundary lightly to keep it cohesive.
This is bold because it has a tiered wrist base and crescent shapes that sit right on the knuckles. The stepped medallion at the wrist gives weight, while the crescent knuckle pattern creates a clean rhythm across the back of the hand. Inside the crescents, use tight dot fills so the texture looks dark and even. It works for holiday events when you want something more structured than a floral-only design. Also, the crescent pattern covers uneven knuckle spacing nicely.
AvoidDon’t add extra motifs in the negative space. Steps plus crescents already fill the composition.
Pro tipMake crescent outlines thicker than the interior dots so the shape stays crisp after staining.
23. Outer Bar Border With Inner Dot Columns
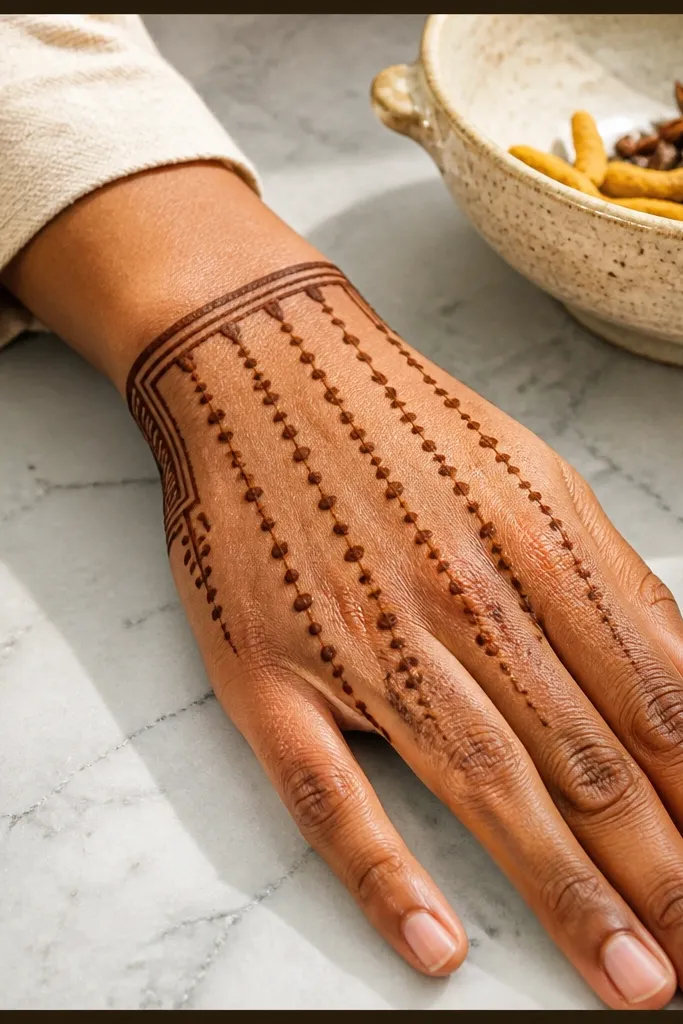
Outline a thick outer bar border around most of the back hand, leaving small gaps near the wrist for comfort. Inside the border, draw 4-6 vertical dot columns from near the wrist up toward the upper knuckles. Add tiny hook marks at the top of each column and connect them lightly with thin curved lines. Finally, reinforce the border line and add a light dot gradient near the center so the design has depth.
This pattern looks high-end because it uses bold framing plus vertical dot columns for depth. The outer border is a thick bar-like frame that wraps the perimeter, while the inside is organized into columns. Each column has dense dots and small hook accents near the top. This creates a controlled, modern Arabic look that reads as bold even when the hand is moving in photos. If you want something that stays readable as henna fades, this is a great pick because the dots hold their visibility.
AvoidDon’t turn columns into long lines; dots are what keep the design bold and stain-friendly.
Pro tipKeep dot columns evenly spaced. Crowded columns look messy fast.
24. Wrist Bloom With Two Mirror Arcs
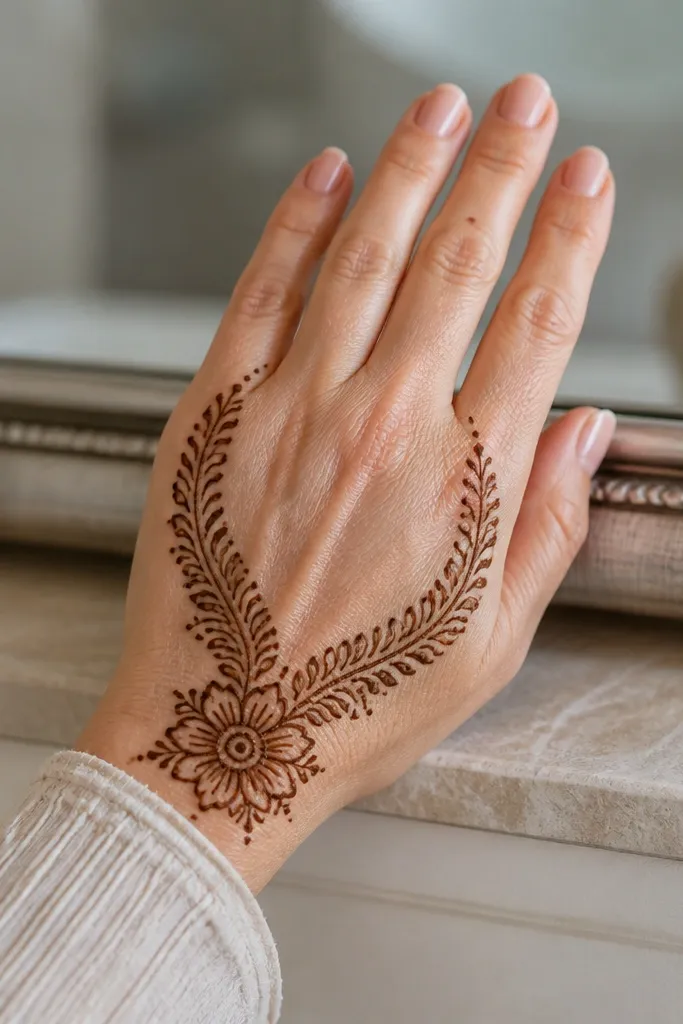
Start with a wrist bloom: draw a flower or rosette at the outer wrist with a thick outline and dense dot center. From both sides of the bloom, draw two thick arcs that rise toward the knuckles, keeping them mirror-symmetrical. Fill each arc with dot clusters and short leaf strokes pointing inward. Finish by adding a thin outline around the outer edge of the arcs and a few tiny dots at arc endpoints near the knuckles.
Mirror arcs make a hand look balanced and expensive. This design places a compact bloom at the wrist, then sends two mirror arcs upward — one on each side — toward the knuckles. The arcs are filled with dot patterns and small leaf strokes so they darken evenly. It’s bold because the arcs are thick and symmetrical, and the wrist bloom adds a strong beginning point. This works well for holiday gatherings where you’ll have hands in motion — symmetry reads even in quick photos.
AvoidDon’t add extra fillers between arcs. The mirror arcs are the whole look.
Pro tipDo a quick symmetry check: count your arc segments on both sides before you fill.
25. Bold Vine Corners With Center Negative Space
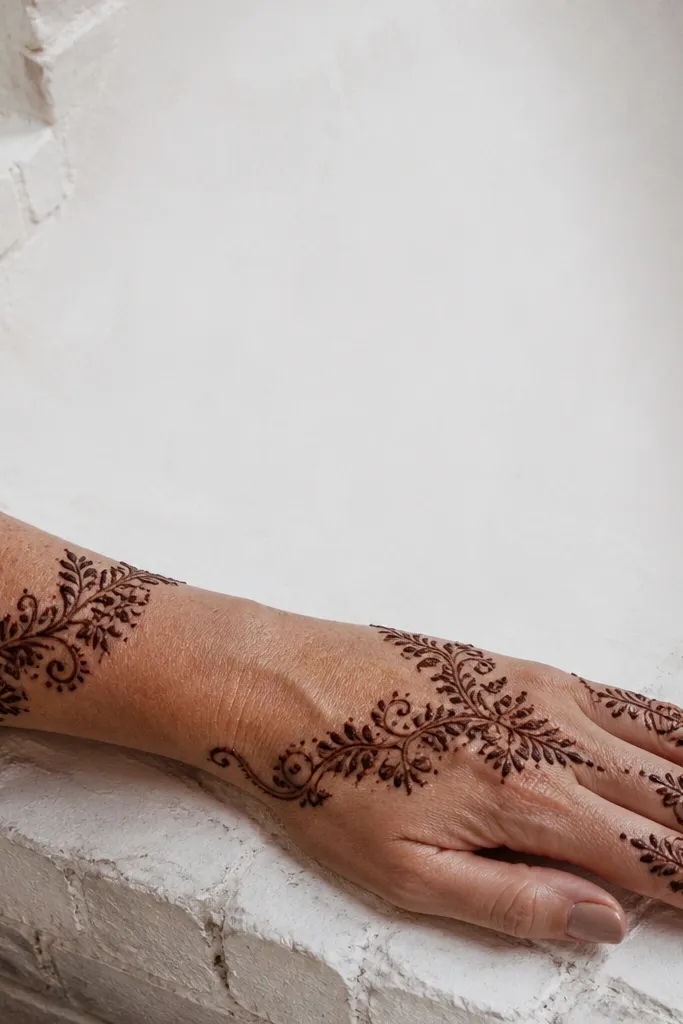
This design is intentionally dramatic because it leaves a large center negative space and fills only the corners with bold vine motifs. The corner vines create a frame that makes the hand look taller and more structured. Inside the center, you keep it mostly clean, maybe with a thin center guideline so the overall shape stays connected. This is a smart choice if your mehndi tends to blur — leaving a lighter middle keeps the design readable and photogenic. It’s also a strong holiday option because it looks styled, not overdone.
Outline a thin boundary shape across the back of the hand, then draw two thick vine corner motifs at the upper-left and upper-right areas. Mirror the same vine corner style on the lower corners near the wrist. Keep the center area mostly empty, only add a thin vertical line down the center to connect the corners. Add small dot clusters only along the inner edges of the vines, and finish by thickening the outer vine outlines.
Use thicker paste on the vine outlines, not the center line. Outlines do the heavy lifting visually.
Don’t fill the center with random dots. If you break the negative space, it stops looking bold.



