

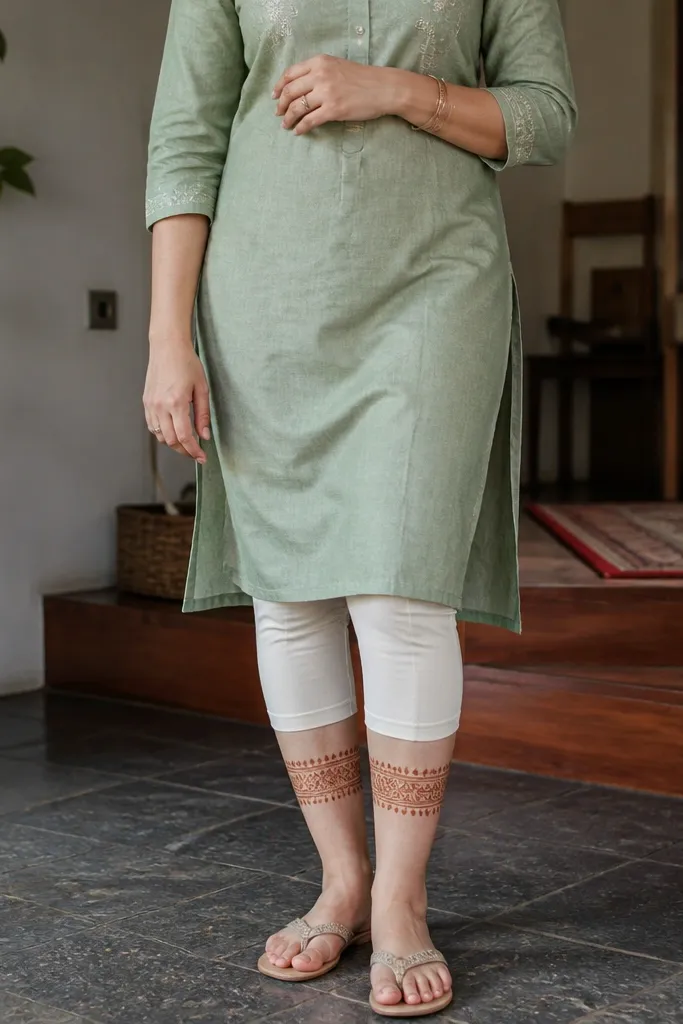
1. Double Ankle Ring with Upward Teardrop Trail
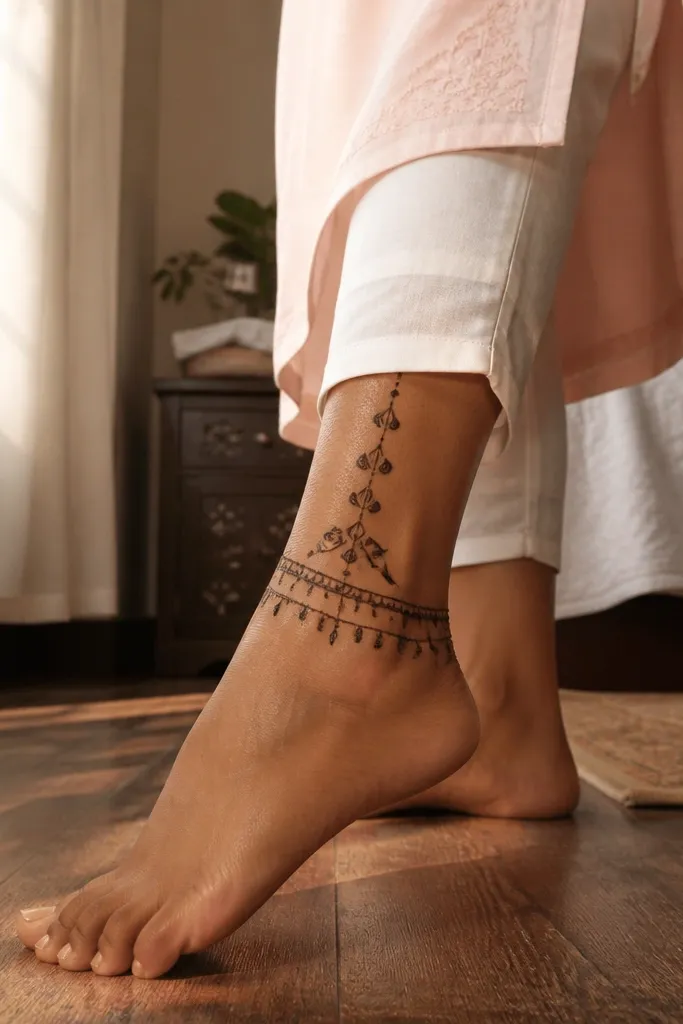
Step 1: Draw a thin band around the ankle first, then a second band slightly above it with a small gap. Step 2: From the outer ankle, place a line of teardrops spaced 1 cm apart, pointing upward, stopping around the lower calf. Step 3: Add tiny dot fillers between teardrops and finish with a small leaf at the top of the trail. Finally, keep the center of the leg mostly empty so the trail stays the hero.
This design is the one to pick when you want clean, wearable mehndi that still looks “done.” The double ankle ring frames your foot and makes the lower leg instantly look styled, even if you only have 20-30 minutes. The upward teardrop trail keeps the movement going toward the calf without filling the whole space, so it stays photogenic and not heavy. Use hollow teardrops with dot interiors so the pattern reads crisp in daylight. It suits sandals, anklets, and cropped jeans because the ankle area is the main visual focus.
AvoidDon’t fill the space between rings — it makes the ankle look like one thick band.
Pro tipUse a slightly angled cone so your teardrops taper neatly at the top.
2. Lower-Calf Horizontal Band with Dot Ladder
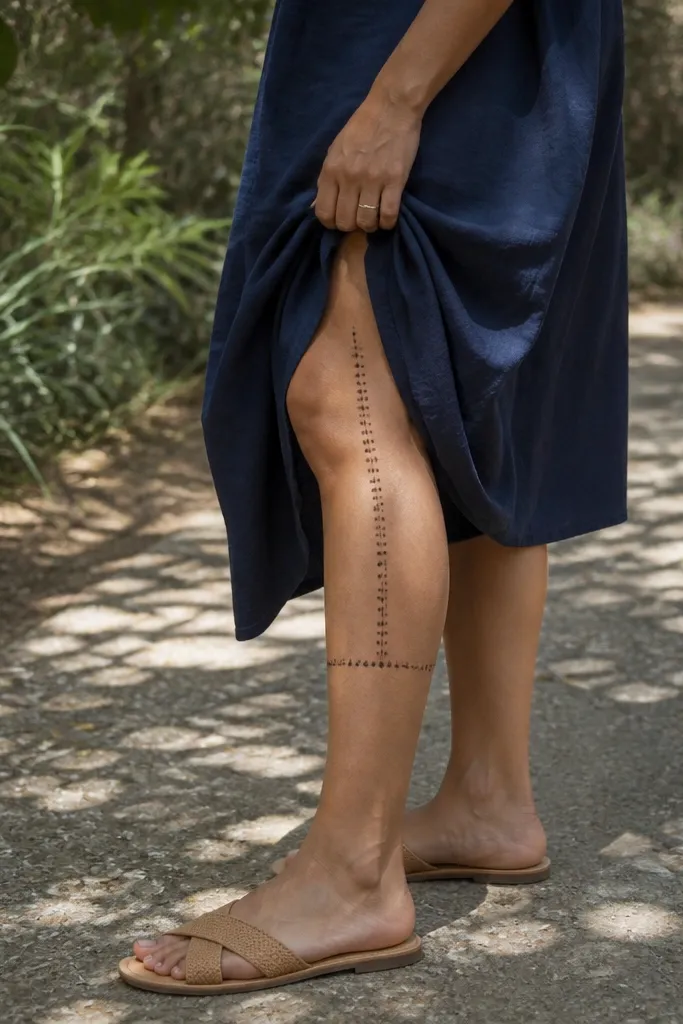
This is a simple layout that photographs like a pattern, not like scattered marks. The horizontal band gives instant structure, and the dot ladder adds rhythm as it climbs. Because the ladder is made of dots and short strokes instead of dense filling, the design stays light and readable. It looks especially good with leggings and long skirts where the lower calf shows clearly. You can keep it minimal or add one extra small arch motif at the ends of the band for more polish.
Step 1: Mark the lower calf zone and draw a straight horizontal band about 4-5 cm wide. Step 2: From the center of the band, draw a vertical line and place dots on both sides like a ladder, moving upward 6-8 cm. Step 3: At the top and bottom of the ladder, add two short curve hooks to anchor it. Finally, connect the band ends to the ladder using 2-3 tiny commas so everything looks intentional.
Keep the ladder dots evenly spaced at about the width of one dot from your cone tip.
Don’t make the band too thick — it can bleed and flatten in photos.
3. Ankle-to-Knee Vine with Three Open Leaves

Step 1: Draw a single curved vine line starting at the outer ankle and guiding it toward the knee. Step 2: Place three open leaves along the vine, each about 1.5 cm long, with a simple stem line inside the leaf. Step 3: Add small dot clusters near the vine where it bends, then finish with a tiny leaf at the knee-facing end. Finally, keep the center of the leg empty; the vine should be the main structure.
If you want something that looks elegant without getting complicated, this vine does it. The line starts at the ankle, curves along the outer leg, and carries three larger open leaves that catch the eye. Open leaves mean you outline them and leave the center light, so the design looks airy and clean. The vine pattern also flatters most leg shapes because it follows natural curvature. This one works well for full-length outfits because your eye has a clear path from ankle to knee.
AvoidDon’t add extra side branches — they turn a simple vine into a busy mess.
Pro tipOutline the vine first, then add leaf centers — it keeps symmetry easier.
4. Side Mandala Mini at Ankle with Spark Dots
Step 1: Draw a small circle at the outer ankle, then add 6-8 short petal teardrops around it. Step 2: Inside the circle, add a dot center and 2-3 concentric arcs, keeping the spacing even. Step 3: Around the mandala, place tiny spark dots in a loose ring, then add one short curve line connecting two spark points. Finally, keep the rest of the leg blank or add only a single thin line upward.
Mini mandalas look fancy even when you keep them simple, and placing one at the ankle is a smart way to get maximum impact fast. The mandala acts like a focal point, while spark dots around it make the area feel lively without adding lots of lines. This design works best for events where you want ankle detail to show — sandals, bare feet, and cropped pants. It also looks good with a simple calf trail because the mandala gives you a clear “start” for the rest of the design.
AvoidDon’t overfill the mandala center — it blurs when it dries.
Pro tipStop at 8 petals — more petals make it hard to keep symmetry with simple tools.
5. Calf Band of Tiny Diamonds with Center Comma Row

Step 1: Draw a horizontal line band across the lower calf and outline a row of small diamonds along it. Step 2: In the center of the band, draw a vertical line and add comma marks on both sides like a ribbon, going upward 4-6 cm. Step 3: Add two tiny dot clusters at the top corners of the diamond band to anchor it. Finally, erase nothing — just keep edges crisp and let small gaps show between diamonds.
This is a pattern-forward design that looks neat even if your hand isn’t super steady. A diamond band gives that geometric, fashion-mehndi look, and the center comma row adds a soft curve to balance it. Because diamonds are small outlines, they dry cleanly when you keep lines thin. It’s great for people who like simple but not plain work, and it looks sharp in photos against skin or leggings. Keep the band width narrow so it reads as jewelry, not a full patch.
AvoidDon’t stretch diamonds too large; the geometry breaks in photos.
Pro tipUse a ruler or your own finger width to keep the band straight.
6. Leafy Feather Outline on Outer Calf
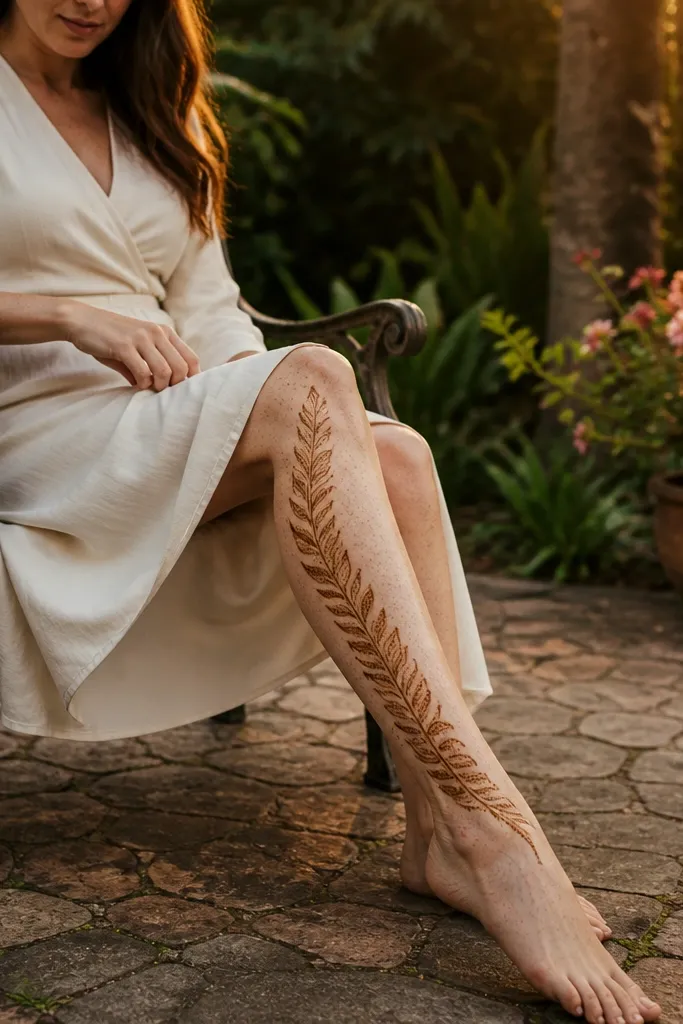
Step 1: Draw a central curved spine line from mid-ankle area up the outer calf. Step 2: On both sides of the spine, add leaf outlines like feathers, each leaf about 1 cm long, with small dot fillers between them. Step 3: End the feather with a slightly larger leaf at the top and a small dot at the bottom. Finally, keep the feather area to one side so it doesn’t crowd the leg.
This design looks like a feather without the heavy filling. It’s made of leaf outlines stacked along a central spine, which gives it that flowing, aesthetic curve. The outer-calf placement is flattering and keeps the design visible when you wear shorter sleeves or dresses. It also works for year-round because the motif is light and doesn’t feel seasonal. Your goal here is clean outlines and consistent leaf size, not dense paste.
AvoidAvoid filling leaves solid black; outline-only looks sharper as it dries.
Pro tipOutline each leaf with a single smooth stroke, then add a tiny inner line for definition.
7. Ankle Bracelet with Three Dangles and Tiny Stars
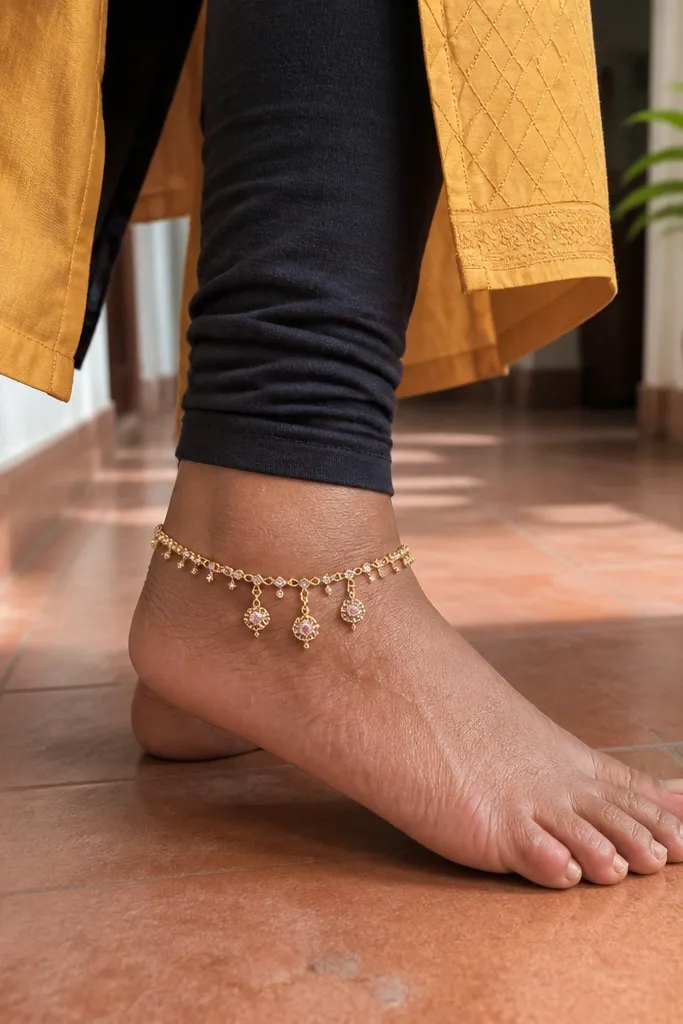
This one is all about the ankle jewelry effect. A bracelet band sits around the ankle, then three dangle motifs hang downward with star dots sprinkled around for sparkle. It’s simple, but the hanging shapes create depth, so it looks more “designed” than a flat band. If you’re doing mehndi for a party, this is the layout that matches anklets and sandals. It also stays photogenic because it frames the foot area where cameras love to focus.
Step 1: Draw a thin bracelet band around the ankle and add small curve hooks along its top edge. Step 2: Center three dangles under the band — each dangle is a teardrop or mini leaf, about 1-1.2 cm tall, spaced evenly. Step 3: Add tiny star dots around the dangles and connect one star to each dangle with a short curved line. Finally, keep the band ends slightly tighter so the design looks like it wraps.
Place the largest dangle in the center for a balanced look.
Don’t put dangles too close together; they merge when paste dries.
8. Knee-to-Mid-Calf Arch with Open Center Lattice
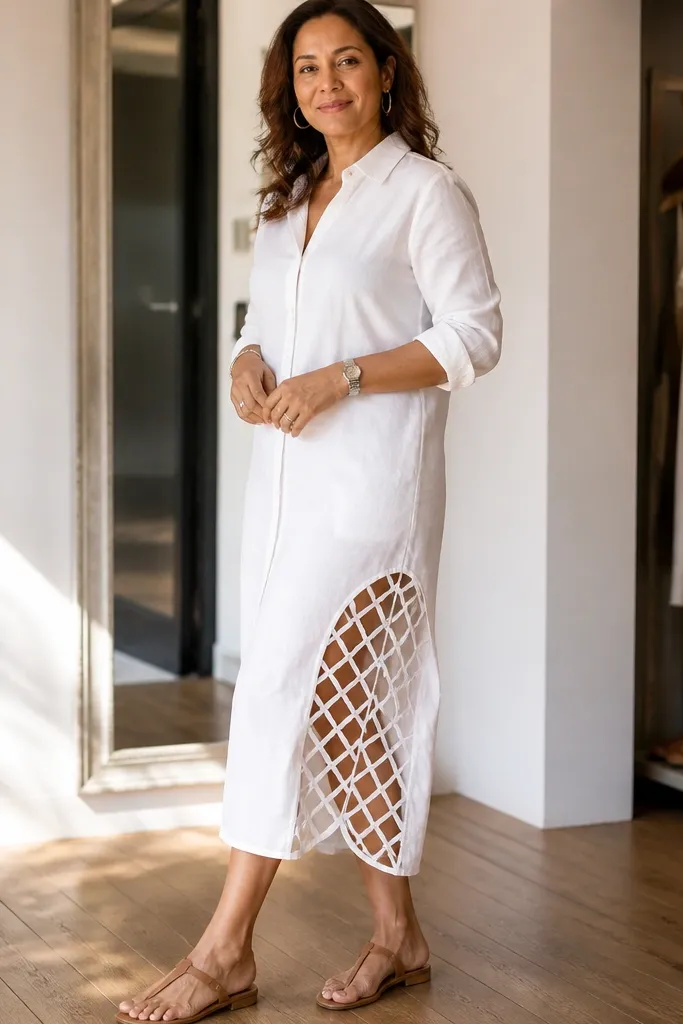
Step 1: Draw an arch line that starts near the outer knee and curves down to mid-calf, about 6-8 cm across. Step 2: Inside the arch, draw a simple lattice using 3-4 vertical lines and 2-3 horizontal crossbars, leaving gaps in between. Step 3: Add two small dot clusters at the arch bottom ends and finish with a thin border line following the arch curve. Finally, keep the center open — don’t overfill the lattice.
This gives you a big, noticeable shape without filling the entire leg. The arch from knee direction down to mid-calf creates a strong silhouette, and an open lattice inside keeps it breathable. Open lattice lines look crisp because they don’t smear into a dark block. This design is great when you want full leg coverage vibes but only have time for one hero pattern. It also looks amazing with shorter hems because the arch naturally frames the leg.
AvoidDon’t close the lattice into solid shapes; open grids photograph best.
Pro tipUse long, confident strokes for arch borders — waviness shows more than you think.
9. Straight Band with Alternating Hexagons
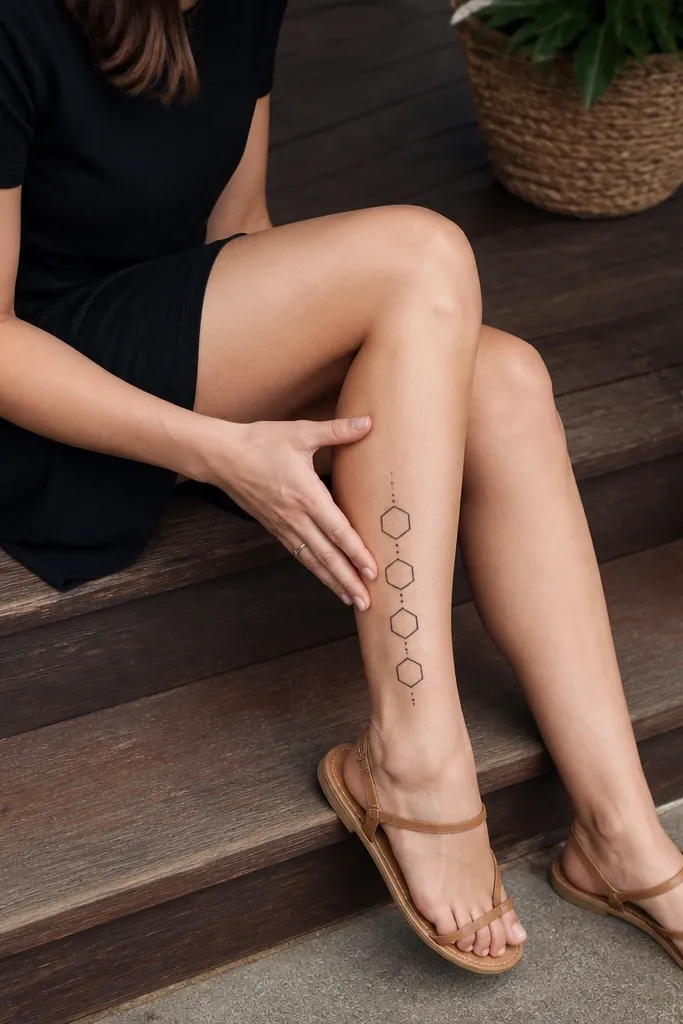
Step 1: Draw a straight horizontal guideline on the outer lower calf about 4 cm wide. Step 2: Outline repeating hexagons along the band, alternating orientation each time, and add a dot in the gap between hexagons. Step 3: At both ends of the band, add two small curved hooks to finish. Finally, keep the rest of the leg blank or add one tiny dot trail up the side.
Geometric mehndi looks clean and modern, and hexagons are the easiest “wow” shape that still stays simple. A straight band with alternating hexagons reads like jewelry, especially on the outer calf. Dot separators keep each hexagon from merging visually. This is a great choice for minimalists who still want strong pattern structure. It also works across seasons because it doesn’t rely on floral density.
AvoidDon’t make the band too long — stop before the design starts to look stretched.
Pro tipIf your hexagons wobble, switch to 5-sided shapes for the first row, then correct size on the second row.
10. Peacock Eye at Ankle with Side Feathers
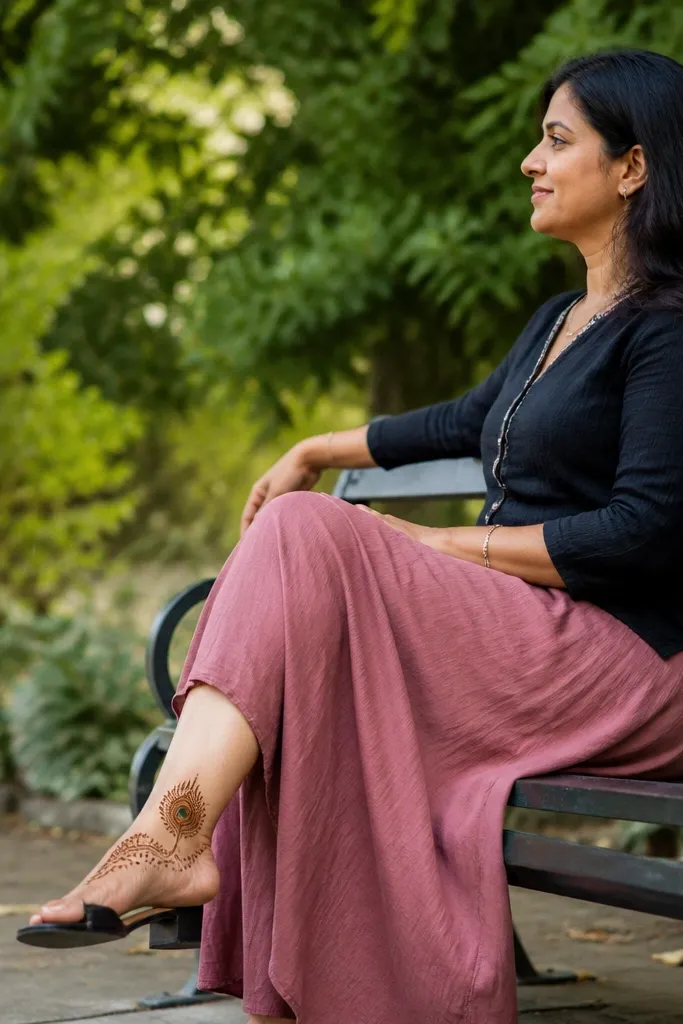
A peacock eye is an instant focal point, and placing it at the ankle makes the whole leg look intentional. The eye shape is simple when you focus on rings and dots instead of heavy feather filling. Side feathers can be tiny — just outline arcs with a few leaf strokes. This design is photogenic because the eye creates a clear center and the surrounding dots add sparkle. It’s a good pick for festive events and also works for year-round because it’s not seasonal floral overload.
Step 1: Draw an almond-shaped outline at the outer ankle and fill the center with a dot. Step 2: Add 3-4 rings around the center using thin arcs and small teardrop tips on the outer ring. Step 3: On both sides, draw two short curved feather lines with 4-5 mini leaf strokes. Finally, connect the eye to the rest of the design with 1-2 tiny comma trails upward.
Keep ring thickness even; one thick ring makes the whole eye look messy.
Skip heavy full-color filling inside the eye; outline rings read cleaner.
11. Calf Vine with Single Dangling Bell Motif
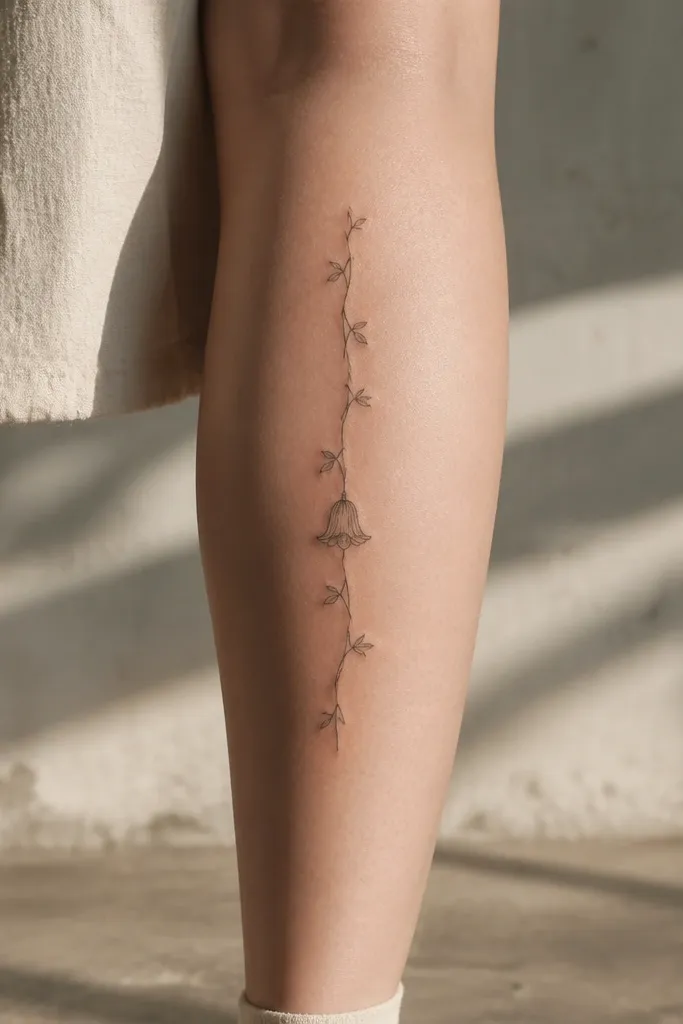
This one is for people who like minimal line work but want a standout moment. A thin vine runs upward and the bell motif gives a clear focal point without adding clutter. The bell shape is easy: an inverted teardrop base with a small top cap and a few dot accents. It looks great on the front or outer calf because it hangs naturally with leg shape. Pair it with a simple ankle outline or keep the ankle blank for a cleaner look.
Step 1: Draw a thin vine line from lower calf toward mid-calf, curving slightly outward. Step 2: At the center of the vine, add a bell motif: a small inverted teardrop with a tiny cap line at the top. Step 3: Add three short lines below the bell like little tassels and dot the sides of the bell. Finally, end with a small leaf at the top of the vine.
Keep the vine line single-stroke; double lines make it look thick and uneven.
Don’t add multiple bells — one bell looks intentional; three starts to feel busy.
12. Ankle Band with Curved Scallop Border

Scallops make mehndi look soft and decorative, and they’re easy to keep neat. This design has a clean ankle band with a scalloped border on one side, plus tiny dots inside the scallops for texture. It gives a “lace trim” effect that looks great on bare ankle skin. Keep it simple — the scallops are the hero. This is the best option when you want something pretty but don’t want to fill a whole calf.
Step 1: Draw a thin band around the ankle. Step 2: Along the upper edge of the band, add 10-14 scallops — each scallop is a short U-shape. Step 3: Place one dot inside each scallop and connect the scallops to the band with light curved lines. Finally, add a tiny dot chain at the end of the band to balance the look.
Use consistent scallop width by counting them: 10 for a tight ankle, 14 for a longer ankle band look.
Don’t crowd scallops too close — they merge when paste dries.
13. Lower-Calf Half-Mandala with Open Petals
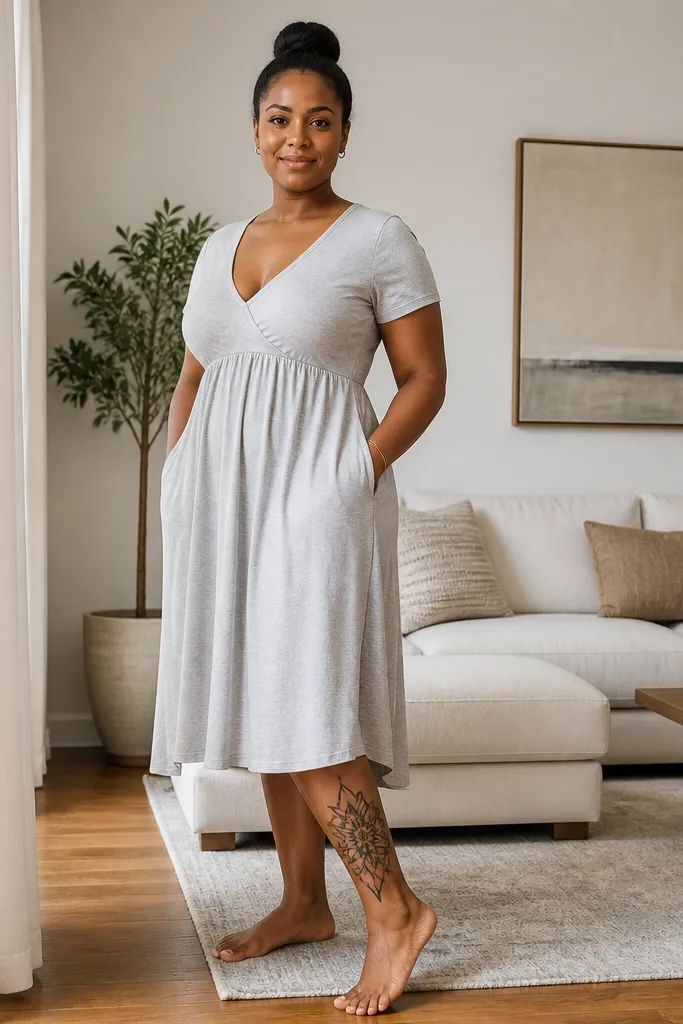
Step 1: Draw a curved arc that represents the outer edge of the half mandala. Step 2: Inside the arc, outline 6-8 open petal teardrops pointing outward, leaving the centers blank. Step 3: Add a dot in the middle, then connect some petal bases to the arc with thin lines. Finally, finish with tiny dot clusters at the two outer ends of the arc.
A half mandala gives you the mandala look without the full-leg density. Place it on the outer lower calf so it frames the leg shape, and keep the petals open so the design stays light. A dot center anchors it, and short arc lines around the petals add structure. This is a strong photo design because the half-mandala reads from a distance. It suits dresses, long skirts, and any outfit where the lower calf is visible.
AvoidDon’t close the half mandala into a full circle — it loses the flattering side placement.
Pro tipUse open petals instead of filled petals to keep the edge crisp.
14. Front Calf Vertical Dots with Tiny Leaf Caps
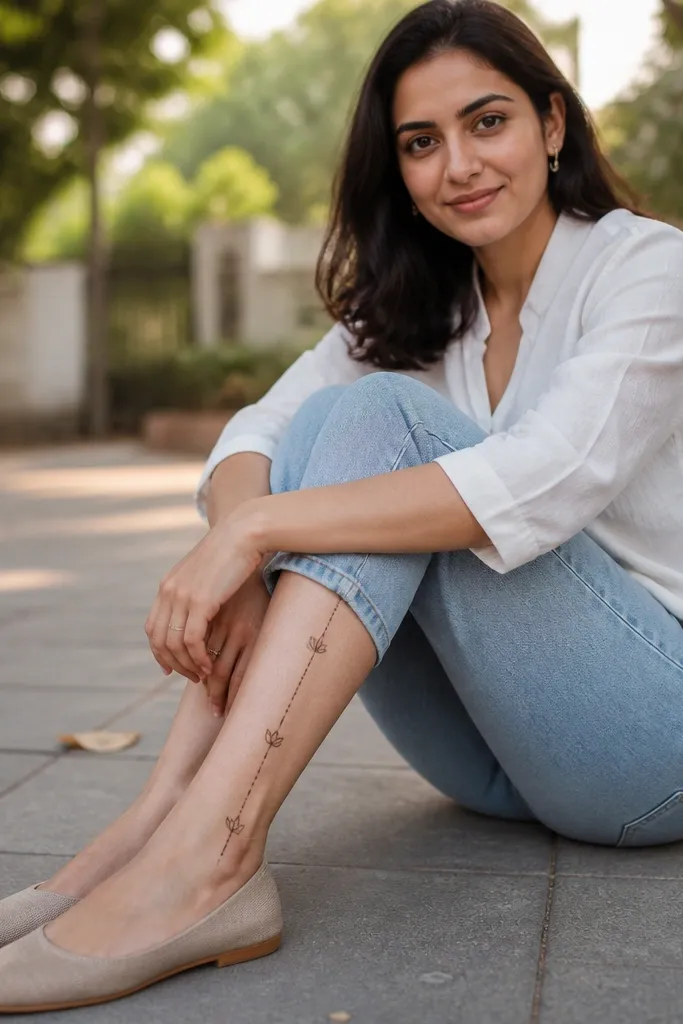
Step 1: Draw a straight vertical guideline down the front calf. Step 2: Place dots along the line, spacing them about 0.8-1 cm apart. Step 3: Every 2-3 dots, add a tiny leaf cap on the top side of the dotted line. Finally, stop the design at mid-calf and add one last dot and short curve at the end.
This is the simplest “looks intentional” design for the front of the calf. A vertical dotted line draws the eye up, and small leaf caps add detail where your eye pauses. It’s minimal, but the leaf caps make it feel handcrafted rather than random. This design is perfect for busy outfits because it doesn’t compete with patterns in your clothes. It also works for year-round because it’s clean and not dependent on seasonal motifs.
AvoidDon’t add extra side swirls — the whole point is the clean vertical rhythm.
Pro tipKeep the leaf caps small and symmetrical left-right — that’s what makes it look “designed.”
15. Wraparound Ankle Band with Micro Star Burst
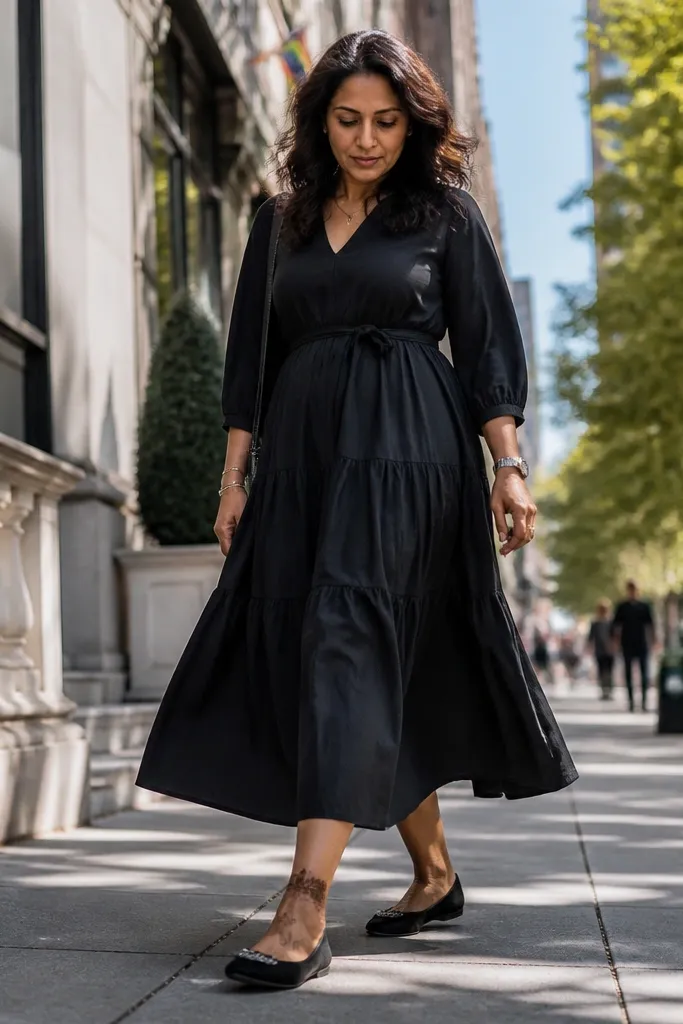
Step 1: Draw a thin band around the ankle and add a second line just above it. Step 2: Along the upper line, add micro starbursts: one center dot with 4 short lines radiating out. Step 3: Place stars in small clusters of 3-4, spaced about 1.5 cm apart, moving around the ankle. Finally, add one tiny dot chain at each band end for balance.
This gives you a polished ankle look with almost no filling. A wraparound band sits around the ankle, then a micro star burst pattern runs along the top edge in small clusters. The stars are quick to draw and they catch attention in photos without making the design heavy. If you want ankle mehndi that looks like jewelry, this is the move. Pair it with a thin line upward trail if you want more coverage, but the star burst alone still looks complete.
AvoidAvoid thick paste for the band edge — stars smear first.
Pro tipMake stars smaller than you think — micro stars read better than big ones.
16. Two-Point Calf Triangle Pattern with Dot Fill

Triangles look sharp and modern, and this layout keeps them simple. You place two small triangle motifs on the calf and connect them with a thin line, then fill only inside the triangle with dots. The dot fill adds texture without making the triangle heavy. This design works best on the outer calf where the angles show clearly. It’s also a good choice for people who want geometry but don’t want full bands that require perfect straight lines.
Step 1: Draw a thin diagonal line on the outer calf from lower to mid-calf. Step 2: Add two triangles that sit on the diagonal, one lower and one higher, both about 2-2.5 cm tall. Step 3: Outline each triangle and fill the interior with evenly spaced dots, leaving small gaps for breathing space. Finally, connect the triangles with a short curved line and add one dot at the diagonal start.
Use dot fill instead of solid fill — it keeps the triangle edges visible as it dries.
Don’t overfill triangles; dense dots can merge into a shaded block.
17. Mehndi Lattice Strip on Lower Calf

Step 1: Draw a horizontal rectangle guide on the lower calf about 4-6 cm wide. Step 2: Create a lattice by drawing 3-4 vertical lines and crossing them with 2-3 horizontal lines, leaving gaps. Step 3: Outline the rectangle edges with a thin line and add a dot at each corner and every 1-2 grid intersections. Finally, add one small curve flourish at the right edge of the strip.
A lattice strip is a clean way to add “texture” without drawing a whole floral pattern. It looks like a thin scarf across the lower calf, and it stays simple because the grid is repetitive. A border of tiny dots at each edge makes it look finished. This design is great when you want something that looks good from multiple angles — front, side, and slightly angled photos. It’s also easy to scale: make the strip 4 cm wide for minimal, 6 cm wide for more drama.
AvoidDon’t make a full solid rectangle — open lattice is what keeps it photogenic.
Pro tipKeep grid lines thin and evenly spaced; thick lines make the lattice look muddy.
18. Calf Mandala Corner with Side Scrolls
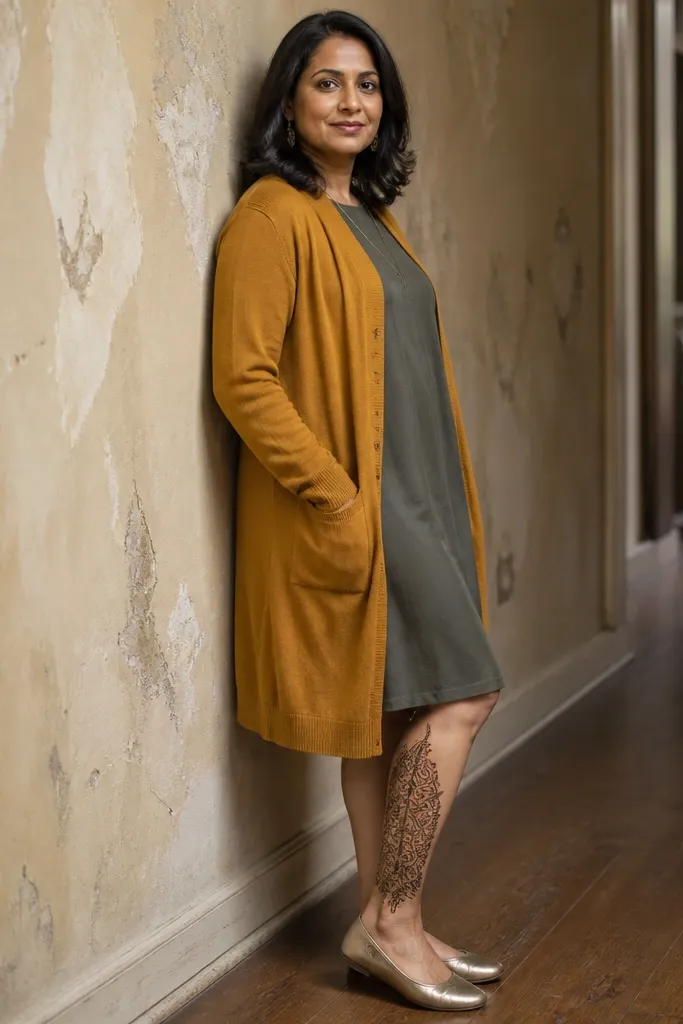
This is a placement hack: instead of a full mandala, you draw a mandala “corner” and let it feel like it spills into scrollwork. The corner motif gives strong symmetry, while side scrolls add motion without filling every space. It looks best on the outer calf where the corner shape aligns with your leg’s curve. This design photographs well because the corner acts like a frame. It also works for year-round because it’s geometric-floral mix without seasonal flowers.
Step 1: Draw a quarter-mandala corner using an arc and two straight edges, like a rounded right angle. Step 2: Inside it, outline 5-7 petal teardrops and a dot center. Step 3: On the outer side of the mandala, draw two scrolls curling upward, each about 3-4 cm long, with tiny dot caps at their ends. Finally, connect the scroll bases to the mandala edge with short curved lines.
Treat the corner like a frame — keep petal sizes consistent across the corner.
Don’t spread the corner too wide; it should stay compact to look intentional.
19. Ankle-to-Mid-Calf Chain Links with Dots
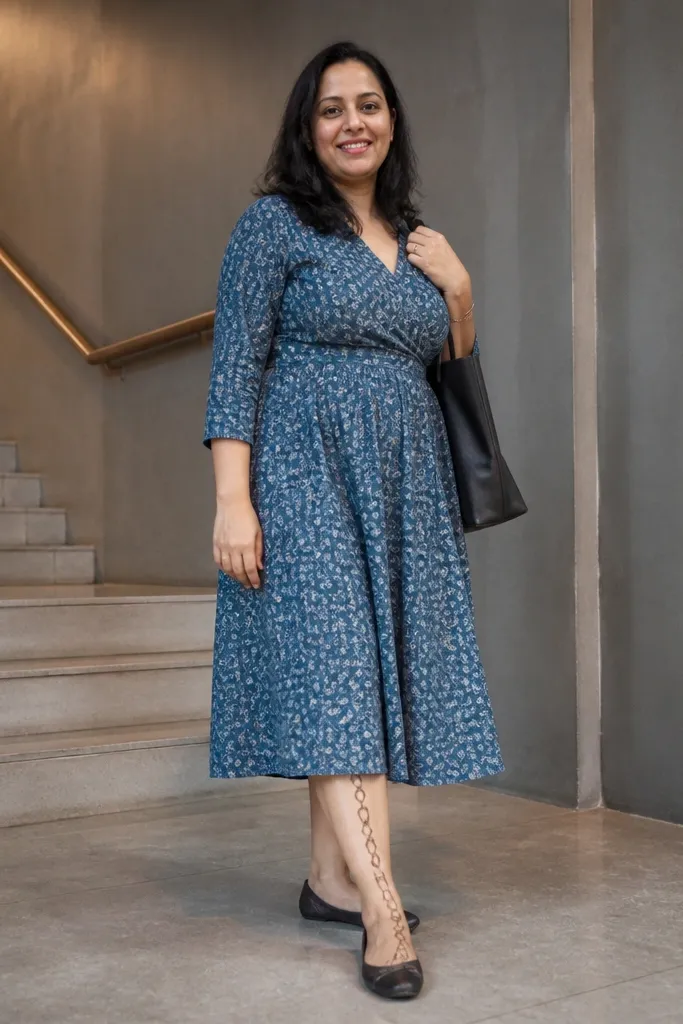
Chain links look clean and stylish, and they’re easier than they look. You outline small oval or rounded rectangle links in a vertical chain, then add dots at the connection points. This creates a “bracelet on the leg” effect that’s perfect for everyday festive looks. It stays simple because the pattern repeats, and it’s photogenic because the edges catch light. Place it on the outer or front calf depending on your outfit — sandals show ankle area, dresses show mid-calf.
Step 1: Start with a small link band around the ankle area, about 2-3 links across. Step 2: Draw a vertical chain of 8-12 links moving upward to mid-calf, spacing each link about 0.5-0.8 cm. Step 3: At each link connection, add one dot so the chain points look crisp. Finally, finish with a small leaf or star at the top end of the chain.
Make links slightly tilted, not perfectly straight — it looks more natural on curved legs.
Don’t make links too thick; thick outlines blur and lose the chain look.
20. Front Ankle X Motif with Small Side Vines
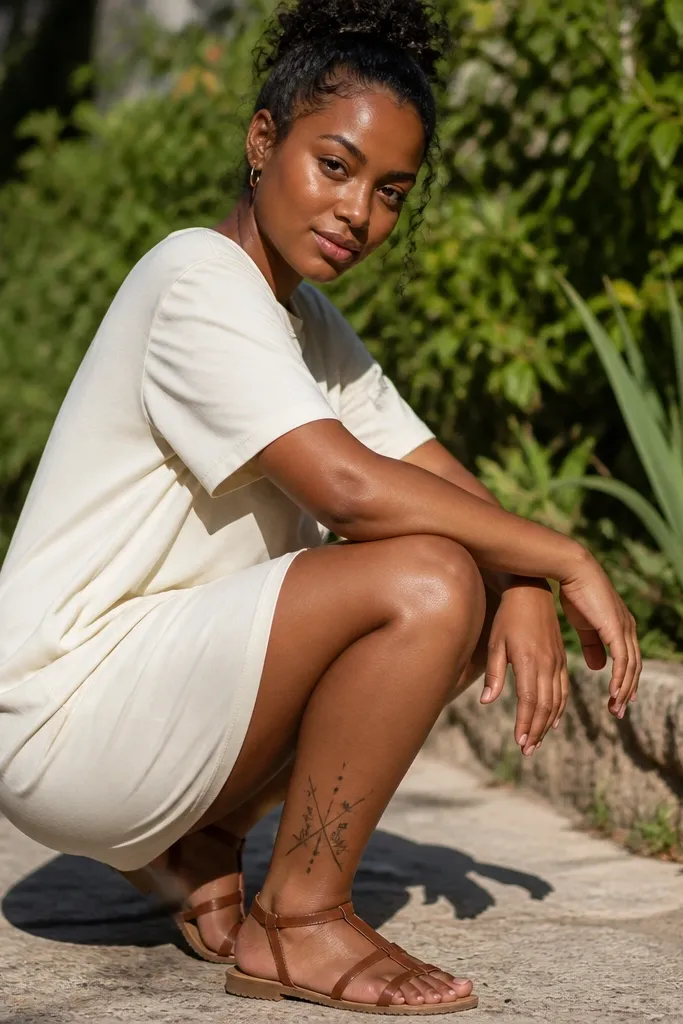
Step 1: Draw two diagonal lines crossing at the front ankle, forming an X with about 4-5 cm span. Step 2: At the center of the X, add a small circle or dot cluster, then outline small teardrops along the diagonals. Step 3: On both outer sides of the X, draw short side vines — each vine is 2-3 leaves connected by a thin line. Finally, add tiny dots near the ends of the vines so the motif feels complete.
An X motif at the ankle is graphic and instantly readable, even with minimal paste. The two crossing lines create structure, and small side vines soften the look so it doesn’t feel too harsh. Add a few dot accents near the crossing point to make it feel festive. This design is good when you want something different from the usual teardrop trails, but still easy enough to copy. It looks great for bare ankles and looks clean under long dresses that show the ankle line.
AvoidDon’t extend the X too high up the leg — it stops looking like ankle jewelry.
Pro tipKeep the X lines thin and smooth; thick crossings are what make this look messy.



